
Popular categories
Looking for a yarn?


Comments / Questions (22)
![]() Tinja wrote:
Tinja wrote:
Hei, kun puseron kaarrokkeessa tehdäänn rahlanlisäykset joka toinen kerros, tarkoittaako se joka toinen oikeanpuolen kerros vai jokaisella oikeanpuolen kerroksella?
10.02.2026 - 17:24DROPS Design answered:
Hei, raglanlisäykset tehdään jokaisella oikean puolen kerroksella (myöhemmin lisätään myös työn nurjan puolen kerroksilla).
10.02.2026 - 19:23
![]() Sylvie Boucher wrote:
Sylvie Boucher wrote:
Ready,Set,Go , Baby 31-18 apres mon cache oreille , le liens avec le crochet 3 ainsi; 1 maille coulée dans la pointe du cache-oreille, crocheter des mailles en l'air sur 20 -30 cm,tourner et crocheter 1 maille coulée dans la maille en l'air,terminer par 1 maille coulée dans la pointe du cache -oreille, je ne comprend pas ,ce que c'est une maille coulée
17.10.2025 - 07:48DROPS Design answered:
Bonjour Mme Boucher, découvrez ici, en vidéo, comment crocheter une maille coulée, pour le lien, piquer le crochet dans la pointe du cache oreille, passez le fil autour du crochet et écoulez le fil dans la pointe du bonnet = vous avez 1 maille sur le crochet, puis crochetez des mailles en l'air de la longueur souhaitée, puis des mailles coulées comme dans cette vidéo. Bon crochet!
17.10.2025 - 08:35
![]() Katharina wrote:
Katharina wrote:
Guten Tag, Frage: wenn ich 8 Reihen je 8 Maschen zunehme, wie geht es dann weiter? Ich verstehe nicht, wie viele Reihen und welche Maschen …:? (Größe 1/3) In dieser Weise in jeder 2. Reihe insgesamt 8 zunehmen, dann in jeder Reihe insgesamt 3 (= insgesamt 11 - x) = 188 Maschen. MASCHENPROBE BEACHTEN! Bei einer Länge von 9 cm je 2 neue Maschen am Ende der nächsten 2 Reihen, d.h. beidseitig, anschlagen…. Können Sie es bitte erklären? Danke und herzliche Grüße Katharina
30.05.2025 - 14:00DROPS Design answered:
Liebe Katharina, für den Raglan nehmen Sie in Größe 1/3 Monate (3. Größe): 8 Mal 8 Maschen in jede 2. Reihe (= 16 Reihen insgesamt) dann 3 Mal in jeder Reihe (3 Reihen), so haben Sie 16+3=19 Reihen gestrickt, das sind ca 9 cm mit 32 Reihen = 10 cm, so stricken Sie noch 1 extra cm aber ohne weitere Zunahmen, dann ketten Sie die 2 Maschen am Ende der 2 nächsten Reihen. Viel Spaß beim Stricken!
30.05.2025 - 15:48
![]() Hilde wrote:
Hilde wrote:
Har problemer med Plassering av øreklaffene. Får ikke maskeavstanden mellom de 2 klaffene til å stemne. Strikke opp 24 masker 28 maskers avstand fra første klaff. Plasseringen ser OK ut men jeg har mye mer enn 16 masker mellom øreklaffene bak.
25.10.2023 - 20:36DROPS Design answered:
Hej Hilde, du har 92 masker: 28m foran, 24m øreklap, 16m bagpå, 24m øreklap :)
26.10.2023 - 14:09
![]() Mirjam wrote:
Mirjam wrote:
Goeden avond. Ik ben bezig met het breien van het mutsje. Moet je de steken voor de oorflappen nu opnemen aan de omvouwrand van de ribbelsteek of aan de binnenkant van het mutsje waar die naar binnen is vastgezet (bovenkant zoompje)? Hoor graag van U. Groetjes Mirjam Goudswaard
28.11.2021 - 17:29DROPS Design answered:
Dag Mirjam
Je neemt de steken voor de oorflap op in de omvouwrand, en niet aan de binnenkant.
01.12.2021 - 12:22
![]() F__ wrote:
F__ wrote:
Bonjour, Je suis en train de tricoter les chaussettes en 0-3mois. Je ne comprends pas tres bien la phrase suivante pour le talon: "Rabattre les mailles restantes et les assembler dans le brin le plus à l'extérieur des mailles (= milieu sous le pied)." Est ce que vous avez un schema ou une video pour expliquer ca ? Dans les videos de chaussettes que j'ai regarde, souvent les dernieres mailles du talon ne sont pas rabattues mais tricotees avec le reste de la chaussette.
01.07.2021 - 12:19DROPS Design answered:
Bonjour F., cette vidéo montre une technique similaire pour tricoter le talon, (dans la vidéo, on ne rabat pas les mailles, on les tricote ensemble, dans ce modèle, vous les rabattez avant de passer aux diminutions indiquées. Elle devait vous aider à visualiser comment terminer ce talon. Bon tricot!
01.07.2021 - 12:59
![]() Sarah wrote:
Sarah wrote:
...und 3. Nachdem ich dann die äußerste Masche weggenäht habe, soll ich genau dort wieder 24 Maschen auffassen??? Kann man das nicht verbinden? Das versteh ich auch nicht.... Danke vorab!
25.03.2021 - 22:19DROPS Design answered:
Liebe Sarah, schauen Sie mal das Video unten gelinkt, auch wenn das Technik etwas unterschiedlich ist (bei den Socken werden die Maschen zusammengenäht; im Video werden sie zusammengestrickt), aber am Ende sehen Sie die Öffnung von der Ferse, wo Sie die Maschen auffassen werden. Viel Spaß beim stricken!
26.03.2021 - 07:40
![]() Sarah wrote:
Sarah wrote:
Hallo, ich bräuchte bitte Hilfe bei der Sockenanleitung, obwohl ich eigtl. schon so viele Erwachsenensocken gestrickt habe.... ;) Es heißt dort nach den 3 Reihen Fersenmaschen: Die restlichen Maschen abketten und am äußeren Maschenglied der äußersten Masche zusammennähen (= Mitte unter dem Fuß)." 1. Sind mit "restlichen Maschen" die 16 verbleibenden M. der 4. Rückreihe gemeint? 2. Was soll ich nun genau mit was zusammennähen? Es bleibt ja nur eine Abkettmasche? Danke vorab!
25.03.2021 - 22:15DROPS Design answered:
Liebe Sarah, die 16 M am Ende der 3 Reihen werden zusammengenäht (8 und 8), dh einfach so zusammennähen oder die 16 M doppelt legen und so zusammennähen; Dann werden 24 Maschen aufgefassen: in die 3 cm für die Fersen auf einer Seite bis zur Naht + von der Naht entlang die 3 cm für die Fersen, und dann die andere Maschen zusammenlegen. Dieses Video zeigt eine ähnliche Ferse, also nicht genau wie bei diese Socken, es kann Ihnen aber helfen. Viel Spaß beim stricken!
26.03.2021 - 07:38
![]() Fuchs wrote:
Fuchs wrote:
Bonsoir, Je suis entrain de tricoter le pull taille 6/9 mois et j'ai fais les 9 augmentations (de 8mailles par rang) tous les 2 rangs (sur l'endroit) + 3x sur chaque rang. J'ai donc 200 mailles actuellement. Par contre ce que je ne comprend pas, c'est que mon tricot mesure que 6cm et non pas 10 comme indiqué sur le modèle. Dois-je continuer de tricoter "droit" sans faire d'augmentations supplémentaires jusqu'à10 cm ou bien je continue à augmenter ? Merciii
01.02.2021 - 20:49DROPS Design answered:
Bonjour Mme Fuchs, quand les augmentations du raglan son terminées, tricotez comme avant mais sans augmenter (= "droit") jusqu'à ce que l'ouvrage mesure 10 cm et alors montez 2 mailles à la fin des 2 rangs suivants. Bon tricot!
02.02.2021 - 09:55
![]() Emma wrote:
Emma wrote:
Hej! På tröjan så står det att raglanökningarna ska göras först på vartannat varv x antal gånger och sedan på varje varv. Men arbetet stickas ju fram och tillbaka, så vartannat varv är avigsidan. Menas att det ska stickas först på vartannat RÄTT varv och sedan varje RÄTT varv?
22.01.2021 - 14:57DROPS Design answered:
Hej Emma, du stickar raglan på vartannat varv = varje varv från rätsidan. Sedan på varje varv = både från rätsidan och avigsidan. Lycka till :)
27.01.2021 - 15:10
|
|||||||||||||||||||
Ready, Set, Go#readysetgosweater |
|||||||||||||||||||
 |
 |
||||||||||||||||||
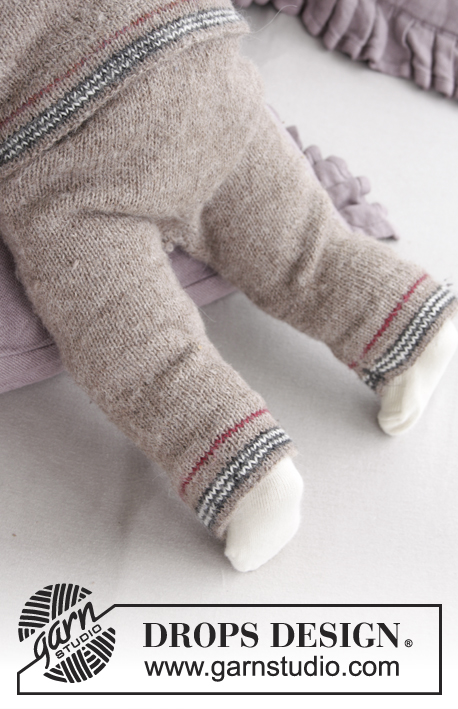
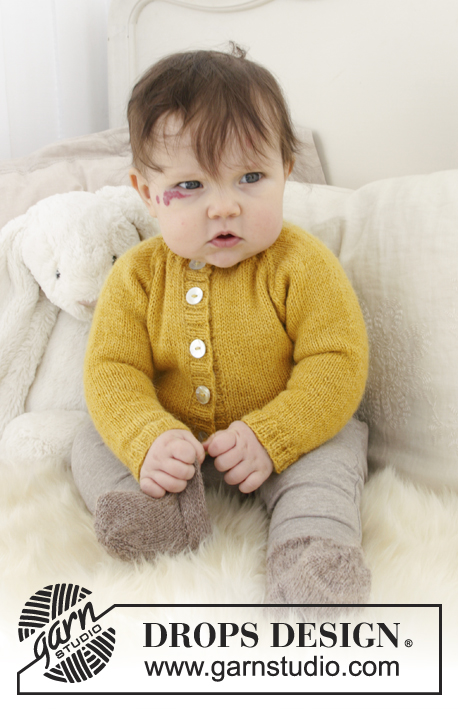
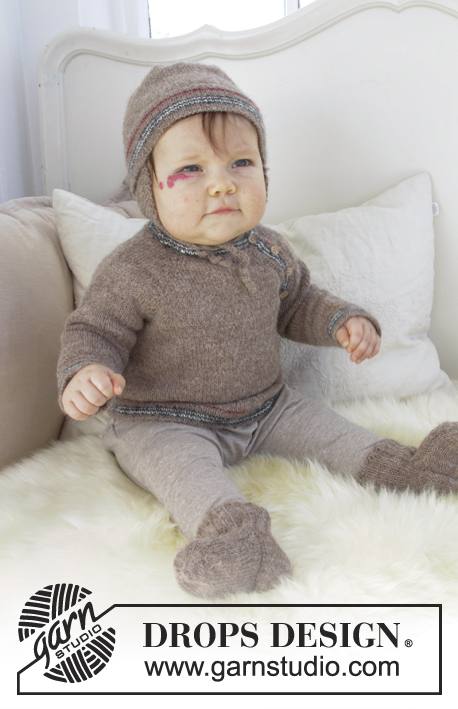
Set consists of: Jumper with stripes and raglan for baby, knitted top down. Hat with stripes and ear flaps and socks for baby. Size premature - 4 years Set is knitted in DROPS Alpaca.
DROPS Baby 31-18 |
|||||||||||||||||||
|
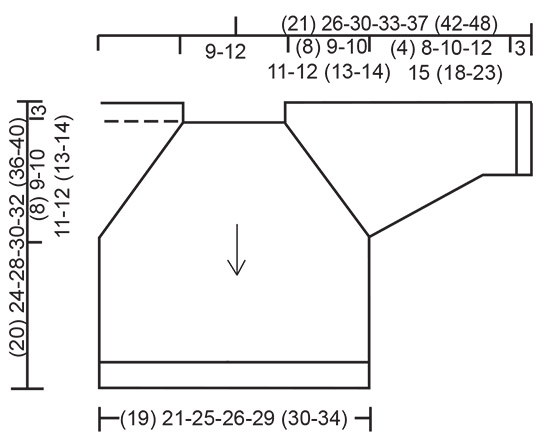
INFORMATION FOR PATTERN: GARTER STITCH (worked back and forth - applies to jumper and hat): 1 ridge = knit 2 rows. INCREASE TIP (applies to jumper): All increases are done from the right side. Increase with yarn over, purl yarn over twisted on next row to avoid holes. PATTERN: See diagrams A.1 to A.4. DECREASE TIP (applies to jumper): Decrease 1 stitch on each side of marker as follows: Work until 3 stitches remain before marker and knit 2 together, knit 2 (marker is between these stitches), slip 1 stitch knitwise, knit 1, pass slipped stitch over stitch worked. DECREASE TIP-1 (applies to sock): Decrease 1 stitch before 1 purl stitch as follows: Work until 2 stitches remain before 1 purl stitch, knit 2 together. Decrease 1 stitch after 1 purl stitch as follows: Slip 1 stitch knitwise, knit 1, pass slipped stitch over. TOE DECREASE (applies to sock): Decrease 3 stitches before marker as follows: Knit 2 together, knit 1. Decrease as follows after marker: Knit 1, slip 1 stitch knitwise, knit 1, pass slipped stitch over. ---------------------------------------------------------- JUMPER: Worked top down. First work the yoke back and forth, then divide the piece into body and sleeves. Body is worked in the round on circular needle, then work sleeves on double pointed needles. Pick up stitches into a band on each side of raglan opening and work a neck edge back and forth at the end. YOKE: Cast on (88) 88-92-92-96 (100-100) stitches (including 1 edge stitch in each side of piece) on circular needle size 3 mm with light beige. Now work back and forth from one raglan line (i.e. between front piece and left sleeve). Work as follows from right side: Work 1 edge stitch in GARTER STITCH – see explanation above, work 1 stitch in stocking stitch and insert 1st marker in this stitch, (16) 16-14-14-14 (16-14) stitches in stocking stitch and increase (2) 4-4-6-6 (6-6) stitches evenly (= left sleeve) – read INCREASE TIP, work 1 stitch in stocking stitch and insert 2nd marker in this stitch, (24) 24-28-28-30 (30-32) stitches in stocking stitch, work 1 stitch in stocking stitch and insert 3rd marker in this stitch (= back piece), (20) 20-18-18-18 (20-18) stitches in stocking stitch and increase (2) 4-4-6-6 (6-6) stitches evenly (= right sleeve), work 1 stitch in stocking stitch and insert 4th marker in this stitch, work (21) 21-25-25-27 (27-29) stitches in stocking stitch, work 1 stitch in stocking stitch and insert 5th marker in this stitch and finish with 1 edge stitch in garter stitch = (92) 96-100-104-108 (112-112) stitches. Purl 1 row from wrong side with 1 edge stitch in garter stitch in each side of piece. On next row from right side increase for raglan as follows: Increase 1 stitch after 1st marker, 1 stitch on each side of 2nd, 3rd and 4th marker (= 2 stitches increased in total on each side of these markers) and increase 1 stitch before 5th marker (= 8 stitches increased on every increase round). Increase every other row (2) 4-8-9-13 (14-20) times in total, then every row (4) 4-3-3-2 (2-0) times in total (= (6) 8-11-12-15 (16-20) times in total) = (140) 160-188-200-228 (240-272) stitches. REMEMBER THE KNITTING TENSION! When piece measures (7) 8-9-10-11 (12-13) cm, cast on 2 new stitches at the end of the next 2 rows = (144) 164-192-204-232 (244-276) stitches. Now work piece in the round in stocking stitch (round begins in transition between left sleeve and front piece) until piece measures (8) 9-10-11-12 (13-14) cm. Now work body and sleeves as follows: Slip the first (34) 40-44-48-54 (58-64) stitches on a stitch holder for sleeve (= left sleeve), cast on 8 stitches under sleeve, knit (38) 42-52-54-62 (64-74), slip the next (34) 40-44-48-54 (58-64) stitches on a stitch holder for sleeve (= right sleeve), cast on 8 stitches under sleeve, knit the last (38) 42-52-54-62 (64-74) stitches. BODY: = (92) 100-120-124-140 (144-164) stitches. Insert 1 marker in piece, NOW MEASURE PIECE FROM HERE! Continue in the round in stocking stitch as follows: When piece measures (6) 9-12-13-14 (17-20) cm, work A.1. When A.1 has been worked 1 time, purl next round (= folding edge). Knit 12 rounds with light beige. Cast off by knitting. SLEEVE: Slip the (34) 40-44-48-54 (58-64) stitches from stitch holder in one side of piece on double pointed needles size 3 mm. Pick up 1 stitch in each of the 8 stitches cast on under sleeve = (42) 48-52-56-62 (66-72) stitches. Insert 1 marker mid under sleeve. Work in stocking stitch in the round. When piece measures 2 cm from where piece was divided from body, decrease 1 stitch on each side of marker - read DECREASE TIP. Decrease like this every (2nd) 4th-4th-4th-4th (4th-5th) row (3) 5-7-9-11 (12-14) times in total = (36) 38-38-38-40 (42-44) stitches. When piece measures (4) 8-10-12-15 (18-23) cm work A.2 (the last 12 rows of A.2 is folded in and sewn to sleeve later). Cast off with light beige. Work the other sleeve the same way. RAGLAN OPENING: Now pick up 1 band inside 1 edge stitch on front piece back and forth as follows: Pick up (17) 19-22-24-26 (29-31) stitches on circular needle size 3 mm with light beige from right side. Work A.3 (work first row from wrong side, the last 10 rows of A.3 is folded in and sewn to jumper from wrong side). AT THE SAME TIME on 6th row (= from right side) decrease for 3 buttonholes evenly by knitting 2 stitches together and make 1 yarn over (make first buttonhole approx. 2 cm down from neck, distribute the 2 remaining buttonholes evenly). Decrease for buttonhole the same way on 16th row. Remember that the buttonholes must be on top of each other later when the edge is folded, to button buttons through both holes. Now pick up 1 band inside 1 edge stitch on left sleeve back and forth as follows: Pick up (17) 19-22-24-26 (29-31) stitches on circular needle size 3 mm with light beige from right side. Work 10 rows in stocking stitch (work first row from wrong side), cast off by knitting from wrong side. ASSEMBLY: Fold edge on body up and sew it nicely to body from wrong side with light beige. Fold edge on sleeves up and sew them nicely to sleeve from wrong side with light beige. Fold band on front piece double, place band on left sleeve under it and sew it to the bottom where 2 stitches were cast on with light beige. NECK EDGE: Worked back and forth. Begin on band on front piece and pick up approx. 70-97 stitches from right side around the entire neck to band on sleeve (pick up stitches through both layers on band on front piece). Work A.3 over all stitches (1st row = wrong side) AT THE SAME TIME on 6th row decrease for 1 buttonhole, by knitting 4th and 5th stitch together and make 1 yarn over, decrease for buttonhole the same way on 16th row. When A.3 has been worked, cast off with light beige. Fold edge double and sew nicely to where stitches were picked up for neck with light beige from wrong side. Sew opening in each side on neck together in outermost loop of edge stitch with light beige from right side. Sew the buttons on to neck edge and band on left sleeve. ---------------------------------------------------------- HAT: Worked in the round on double pointed needles. Cast on (70) 82-92-96-98 (108-112) stitches on double pointed needles size 3 mm with light beige. Work 5 cm in stocking stitch. Purl 1 round (= folding edge). Insert 1 marker in piece, NOW MEASURE PIECE FROM HERE! Work A.4 over all stitches. When A.4 has been worked 1 time vertically, continue with light beige. REMEMBER THE KNITTING TENSION! When piece measures (9) 8-9-10-10 (10-11) cm decrease (4) 4-2-0-2 (0-4) stitches evenly = (66) 78-90-96-96 (108-108) stitches. Then insert 6 markers (11) 13-15-16-16 (18-18) stitches apart. Approx. (5) 6-6-6-6 (7-7) cm remain on hat. Now decrease 1 stitch after every marker by knitting 2 stitches together every other round (7) 8-6-5-5 (6-6) times in total, then every round (2) 3-7-9-9 (10-10) times in total = 12 stitches. Work all stitches together 2 by 2 = 6 stitches. Cut the yarn and pull it through the remaining stitches and tighten together. The entire hat measures approx. (19) 19-20-21-21 (22-23) cm (including folding edge). Fold edge of hat up and sew it nicely from wrong side with light beige. 1ST EAR FLAP: Hold hat with tip towards you and pick up on 1 double pointed needle size 3 mm with light beige (18) 22-24-24-24 (28-30) stitches at the bottom along one side - pick up 1 stitch in every stitch. Work in GARTER STITCH - see explanation above - back and forth over stitches on needle - AT THE SAME TIME decrease 1 stitch in each side by knitting the 2 next to last stitches together, decrease every 4th row (5) 3-2-4-6 (5-6) times and then every other row (2) 6-8-6-4 (7-7) times = 4 stitches, work these stitches together 2 by 2 and pass the 2 remaining stitches over each other, cut the yarn and pull it through the remaining stitch. Flap measures approx. (5) 5-5-6-6½ (7-8) cm. 2ND EAR FLAP: Pick up stitches (22) 26-28-32-34 (34-34) stitches from the first ear flap (these (22) 26-28-32-34 (34-34) stitches = mid front on hat). Pick up on 1 double pointed needle size 3 mm with light beige 1 stitch in each of the next (18) 22-24-24-24 (28-30) stitches. There are now (12) 12-16-16-16 (18-18) stitches between ear flaps at the back. Work this ear flap the same way as the first. TIES: Crochet with light beige on hook size 3 mm as follows: Work 1 slip stitch through tip on ear flap, work chain stitches for approx. 20-30 cm, turn piece and work 1 slip stitch in every chain stitch, finish with 1 slip stitch in the tip on ear flap. Fasten off. Work 1 tie in each of the ear flaps. ---------------------------------------------------------- SOCK: Cast on 40-44-48 (52-56) stitches on double pointed needles size 2.5 mm with light beige. Work in the round in rib (= knit 2/purl 2) until piece measures 5-6-7 (9-10) cm. Slip the last stitch worked on to same needle as the first 19-19-23 (23-27) stitches on round = 20-20-24 (24-28) stitches on needle for heel. Slip the other 20-24-24 (28-28) stitches (= on top of foot) on 1 stitch holder - rib on top of foot will now start and end with 1 purl stitch. Work in stocking stitch back and forth over heel stitches for 3-3-4 (4-4) cm. REMEMBER THE KNITTING TENSION! Insert 1 marker in the middle of these stitches (= 10-12-12 (14-14) stitches on each side of marker). On next row from right side decrease as follows: ROW 1 (= from right side): Knit until 4 stitches remain before marker, slip 1 stitch knitwise, knit 1, pass the slipped stitch over (= 1 stitch decreased), knit 4 stitches, knit the next 2 stitches together (= 1 stitch decreased), knit the rest of row = 18-18-22 (22-26) stitches. ROW 2 (= from wrong side): Purl all stitches. ROW 3: Knit until 3 stitches remain before marker, slip 1 stitch knitwise, knit 1, pass the slipped stitch over (= 1 stitch decreased), knit 2 stitches, knit the next 2 stitches together (= 1 stitch decreased), knit the rest of row = 16-16-20 (20-24) stitches. Cast off the remaining stitches and sew together in outermost loop of edge stitch (= mid under foot). Then pick up 24-24-28 (28-32) stitches in outermost loop of edge stitch over heel. Slip stitches from stitch holder back on needle = 44-48-52 (56-60) stitches. Continue in the round. NOTE! Work rib over the 20-24-24 (28-28) stitches on top of foot and stocking stitch over the 24-24-28 (28-32) stitches under foot. AT THE SAME TIME on every other round decrease 1 stitch on each side of rib on top of foot - read DECREASE TIP-1! Decrease like this 2 times in total = 40-44-48 (52-56) stitches. When sock measures 7½-8½-9 (11-12) cm from back on heel (approx. 2½-2½-3 (3-4) cm remain until finished measurements), distribute stitches so that there are 20-22-24 (26-28) stitches both on top of foot and under foot. Insert 1 marker in each side. Work in stocking stitch in the round over all stitches - while AT THE SAME TIME decreasing 1 stitch on each side of every marker - read TOE DECREASE! Decrease like this every other round 5-5-6 (6-7) times in total = 20-24-24 (28-28) stitches. Work all stitches together 2 by 2 = 10-12-12 (14-14) stitches. Cut the yarn and pull it through the remaining stitches, tighten together and fasten. Sock measures approx. 10-11-12 (14-16) cm. Work the other sock the same way. |
|||||||||||||||||||
Diagram explanations |
|||||||||||||||||||
|
|||||||||||||||||||
 |
|||||||||||||||||||
 |
|||||||||||||||||||
Have you finished this pattern?Tag your pictures with #dropspattern #readysetgosweater or submit them to the #dropsfan gallery. Do you need help with this pattern?You'll find 38 tutorial videos, a Comments/Questions area and more by visiting the pattern on garnstudio.com. © 1982-2026 DROPS Design A/S. We reserve all rights. This document, including all its sub-sections, has copyrights. Read more about what you can do with our patterns at the bottom of each pattern on our site. |
|||||||||||||||||||


With over 40 years in knitting and crochet design, DROPS Design offers one of the most extensive collections of free patterns on the internet - translated to 17 languages. As of today we count 325 catalogues and 12298 patterns translated into English (UK/cm).
We work hard to bring you the best knitting and crochet have to offer, inspiration and advice as well as great quality yarns at incredible prices! Would you like to use our patterns for other than personal use? You can read what you are allowed to do in the Copyright text at the bottom of all our patterns. Happy crafting!
Post a comment to pattern DROPS Baby 31-18
We would love to hear what you have to say about this pattern!
If you want to leave a question, please make sure you select the correct category in the form below, to speed up the answering process. Required fields are marked *.