
Popular categories
Looking for a yarn?


Comments / Questions (34)
![]() Sabine wrote:
Sabine wrote:
Hallo, muss ich bei Muster A2 die Fäden auch überkreuzen (d.h. den, den neuen grauen in der aktuellen Reihe mit dem weißen der vorigen Reihe), wenn der Farbwechsel nicht übereinanderliegt (d.h., der Faden über mehrere Maschen mitwandert)? Danke
23.09.2020 - 21:25DROPS Design answered:
Liebe Sabine, ja, die Fäden am beste immer miteinander kreuzen, dieses Video zeigt, wie man mit 3 Knäueln strickt. Viel Spaß beim stricken!
24.09.2020 - 09:31
![]() Marina wrote:
Marina wrote:
Ho provato a fare la taglia di 10 anni, ma mi ritrovo dalla spalla fino allo scalfo 40 maglie per il davanti e 40 per il dietro, in totale 80, mentre la manica ne ha 52, allora ho pensato di riprendere i bordi del davanti e del dietro e di diminuire le maglie in 3 giri: 6 diminuzioni al primo giro, 6 diminuzioni al secondo giro e 2 diminuzioni al terzo giro, così da avere 26 maglie sul davanti e 26 maglie sul dietro del maglione, che corrispondono alle 52 della manica.
10.06.2020 - 10:22
![]() Janet wrote:
Janet wrote:
I have been a knitter for more than 40 years. I have to say this is the worse written pattern I have ever read. Tonight I will finish this sweater for my grandson. I look forward to putting this pattern in the recyle bin before going to bed. I would not suggest a beginner knitter start with this one.
01.12.2019 - 02:40
![]() Margit Weihrauch wrote:
Margit Weihrauch wrote:
Hallo, wie können denn Drops Air oder Drops Nepal Garn angegeben werden; sie haben doch völlig unterschiedliche Lauflängen? oder muss Drops Air mit doppeltem Faden gestrickt werden? MfG M.W.
13.11.2019 - 12:02DROPS Design answered:
Liebe Frau Weihrauch, Air und Nepal gehören zur gleichen Garngruppe (C), dh sie haben beide gleiche Maschenprobe aber eine unterschiedliche Lauflänge, deshalb brauchen Sie eine unterschiedliche Gewichtanzahl/Knäuelanzahl. hier lesen Sie mehr über Garnatlternativen. Der Pulli wird dann mit nur 1 Faden Air oder Nepal gestrickt. Viel Spaß beim stricken!
13.11.2019 - 12:18
![]() Helena Maine wrote:
Helena Maine wrote:
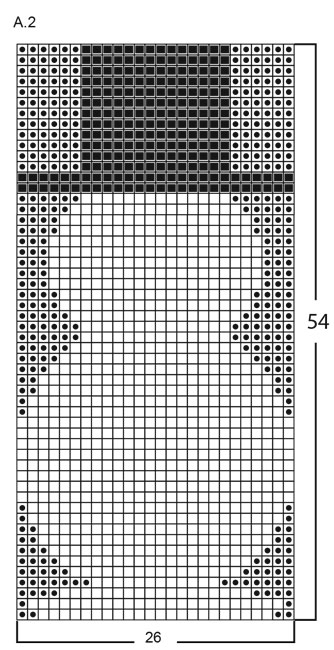
I am confused with the A2 pattern. Do I count the rows from wrong side too into 54 rows? If I follow the pattern from RS only I seem to end up with too many rows. I had to unravel it twice. Example, to decrease from the body towards the neck do I knit 2 from the RS , thus knitting 2 coming back before I decrease again? I don't get this A2 instructions at all. Please help. Thank you.
25.10.2019 - 16:10DROPS Design answered:
Dear Mrs Maine, Diagram A.2 is 54 rows, ie read diagram from the right towards the left from RS and from the left towards the right from WS, in other words, diagram shows all rows both from RS and form WS. Happy knitting!
25.10.2019 - 16:36
![]() Helena Maine wrote:
Helena Maine wrote:
I just wish to say thank you for your lovely patterns and in particular for including in you video demo how to make the knots. I asked fir this last year and you listened. I am grateful and I will now knit this sweater.
02.10.2019 - 19:39
![]() Addy wrote:
Addy wrote:
Hi there. The numbers don’t appear to be correct for the front neck shaping. I’m doing the 3-4 size and pattern says k17, centre 10 stitches on hold. So 17 stitches for shoulder. But this only adds up to 44 stitches when there are 54. How many should there be on hold? Thank you
15.11.2018 - 18:05DROPS Design answered:
Dear Addy, in the size 3/4 years, there are 52 sts on needle, yo slip the middle 12 sts on a thread for neck as follows: work the first 20 sts as before (1st shoulder), knit the next 12 sts and slip them on a thread/st holder, work the last 20 sts for 2nd shoulder. Turn and continue now over the sts from this shoulder binding off sts at the beg of every row starting from neck 2 sts 1 time and 1 stitch 2 times = 17 sts remain for the shoulder. Now slip the stitches from first shoulder back onto needles and continue the same way casting off the sts at the beg of row from neck. Happy knitting!
16.11.2018 - 08:58
![]() Elisabeth wrote:
Elisabeth wrote:
Y a t'il un inconvénient sur ce modèle, à inverser l'ordre de réalisation des manches en relevant les mailles autour de l’emmanchure pour terminer avec les poignets, après diminutions? Merci de votre réponse.
14.11.2018 - 18:59DROPS Design answered:
Bonjour Elisabeth, effectivement, vous pouvez à priori tricoter les manches de haut en bas en les relevant le long des emmanchures et en diminuant au lieu d'augmenter. Bon tricot!
15.11.2018 - 08:37
![]() Sandi wrote:
Sandi wrote:
Hi I can I knit the sleeves flat? Not too keen on using double pointed needles Thanks
07.10.2018 - 12:48DROPS Design answered:
Dear Sandi, yes, you can easily convert the sleeves pattern, to one that is knitted flat (back and forth). Add two edge stitch to the stitch count for the seams, and do the increases that is written to both sides of the mid under sleevs, at the beginninga nd end of the rows. Happy Knitting!
07.10.2018 - 23:00
![]() Debra wrote:
Debra wrote:
It says"work back until it measures 17 inches (size 7/8) now cast off the middle 22 sts for neck and shoulders are finished separately. Now continue in stocking stitch decrease 1 st at neck edge 17 sts remain for shoulder. Continue till work measures 17 inches" The measurements seem to be a little off.
29.12.2017 - 14:59DROPS Design answered:
Dear Debra, you first work until 44 cm (= 17.32 inches) then piece measures 45 cm (= 17.72 inches). Happy knitting!
02.01.2018 - 10:06
|
|||||||||||||
Frosty's Christmas Kids#frostyschristmassweater |
|||||||||||||
 |
 |
||||||||||||
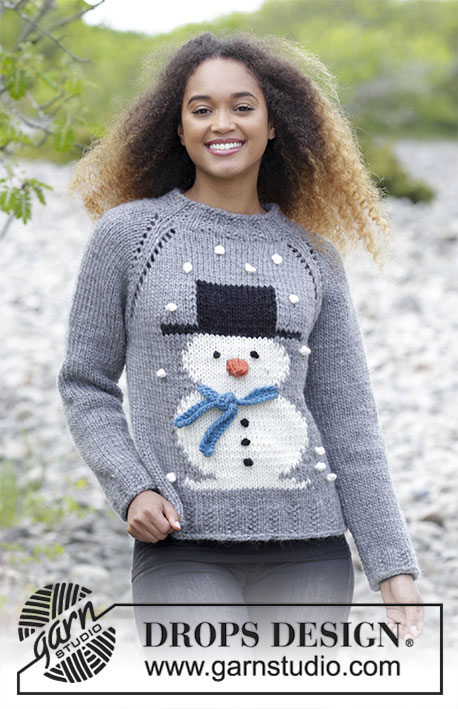
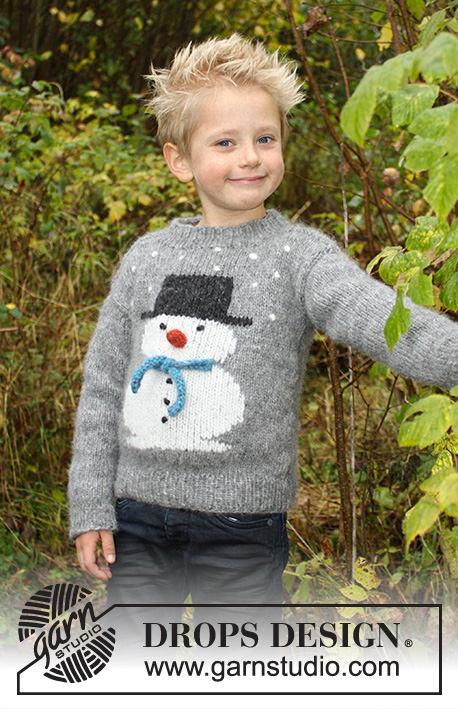
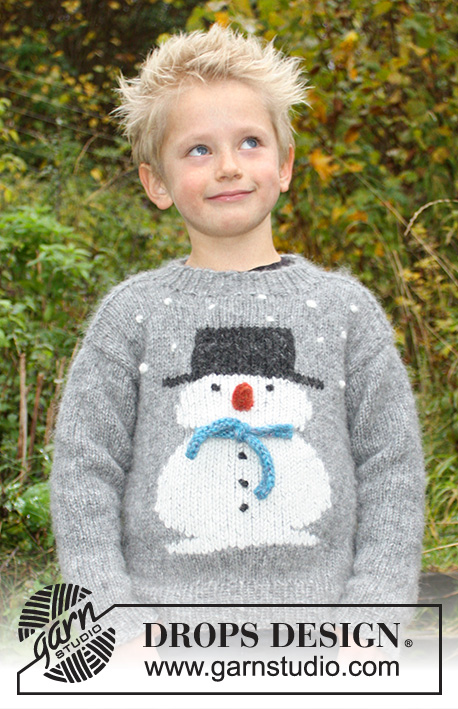
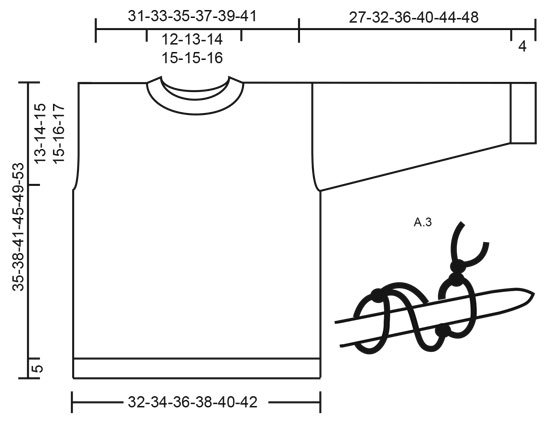
Knitted Christmas jumper with snowman. For children sizes 2 – 12 years. The piece is worked in DROPS Air.
DROPS Children 30-28 |
|||||||||||||
|
INFORMATION FOR THE PATTERN: RIDGE/GARTER STITCH (worked back and forth): 1 ridge = Knit 2 rows. PATTERN: See diagrams A.2 and A.3. Diagram A.3 shows a knot. Diagram A.2 (snowman): The whole diagram is worked in stocking stitch. Worked with 3 balls, so that you avoid long carrying loops on the wrong side. In other words, work with 1 ball of medium grey Air/ grey Nepal on each side of jumper and 1 ball of pattern colour in middle of jumper. NOTE: To avoid holes when changing colours, you need to twist the strands together. INCREASE TIP (sleeve): Work until 1 st remains before marker, 1 YO, knit 2 sts (marker sits between these 2 sts) , 1 YO. On next round knit yarn overs twisted to avoid holes. ---------------------------------------------------------- JUMPER: Front and back pieces (back piece with or without snowman) are worked back and forth separately with circular needle. This is to make it easier to work pattern. The sleeves are worked in the round with double pointed/short circular needle. Then the pieces are sewn together, outermost stitch to outermost stitch. The neckline is worked to finish. BACK PIECE - without snowman: Cast on 52-54-58-60-64-68 stitches with circular needle size 4.5 mm and medium grey Air or grey Nepal. Work rib (knit 1, purl 1) until the piece measures 5 cm, change to circular needle size 5.5 mm and then work stocking stitch until the piece measures 23-25-27-30-33-35 cm. Now cast off 1 stitch in each side for armhole = 50-52-56-58-62-66 stitches. Work until piece measures 33-36-39-43-47-51 cm. Now cast off the middle 16-18-20-22-22-24 stitches for neck and each shoulder is finished separately. Continue with stocking stitch and cast off 1 stitch on next row from neck = 16-16-17-17-19-20 stitches left on shoulder. Continue working until piece measures 34-37-40-44-48-52 cm, work 2 RIDGES, see description above, over all stitches, then LOOSELY cast off. The piece measures approx. 35-38-41-45-49-53 cm from the shoulder down. Work the other shoulder in the same way. BACK PIECE - with snowman: Cast on 52-54-58-60-64-68 stitches with circular needle size 4.5 mm and medium grey Air or grey Nepal. Work rib (knit 1, purl 1) until piece measures 5 cm, change to circular needle size 5.5 mm and then work stocking stitch. When piece measures approx. 6-7-8-9-10-11 cm work as follows from right side: 13-14-16-17-19-21 stitches stocking stitch, A.2 (= 26 stitches) - read PATTERN and watch video if necessary, 13-14-16-17-19-21 stitches stocking stitch. Continue in this way until piece measures 23-25-27-30-33-35 cm. Now decrease 1 stitch in each side for armholes = 50-52-56-58-62-66 stitches. Continue with stocking stitch and A.2. When A.2 has been completed, work stocking stitch and medium grey Air / grey Nepal until piece measures 33-36-39-43-47-51 cm. Now cast off the middle 16-18-20-22-22-24 stitches for neck and each shoulder is finished separately. Continue with stocking stitch and cast off 1 stitch on next row from neck = 16-16-17-17-19-20 stitches left on shoulder. Continue working until piece measures 34-37-40-44-48-52 cm, work 2 RIDGES (see description above) over all stitches, then LOOSELY cast off. Piece measures approx. 35-38-41-45-49-53 cm from shoulder down. Work the other shoulder in the same way. FRONT PIECE - with snowman: Cast on 52-54-58-60-64-68 stitches with circular needle size 4.5 mm and medium grey Air or grey Nepal. Work rib (knit 1, purl 1) until piece measures 5 cm, change to circular needle size 5.5 mm and then work stocking stitch. When piece measures approx. 6-7-8-9-10-11 cm work as follows from right side: 13-14-16-17-19-21 stitches stocking stitch, A.2 (= 26 stitches)- read PATTERN, 13-14-16-17-19-21 stitches stocking stitch. Continue in this way until piece measures 23-25-27-30-33-35 cm. Now cast off 1 stitch in each side for armholes = 50-52-56-58-62-66 stitches. Continue with stocking stitch and A.2, when A.2 has been completed, continue with stocking stitch and medium grey Air / grey Nepal until piece measures 31-34-37-40-43-47 cm. Now place the middle 10-12-14-16-16-18 stitches on 1 thread for neck and each shoulder is finished separately. Cast off to neck at beginning of each row from neck as follows: 2 stitches 1 time and 1 stitch 2 times = 16-16-17-17-19-20 stitches left on shoulder. Continue until piece measures 34-37-40-44-48-52 cm, work 2 RIDGES over all stitches, then loosely cast off. Piece measures approx. 35-38-41-45-49-53 cm from the shoulder down. Work the other shoulder in the same way. SLEEVE: Cast on 28-28-30-30-32-32 stitches with double pointed needles size 4.5 mm and medium grey Air or grey Nepal. Insert 1 marker thread at the beginning of the round = mid under sleeve. Work rib (knit 1, purl 1) until piece measures 4 cm, change to circular needle size 5.5 mm and then work stocking stitch. When piece measures 6 cm increase 2 stitches mid under sleeve – read INCREASE TIP. Increase in this way every 4-4-4-4-4-4 cm a total of 5-7-7-9-10-11 times = 38-42-44-48-52-54 stitches. When piece measures 27-32-36-40-44-48 cm loosely cast off. Work another sleeve in the same way. ASSEMBLY: Sew shoulder seams inside the cast-off edge. Sew the front and back pieces together in the outermost stitch. Sew in sleeves. NECKLINE: Knit up from right side approx. 58 to 68 stitches (number of stitches must be divisible by 2) around the neck (including stitches on thread at front) with short circular needle size 4.5 mm and medium grey Air or grey Nepal. Work rib (knit 1, purl 1) until piece measures 4 cm. Cast off with knit over knit and purl over purl - make sure the cast-off edge is not tight. NOSE: Cast on 8 stitches with 2 strands orange Air or Nepal with needle size 5.5 mm (leave strand lengths of approx. 30 cm, these are used as stuffing afterwards). Then continue with 1 strand. Purl 1 row. The next row is worked as follows: Knit 1, knit 2 together, knit 5 = 7 stitches. Purl 1 row. Knit 3, knit 2 together, knit 2 = 6 stitches. Purl 1 row. Knit 1, knit 2 together, knit 3 = 5 stitches. Cut the strand (leave a strand-length of approx. 30 cm; this is used to fasten), pull it through the remaining stitches. Sew together in the side and push the long strands from casting-on inside the nose as stuffing. Sew the nose to the middle of the snowman’s head on the front piece. SCARF: Cast on 62 stitches with needle size 5.5 mm and peacock blue Air or deep ocean Nepal. Work 2 rows stocking stitch. Cast off. Thread the scarf through the jumper by the neck of the snowman (on the front piece) and back to right side on the other side of the neck. Tie the scarf ends together with a double knot in front. SNOW, BUTTONS AND EYES: Make 12 knots with off white Air or Nepal for snow and 5 knots with a left-over of black Air or Nepal for buttons and eyes as follows: 1 knot: Cut 1 strand of approx. 40 cm. Make 4 knots around a needle size 5.5 mm - see diagram A.3 (i.e. make 3 LOOSE knots, make 1 more knot and tighten the strand on this knot = 1 knot). Position the knots on the front piece, thread the strand ends through each side of 1 stitch and tie at wrong side - see photo. |
|||||||||||||
Diagram explanations |
|||||||||||||
|
|||||||||||||
 |
|||||||||||||
 |
|||||||||||||
Have you finished this pattern?Tag your pictures with #dropspattern #frostyschristmassweater or submit them to the #dropsfan gallery. Do you need help with this pattern?You'll find 31 tutorial videos, a Comments/Questions area and more by visiting the pattern on garnstudio.com. © 1982-2026 DROPS Design A/S. We reserve all rights. This document, including all its sub-sections, has copyrights. Read more about what you can do with our patterns at the bottom of each pattern on our site. |
|||||||||||||


With over 40 years in knitting and crochet design, DROPS Design offers one of the most extensive collections of free patterns on the internet - translated to 17 languages. As of today we count 325 catalogues and 12291 patterns translated into English (UK/cm).
We work hard to bring you the best knitting and crochet have to offer, inspiration and advice as well as great quality yarns at incredible prices! Would you like to use our patterns for other than personal use? You can read what you are allowed to do in the Copyright text at the bottom of all our patterns. Happy crafting!
Post a comment to pattern DROPS Children 30-28
We would love to hear what you have to say about this pattern!
If you want to leave a question, please make sure you select the correct category in the form below, to speed up the answering process. Required fields are marked *.