
Popular categories
Looking for a yarn?


Comments / Questions (12)
![]() Anu Laaksolehto wrote:
Anu Laaksolehto wrote:
Mallin ohjeen mukaan ostettu lanka loppui kesken, vaikka tehty ohjeen mukaan. Tarve olisi ollut yhdelle harmaalle kerälle.
10.12.2023 - 17:30
![]() SB Van Den Brink wrote:
SB Van Den Brink wrote:
Waar kan ik het telpatroon A3 vinden?
11.11.2022 - 16:56
![]() Raquel wrote:
Raquel wrote:
Hola, me gustaría saber si este patrón se puede hacer con agujas rectas de una sola punta. Gracias
09.11.2021 - 19:17DROPS Design answered:
Hola Raquel, se puede. Happy knitting!
10.11.2021 - 08:22
![]() Carmen wrote:
Carmen wrote:
Hola, Hace unos días que la pàgina web no funciona del todo bien. No carga los patrones ni las fotos. He provado con diferentes navegadores, pero no funciona bien con ninguno. Es provisional? He comprado la lana que necesito para este modelo y me gustaría poder ver el patrón con sus fotos. Muchas grácias y un saludo cordial.
05.10.2021 - 10:44DROPS Design answered:
Hola Carmen, esta situacion es provisional. Perdónanos, estamos tratando de arreglar esto.
05.10.2021 - 11:26
![]() Nikki B wrote:
Nikki B wrote:
If it’s knit from top down why is the snowman pattern A2 upside down ?? I think this might be confusing for some knitters
08.08.2021 - 00:26
![]() Erika wrote:
Erika wrote:
Lieve DD , die verhouding van mijn proeflap is 11 en1/2 steek . Met een lagere priemdikte = 6en1/2 statt 7 is het bekomen breisel iets te vast om goed te zijn . Wat beraadt u mij . Vriendelijke Groet van Erika
15.11.2020 - 18:34DROPS Design answered:
Dag Erika,
Als je bij een naalddikte van 8 mm 11,5 steken in de breedte hebt, dan zou ik dat aanhouden. Kijk of je evt. wat minder steken op wilt zetten, zodat de breedte van de panden weer overeenkomen.
18.11.2020 - 12:15
![]() Sian Brown wrote:
Sian Brown wrote:
I am working on a book on intarsia for Crowwod Press and would love to show the image of the cover of the pattern as an example of Christmas intarsia jumpers. Could you please let me know who to contact about this. Thnaks. Regards Sian.
20.03.2020 - 12:45DROPS Design answered:
Dear Mrs Brown, can you please write us at media@garnstudio.com ? Thank you very much!
20.03.2020 - 14:40
![]() NicZwick wrote:
NicZwick wrote:
Guten Tag, wie ist das gemeint mit: 4-4-4-2-2-2 Reihen ohne Zunahmen stricken. Die Arbeit hat eine Länge von ca. 20-21-23-23-24-27 cm. DIE ARBEIT WIRD NUN AB HIER GEMESSEN! Nun am Ende der nächsten 2 Reihen, d.h. beidseitig, je 2-2-3-3-4-4 neue Maschen für die Armausschnitte anschlagen = 52-56-60-66-72-80 Maschen. Muss ich zuerst 4 Reihen stricken und dann noch zwei extra und erst in diesen die M für den Arm anschlagen? Mfg Nicole
17.02.2020 - 09:58DROPS Design answered:
Liebe NicZwick, Sie stricken zuerst 4 Reihen dann am Ende der 2 nächsten Reihen schlagen Sie 2 neuen Maschen an. Viel Spaß beim stricken!
17.02.2020 - 12:46
![]() Karin wrote:
Karin wrote:
Hello, I'm not sure which size to choose, my height is 158cm and weight 59 and bust 90 but I want it to fit a little loose
10.11.2019 - 06:50DROPS Design answered:
Dear Karin, for sizing please refer to the shcematics drawing at the bottom of the pattern, it has the measurements of the sweater. If you are unsure, take an existing sweater of yours that you find comfortable and compar the sizes givenon the drawing. Happy Knitting!
10.11.2019 - 10:55
![]() Kathrin wrote:
Kathrin wrote:
Bei mir fällt der Pullover mega-riesig aus. Ich habe Gr. L gestrickt mit Eskimo und Nadeln Nr. 8, die Hüftbreite war dann bei 73!!! cm (anstatt 53). Ich stricke nun Gr. S mit Nadelstärke 7 und hoffe, dass ich zu einem tragbaren Ergebnis komme. Ansonsten muss ich das ganze noch umrechnen... Die Größen sind wirklich sehr reichlich bemessen.
02.02.2019 - 12:30DROPS Design answered:
Liebe Kathrin, stimmte Ihre Maschenprobe? mit 11 M = 10 cm, haben Sie dann 60 M vor dem Bündchen = ca 54 cm., etwas weniger mit A.1 und Nadeln Nr7. Viel Spaß beim stricken!
04.02.2019 - 14:46
|
||||||||||||||||||||||
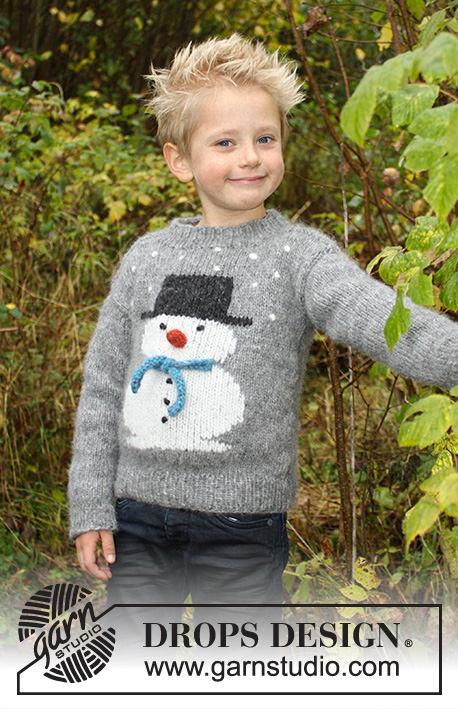
Frosty's Christmas#frostyschristmassweater |
||||||||||||||||||||||
 |
 |
|||||||||||||||||||||
Christmas jumper with raglan and snowman, worked top down. Sizes S - XXXL. The piece is worked in DROPS Snow or DROPS Wish.
DROPS 183-13 |
||||||||||||||||||||||
|
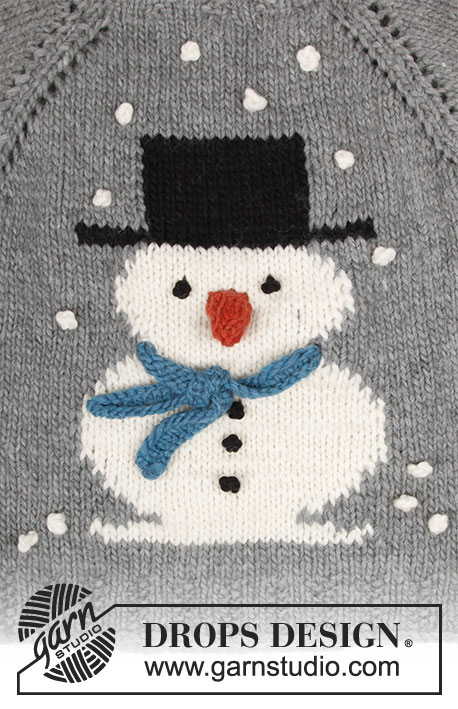
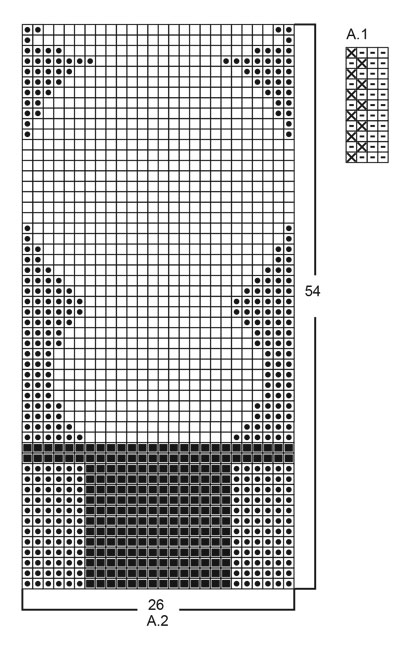
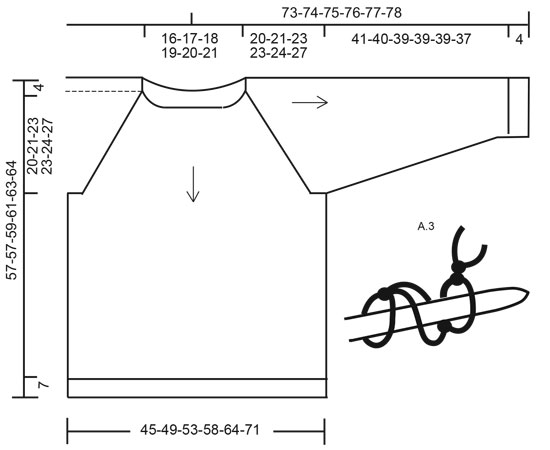
INFORMATION FOR THE PATTERN: RIDGE/GARTER STITCH (worked back and forth): 1 ridge = Knit 2 rows. PATTERN: See diagrams A.1 to A.3. Diagram A.3 shows a knot. Diagram A.2 (snowman): The whole diagram is worked in stocking stitch. Work with 3 balls so that you avoid long carrying strands on the wrong side. In other words, you work with 1 ball medium grey on each side of the jumper and 1 ball of pattern colour in the middle. NOTE: To avoid a hole when changing colours, the strands must be twisted together. INCREASE TIP (raglan): All increases are worked from the right side! Work 1 edge stitch in garter stitch, knit 1, 1 yarn over, work until there are 2 stitches left, 1 yarn over, knit 1, 1 edge stitch in garter stitch. On the next row, purl the yarn overs - to leave holes. DECREASE TIP (for sleeves): All decreases are worked from the right side! Decrease as follows after the 1 edge stitch: Slip 1 stitch as if to knit, knit 1, pass the slipped stitch over the knitted stitch. Decrease as follows before the 1 edge stitch: Start 2 stitches before the edge stitch and knit 2 together. ---------------------------------------------------------- JUMPER: The piece is worked back and forth with circular needle, top down. Front piece, back piece (back piece with or without snowman) and sleeves are worked back and forth separately. This is to make it easier to work pattern. Then the pieces are sewn together stitch by stitch along the raglan increases and sides. The neckline is worked in the round to finish. BACK PIECE – without snowman: Cast on 22-24-24-28-30-34 stitches (including 1 edge stitch in each side) with circular needle size 8 mm and medium grey. Purl 1 row from the wrong side. Then work stocking stitch with 1 edge stitch in GARTER STITCH - see description above, in each side. At the same time on the next row increase 1 stitch in each side - read INCREASE TIP (raglan) above! Increase in this way every 2nd row a total of 13-14-15-16-17-19 times = 48-52-54-60-64-72 stitches - REMEMBER THE KNITTING TENSION! Work 4-4-4-2-2-2 rows without increases. The piece measures approx. 20-21-23-23-24-27 cm. THE PIECE IS NOW MEASURED FROM HERE! Then cast on 2-2-3-3-4-4 new stitches for armholes at the end of the next 2 rows = 52-56-60-66-72-80 stitches. Continue with stocking stitch with 1 edge stitch in garter stitch in each side until the piece measures 30-29-30-31-32-30 cm. Change to circular needle size 7 mm and work 1 row stocking stitch where you increase 2-2-2-0-2-2 stitches evenly on row = 54-58-62-66-74-82 stitches. Then work as follows: 1 edge stitch in garter stitch, work A.1 (= 4 stitches) until there is 1 stitch left, work 1 edge stitch in garter stitch. Continue until A.1 has been worked in height. Cast off LOOSELY with knit over knit and purl over purl. BACK PIECE – with snowman: Cast on 22-24-24-28-30-34 stitches (including 1 edge stitch in each side) with circular needle size 8 mm and medium grey. Purl 1 row from the wrong side. Then work stocking stitch with 1 edge stitch in GARTER STITCH (see description above) in each side. At the same time on the next row increase 1 stitch in each side - read INCREASE TIP (raglan) above! Increase in this way every 2nd row a total of 13-14-15-16-17-19 times = 48-52-54-60-64-72 stitches - REMEMBER THE KNITTING TENSION! - AT THE SAME TIME when there are 40-40-44-44-50-56 stitches on the row start pattern. I.e. the next row is worked as follows (including increases in each side): Work 1 edge stitch in garter stitch, knit 1, 1 yarn over (= increase), knit 5-5-7-7-10-13 stitches, diagram A.2 (= 26 stitches)-Read PATTERN above, knit 5-5-7-7-10-13 stitches, 1 yarn over (= increase), knit 1 and 1 edge stitch in garter stitch = 42-42-46-46-52-58 stitches. Continue pattern and increases until you have 48-52-54-60-64-72 stitches. Work 4-4-4-2-2-2 rows without increases. The piece measures approx. 20-21-23-23-24-27 cm. THE PIECE IS NOW MEASURED FROM HERE! Then cast on 2-2-3-3-4-4 new stitches for armholes at the end of the next 2 rows = 52-56-60-66-72-80 stitches. Continue with stocking stitch and pattern with 1 edge stitch in garter stitch in each side. When A.2 has been worked in height, the piece measures 29-27-27-27-26-25 cm. Continue working with medium grey as before until the piece measures 30-29-30-31-32-30 cm. Change to circular needle size 7 mm and work 1 row stocking stitch where you increase 2-2-2-0-2-2 stitches evenly on row = 54-58-62-66-74-82 stitches. Then work as follows: 1 edge stitch in garter stitch, work A.1 (= 4 stitches) until there is 1 stitch left, work 1 edge stitch in garter stitch. Continue until A.1 has been worked in height. Cast off with knit over knit and purl over purl - make sure the cast-off edge is not tight. FRONT PIECE: Cast on 22-24-24-28-30-34 stitches (including 1 edge stitch in each side) with circular needle size 8 mm and medium grey. Purl 1 row from the wrong side. Then work stocking stitch with 1 edge stitch in garter stitch in each side. At the same time on the next row begin to increase as for back piece. Continue to increase as for back piece - AT THE SAME TIME when there are 40-40-44-44-50-56 stitches on the row start the pattern. I.e. the next row is worked as follows (including the increase in each side): Read PATTERN above! Work 1 edge stitch in garter stitch, knit 1, 1 yarn over (= increase), knit 5-5-7-7-10-13 stitches, diagram A.2 (= 26 stitches), knit 5-5-7-7-10-13 stitches, 1 yarn over (= increase), knit 1 and 1 edge stitch in garter stitch = 42-42-46-46-52-58 stitches. Continue the pattern and increases in each side are continued as for back piece = 48-52-54-60-64-72 stitches. Work 4-4-4-2-2-2 rows without increases. The piece measures approx. 20-21-23-23-24-27 cm. THE PIECE IS NOW MEASURED FROM HERE! Cast on new stitches for the armholes as for the back piece = 52-56-60-66-72-80 stitches. Continue with stocking stitch and pattern with 1 edge stitch in garter stitch in each side. When A.2 has been worked in height the piece measures approx. 29-27-27-27-26-25 cm. Continue to work with medium grey until the piece measures 30-29-30-31-32-30 cm. Change to circular needle size 7 mm and work 1 row stocking stitch where you increase 2-2-2-0-2-2 stitches evenly on row = 54-58-62-66-74-82 stitches. Then work as follows: 1 edge stitch in garter stitch, work A.1 (= 4 stitches) until there is 1 stitch left, work 1 edge stitch in garter stitch. Continue until A.1 has been worked in height. Cast off with knit over knit and purl over purl - make sure the cast-off edge is not tight. SLEEVE: Cast on 10-12-12-12-10-8 stitches (including 1 edge stitch in garter stitch in each side) with circular needle size 8 mm and medium grey. Purl 1 row from the wrong side. Then work stocking stitch. On the next row increase 1 stitch in each side - remember INCREASE TIP (raglan)! Increase in this way every 2nd row a total of 13-14-15-16-17-19 times = 36-40-42-44-44-46 stitches. Work 4-4-4-2-2-2 rows without increases. The piece measures approx. 20-21-23-23-24-27 cm. THE PIECE IS NOW MEASURED FROM HERE! Then cast on 2-2-3-3-4-4 new stitches for armholes at the end of the next 2 rows = 40-44-48-50-52-54 stitches. Continue with stocking stitch with 1 edge stitch in garter stitch in each side. When the piece measures 2 cm decrease 1 stitch in each side - read DECREASE TIP above. Decrease in this way every 7-5-4-3½-3½-3 cm a total of 6-8-9-10-10-11 times = 28-28-30-30-32-32 stitches. Continue until the piece measures 41-40-39-39-39-37 cm (shorter measurements in larger sizes because of wider neck and longer yoke). Change to circular needle size 7 mm and work 1 row stocking stitch where you increase 2-2-0-0-2-2 stitches evenly on row = 30-30-30-30-34-34 stitches. Then work as follows: 1 edge stitch in garter stitch, work A.1 (= 4 stitches) until there is 1 stitch left, work 1 edge stitch in garter stitch. Work in this way for 4 cm. Cast off with knit over knit and purl over purl - make sure the cast-off edge is not tight. Work one more sleeve in the same way. ASSEMBLY: Sew sleeves to front and back pieces - sew inside the 1 edge stitch in garter stitch. NOTE! Make sure the seam is not tight! Sew under sleeve and side seams in one go inside the 1 edge stitch. Sew the hole under the sleeves. NECK: Knit up from the right side 1 stitch in each stitch (= 56-64-64-72-72-76 stitches) with short circular needle size 7 mm. Knit 1 round where you decrease 8-12-12-16-16-16 stitches evenly on round = 48-52-52-56-56-60 stitches. Work 9 rounds in the round according to diagram A.1 (= 4 stitches). Cast off with knit over knit and purl over purl - make sure the cast-off edge is not tight. NOSE: Cast on 8 stitches with 2 strands orange / tobasco and needle size 7 mm (leave strand lengths of approx. 30 cm; these are used to fill afterwards). Continue working with 1 strand. Purl 1 row. The next row is worked as follows: Knit 1, knit 2 together, knit 5 = 7 stitches. Purl 1 row. Knit 3, knit 2 together, knit 2 = 6 stitches. Purl 1 row. Knit 1, knit 2 together, knit 3 = 5 stitches. Cut the strand (leave a strand-length of approx. 30 cm; this is used for assembly), pull it through the remaining stitches. Sew together in the side and push the long strands from casting-on into the nose as stuffing. Sew the nose to the middle of the snowman’s head. SCARF: Cast on 62 stitches with needle size 7 mm and petrol / navy blue. Work 2 rows stocking stitch. Cast off. Thread the scarf through to the wrong side of the jumper at the neck of the snowman and back to the right side on the other side of the neck. Tie the scarf with a knot at the front. SNOW, BUTTONS AND EYES: Make 12 knots with off white for snow and 5 knots with a left-over of black / dark grey for eyes and buttons as follows: 1 knot: Cut 1 strand of approx. 40 cm. Make 4 knots around needle size 8 mm - see diagram A.3 (i.e. make 3 LOOSE knots, make 1 more knot and tighten the strand on this knot = 1 knot). Lay the knots on the front piece of the jumper, thread the strands on either side of the knots through the jumper and tie together on the wrong side - see photo. |
||||||||||||||||||||||
Diagram explanations |
||||||||||||||||||||||
|
||||||||||||||||||||||
|
||||||||||||||||||||||
|
||||||||||||||||||||||
Have you finished this pattern?Tag your pictures with #dropspattern #frostyschristmassweater or submit them to the #dropsfan gallery. Do you need help with this pattern?You'll find 28 tutorial videos, a Comments/Questions area and more by visiting the pattern on garnstudio.com. © 1982-2025 DROPS Design A/S. We reserve all rights. This document, including all its sub-sections, has copyrights. Read more about what you can do with our patterns at the bottom of each pattern on our site. |
||||||||||||||||||||||


With over 40 years in knitting and crochet design, DROPS Design offers one of the most extensive collections of free patterns on the internet - translated to 17 languages. As of today we count 314 catalogues and 11822 patterns translated into English (UK/cm).
We work hard to bring you the best knitting and crochet have to offer, inspiration and advice as well as great quality yarns at incredible prices! Would you like to use our patterns for other than personal use? You can read what you are allowed to do in the Copyright text at the bottom of all our patterns. Happy crafting!
Post a comment to pattern DROPS 183-13
We would love to hear what you have to say about this pattern!
If you want to leave a question, please make sure you select the correct category in the form below, to speed up the answering process. Required fields are marked *.