
Popular categories
Looking for a yarn?


Comments / Questions (29)
![]() ETeice wrote:
ETeice wrote:
How do I adapt this pattern for two needles
05.01.2026 - 09:34DROPS Design answered:
Hi, the sweater is worked back and forth (except the neck) so you can make it on straight needles as soon as you have enough room to place all the stitches on them. If not, please try to do it on circular needles, back and forth as in the video HERE. Happy knitting!
05.01.2026 - 14:38
![]() Elizabeth wrote:
Elizabeth wrote:
The yarn requirement seems over-generous for the pattern. I made the XL size (bought 22 50g balls of Eskimo), knitted to correct tension and have ended up with 4 and a bit balls of yarn left over.
27.11.2025 - 17:46
![]() Elizabeth wrote:
Elizabeth wrote:
Hi. I'm sorry, but I don't understand the decrease instructions for the armhole on the back. If you decrease by 1 stitch on every other row, you either have the shaping all at the beginning of the rows and therefore only decrease on one edge. Alternatively, if you alternate the decrease between the beginning and the end of rows, you end up with an uneven number of decreases (3 on one edge, 2 on the other). It doesn't make a lot of sense.
20.12.2024 - 19:34DROPS Design answered:
Dear Elizabeth, every 2nd row for each armhole. So on a right side row you cast off for the first armhole, on the wrong side row you cast off for the 2nd armhole; on the next right side row, cast off for the 1st armhole, on the next wrong side row, cast off for the 2nd armhole. So you cast off on alternate rows for each armhole (that is, you don't cast off at the beginning and end of every row, but alternate between casting off for each armhole on each row). Also, it's 2-3-5-6 times for each armhole, so you cast off 4, 6, 10 or 12 stitches, depending on the size. Happy knitting!
22.12.2024 - 23:33
![]() Elizabeth wrote:
Elizabeth wrote:
Hi I'm trying to knit the silverwood pattern in the XL size. For the rib section, it says to P3 stitches, then K3-P3, with 1 garter stitch at either end. Is this first row a right side row or a wrong side row? Also, should the rib section end on a right or wrong side row before the 2 knit rows that form the ridge? And the diagram section presumably starts on a right side row?
06.12.2024 - 15:49DROPS Design answered:
Dear Elizabeth, unless otherwise stated, most patterns start with a right side row after casting on and you will start with a right side row when you start a new stitch-pattern. So, the first row indicated in the question would be a right side row, you end the rib after a wrong side row and work a ridge (starting in a row from the right side). Then the chart is also started on a right side row. Happy knitting!
08.12.2024 - 18:45
![]() Hanna Silverblad wrote:
Hanna Silverblad wrote:
Hej! Jag skulle vilja sticka denna tröja i Puna men jag förstår inte riktigt hur mycket garn jag ska köpa och vilken stickstorlek som gäller om jag vill byta till detta garn. Har ni möjlighet att hjälpa mig med det?
26.11.2024 - 10:23DROPS Design answered:
Hej Hanna. DROPS Puna är dessvärre för tunt att sticka med till detta mönster, eftersom du inte kommer få stickfastheten/måtten att stämma. Det lättaste är att hitta ett annan mönster i garngrupp B som Puna tillhör och sticka efter det istället. Mvh DROPS Design
27.11.2024 - 13:21
![]() Sophie wrote:
Sophie wrote:
Bonjours je ne comprend pas les aiguille 8 snow ses quoi et aussi je peux savoir le nom du point de fantaisie et comment on le fait je ne comprend pas et est ce que je peux tricoter le dos et le devant ensemble sans faire de couture ? Si oui quel serait les etaple a faire ? Pour 2xl svp si possible Merci
08.08.2023 - 12:42DROPS Design answered:
Bonjour Sophie, Snow est le nom de la laine utilisée pour tricoter ce pull (cf nuancier); les aiguilles 8, la taille des aiguilles utilisées pour une tension de 11 m x 15 rangs = 10 x 10 cm; je ne connais pas le nom du point, désolée, tricotez A.1 ainsi, R1 (sur l'endroit): tout à l'endroit, R2 (sur l'envers): (1 m end, 1 m env), répétez de (à). Vous pouvez tricoter en allers et retours sur aiguilles droites - retrouvez plus d'infos ici. Bon tricot!
08.08.2023 - 16:16
![]() Elisabeth wrote:
Elisabeth wrote:
Har en fråga om mönstret. Är detta rätt? Sett från rätsidan, varv 1: alla maskor är räta. Sett från rätsidan , varv 2: 1 kantmaska sedan 1 maska rät, 1 maska avigt osv. Avslutning på varv 2 är en rät maska och sedan en kantmaska.
15.12.2022 - 18:10DROPS Design answered:
Hej Elisabeth. Ja det stämmer (den första och sista rätmaskan på varv 1 är då kantmaskor). Mvh DROPS Design
16.12.2022 - 13:46
![]() Elisabeth wrote:
Elisabeth wrote:
Hej Har en fråga om minskningen för hals på framstycket. 1. På höger sida, görs minskningen från avigsidan? 2. Görs minskningen innanför sista maskan? 3. Hur minskar man "2 maskor 1 gång" Tacksam för svar
05.12.2022 - 14:00DROPS Design answered:
Hei Elisabeth. Vi har forandret FELLETIPS til bare å gjelde ermhull, ikke halskant. Da blir det mer riktig. mvh DROPS Design
13.12.2022 - 08:41
![]() Mehwish wrote:
Mehwish wrote:
There is no video for this ridge stitch . i am completly lost
27.07.2022 - 21:31DROPS Design answered:
Dear Mehwish, ridge = work 2 knitted rows (all stitches are knitted). Where do you have problems working it? Or do you mean rib stitch?
31.07.2022 - 18:24
![]() Ghg wrote:
Ghg wrote:
“ Når arb måler 41-42-43-44 cm lukkes der 3 m af i hver side til ærmegab” lukkes der af på indersiden af kantmasken eller lukkes denne af?
26.02.2022 - 11:43
|
|||||||
Silverwood#silverwoodsweater |
|||||||
|
|
|||||||
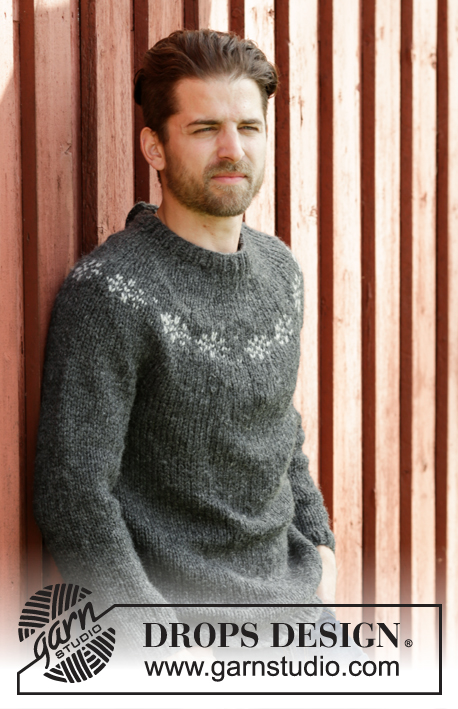
Knitted DROPS men’s jumper with textured pattern and neck in rib in Snow. Size: S - XXL.
DROPS 174-23 |
|||||||
|
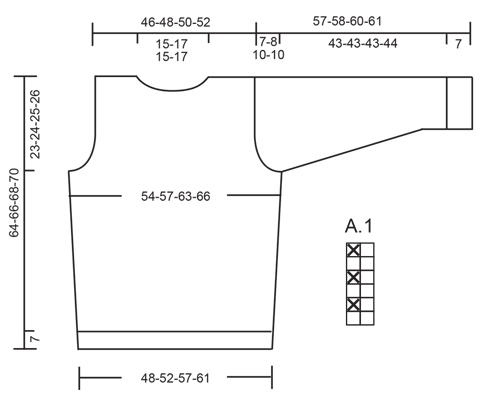
GARTER ST (back and forth): K all rows. 1 ridge = 2 rows K. PATTERN: See diagram A.1. The diagram shows all rows in pattern seen from RS. 1st row in diagram = RS. INCREASE TIP: All inc are done from RS. Inc 1 st by making a YO. On next row work YO twisted to avoid holes. DECREASE TIP (applies to armholes): Dec inside 1 edge st in garter st. All dec are done from RS! Dec as follows before 1 edge st: K 2 tog. Dec after 1 edge st as follows: Slip 1 st as if to K, K 1, psso. NOTE: On next row (= from WS) always work st inside edge st P (to get 1 K inside edge st at assembly). ---------------------------------------------------------- BACK PIECE: Worked back and forth on circular needle to make room for all the sts. Cast on 56-59-65-71 sts (incl 1 edge st in each side) on circular needle size 8 mm with Snow. Work rib as follows: 1 edge st in GARTER ST - see explanation above, P 0-3-3-3, * K 3, P 3 *, repeat from *-* until 1 st remains and finish with 1 edge st in garter st. Continue rib like this until piece measures 7 cm. Work 1 ridge AT THE SAME TIME adjust no of sts to 55-59-65-69 on first row. Now work A.1, finish with 1st st in A.1 and 1 edge st in garter st in each side. REMEMBER THE KNITTING TENSION When piece measures 12 cm, inc 1 st inside 1 edge st in each side - READ INCREASE TIP! Inc like this every 11th cm 3 times in total – work the inc sts in pattern = 61-65-71-75 sts. When piece measures 41-42-43-44 cm, cast off 3 sts in each side for armhole. Now dec for armholes as follows - READ DECREASE TIP: Cast off 1 st on every other row a total of 2-3-5-6 times = 51-53-55-57 sts. When piece measures 62-64-66-68 cm, cast off the middle 15-17-15-17 sts for neck and finish each shoulder separately. Then cast off 1 st on next row from neck = 17-17-19-19 sts remain on shoulder. Cast off when piece measures 64-66-68-70 cm. Work the other shoulder. FRONT PIECE: Cast on as on back piece and work rib as follows: 1 edge st in garter st, * K 3, P 3 *, repeat from *-* until 1-4-4-4 sts remain, K 0-3-3-3 and finish with 1 edge st in garter st. Then adjust no of sts as on back piece before continuing with A.1 and inc in each side. Cast off for armholes as on back piece and continue until piece measures 57-59-60-62 cm. Now slip the middle 9-11-9-11 sts on a stitch holder for neck and finish each shoulder separately. Continue to cast off for neck at beg of every row from neck as follows: Cast off 2 sts 1 time and 1 st 2 times = 17-17-19-19 sts remain on shoulder. Cast off when piece measures 64-66-68-70 cm. Work the other shoulder. SLEEVE: Worked back and forth on circular needle. Cast on 26-26-32-32 sts (incl 1 edge st in each side) on circular needle size 8 mm with Snow. Work rib K 3/P 3 with 1 edge st in garter st for 7 cm. Work 1 ridge AT THE SAME TIME adjust no of sts to 28-28-30-30 on first row. Continue with A.1 with 1 edge st in garter st in each side. When piece measures 12-14-14-13 cm, inc 1 st inside 1 edge st in each side. Inc like this every 3½-3-3-3 cm 11-12-12-13 times in total - work the inc sts in pattern = 50-52-54-56 sts. When sleeve measures 50-50-50-51 cm, cast off for sleeve cap at beg of row in each side as follows: 3 sts 1 time, then cast off 2 sts at beg of row in each side until piece measures 56-57-59-60 cm, then cast off 3 sts at beg of the next 2 rows before casting off all sts, piece measures approx. 57-58-60-61 cm. ASSEMBLY: Sew the shoulder seams. NECK: Worked in the round on circular needle. Pick up from RS approx. 60 to 72 sts around the neck (incl sts on stitch holder at the front) on short circular needle size 8 mm. P 1 round while adjusting the no of sts to 60-66-66-72. K 1 round. Then work rib = K 3/P 3. When neck measures 7 cm, inc all P 3 to P 4 = 70-77-77-84 sts. When neck measures 14 cm, dec all P 4 to P 3 = 60-66-66-72 sts. Continue with rib until neck measures 21 cm. LOOSELY cast off sts with K over K and P over P - NOTE: To make the cast-off edge more elastic make 1 YO after approx. every 6th st while casting off (cast off YOs as sts). ASSEMBLY: Sew in the sleeves inside 1 edge st. Sew sleeve and side seams in one inside 1 edge st in garter st. |
|||||||
Diagram explanations |
|||||||
|
|||||||
 |
|||||||
Have you finished this pattern?Tag your pictures with #dropspattern #silverwoodsweater or submit them to the #dropsfan gallery. Do you need help with this pattern?You'll find 29 tutorial videos, a Comments/Questions area and more by visiting the pattern on garnstudio.com. © 1982-2026 DROPS Design A/S. We reserve all rights. This document, including all its sub-sections, has copyrights. Read more about what you can do with our patterns at the bottom of each pattern on our site. |
|||||||


With over 40 years in knitting and crochet design, DROPS Design offers one of the most extensive collections of free patterns on the internet - translated to 17 languages. As of today we count 324 catalogues and 12290 patterns translated into English (UK/cm).
We work hard to bring you the best knitting and crochet have to offer, inspiration and advice as well as great quality yarns at incredible prices! Would you like to use our patterns for other than personal use? You can read what you are allowed to do in the Copyright text at the bottom of all our patterns. Happy crafting!
Post a comment to pattern DROPS 174-23
We would love to hear what you have to say about this pattern!
If you want to leave a question, please make sure you select the correct category in the form below, to speed up the answering process. Required fields are marked *.