
Popular categories
Looking for a yarn?


Comments / Questions (46)
![]() Audrey ZIMMERMANN wrote:
Audrey ZIMMERMANN wrote:
Bonjour, il y a un détail que je n'arrive à comprendre Selon les explications, je démarre mon travail en cotes mousse puis je continue en faisant les différents diagrammes, or sur la photo les torsades sont plus hautes. Ne devrais je pas démarrer A4 vers 30cm de hauteur?
04.10.2018 - 08:46DROPS Design answered:
Bonjour Mme Zimmermann, après les côtes mousse, on tricote le 1er rang de A.1, A.2 (on augmente le nombre de mailles dans A.2 pour les torsades de A.4) et A.3, puis le rang suivant sur l'envers (= 2ème rang de A.1 et A.3, 2ème et dernier rang de A.2). Au rang suivant, on tricote A.1, A.4 au-dessus de A.2 et A.3 comme avant. Bon tricot!
04.10.2018 - 10:27
![]() Carmen Couture wrote:
Carmen Couture wrote:
Bonjour, que signifie la case noire qui indique "pas de maille, sauter cette case", que dois-je faire à cet endroit. Merci!
23.08.2018 - 03:15DROPS Design answered:
Bonjour Carmen. La case noire représente une maille qui a été diminuée avant. Vous devez sauter cette case et tricotez la première maille sur l’aiguille gauche selon le symbole suivant. En ce cas, si vous êtes sur l’endroit vous travaillez la maille à l’envers ; sur l’envers, vous travaillez la maille à l’endroit. Bon tricot !
23.08.2018 - 08:45
![]() Claudine Gigaud wrote:
Claudine Gigaud wrote:
Modèle magnifique. Je lai fait pour ma fille de 11 ans.
12.05.2018 - 11:23
![]() Petra Stammkötter wrote:
Petra Stammkötter wrote:
Hallo die Frage hat sich erledigt, ich hatte ein Brett vor dem Kopf. Trotzdem vielen Dank :-)
28.12.2017 - 18:03
![]() Petra Stammkötter wrote:
Petra Stammkötter wrote:
Hallo, die MP stimmt soweit. Allerdings bin ich nun beim Muster A4 bei R29 angelangt und habe 15 cm in der Höhe erreicht. Sind im Diagramm nur Hin-R eingezeichnet oder auch die RR? Ich würde das Teil gerne stricken, aber so funktioniert es scheinbar nicht. Vielleicht können Sie mir weiter helfen. Vielen Dank.
27.12.2017 - 14:49DROPS Design answered:
Liebe Frau Stammkötter, Diagram zeigt alle Reihen, dh die Hin- sowie die Rückreihen. Viel Spaß beim stricken!
02.01.2018 - 08:53
![]() Caroline wrote:
Caroline wrote:
Ik begrijp "geen steek, sla dit vierkant over" niet... worden deze 2 steken dan afgenomen en niet gebreid?
19.08.2017 - 09:50DROPS Design answered:
Hoi Caroline, Nee, je neemt de steken niet af maar je gaat gewoon verder met de steken die volgen op een zwart blokje. (Later in het telpatroon zijn er meerderingen, waardoor die blokjes weer opgevuld worden met steken)
20.08.2017 - 22:14
![]() Grand Véronique wrote:
Grand Véronique wrote:
Bonjour, je débute sur vos diagrammes et j'ai du mal , pouvez-vous me conseiller. Pour le A1 le diagramme montre t'il que les rangs aller ?
11.08.2017 - 14:21DROPS Design answered:
Bonjour Mme Grand, les diagrammes montrent tous les rangs du point fantaisie, vus sur l'endroit. Commencez en bas à droite du diagramme et lisez les rangs sur l'endroit de droite à gauche, et les rangs sur l'envers de gauche à droite. 1 case = 1 m x 1 rang. Bon tricot!
11.08.2017 - 14:36
![]() Nancy wrote:
Nancy wrote:
Ik ga beginnen aan de hoge col,maar wat bedoelen jullie met 2r,om en om en na 18 cm met de overgebleven delen 2 r totv3 r?
07.03.2017 - 21:18DROPS Design answered:
Hoi Nancy. Je breit boordsteek 2 r, 2 av. Je meerdert dan elke tweede 2 r naar 3 r (dus je hebt 2 r, 2 av, 3 r, 2 av, 2 r enzovoort). En bij 18 cm meerder je de overgebleven 2 r naar 3 r.
08.03.2017 - 13:47
![]() Birgitte Linnet wrote:
Birgitte Linnet wrote:
Jeg forstår ikke hvad jeg skal i diagram A4, hvor der står ingen m, spring over denne rude!
01.03.2017 - 21:48DROPS Design answered:
Hej Birgitte, du hopper bare over til den anden side, det vil sige du strikke 12 vrangmasker på første pind imellem snoningerne. Bare følg diagrammet - god fornøjelse!
02.03.2017 - 09:15
![]() Ann Andersson wrote:
Ann Andersson wrote:
Är det fel i diagramförklaringen, de två sista flätorna ska gå åt olika håll men det står likadan förklaring under dom!
07.02.2017 - 12:40DROPS Design answered:
Hej Ann. Det er en fejl. Vi skal faa det rettet hurtigt. Se evt den rette oversaettelse her paa den norske opskrift
07.02.2017 - 13:32
|
||||||||||||||||||||||||||||||||||
Alanna#alannaponcho |
||||||||||||||||||||||||||||||||||
|
|
||||||||||||||||||||||||||||||||||
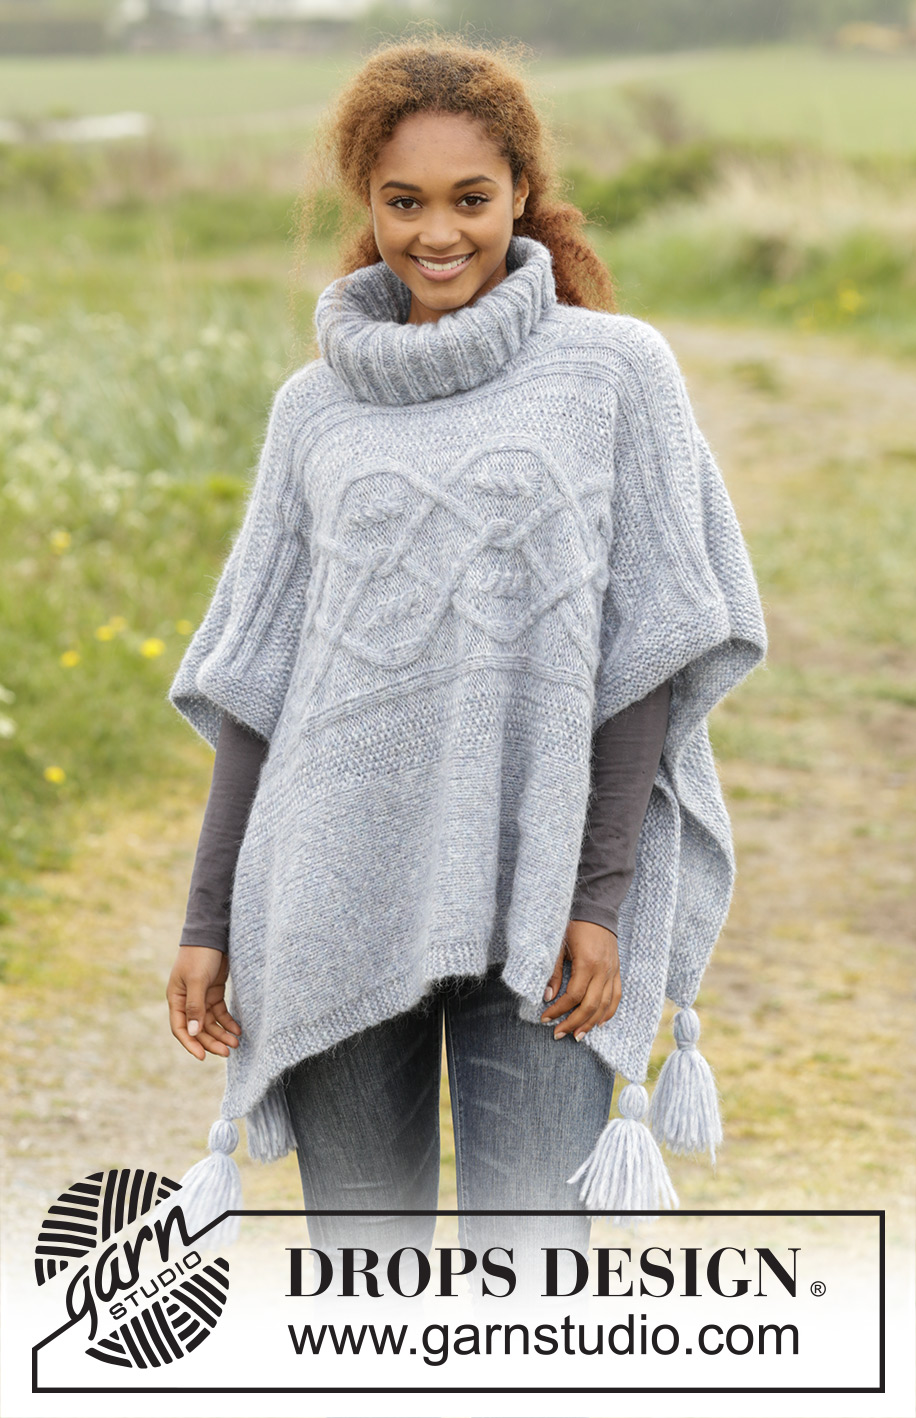
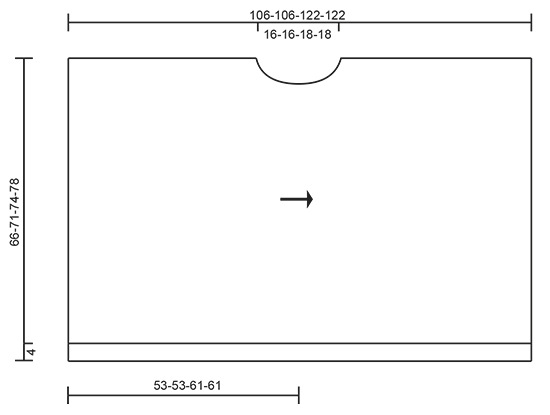
Knitted DROPS poncho with cables, turtle neck and tassels in “Air”. Size: S - XXXL.
DROPS 171-49 |
||||||||||||||||||||||||||||||||||
|
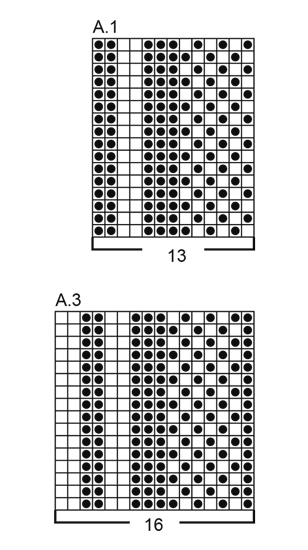
GARTER ST (back and forth): K all rows. 1 ridge = 2 rows K. PATTERN: See diagrams A.1 to A.4. The diagrams show all rows in pattern seen from RS. ---------------------------------------------------------- PONCHO: Piece is worked sideways and front and back on circular needle in 2 parts. FRONT PIECE: Cast on 112-120-126-132 sts on circular needle size 4.5 mm with Air. Work 6 ridges in GARTER ST - see explanation above. Switch to circular needle size 5 mm and work next row from RS as follows: 6 edge st in garter st, 45-53-59-65 sts in stocking st, A.1 (= 13 sts), A.2 (= 30 sts), A.3 (= 16 sts) and 2 edge sts in garter st. Work back from WS the same way = 118-126-132-138 sts. Work next row as follows from RS: 6 edge sts in garter st, 45-53-59-65 sts in stocking st, continue A.1 over the next 13 sts, work A.4 over the next 36 sts, continue A.3 over the next 16 sts and finish with 2 edge sts in garter st. Continue pattern like this. REMEMBER THE KNITTING TENSION When piece measures approx. 45-45-52-52 cm, insert 1 marker at the end of row from RS, i.e. if the knitting tension is kept vertically, there should now remain 8 cm in size S/M + L/XL before finishing with one whole repetition of A.4 vertically and 9 cm in size XXL + XXXL before finishing with half a repetition of A.4 vertically – i.e. 8-8-9-9 cm remain before piece measures 53-53-61-61 cm (= mid front). Now cast off for neck at beg of every row from WS as follows: Cast off 3 sts 1 time, 2 sts 2 times and 1 st 3 times = 108-116-122-128 sts. Continue pattern as before with 1 edge st in garter st towards the neck until piece measures 8-8-9-9 cm from marker and insert 1 new marker (= mid front). Work until piece measures 2-2-3-3 cm from marker mid front. Now cast on sts for neck at the end of every row from RS as follows: Cast on 1 st 3 times, 2 sts 2 times and 3 sts 1 time = 118-126-132-138 sts on needle (piece measures now approx. 16-16-18-18 cm from first marker (= neck). Continue pattern over all sts as before until piece measures approx. 102-102-118-118 cm – finish after one whole repetition of A.4 vertically (= 6-6-7-7 repetitions in total with A.4 vertically). Work 1 row from RS as before but work the 6 sts in each cable K tog two by two = 112-120-126-132 sts remain on needle. Switch to circular needle size 4.5 mm, work 6 ridges and cast off with K from RS (make sure to avoid a tight cast-off edge). BACK PIECE: Cast on and work as front piece. When casting off for neck, this is done the same way but cast off like this: Cast off 1 sts 1 time and 2 sts 1 time = 115-123-129-135 sts on needle. When 6-6-7-7 cm have been worked from marker mid back, cast on new sts for neck the same way as on front piece but cast on as follows: Cast on 2 sts 1 time and 1 sts 1 time = 118-126-132-138 sts on needle. Then continue the same way as on front piece. ASSEMBLY: Sew the 2 parts tog on the shoulder - sew edge to edge in outer loops of edge sts so that the seam is flat. Sew if needed a little stitch in each side approx. 30-35 cm from shoulder and down. TURTLE NECK: Pick up from RS approx. 68 to 78 sts around the neck on a short circular needle size 4.5 mm. K 1 round while inc evenly to 96-96-104-112 sts (divisible by 4). Work rib in the round (= K 2/P 2). When rib measures 10 cm, inc every other 2 K sts to 3 K sts = 108-108-117-126 sts. When rib measures 18 cm, inc the remaining 2 K sts to 3 K sts = 120-120-130-140 sts. Continue in the round with K 3/P 2 until neck measures approx. 20-22-22-24 cm and loosely cast off with K over K and P over P. Fold the neck down. TASSEL: Use a cardboard piece or similar measuring approx. 15 cm. Twine the yarn 25 times around this (or do desired thickness). Use another strand to fasten tightly around the strands in one end. Use another strand and thread through loop now made at the top of tassel and use strand to fasten the tassel to the poncho. Cut the strands in the other end of tassel. Fasten one tassel in each corner on poncho (= 4 tassels). |
||||||||||||||||||||||||||||||||||
Diagram explanations |
||||||||||||||||||||||||||||||||||
|
||||||||||||||||||||||||||||||||||
 |
||||||||||||||||||||||||||||||||||
 |
||||||||||||||||||||||||||||||||||
 |
||||||||||||||||||||||||||||||||||
Have you finished this pattern?Tag your pictures with #dropspattern #alannaponcho or submit them to the #dropsfan gallery. Do you need help with this pattern?You'll find 24 tutorial videos, a Comments/Questions area and more by visiting the pattern on garnstudio.com. © 1982-2026 DROPS Design A/S. We reserve all rights. This document, including all its sub-sections, has copyrights. Read more about what you can do with our patterns at the bottom of each pattern on our site. |
||||||||||||||||||||||||||||||||||


With over 40 years in knitting and crochet design, DROPS Design offers one of the most extensive collections of free patterns on the internet - translated to 17 languages. As of today we count 324 catalogues and 12291 patterns translated into English (UK/cm).
We work hard to bring you the best knitting and crochet have to offer, inspiration and advice as well as great quality yarns at incredible prices! Would you like to use our patterns for other than personal use? You can read what you are allowed to do in the Copyright text at the bottom of all our patterns. Happy crafting!
Post a comment to pattern DROPS 171-49
We would love to hear what you have to say about this pattern!
If you want to leave a question, please make sure you select the correct category in the form below, to speed up the answering process. Required fields are marked *.