
Popular categories
Looking for a yarn?


Comments / Questions (24)
![]() Joan Brickley wrote:
Joan Brickley wrote:
Square #2, 3rd row: (there are 45 sets) A combination of "A2a,A2b 9 times in total width would =99 plus A2c of4 its would total 103. How do I configure this 3rd row?
02.05.2025 - 00:17DROPS Design answered:
Dear Mrs Brickley, the number of stitches in diagrams A.2 is not supposed to increase, you work A.2a over 5 sts, then repeat 9 times the 4 sts A.2b (36 sts) and finish with the 4 sts A.2c= 5+36+4=45 sts. From the right side read diagrams from the right towards the left and from the wrong side from the left towards the right. Happy knitting!
02.05.2025 - 09:03
![]() Silvie wrote:
Silvie wrote:
Hello, this is not what I meant. Not the ridges on the sides where you sew it together, I mean the knitting on the top of sq 1 (and then bottom sq2) - it just adds up to 2 ridges, but there are 4 on the close picture, there is no sewing, you just continue knitting. Can you please look at my question again? Thank you very much
19.06.2024 - 11:53DROPS Design answered:
Dear Silvie, you should have 2 ridges at the end of 1st square (remember to finish each square with K 1 row from WS), then start 2nd square with 1 ridge end end with K1from wrong side - see description under SQUARES:,so that you will have 4 ridges. Happy knitting!
19.06.2024 - 16:18
![]() Silvie wrote:
Silvie wrote:
Hello, I just finished square 1 and I should start with sq 2. I finish with K1 on RS and K1 on WS. That is one ridge from RS. Then I knit K1 on RS and K1 on WS (the part between the squares). That is second ridge from RS. I start sq 2 with K1 on RS (adding 7 sts) and P1 on WS. At the end I have 2 ridges from RS before starting the pattern. But if I look at the photo of the pattern, I see 4 ridges between sq1 and sq2. Where the other 2 came from? Thanks.
19.06.2024 - 09:53DROPS Design answered:
Dear Silvie, the squares are sewn together and the garter stitch riges add up at the sides of the seam. Happy Knitting!
19.06.2024 - 10:15
![]() Evertdina wrote:
Evertdina wrote:
Ik heb hem pas gemaakt in twee kleuren. Prima te volgen patroon. Al heb ik wel wat aanpassingen gemaakt. Jammer dat ik geen foto kan plaatsen met het eindresultaat.
26.04.2023 - 13:49
![]() Brigitte wrote:
Brigitte wrote:
Da hat mir doch jemand Wolle geschenkt, mit der ich erst nichts anfangen konnte und dann sah ich diese Anleitung. Ich stricke die Quadrate nicht einzeln, sondern stricke sie direkt zusammen. Es sieht einfach nur toll aus. Die Maße passen absolut. Ich bin total begeistert. Werde auch Vorder- und Rückenteil in einem Teil stricken, so muß ich nicht soviel vernähen ;) Danke für die Anleitung zu diesem wunderschönen Poncho.
09.09.2022 - 13:44
![]() Valérie wrote:
Valérie wrote:
Bonjour, Si j'ai bien compris, on doit tricoter 18 carrés individuellement, puis les coudre pour former d'abord des bandes puis coudre les bandes entre elles pour faire le poncho ? Et alors pourquoi une aiguille circulaire pour les carrés ? Je suis perdue, désolée...
30.08.2022 - 15:21DROPS Design answered:
Bonjour Valérie, pas exactement, vous tricotez des bandes de carrés (cf flèche au milieu du schéma) - cf BANDES; vous allez tricoter 3 bandes pour le devant et autant pour le dos et les assembler entre elles. On tricote ici sur aiguille circulaire en allers et retours, habitude nordique; le col et les manches sont tricotés en rond, sur la petite aiguille circulaire. Bon tricot!
30.08.2022 - 16:07
![]() Patti Fisher wrote:
Patti Fisher wrote:
Hi . Am starting the sleeve. Is it sewn together into a circle before attached or left open at the bottom?
23.10.2021 - 22:07DROPS Design answered:
Dear Patti, the sleeve is knitted ON THE ROUND. It is not open, but you will not need to sew it, into a circle as it is already a circle. Happy Stitching!
24.10.2021 - 03:11
![]() Diane Caron wrote:
Diane Caron wrote:
Does anyone know how to knit square 1 flat and achieve the cable. Very confused here.
13.02.2021 - 17:57
![]() Diane Caron wrote:
Diane Caron wrote:
How is it possible to net square 1 flat and still achieve the cable?
13.02.2021 - 17:56DROPS Design answered:
Dear Mrs Caron, at the end of square, you will first decrease evenly 12 stitches then knit2 rows over the 38 stitches. The decreases should compensate the stitches incraesed at the beginning for the cables, and that way you should have same height at the top as at the bottom. Happy knitting!
15.02.2021 - 08:24
![]() Ann-Kristin wrote:
Ann-Kristin wrote:
Hvorfor skal man legge opp 38 masker for så å ta ut til 50, så felle til 38på rute 1, for så øke til 45 igjen på rute 2,og så felle til 38,for så å legge ut til 56 og felle til 38 på rute 3.forstår ikke alle disse inn og ut leggene. Skal ikke rutene være kvadratiske?
27.06.2019 - 15:05DROPS Design answered:
Hei Ann-Kristin. Jo, rutene skal være kvadratiske og like store. Fordi det er ulike strukturer og mønster på de ulike rutene må du legge til/trekke fra masker for å få dem til å bli like store. En flette trekker seg sammen, og trenger derfor fler masker for å oppnå samme størrelse som feks glattstrikk. Det er derfor vanlig å øke rett før du begynner å strikke flette, og felle det samme antall masker når fletten er ferdig. Andre strukturer med rett og vrang oppfører seg også ulikt i forhold til både fletter og glattstrikk. Det er derfor det økes og felles ulikt for hver rute. God fornøyelse
28.06.2019 - 14:42
|
|||||||||||||||||||
Comfort Chronicles#comfortchroniclesponcho |
|||||||||||||||||||
|
|
|||||||||||||||||||
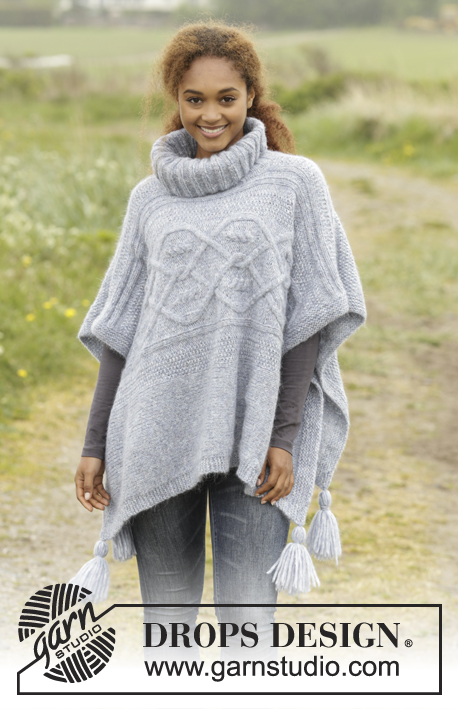
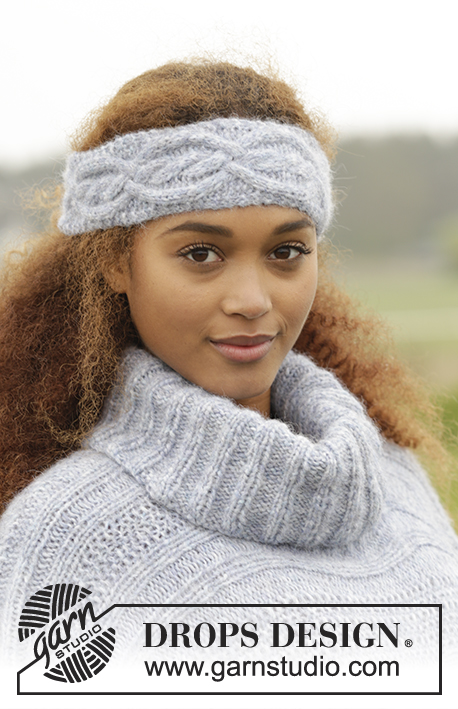
Knitted DROPS poncho with sleeves, vents, squares in cables and textured pattern in ”Nepal”. One-size
DROPS 172-22 |
|||||||||||||||||||
|
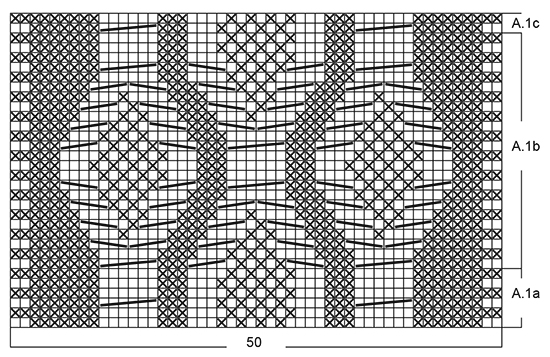
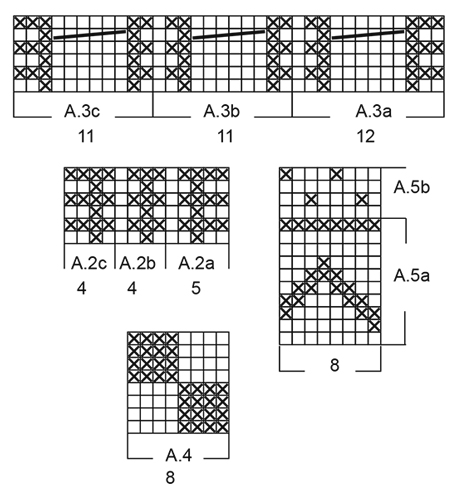
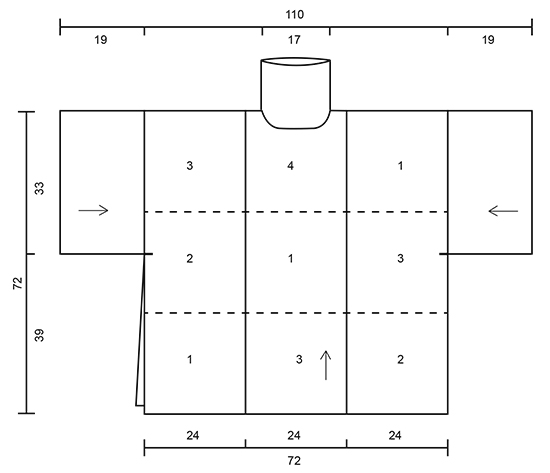
GARTER ST (back and forth): K all rows. 1 ridge = 2 rows K. GARTER ST (worked in the round): 1 ridge = 2 rounds. * K 1 round and P 1 round *, repeat from *-*. PATTERN: See diagrams A.1 to A.5. The diagrams show all rows in pattern seen from RS. STRIPS: Strip 1: Square 1, 2, and 3. Strip 2: Square 3, 1, and 4 (= neck dec). Strip 3: Square 2, 3, and 1. SQUARES: First square on a strip: Cast on 38 sts on circular needle size 5 mm with Nepal. K 1 row from RS and K 1 row from WS. Work square as explained. Finish with 1 row K from WS. Second square on a strip: K 1 row from RS and K 1 row from WS. Work square as explained. Finish with 1 row K from WS. Last square on a strip: K 1 row from RS and K 1 row from WS. Work square as explained. Finish with K 1 row from WS and K 1 row from RS. Cast off from WS with K over all sts. ---------------------------------------------------------- PONCHO: Work front and back piece as 2 equal parts, except square 4 which has dec for neck. For each part work 3 strips with 3 different squares. There are 4 different squares in total. Sew strips tog across. READ STRIPS and SQUARES, see chart. Work strips back and forth on circular needle. REMEMBER THE KNITTING TENSION SQUARE 1: K 1 row from RS while AT THE SAME TIME inc 12 sts evenly (do not inc the 2 outermost sts in each side) = 50 sts. P 1 row from WS. Work A.1a. Then work A.1b 2 times in total vertically, finish with A.1c. Then K 1 row from RS while AT THE SAME TIME dec 12 sts evenly (do not dec the 2 outermost sts in each side) = 38 sts. K 1 row from WS and K 1 row from RS. SQUARE 2: K 1 row from RS while AT THE SAME TIME inc 7 sts evenly (do not inc the 2 outermost sts in each side) = 45 sts. P 1 row from WS. Then work A.2a, A.2b 9 times in total in width, finish with A.2c. Repeat A.2 upwards until square measures approx. 1 cm less than the finished SQUARE 1 (adjust after row from WS). Now K 1 row from RS while AT THE SAME TIME dec 7 sts evenly (do not dec the 2 outermost sts in each side) = 38 sts. K 1 row from WS and K 1 row from RS. SQUARE 3: K 1 row from RS while AT THE SAME TIME inc 18 sts evenly (do not inc the 2 outermost sts in each side) = 56 sts. P 1 row from WS. Then work A.3a, A.3b 3 times in total in width, finish with A.3c. Continue like this and repeat A.3 upwards until square measures approx. 1 cm less than the finished SQUARE 1 (adjust so that 3 rows have been worked after last cable). Now K 1 row from RS while AT THE SAME TIME dec 18 sts evenly (do not dec the 2 outermost sts in each side) = 38 sts. K 1 row from WS and K 1 row from RS. SQUARE 4 - BACK PIECE: K 1 row from RS while AT THE SAME TIME inc 2 sts evenly (do not inc the 2 outermost sts in each side) = 40 sts. P 1 row from WS. Then work A.4 with 2 sts in GARTER ST - see explanation above - in each side. Repeat A.4 in width and vertically - AT THE SAME TIME when piece measures 20 cm, cast off for neck as follows, beg from RS: Work the first 7 sts, cast off the next 26 sts, work the remaining 7 sts as before. NOTE: 1 edge st towards the neck in garter st. Then finish each shoulder separately as follows: On next row from neck cast off 1 st = 6 sts remain for shoulder. Continue like this until square measures approx. 1 cm less than the finished SQUARE 1 (adjust so that one half or whole repetition vertically). Now K 1 row from RS, K 1 row from WS and K 1 row from RS. When cast off is done, work the other shoulder the same way. SQUARE 4 - FRONT PIECE: K 1 row from RS while AT THE SAME TIME inc 2 sts evenly (do not inc the 2 outermost sts in each side) = 40 sts. P 1 row from WS. Then work A.4 with 2 sts in GARTER ST - see explanation above - in each side. Repeat A.4 in width and vertically - AT THE SAME TIME when piece measures 18 cm (adjust after one whole or half repetition vertically), cast off for neck as follows, beg from RS: Work the first 12 sts in pattern as before, slip the next 16 sts on a stitch holder for neck, and work the remaining 12 sts as before. Then to cast off for neck on every row from neck as follows: 3 sts 1 time, 2 sts 1 time and 1 st 1 time = 6 sts remain for shoulder. Continue like this until square measures approx. 1 cm less than the finished SQUARE 1 (and adjust after SQUARE 4 on back piece). Now K 1 row from RS, K 1 row from WS and K 1 row from RS. When cast off is done, work the other shoulder the same way. ASSEMBLY: Sew strips tog across as shown on chart - sew in outer loops of edge sts to avoid a chunky seam. Then sew the shoulder seams. NECK: Worked in the round on a short circular needle. Beg from RS with Nepal and circular needle size 5 mm mid on top of one shoulder and pick up 96 sts (incl the 16 sts from stitch holder on front piece). P 1 round. Now work in GARTER ST - see explanation above. Continue like this until neck measures 13 cm. Cast off with * K 1, P 1 *, repeat from *-* until all sts are cast off (this is done to avoid a tight cast-off edge). Fold the neck outwards. SLEEVE: Worked in the round on a short circular needle. Cast on 106 sts on circular needle size 5 mm with Nepal. Work 4 ridges. K 1 round while AT THE SAME TIME inc 6 sts evenly = 112 sts. Then work A.5a over all sts (= 14 repetitions on round). When A.5a has been worked vertically, work A.5b. Then repeat A.5b vertically until piece measures 19 cm. Cast off. Work the other sleeve the same way. ASSEMBLY: Fasten sleeve approx. 33 cm down from shoulder, the remaining 39 cm (= vent). Fasten the other sleeve the same way. |
|||||||||||||||||||
Diagram explanations |
|||||||||||||||||||
|
|||||||||||||||||||
|
|||||||||||||||||||
|
|||||||||||||||||||
|
|||||||||||||||||||
Have you finished this pattern?Tag your pictures with #dropspattern #comfortchroniclesponcho or submit them to the #dropsfan gallery. Do you need help with this pattern?You'll find 20 tutorial videos, a Comments/Questions area and more by visiting the pattern on garnstudio.com. © 1982-2025 DROPS Design A/S. We reserve all rights. This document, including all its sub-sections, has copyrights. Read more about what you can do with our patterns at the bottom of each pattern on our site. |
|||||||||||||||||||


With over 40 years in knitting and crochet design, DROPS Design offers one of the most extensive collections of free patterns on the internet - translated to 17 languages. As of today we count 314 catalogues and 11822 patterns translated into English (UK/cm).
We work hard to bring you the best knitting and crochet have to offer, inspiration and advice as well as great quality yarns at incredible prices! Would you like to use our patterns for other than personal use? You can read what you are allowed to do in the Copyright text at the bottom of all our patterns. Happy crafting!
Post a comment to pattern DROPS 172-22
We would love to hear what you have to say about this pattern!
If you want to leave a question, please make sure you select the correct category in the form below, to speed up the answering process. Required fields are marked *.