
Popular categories
Looking for a yarn?


Comments / Questions (63)
![]() Turi Borgersen wrote:
Turi Borgersen wrote:
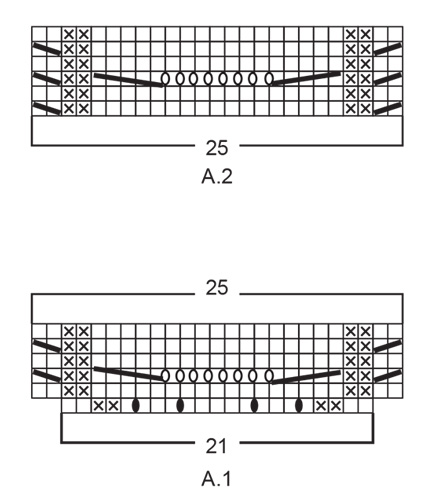
Skjønner ikke hvordan man kan følge oppskriften på 232-4 på mønster A. 1/A-2 uten at man øker til mer enn 21-25 m. Det står tegnet inn kast mellom 2 masker- da må det jo bli mange flere masker på raden🥴. På rad 3 er det tegnet inn kast mellom hver maske i midten. Hvordan gjøre det uten å øke…. Får ingenting til å stemme. Hva gjør jeg feil. Har holdt på kjempelenge. Er egentlig en dreven strikker.
08.03.2022 - 16:55
![]() Dominique Van Der Kaa wrote:
Dominique Van Der Kaa wrote:
Bonjour, Pour l'empiècement, le rang envers se tricote avec les 4 jetés du motif A1 torse. Les autres jetés (manche) sont-ils tricotés normalement à l'envers ?
19.02.2022 - 11:18DROPS Design answered:
Bonjour Mme Van Der Kaa, on parle ici en fait des jetés des manches, autrement dit, au rang suivant, tous les jetés vont être tricotés torse. Bon tricot!
21.02.2022 - 09:08
![]() Julia wrote:
Julia wrote:
Hi, first time making a cardigan and having troubles understanding the first increase in A1, row 3. Increase for RAGLAN by increasing 1 stitch before/afterA.1/A.2. does this mean I should increase before A1, on the sleeve, between the 2 A1 on the back, on the sleeve again, and finally after the last A1, having 8 increases? Thank you!
15.02.2022 - 20:58DROPS Design answered:
Dear Julia, depending on your size you will increase either 8 sts (body + sleeves) or only 4 sts (only on sleeve when increasing on body on every 4th row) - but at the beg you start increasing 8 sts on every 2nd row , this means you will work A.1, *make 1 YO, work the sts in A.1, make 1 YO*, and repeat from *-* on each A.1 = 8 sts increased on the row. Happy knitting!
16.02.2022 - 10:59
![]() Halina wrote:
Halina wrote:
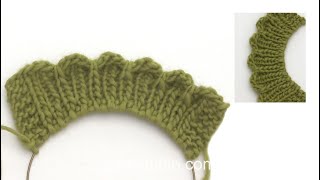
Niestety ale dostałam tylko link do wzoru ogólnego, nie dostałam instrukcji jak wykonać falujący brzeg
08.02.2022 - 12:50DROPS Design answered:
Witaj Halino, instrukcja pisemna jak wykonać falujący brzeg znajduje się we wzorze w części WYKOŃCZENIE DEKOLTU Z FALUJĄCYM BRZEGIEM. Link do filmu jak wykonać ten brzeg został wysłany wczoraj na twój email. Wyślę go raz jeszcze, ale tym razem z innego adresu. Nasz oficjalny film dotyczący tego brzegu jest już gotowy i dostępny TUTAJ. Pozdrawiamy!
08.02.2022 - 13:13
![]() Halina wrote:
Halina wrote:
Podaję swój email
07.02.2022 - 18:56DROPS Design answered:
Witam, link do filmu został wysłany. Pozdrawiam!
07.02.2022 - 20:48
![]() Halina Kasińska wrote:
Halina Kasińska wrote:
Moje pytanie dotyczyło: Czy jest gdzieś na stronie pokazane jak wykonać falujący brzeg. .Mam problem z poprawnym odczytaniem zapisanego wzoru.
07.02.2022 - 15:43DROPS Design answered:
Witaj Halino, tego typu falujący brzeg jak w tym konkretnym wzorze jeszcze nie jest nigdzie na stronie pokazany. Video może pojawić się, ale później. Na szybko nagrałam krótki filmik jak to zrobić i mogę Ci go przesłać :)
07.02.2022 - 16:28
![]() Isabelle wrote:
Isabelle wrote:
Hallo liebes Drops-Team, ich komme leider gar nicht mit der "gedrehten Anschlagkante" klar. Hierzu gibt es leider kein Video?! Ich muss die linke Masche dann rechts sticken und umgekehrt, oder? Vielen Dank für eine Antwort!
07.02.2022 - 12:26DROPS Design answered:
Liebe Isabelle, ein Video kommt bald - ich versuche etwas anders auszusprechen: stricken Sie 1 Masche links, 1 Masche rechts, 1 Masche links (fehlt in deutsch) dann sollen Sie die rechte Nadel rund unter die Arbeit (von vorne nach hinten, 1 Masche abheben, die Nadel rund unter die Arbeit aber dieses Mal von hinten nach vorne, die abgehobene Masche über die linke Nadel stellen und diese Masche stricken Sie jetzt rechts* - hoffentlich kann es Ihnen helfen. Viel Spaß beim stricken!
07.02.2022 - 15:49
![]() Halina wrote:
Halina wrote:
Czy jest gdzieś na stronie pokazane jak wykonać falujący brzeg. .Mam problem z poprawnym odczytaniem zapisanego wzoru. Halina
06.02.2022 - 23:14DROPS Design answered:
Witaj Halino, jeszcze nie ma takiego filmu, zgłoszę taką potrzebę. W międzyczasie wyślę Ci krótki nagrany filmik, podaj tylko swój adres email. Pozdrawiamy!
07.02.2022 - 09:24
![]() Bea wrote:
Bea wrote:
Denna måste med! Älskar den redan!
18.01.2022 - 22:49
![]() Helena Mjöberg wrote:
Helena Mjöberg wrote:
Summerbreeze
15.01.2022 - 08:47
|
|||||||||||||||||||||||||
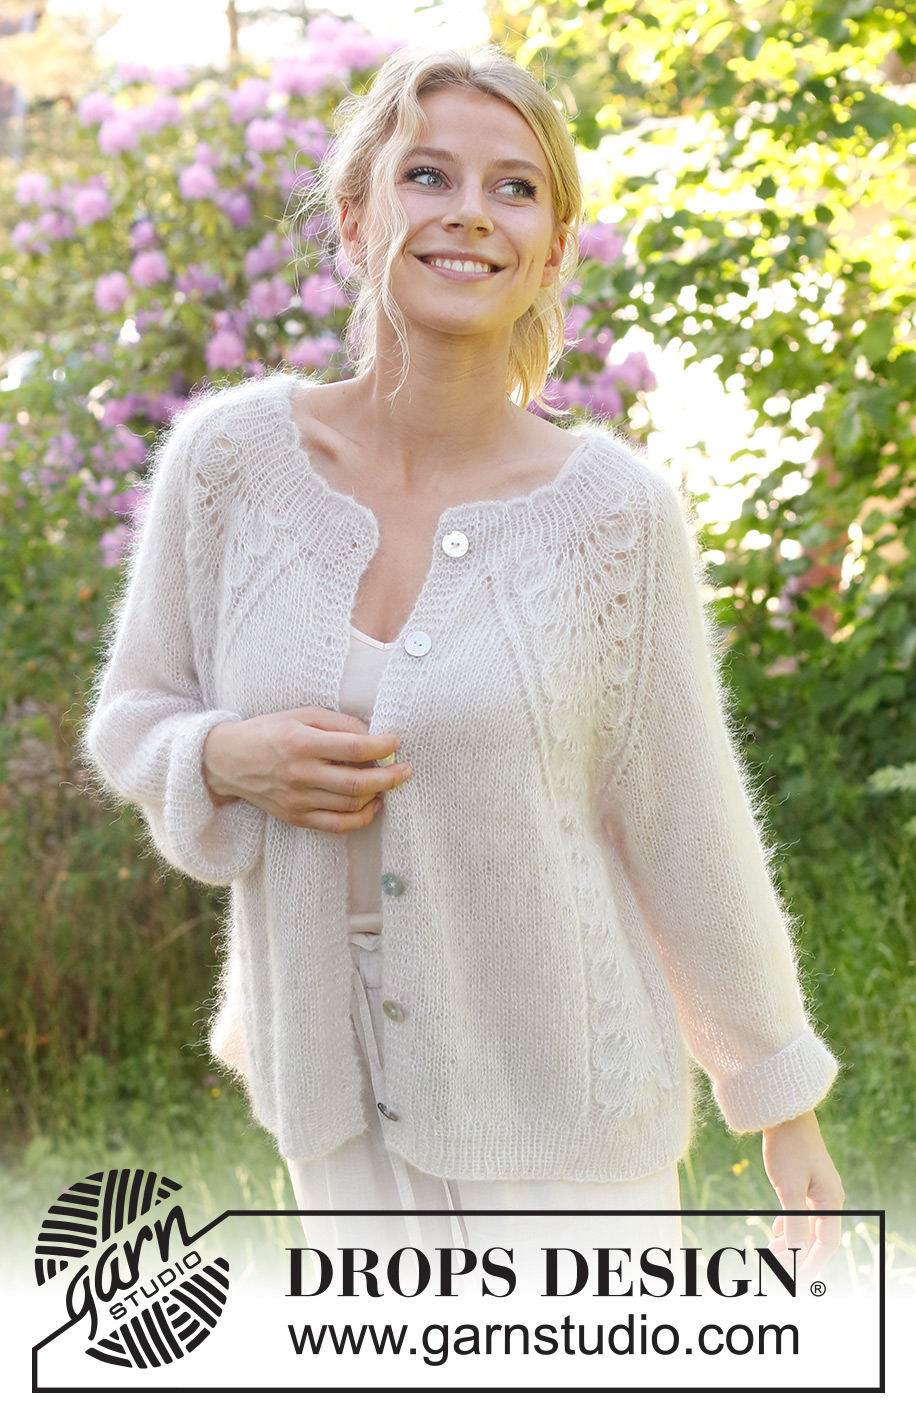
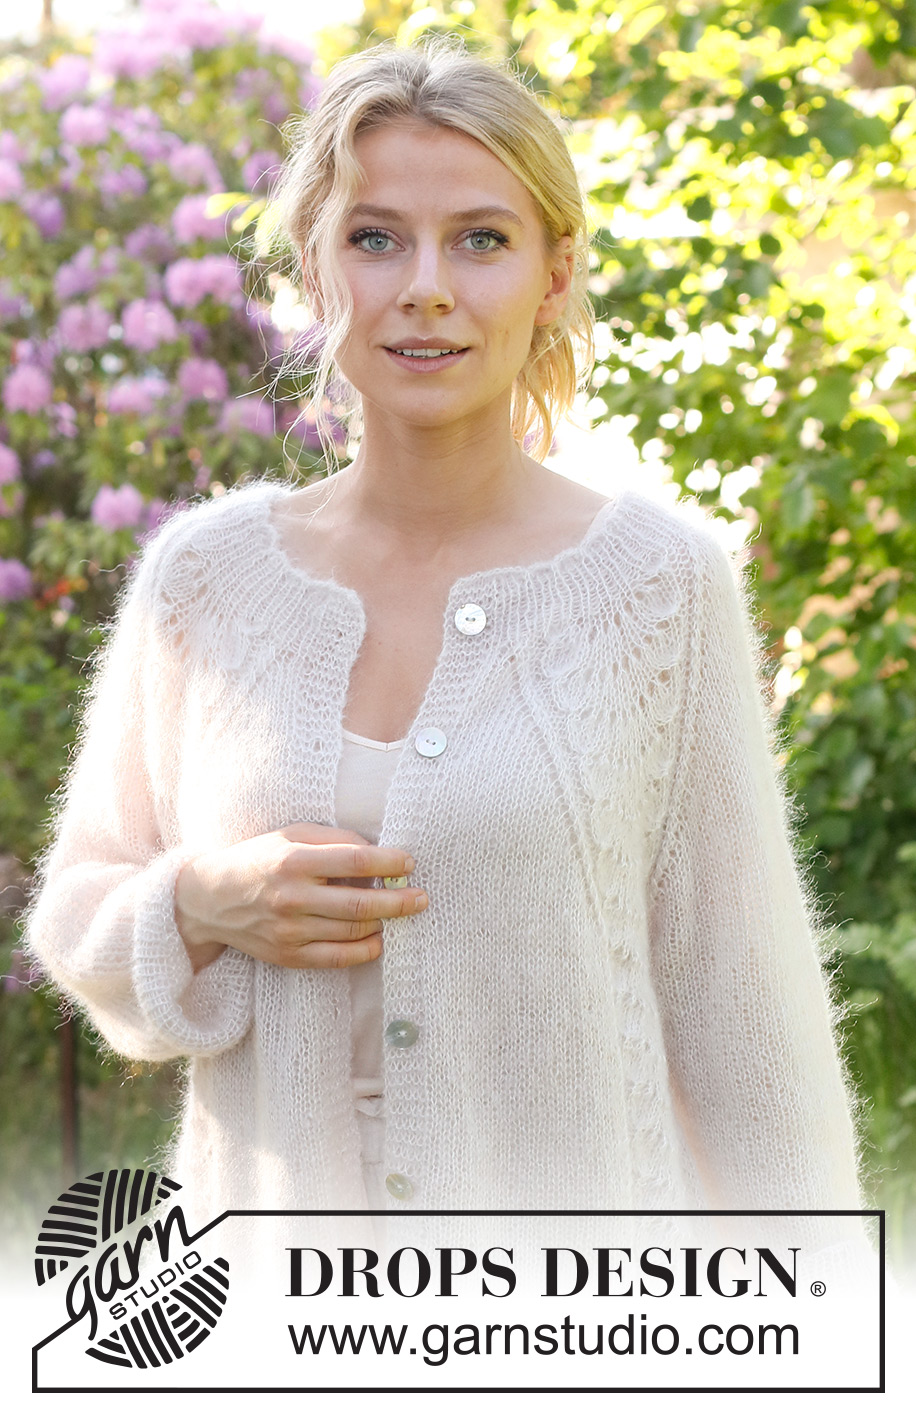
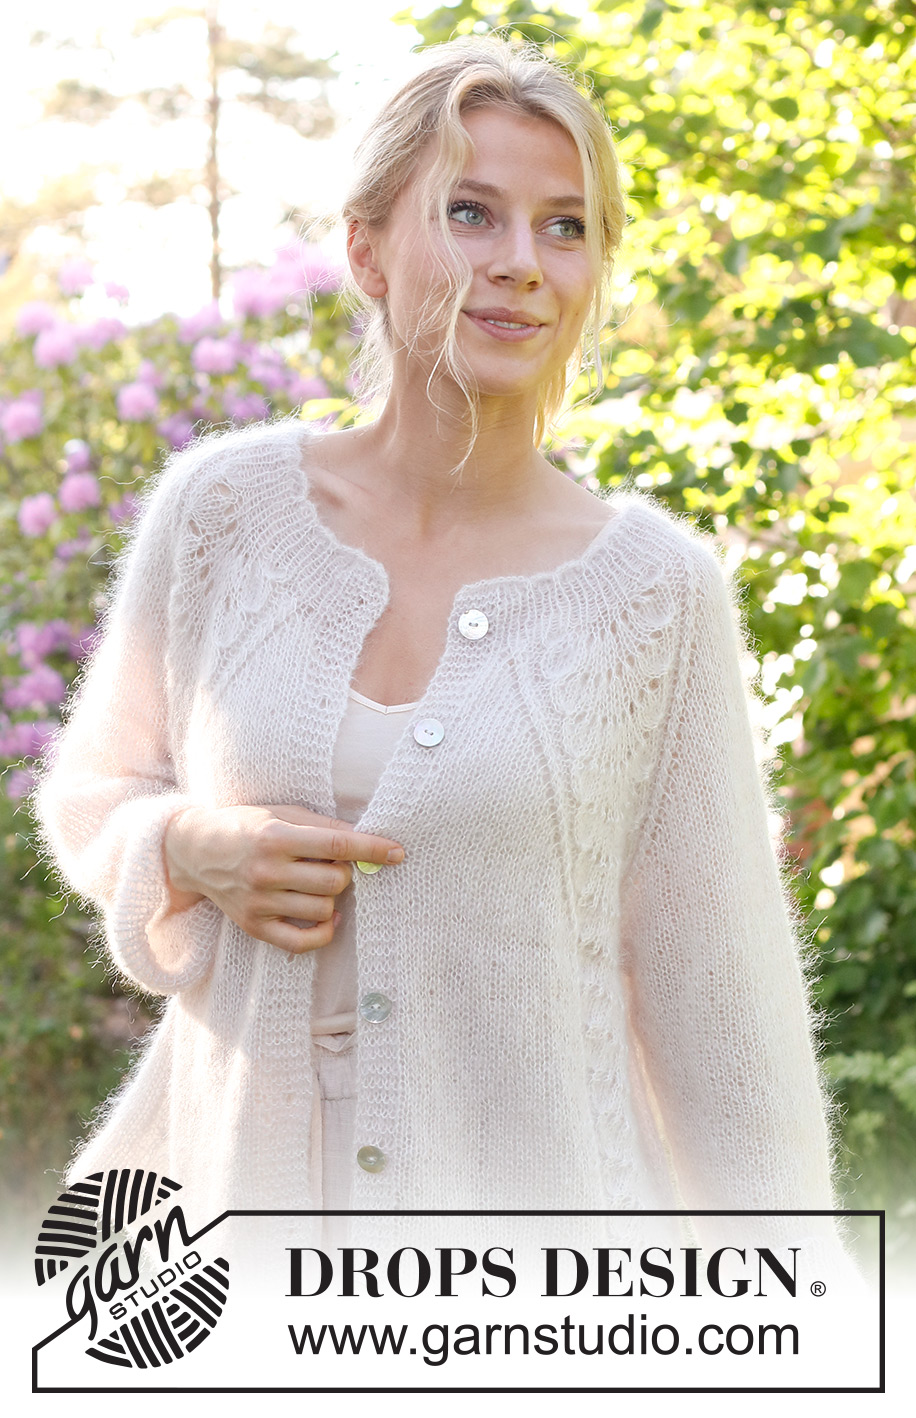
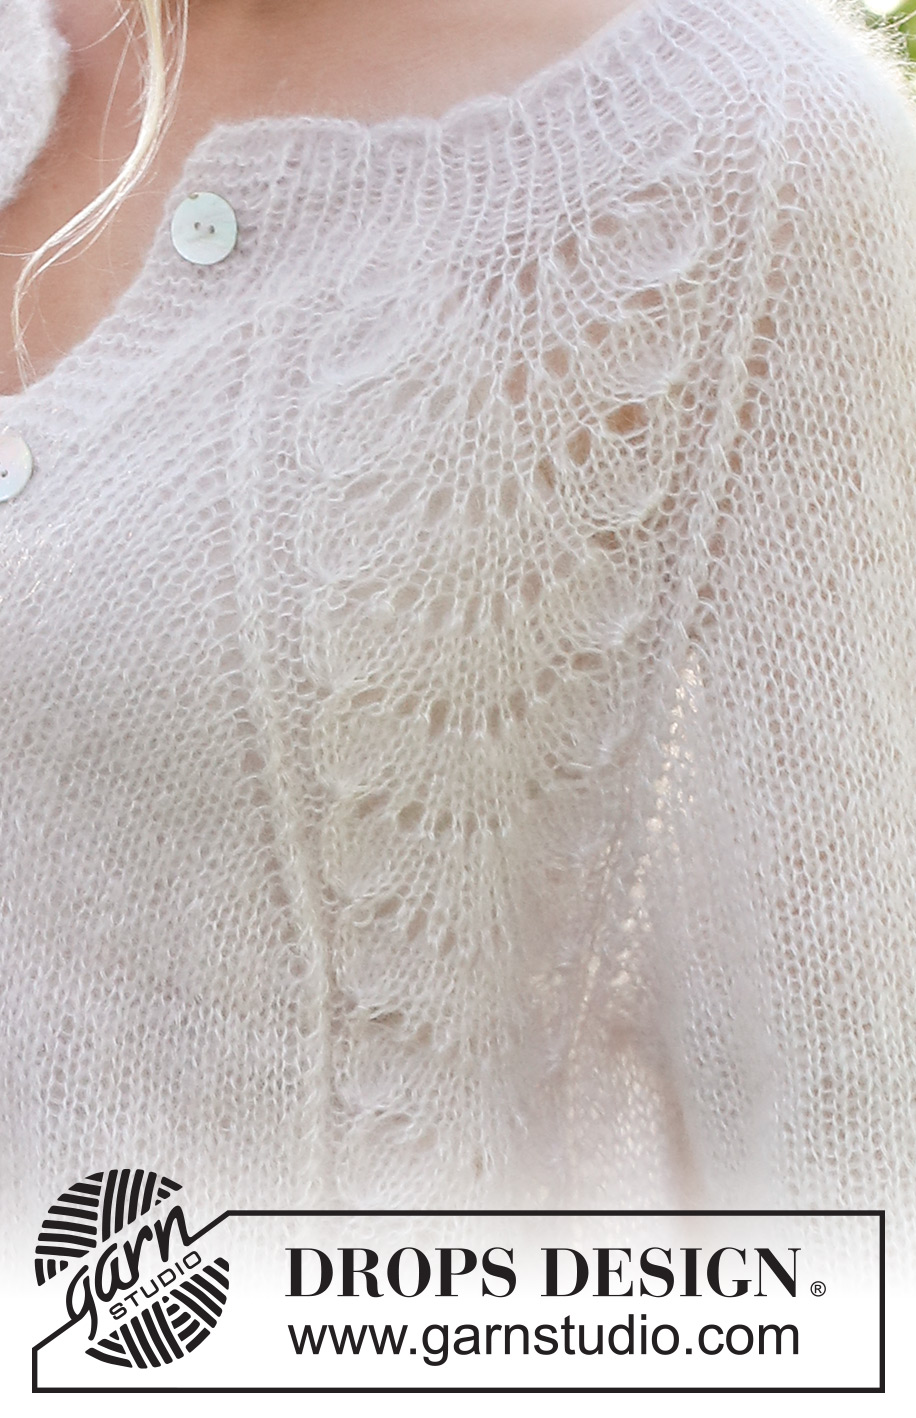
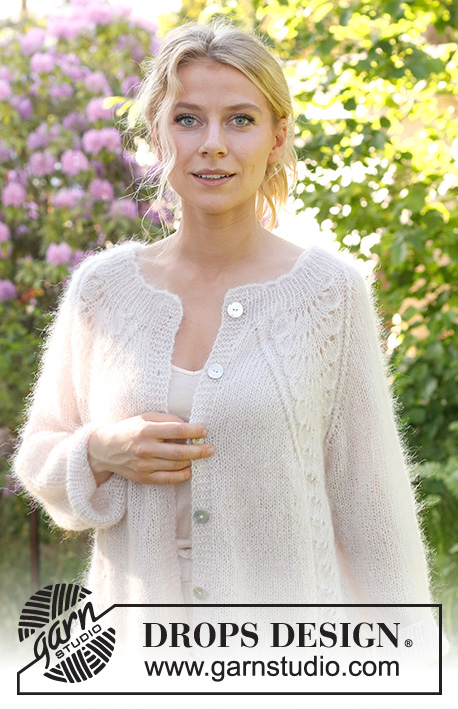
Wave Romance Cardigan#waveromancecardigan |
|||||||||||||||||||||||||
 |
 |
||||||||||||||||||||||||
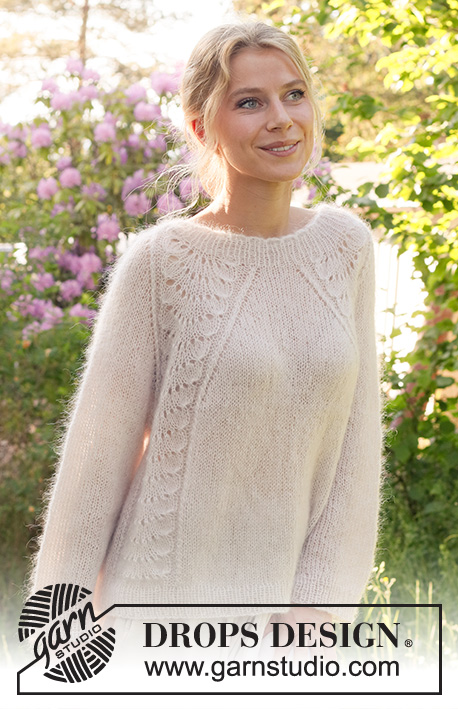
Knitted jacket in 2 strands DROPS Kid-Silk. The piece is worked top down with raglan and wave-pattern. Sizes S - XXXL.
DROPS 232-4 |
|||||||||||||||||||||||||
|
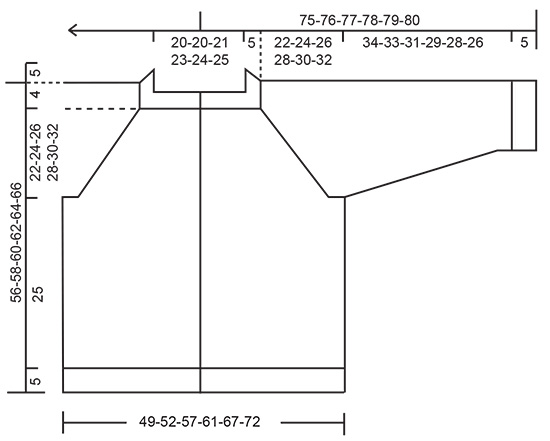
------------------------------------------------------- EXPLANATIONS FOR THE PATTERN: ------------------------------------------------------- RIDGE/GARTER STITCH (worked back and forth): Knit all rows. 1 ridge = knit 2 rows. PATTERN: See diagrams A.1 and A.2. The diagrams show all rows in the pattern from the right side. RAGLAN: All increases are worked from the right side! Increase in each transition between the body and sleeves by increasing before/after A.1/A.2. Increases are different on the body and sleeves, so sometimes you increase 8 stitches other times 4 stitches on the increase-row. Increase 1 stitch by making 1 yarn over. On the next row (wrong side) purl the yarns over twisted to avoid holes. Then work the new stitches in stocking stitch. DECREASE TIP (for sleeves): Work until there are 3 stitches left before the marker, knit 2 together, knit 2 (marker sits between these 2 stitches), slip 1 stitch as if to knit, knit 1 and pass the slipped stitch over the knitted stitch. BUTTONHOLES: Work buttonholes on the right band (when the garment is worn). 1 buttonhole = When there are 3 stitches left on a row from the right side, make 1 yarn over. On the next row (wrong side), knit the yarn over to leave a hole and then knit 2 together. The first buttonhole is worked when the rib on the neck measures 3 cm. Then work the other 5-5-6-6-7-7 buttonholes with approx. 9-10-8½-9-8-8½ cm between each one. ------------------------------------------------------- START THE PIECE HERE: ------------------------------------------------------- JACKET – SHORT OVERVIEW OF THE PIECE: The neck and yoke are worked back and forth with circular needle, from mid-front and top down. The yoke is divided for body and sleeves and the body is continued back and forth. The sleeves are worked in the round with double pointed needles, top down. NECK WITH WAVY EDGE: Cast on 101-101-105-109-113-117 stitches with circular needle size 4 mm and 2 strands DROPS Kid-Silk. Purl 1 row from the wrong side, then work as follows from the right side: 6 band stitches in GARTER STITCH – read description above, * knit 1 purl 1 *, work from *-* until there are 7 stitches left, knit 1 and 6 band stitches in garter stitch. Continue this rib for 3 more rows. Work the next row as follows from the right side: 6 band stitches in garter stitch, knit 1, * purl 1, knit 1, purl 1, take the right needle from the front of work and under the cast on edge, use right needle to lift the outermost stitch from left needle to the right needle, then take the right needle back around under the cast on edge (only the outermost stitch on the right needle is wrapped around the cast on edge), place this stitch back on left needle and knit the stitch (make sure the stitch is not twisted) *, work from *-* until there are 6 stitches left and work 6 band stitches in garter stitch. The neck now has small waves along the cast-on edge. Continue the rib as before with knit 1, purl 1 until the rib measures 5 cm after the waves – remember the BUTTONHOLES on the right band – read description above. AT THE SAME TIME on the last row, increase 6-6-2-2-2-2 stitches evenly spaced = 107-107-107-111-115-119 stitches. When the rib is finished insert a marker after the band at the beginning of the row – the yoke is measured from this marker! YOKE: Change to circular needle size 5 mm. Work as follows from the right side: 6 band stitches in garter stitch, 1-1-1-2-3-4 stitches in stocking stitch, A.1 (front piece), * 1 yarn over, knit 1 *, work from *-* 2 more times, 1 yarn over (sleeve), A.1, 3-3-3-5-7-9 stitches in stocking stitch, A.1 (back piece), * 1 yarn over, knit 1 *, work from *-* 2 more times, 1 yarn over (sleeve), A.1, 1-1-1-2-3-4 stitches in stocking stitch and 6 band stitches in garter stitch (front piece). There are 131-131-131-135-139-143 stitches on the needle. Work this pattern back from the wrong side, but without increasing on the sleeves; the 4 yarn overs from the previous row are purled twisted to avoid holes. REMEMBER THE KNITTING TENSION! OVERVIEW OF THE NEXT SECTION – read the whole section before continuing. Continue the pattern with 6 band stitches in garter stitch on each side. When A.1 has been worked 1 time in height, work A.2 over the 25 stitches in A.1. Then repeat A.2 in height. AT THE SAME TIME on row 3 in A.1 start to increase to RAGLAN as explained below. RAGLAN: Increase for RAGLAN by increasing 1 stitch before/afterA.1/A.2 – read description above. The increases on the front/back pieces and sleeves differ as follows: FRONT/BACK PIECES: Increase every 2nd row (each row from the right side) a total of 10-15-19-22-25-30 times, then every 4th row 6-4-3-3-3-1 times. SLEEVES: Increase every 2nd row (each row from the right side) a total of 21-23-25-29-30-31 times. When all the increases are finished there are 279-299-319-351-371-391 stitches. Continue working without further increases until the piece measures 22-24-26-28-30-32 cm from the marker. Now divide for the body and sleeves: Work the first 48-51-54-58-62-66 stitches (front piece), place the next 49-53-57-65-67-69 stitches on a thread for the sleeve, cast on 6-6-8-8-10-10 stitches (in side under the sleeve), work 85-91-97-105-113-121 stitches (back piece), place the next 49-53-57-65-67-69 stitches on a thread for the sleeve, cast on 6-6-8-8-10-10 stitches (in side under the sleeve), work the last 48-51-54-58-62-66 stitches (front piece). The body and sleeves are finished separately. The piece is now measured from here! BODY: = 193-205-221-237-257-273 stitches. Work A.2, stocking stitch and 6 band stitches in garter stitch on each side as before – the 6-6-8-8-10-10 stitches cast on under each sleeve are worked in stocking stitch. Work until the body measures 25 cm from the division – make sure you have 3 or 5 rows of stocking stitch after a row of yarn overs/decreases in A.2. Knit 1 row from the right side where you increase 18-20-22-24-26-26 stitches evenly spaced (do not increase over the bands) = 211-225-243-261-283-299 stitches. Change to circular needle size 4 mm and work as follows from the wrong side: 6 band stitches in garter stitch, * purl 1, knit 1 *, work from *-* until there are 7 stitches left, purl 1 and 6 band stitches in garter stitch. Continue this rib for 5 cm. Cast off a little loosely. The jacket measures approx. 56-58-60-62-64-66 cm from the shoulder down. SLEEVES: Place the 49-53-57-65-67-69 stitches from the thread on the one side of the piece on short circular needle/double pointed needles size 5 mm and knit up 1 stitch in each of the 6-6-8-8-10-10 stitches cast on under the sleeve = 55-59-65-73-77-79 stitches. Insert a marker in the middle of the 6-6-8-8-10-10 stitches under the sleeve. Allow the marker to follow your work onwards; it will be used when decreasing under the sleeve. Start at the marker and work stocking stitch in the round for 4-4-3-3-2-2 cm. Now decrease 1 stitch on each side of the marker – read DECREASE TIP. Decrease like this every 5-4-3-2-2-1½ cm a total of 6-7-9-12-13-13 times = 43-45-47-49-51-53 stitches. Continue working until the sleeve measures 34-33-31-30-28-26 cm from the division. Knit 1 round where you increase 3 stitches evenly spaced = 46-48-50-52-54-56 stitches. Change to double pointed needles size 4 mm. Work rib (knit 1, purl 1) for 5 cm. Cast off a little loosely. The sleeve measures approx. 39-38-36-35-33-31 cm. Work the other sleeve in the same way. ASSEMBLY: Sew the buttons onto the left band. |
|||||||||||||||||||||||||
Diagram explanations |
|||||||||||||||||||||||||
|
|||||||||||||||||||||||||
 |
|||||||||||||||||||||||||
 |
|||||||||||||||||||||||||
Have you finished this pattern?Tag your pictures with #dropspattern #waveromancecardigan or submit them to the #dropsfan gallery. Do you need help with this pattern?You'll find 34 tutorial videos, a Comments/Questions area and more by visiting the pattern on garnstudio.com. © 1982-2026 DROPS Design A/S. We reserve all rights. This document, including all its sub-sections, has copyrights. Read more about what you can do with our patterns at the bottom of each pattern on our site. |
|||||||||||||||||||||||||


With over 40 years in knitting and crochet design, DROPS Design offers one of the most extensive collections of free patterns on the internet - translated to 17 languages. As of today we count 324 catalogues and 12290 patterns translated into English (UK/cm).
We work hard to bring you the best knitting and crochet have to offer, inspiration and advice as well as great quality yarns at incredible prices! Would you like to use our patterns for other than personal use? You can read what you are allowed to do in the Copyright text at the bottom of all our patterns. Happy crafting!
Post a comment to pattern DROPS 232-4
We would love to hear what you have to say about this pattern!
If you want to leave a question, please make sure you select the correct category in the form below, to speed up the answering process. Required fields are marked *.