
Popular categories
Looking for a yarn?


Comments / Questions (72)
![]() Mrs Vanessa Mann wrote:
Mrs Vanessa Mann wrote:
There are cable instructions: hold 1 to the back (or front) on a cable needle...
28.05.2025 - 16:32DROPS Design answered:
Dear Mrs Mann, you will find how to work such a small cable in this video - both way: in front/back. Happy knitting!
28.05.2025 - 16:58
![]() Mrs Vanessa Mann wrote:
Mrs Vanessa Mann wrote:
I am struggling to do the cables on my very fine yarn. Can you suggest an alternative stitch instead of the cable?
27.05.2025 - 19:02DROPS Design answered:
Dear Mrs Mann, there are no cables in this pattern, but to work the decreases (5 sts together) in both diagrams you will find these videos: How to knit 5 together and how to knit 5 twisted together, this might help you. You can also use a crochet hook to help if it can help. Happy knitting!
28.05.2025 - 08:28
![]() Nicole Anconina wrote:
Nicole Anconina wrote:
Bonjour J'en suis au 2ème rang de l'empiècement qu'il faut faire comme le 1er. Sans tenir compte des manches, il y a des augmentations à ce 1er rang, comment donc faire que les mailles envers se superposent d'autre part les diagrammes représentent-ils les rangs envers? Merci pour votre réponse
20.04.2025 - 20:13DROPS Design answered:
Bonjour Mme Anconina, au 1er tour de l'empiècement, vous augmentez comme indiqué pour les manches et vous augmentez dans A.1 comme le montre le diagramme (4 m dans chaque A.1.) - au 2ème tour, tricotez le 2ème tour de A.1 les mailles endroit et les mailles envers vont se trouver naturellement comme il faut: les augmentations sont faites au milieu et pas sur les côtés) et les autres mailles à l'endroit (tricotez les jetés torse à l'endroit pour éviter des trous). Le nombre de mailles reste ainsi le même qu'à la fin du 1er tour. Bon tricot!
22.04.2025 - 15:28
![]() Alice wrote:
Alice wrote:
Maat Xxxl: klopt de eerste naald van de pas wel? Ik hou steken over. Moet A1 in de eerste naald 3x of 4x in totaal gebreid worden?
06.03.2025 - 22:35DROPS Design answered:
Dag Alice,
A.1 wordt 4 keer in totaal gebreid.
12.03.2025 - 11:43
![]() Muriel wrote:
Muriel wrote:
Bonjour, j'aimerais bien savoir au 3ème tour de A1 combien de mailles avant de A1? Doit-on les tricoter en jersey? idem entre le devant et la manche qui finit le tour ?
05.03.2025 - 17:31DROPS Design answered:
Bonjour Muriel, vous avez le même nombre de mailles pour le devant et le dos entre chaque A.1 au 2ème et au 3ème tour car vous n'avez pas encore augmenté pour le raglan, de même pour les manches. Les augmentations du raglan ne commencent qu'avec le 3ème rang de A.1, et vous augmentez avant/après le diagramme (avant au début des manches, du devant et du dos / après à la fin des manches, du devant et du dos). Bon tricot!
06.03.2025 - 11:18
![]() Sylvie wrote:
Sylvie wrote:
Également, lorsque sur le 3eme tours, nous devons augmenter , manches, raglans et devant dos, cela veut dire que l'on fini la section manche par un jeté, et on commence le raglan par un autre jeté ???2de suite ?? Merci d'avance
08.02.2025 - 09:30DROPS Design answered:
Bonjour Sylvie, au 3ème tour de l'empiècement, tricotez comme avant en jersey avec A.1 pour chaque raglan et commencez maintenant à augmenter pour le raglan avant/après chaque A.1 comme indiqué sous RAGLAN:, quand on augmente pour les manches, le dos et le devant, le nombre de mailles de chaque pièce augmente de 2 à chaque tour d'augmentations, on a 1 m jersey en plus au début + 1 m jersey en plus à la fin de ces mailles jersey, entre les diagrammes. Bon tricot!
10.02.2025 - 09:38
![]() Sylvie wrote:
Sylvie wrote:
Bonjour. Concernant les augmentations..devant/dos, augmentations tous les 2tours, puis ts les 4tours, manches, tous les 2tours, mais concernant les raglans, avavt et aprèsA1/À2, est- ce tous les tours, ou tous les 2tours? Merci d'avance
08.02.2025 - 09:03DROPS Design answered:
Bonjour Sylvie, lorsque vous devez augmenter tous les 4 tours pour le devant et le dos, augmentez après A.2 (A.1 ne se tricote qu'une seule fois en hauteur), au début du devant et du dos et augmentez avant le A.2 suivant à la fin du dos et du devant; pour les manches, on augmente toujours tous les 2 tours, ainsi, augmentez après le A.2 au début des manches et avant le A.2 suivant à la fin des manches. Bon tricot!
10.02.2025 - 09:25
![]() Savin Mireille wrote:
Savin Mireille wrote:
Je vais tricoter votre modèle Wave … pour lequel vous conseillez des aiguilles doubles pointes …. Mais je voudrais savoir comment elles s’utilisent ?? Existe t il un tuto pour voir ?? Avec mes remerciements.
03.02.2025 - 11:41DROPS Design answered:
Bonjour Mme Savin, retrouvez ici en vidéo comment monter les mailles (non utilisé ici) et comment tricoter ensuite du jersey sur aiguilles doubles pointes - notez que vous pouvez également tricoter en magic loop si vous préférez. Bon tricot!
03.02.2025 - 13:47
![]() Savin wrote:
Savin wrote:
Désolée , je ne comprends pas pas bien le2ieme rang de l’empiecement. Quand vous dites (manche)(dos)(devant ) s’agit il des mailles qui précèdent ou bien qui suivent les parenthèses ??? D’autre part les augmentations des manches à supprimer correspondent elles à des points points noirs du motifs A1 quand ??? Remerciements anticipés
21.01.2025 - 14:46DROPS Design answered:
Bonjour Mme Savin, tout à fait, les mailles indiqué avant (manche) ou bien (devant)(dos) sont celles qui correspondent à la mention indiquée après ces mailles. Je ne suis pas sûre de comprendre ce que vous entendez par "les augmentations des manches à supprimer", pouvez-vous m'en dire plus? Au 1er rang de A.1, on doit augmenter pour avoir le bon nombre de mailles correspondant à la largeur souhaitée (il faut plus de mailles au point de vagues qu'en jersey pour la même largeur). Bon tricot!
21.01.2025 - 17:14
![]() Savin wrote:
Savin wrote:
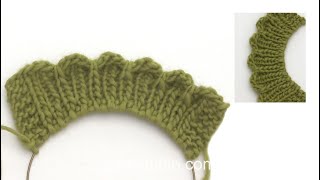
Bonjour Mme J’ai commandé le fil alpaga bridges Silk Pour le modèle 232-3 . je ne comprends vraiment pas les explications pour réaliser le « feston »de l’encolure . ??? D’autre part que conseillez vous comme type de montage et d’arrêt aux aiguilles pour avoir des côtes 1et1 très souples . Avec mes remerciements
17.01.2025 - 11:40DROPS Design answered:
Bonjour Mme Savin, dans cette vidéo, nous montrons comment tricoter ce type de "festons". Pour le montage, utilisez votre technique habituelle en veillant à ce que les mailles montées ne soient pas trop serrées - retrouvez ici différentes techniques de montage. Bon tricot!
17.01.2025 - 13:21
|
|||||||||||||||||||||||||
Wave Romance#waveromancesweater |
|||||||||||||||||||||||||
 |
 |
||||||||||||||||||||||||
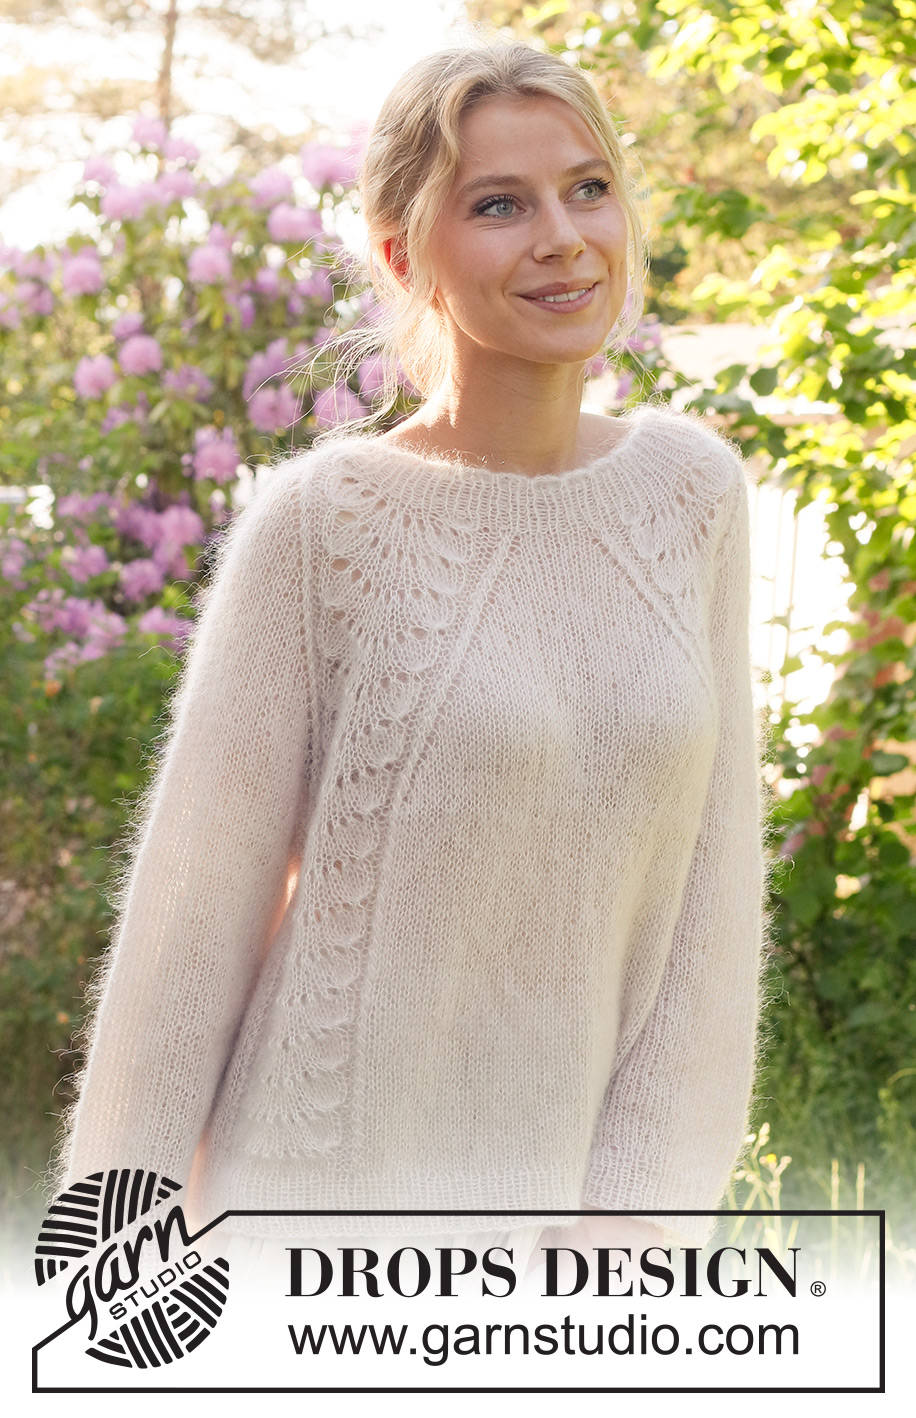
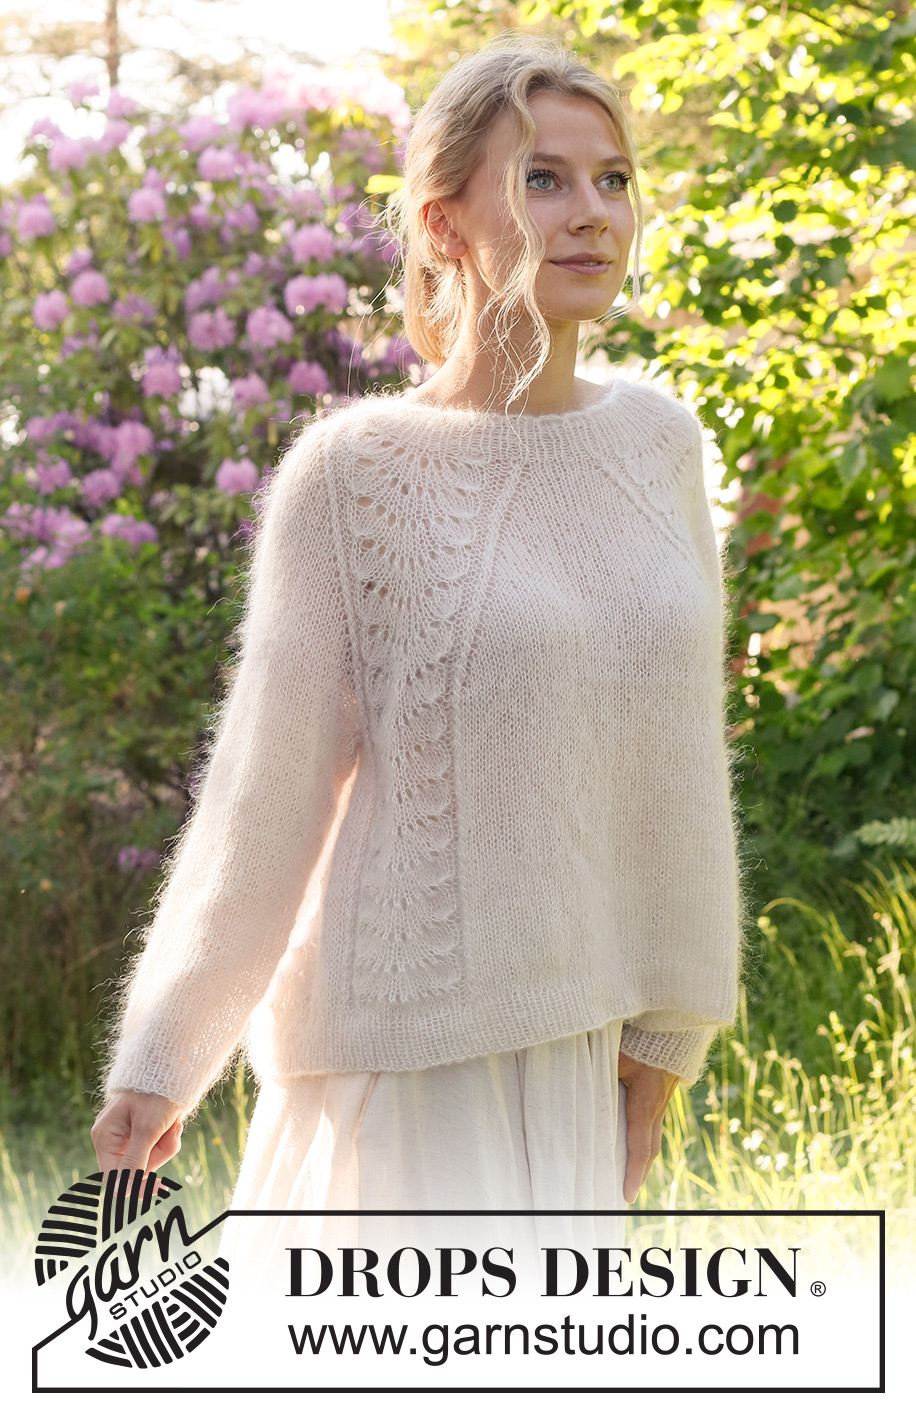
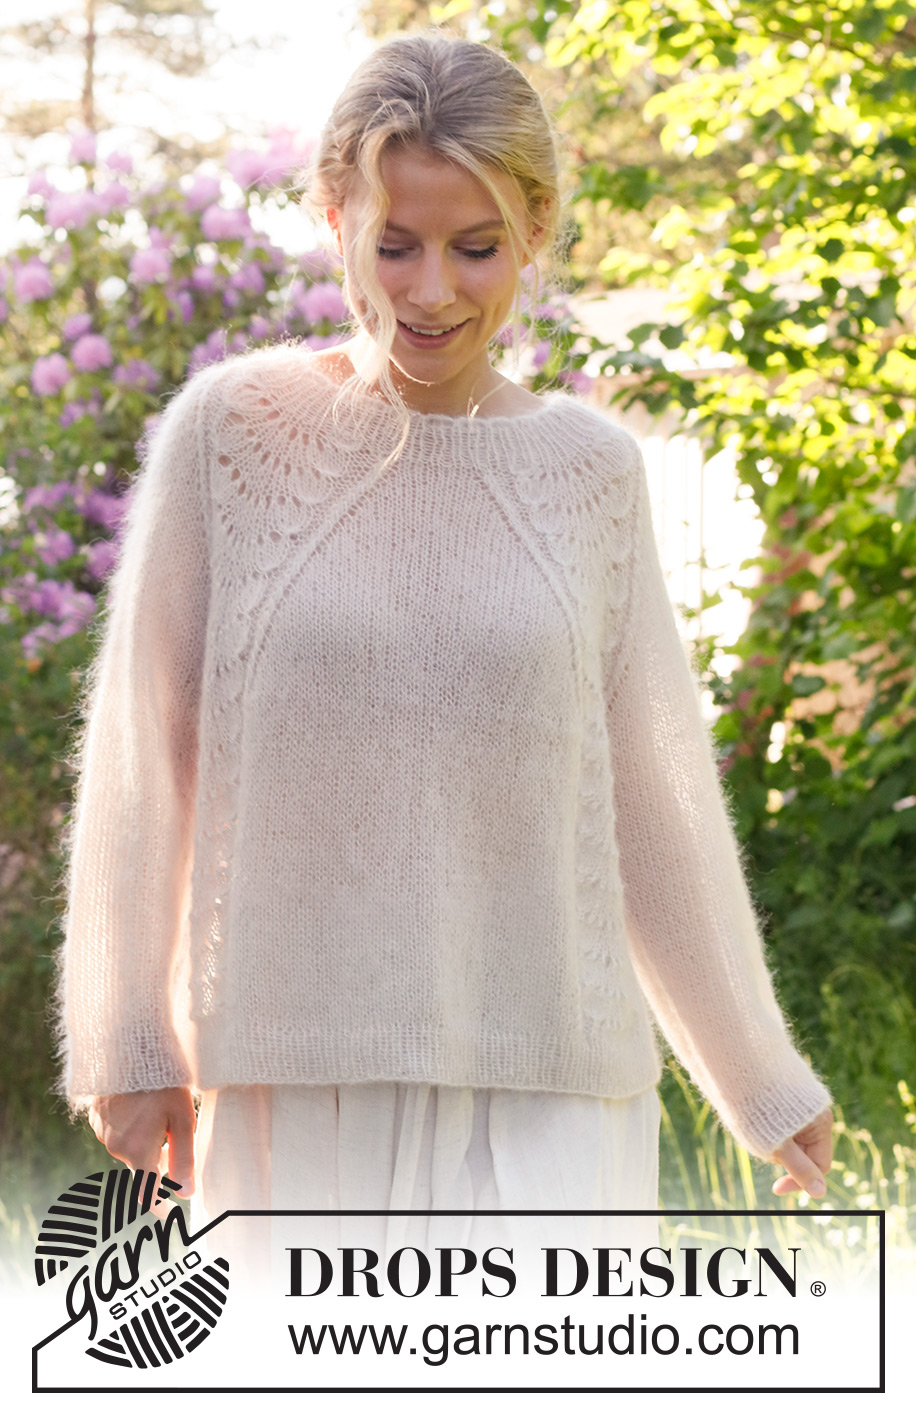
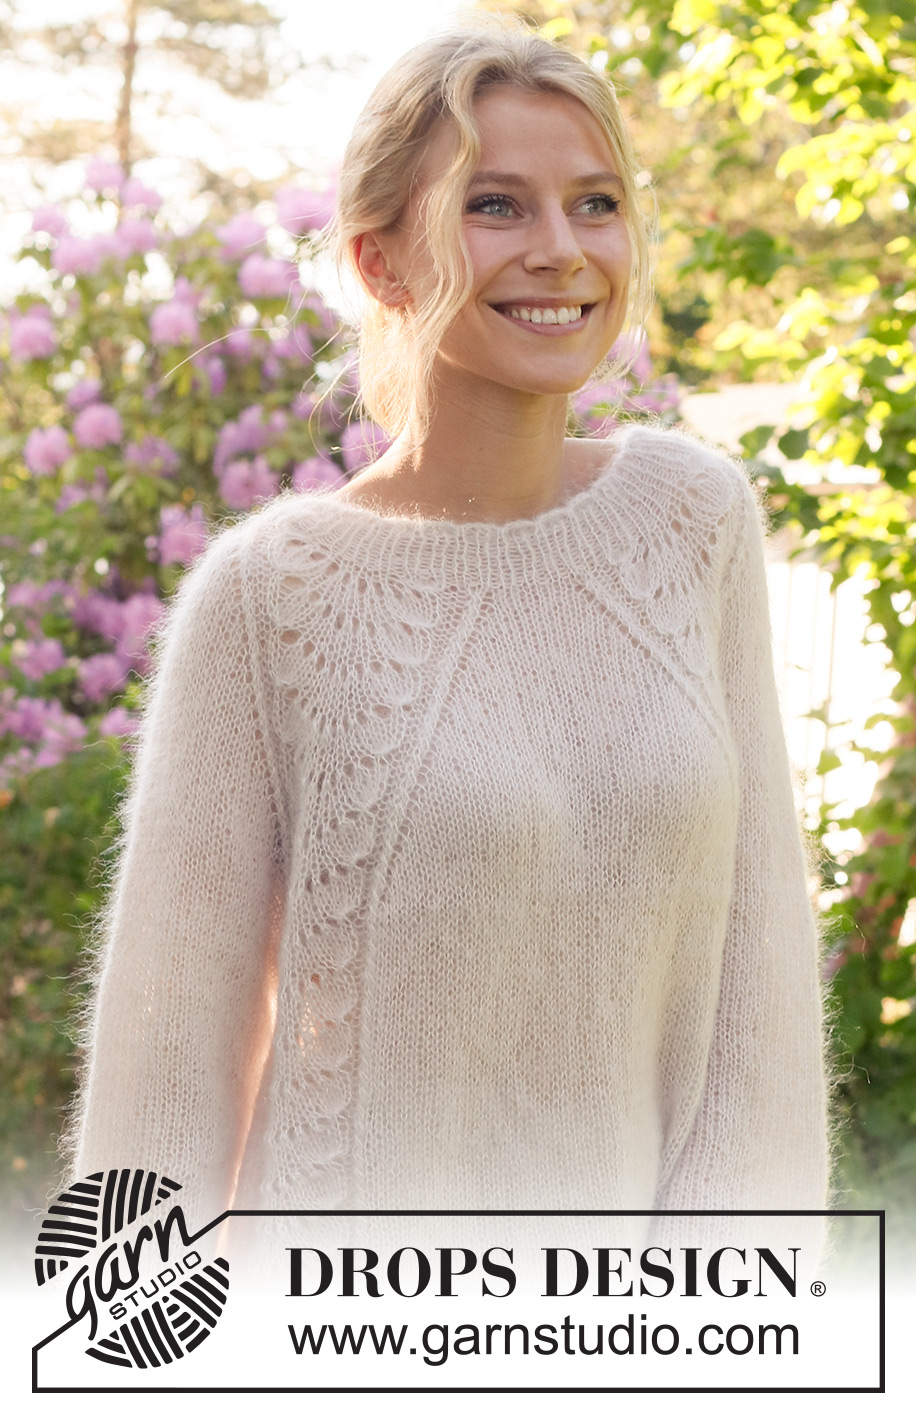
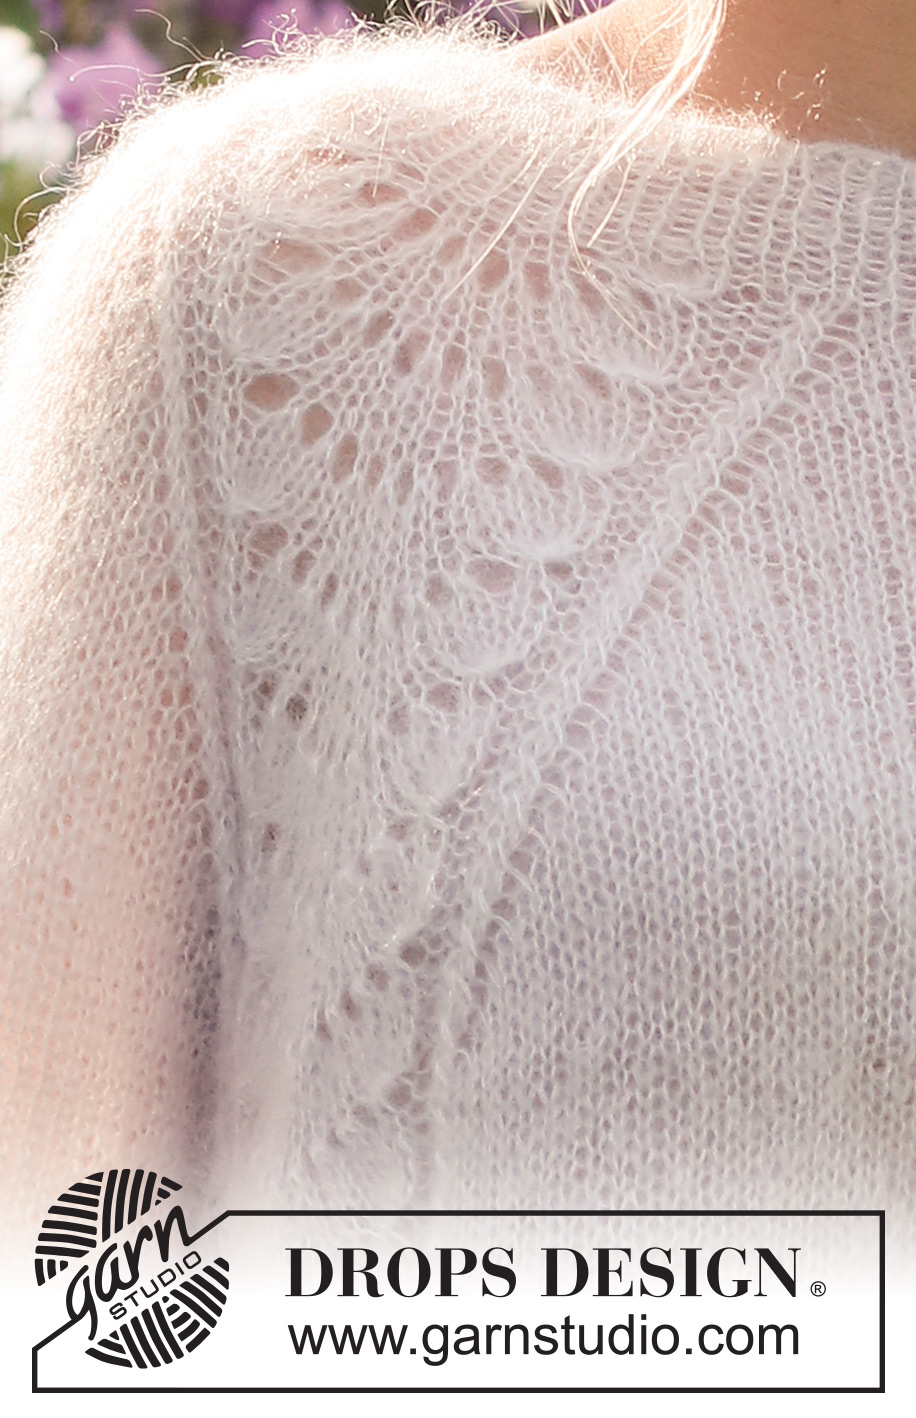
Knitted jumper in 2 strands DROPS Kid-Silk. The piece is worked top down with raglan and wave-pattern. Sizes S - XXXL.
DROPS 232-3 |
|||||||||||||||||||||||||
|
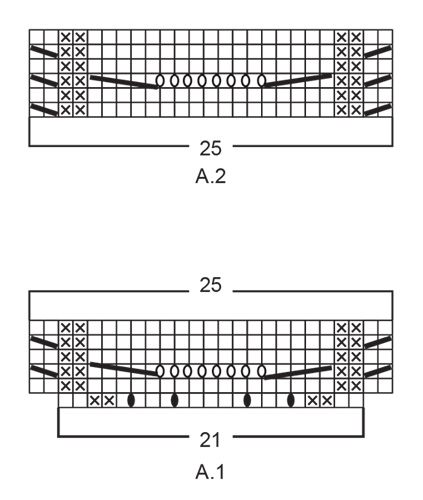
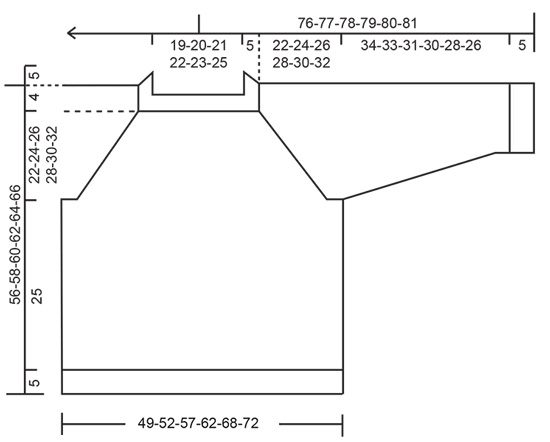
------------------------------------------------------- EXPLANATIONS FOR THE PATTERN: ------------------------------------------------------- PATTERN: See diagrams A.1 and A.2. RAGLAN: Increase in each transition between the body and sleeves by increasing before/after A.1/A.2. Increases are different on the body and sleeves, so sometimes you increase 8 stitches other times 4 stitches on the increase-round. Increase 1 stitch by making 1 yarn over. On the next round knit the yarns over twisted to avoid holes. Then work the new stitches in stocking stitch. DECREASE TIP (for sleeves): Work until there are 3 stitches left before the marker, knit 2 together, knit 2 (marker sits between these 2 stitches), slip 1 stitch as if to knit, knit 1 and pass the slipped stitch over the knitted stitch (2 stitches decreased). ------------------------------------------------------- START THE PIECE HERE: ------------------------------------------------------- JUMPER – SHORT OVERVIEW OF THE PIECE: The neck and yoke are worked in the round with circular needle, from the right shoulder and top down. The yoke is divided for body and sleeves and the body is continued in the round with circular needle. The sleeves are worked in the round with short circular needle/double pointed needles, top down. NECK WITH WAVY EDGE: Cast on 84-88-92-96-100-104 stitches with short circular needle size 4 mm and 2 strands DROPS Kid-Silk. Knit 1 round, then work rib (knit 1, purl 1). After 4 rounds of rib, work the next round as follows: Knit 1, * purl 1, knit 1, purl 1, take the right needle from the front of work and under the cast on edge, use right needle to lift the outermost stitch from left needle to the right needle, then take the right needle back around under the cast on edge (only the outermost stitch on the right needle is wrapped around the cast on edge), place this stitch back on left needle and knit the stitch (make sure the stitch is not twisted) *, work from *-* the whole round – NOTE: The last time the stitch «wrapped» will be the first stitch on the next round. The neck now has small waves along the cast-on edge. Continue the rib as before with knit 1, purl 1 until the rib (after the waves) measures 5 cm – AT THE SAME TIME on the last round increase 20-16-12-12-8-8 stitches evenly spaced = 104-104-104-108-108-112 stitches. When the rib is finished, insert 1 marker at the beginning of the round. The yoke is measured from this marker! YOKE: Change to circular needle size 5 mm. Work the first round as follows: * 1 yarn over, knit 1 *, work from *-* 3 times in total, 1 yarn over (sleeve), A.1, 7-7-7-9-9-11 stitches in stocking stitch, A.1 (front piece), * 1 yarn over, knit 1 *, work from *-* 3 times in total, 1 yarn over (sleeve), A.1, 7-7-7-9-9-11 stitches in stocking stitch, A.1 (back piece). There are 128-128-128-132-132-136 stitches. Work 1 more round of pattern as described above without increasing on the sleeves - the 4 increased stitches on each sleeve from the previous round are knitted twisted to avoid holes. REMEMBER THE KNITTING TENSION! OVERVIEW OF THE NEXT SECTION – read the whole section before continuing: Continue with the pattern. When A.1 has been worked 1 time in height, work A.2 over the 25 stitches in A.1. Repeat A.2 in height. AT THE SAME TIME on round 3 in A.1 start to increase to raglan as explained below. RAGLAN: Increase for RAGLAN by increasing 1 stitch before/after A.1/A.2 – read description above. The increases on the front/back pieces and sleeves differ as follows: FRONT/BACK PIECES: Increase every 2nd round a total of 7-11-14-17-23-27 times, then every 4th round 7-6-6-6-4-3 times. SLEEVES: Increase every 2nd round a total of 21-23-25-29-30-31 times. When all the increases are finished there are 268-288-308-340-360-380 stitches. Continue working without further increases until the piece measures 22-24-26-28-30-32 cm from the marker. Now divide for the body and sleeves: Place the first 49-53-57-65-67-69 stitches on a thread for the sleeve (the stitches between A.2 on the back and front pieces), cast on 6-6-8-8-10-10 stitches (in side under the sleeve), work the next 85-91-97-105-113-121 stitches (front piece), place the next 49-53-57-65-67-69 stitches on a thread for the sleeve (the stitches between A.2 on the back and front pieces), cast on 6-6-8-8-10-10 stitches (in side under the sleeve), work the remaining 85-91-97-105-113-121 stitches (back piece). The body and sleeves are finished separately. The piece is now measured from here! BODY: = 182-194-210-226-246-262 stitches. Continue in the round with A.2 and stocking stitch – the 6-6-8-8-10-10 stitches cast on under each sleeve are worked in stocking stitch. Work until the piece measures 25 cm from the division – make sure you have 3 or 5 rounds of stocking stitch after a round of yarn overs/decreases in A.2. Knit 1 round where you increase 18-18-20-22-24-26 stitches evenly spaced = 200-212-230-248-270-288 stitches. Change to circular needle size 4 mm. Work rib (knit 1, purl 1) for 5 cm. Cast off a little loosely. The jumper measures approx. 56-58-60-62-64-66 cm from the shoulder down. SLEEVES: Place the 49-53-57-65-67-69 stitches from the thread on the one side of the piece on short circular needle/double pointed needles size 5 mm and knit up 1 stitch in each of the 6-6-8-8-10-10 stitches cast on under the sleeve = 55-59-65-73-77-79 stitches. Insert a marker in the middle of the 6-6-8-8-10-10 stitches under the sleeve. Allow the marker to follow your work onwards; it will be used when decreasing under the sleeve. Start at the marker and work stocking stitch in the round for 4-4-3-3-2-2 cm. Now decrease 1 stitch on each side of the marker – read DECREASE TIP. Decrease like this every 5-4-3-2-2-1½ cm a total of 6-7-9-12-13-13 times = 43-45-47-49-51-53 stitches. Continue working until the sleeve measures 34-33-31-30-28-26 cm from the division. Knit 1 round where you increase 3 stitches evenly spaced = 46-48-50-52-54-56 stitches. Change to double pointed needles size 4 mm. Work rib (knit 1, purl 1) for 5 cm. Cast off a little loosely. The sleeve measures approx. 39-38-36-35-33-31 cm. Work the other sleeve in the same way. |
|||||||||||||||||||||||||
Diagram explanations |
|||||||||||||||||||||||||
|
|||||||||||||||||||||||||
|
|||||||||||||||||||||||||
|
|||||||||||||||||||||||||
Have you finished this pattern?Tag your pictures with #dropspattern #waveromancesweater or submit them to the #dropsfan gallery. Do you need help with this pattern?You'll find 30 tutorial videos, a Comments/Questions area and more by visiting the pattern on garnstudio.com. © 1982-2025 DROPS Design A/S. We reserve all rights. This document, including all its sub-sections, has copyrights. Read more about what you can do with our patterns at the bottom of each pattern on our site. |
|||||||||||||||||||||||||


With over 40 years in knitting and crochet design, DROPS Design offers one of the most extensive collections of free patterns on the internet - translated to 17 languages. As of today we count 314 catalogues and 11822 patterns translated into English (UK/cm).
We work hard to bring you the best knitting and crochet have to offer, inspiration and advice as well as great quality yarns at incredible prices! Would you like to use our patterns for other than personal use? You can read what you are allowed to do in the Copyright text at the bottom of all our patterns. Happy crafting!
Post a comment to pattern DROPS 232-3
We would love to hear what you have to say about this pattern!
If you want to leave a question, please make sure you select the correct category in the form below, to speed up the answering process. Required fields are marked *.