
Popular categories
Looking for a yarn?


Comments / Questions (63)
![]() Monica wrote:
Monica wrote:
Hej! Hur kan 200 gr (8 nystan) dubbelt garn räcka till storlek L ? Är det underförstått att man ska beställa dubbelt?
21.03.2026 - 18:52DROPS Design answered:
Hei Monica. DROPS Kid-Silk er et meget lett garn og har en løpelengde på 210 meter, så 8 nøster = 1680 meter. Så med 2 tråder = 840 meter garn til en jakke i str. L skal være nok. Sammenligner du med andre jakker med 2 tråder Kid-Silk (f.eks 241-11 og 250-18), skal 8 nøster være nok. mvh DROPS Design
23.03.2026 - 08:41
![]() Cecilia wrote:
Cecilia wrote:
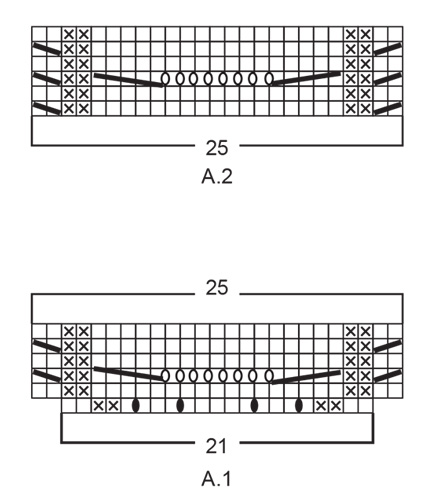
Förstår inte vad jag gör för fel! Har stickat första varvet i A.1 flera gånger nu och får hela tiden 14 maskor kvar efter sista framstycket. Misstänker att jag gör fel på omslagen mellan maskor men kan inte klura ut hur jag ska göra. Hjälp!!
22.02.2026 - 14:40DROPS Design answered:
Hej Cecilia, du skriver ikke hvilken størrelse du strikker. Men her beskriver vi XL med lidt andre ord: Etter halskanten har du 111 m og 1. pinne på bærestykket fra retten strikkes slik: 6 stolpemasker + 2 m glattstrikk + A.1 (21 m + 4 kast) + 1 kast, 1 rett + 1 kast, 1 rett + 1 kast, 1 rett + 1 kast + A.1 (21 m + 4 kast) + 5 m glattstrikk + A.1 (21 m + 4 kast) + 1 kast, 1 rett + 1 kast, 1 rett + 1 kast, 1 rett + 1 kast + A.1 (21 m + 4 kast) + strikk 2 m glattstrikk + 6 stolpemasker = 135 masker (inkl. kastene). Mvh DROPS Design
26.02.2026 - 10:39
![]() EVB wrote:
EVB wrote:
It is PENGUIN SLEEVE!!! I am sooo disappointed. Why cant you write that in text? It is impossible to see in pics. I think you should take a photo of ted cardigan without model, just plain on a table!!! I will riple up my cardigan, unravel, tear to yarn again.
13.12.2025 - 21:47
![]() Turrin wrote:
Turrin wrote:
Au niveau de l'empiecement quelles sont les 4 jetées du rang précédent ? Il y a 4 jetées à chaque A1 x 4. Donc 4x4 = 16 ??? Merci pour votre aide
29.10.2025 - 15:12DROPS Design answered:
Bonjour Mme Turin, ce sont les jetés du 1er rang de A.1, cf. 3ème symbole de la légende; ces 4 jetés (de chaque A.1, donc effectivement 16 au total) se tricotent torse à l'envers pour éviter des trous, on augmente le nombre de mailles pour A.1 pour compenser l'effet de vagues et conserver la bonne largeur. Bon tricot!
30.10.2025 - 18:43
![]() Aileen wrote:
Aileen wrote:
I'm knitting the pattern in size XL. In the yoke section, I worked it as follows: 2×6 sts for the bands=12 2×2 sts in stockinette=4 4×21 sts (A1)=84 stockinette=5 2×1yo (sleeves)=2 That gives a total of 119 sts on the needle, not 135 as mentioned. Also, it’s not clear how to work the yo in the second row, or where the holes are supposed to be. You only mentioned that the yo from diagram A1.
27.10.2025 - 00:03DROPS Design answered:
Hi Aileen, In your size you work: 6 band stitches, 2 stocking stitches, A.1 across 21 stitches with 4 yarn overs = 25 stitches, (1 yo, K1) x 3 = 6 stitches, 1 yo, A.1 = 25 stitches, 5 stocking stitches, A.1 = 25 stitches, (1 yo, K1) x 3 = 6 stitches, 1 yo, A.1 =25 stitches, 2 stocking stitches and 6 band stitches. 6 + 2 + 25 +6 + 1 + 25 + 5 +25 + 6 +1 +25 +2 +6 = 135 stitches. Regards Drops Team.
27.10.2025 - 06:48
![]() Martha Aamodt wrote:
Martha Aamodt wrote:
I siste avsnitt ERME står det: «strikk videre til ermet måler 34-33-31-29-28-26 cm.» Er dette blitt snudd - ser for meg ut at minste størrelse har lengre erme enn største størrelse. I siste linje er det likedan: «Ermet måler ca 39-38-36-34-33-31».. I alle andre oppgitte mål er minste størrelse først. Mvh Martha Aamodt
19.06.2025 - 10:38DROPS Design answered:
Hei Martha, Ermelengden i de største størrelsene er kortere enn i de mindre størrelsene pga videre skulderbredde og lengere bærestykke. Du kan selvfølgelig strikke lengere ermer hvis du ønsker. Hilsen Drops Team.
23.06.2025 - 06:46
![]() Astrid Scholten wrote:
Astrid Scholten wrote:
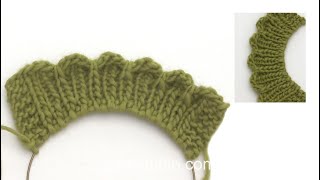
Bestaat er ook een filmpje met uitleg over het maken van de golfrand? Ik kom er niet uit. vriendelijke groet, Astrid
07.06.2025 - 16:45DROPS Design answered:
Dag Astrid,
Ja, bij het patroon staat een video waarin wordt uitgelegd hoe je dit kunt doen. (Klik bovenaan bij het patroon op 'Video's' om hem te vinden.
10.06.2025 - 19:55
![]() Astrid Åslaug Sørensen wrote:
Astrid Åslaug Sørensen wrote:
Er det ikke rart at ermet er mye lengre på den minste str enn på den største? Bør det ikke være omvendt
25.03.2025 - 18:29DROPS Design answered:
Hei Astrid, Ermene er lengre i mindre størrelser fordi bærestykket er smalere enn i de større størrelsene. God fornøyelse!
26.03.2025 - 06:57
![]() Theisen wrote:
Theisen wrote:
Y a t’il une aisance positive ? De combien ? Merci
12.03.2025 - 08:59DROPS Design answered:
Bonjour Mme Theisen, trouvez l'aisance souhaitée en choisissant votre taille: mesurez un vêtement similaire que vous avez et dont vous aimez la forme et comparez ces mesures à celles du schéma en bas de page. Retrouvez plus d'infos ici. Bon tricot!
12.03.2025 - 10:15
![]() Wloda wrote:
Wloda wrote:
Comment trouver la vidéo de montage "vagues ". Explication écrite est difficile à comprendre. Merci.
18.02.2025 - 08:57DROPS Design answered:
Bonjour Mme Wloda, vous la trouverez en cliquant ici ou bien sous l'onglet "Vidéos" en haut de page. Bon tricot!
18.02.2025 - 17:38
|
|||||||||||||||||||||||||
Wave Romance Cardigan#waveromancecardigan |
|||||||||||||||||||||||||
 |
 |
||||||||||||||||||||||||
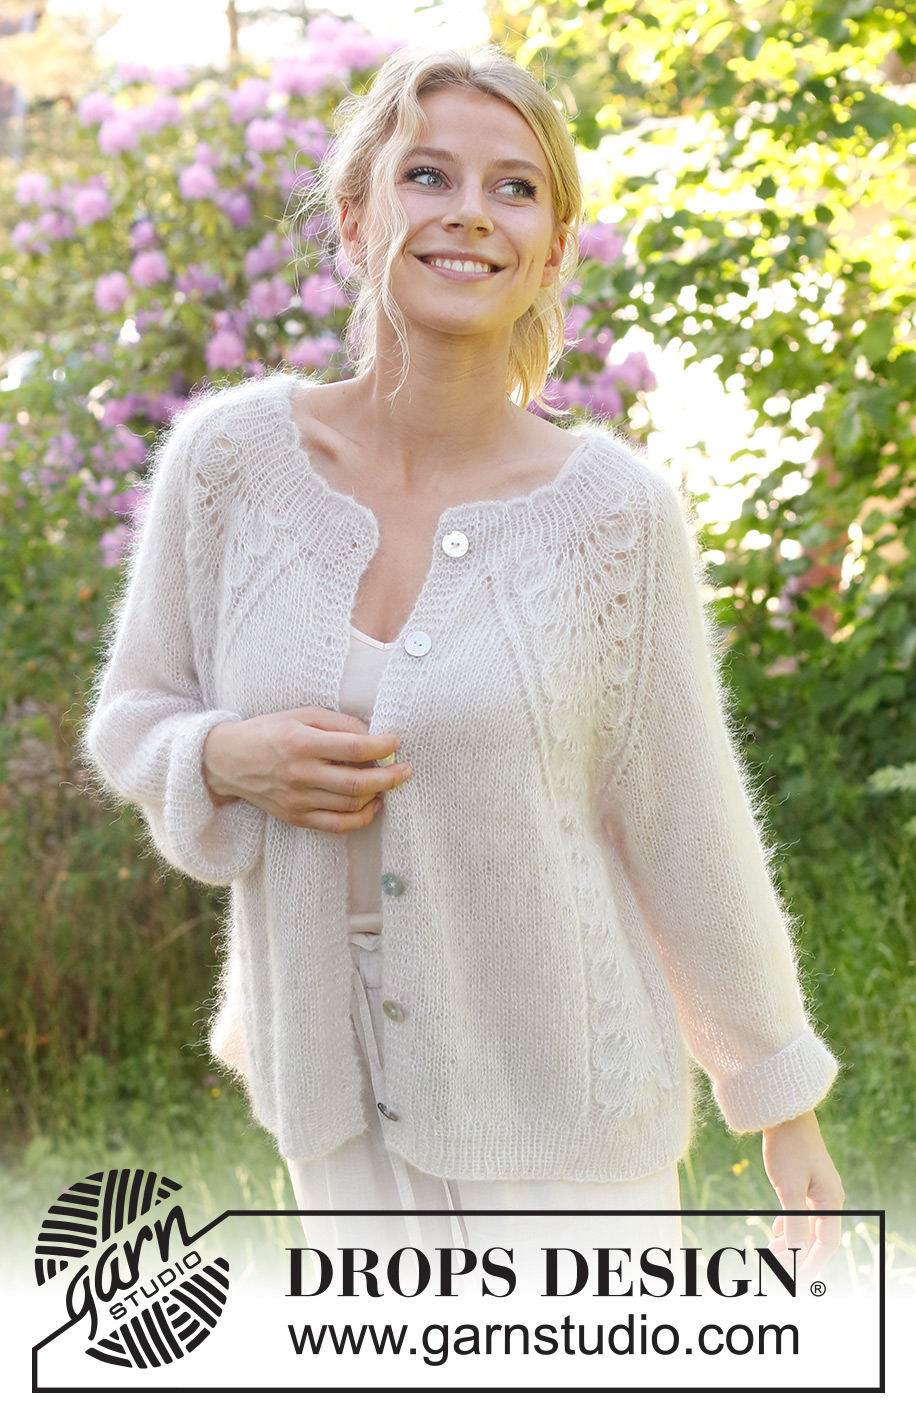
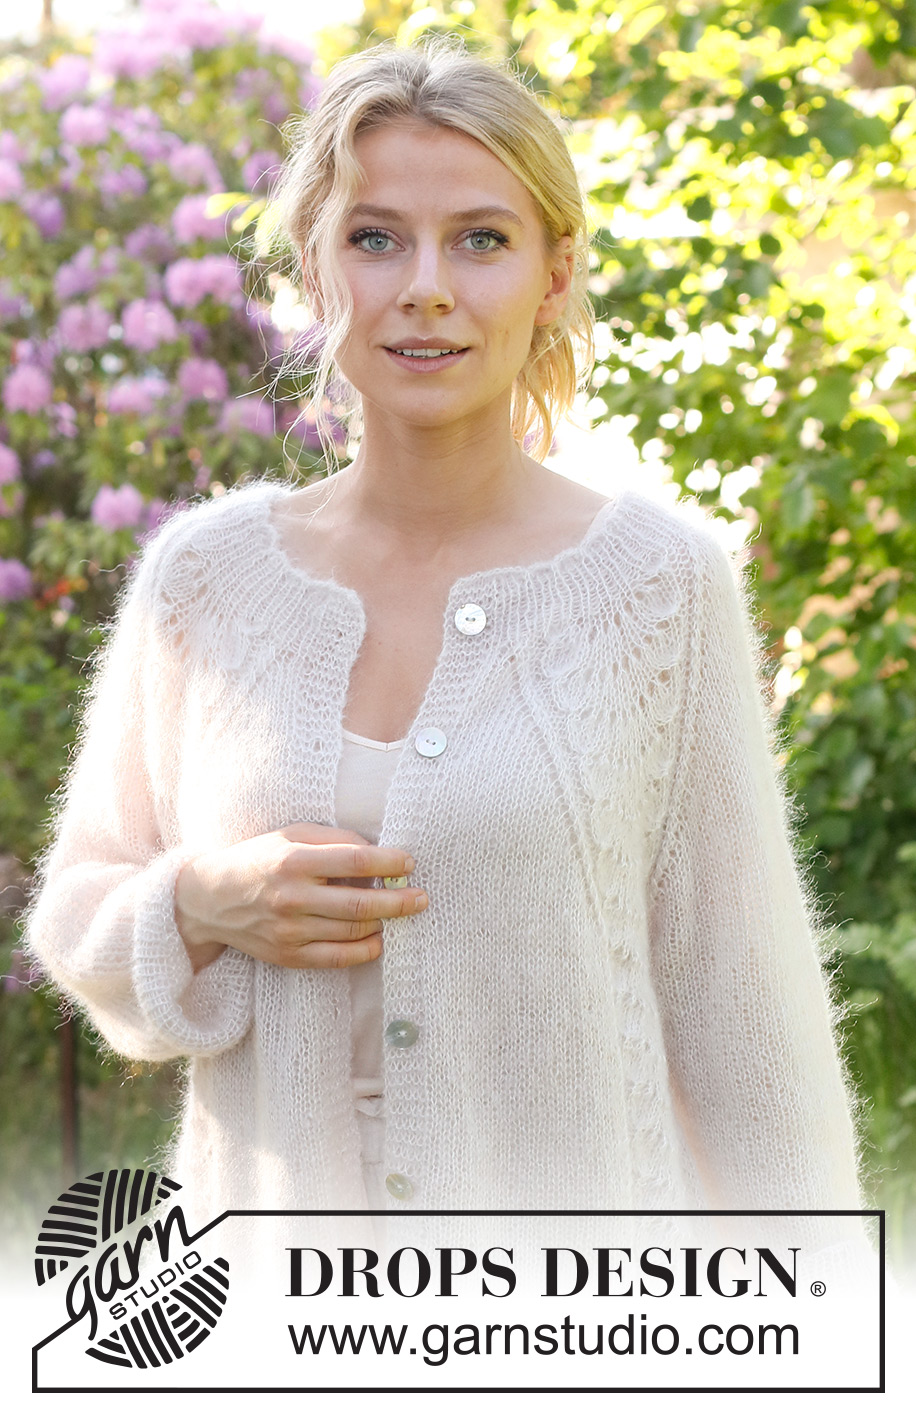
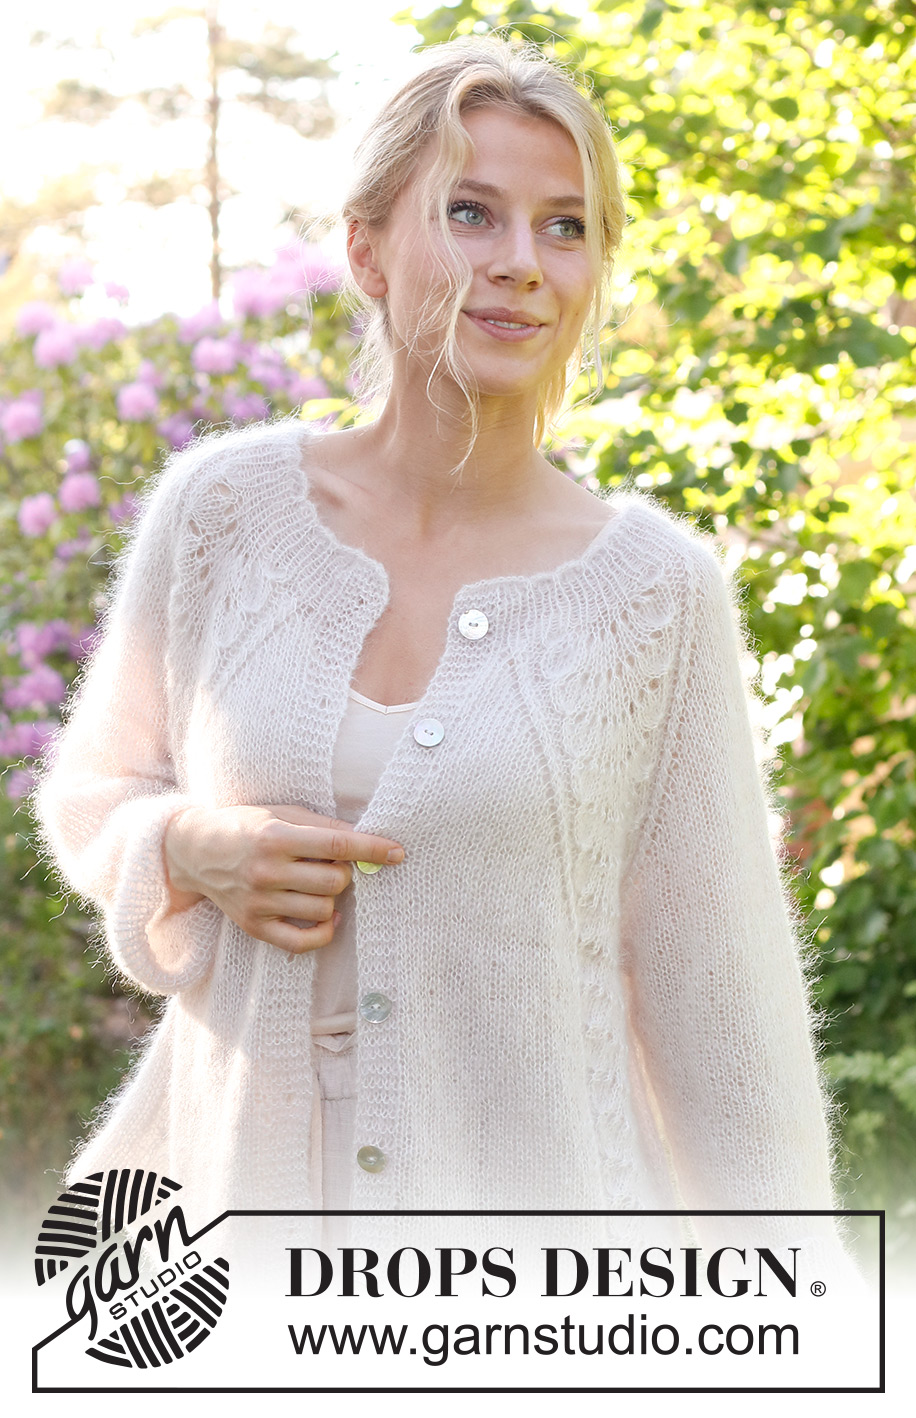
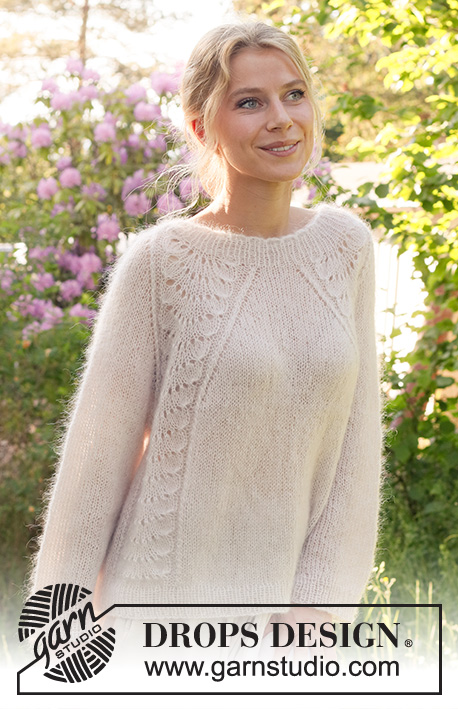
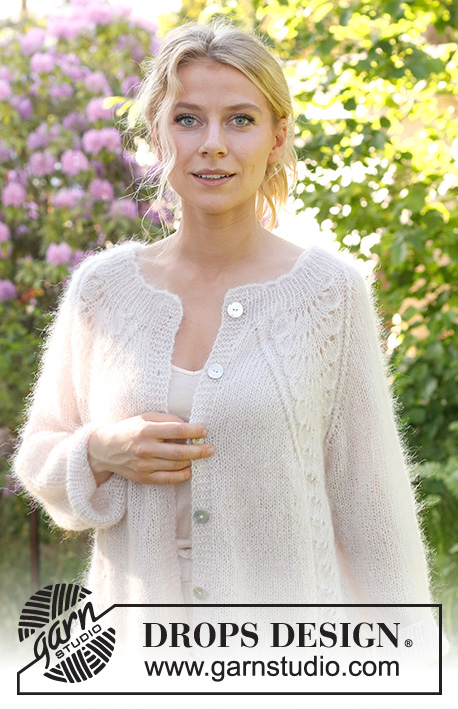
Knitted jacket in 2 strands DROPS Kid-Silk. The piece is worked top down with raglan and wave-pattern. Sizes S - XXXL.
DROPS 232-4 |
|||||||||||||||||||||||||
|
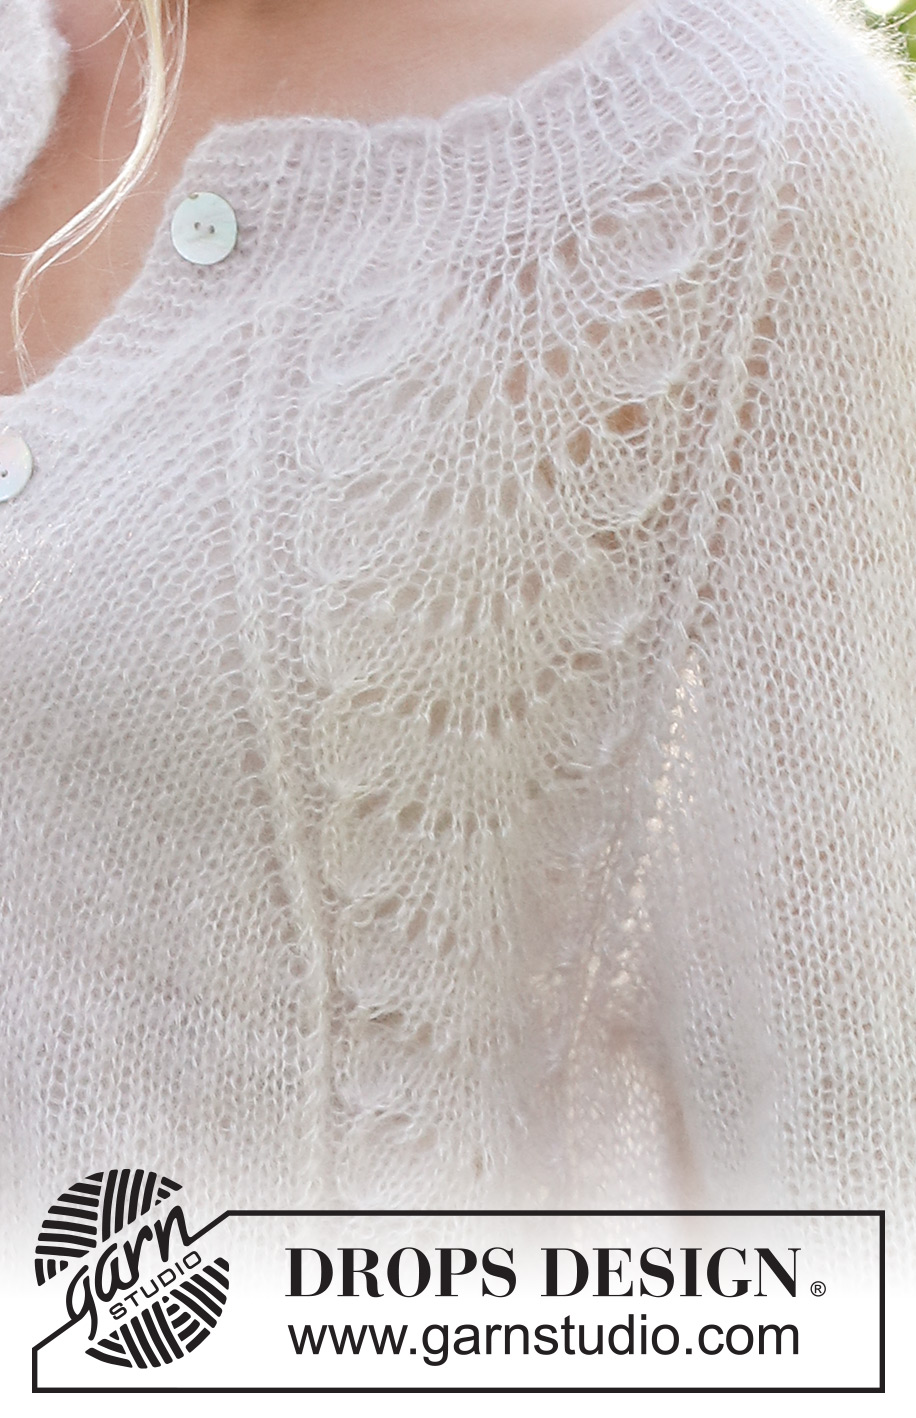
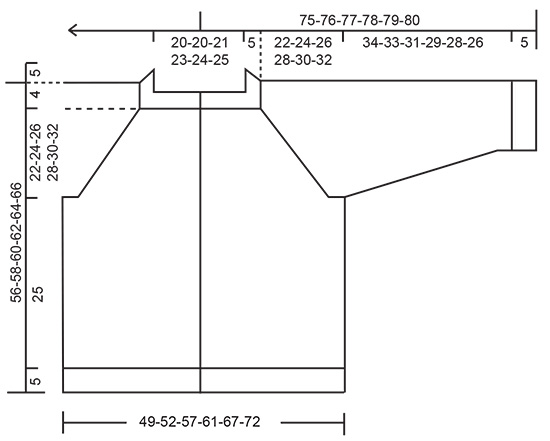
------------------------------------------------------- EXPLANATIONS FOR THE PATTERN: ------------------------------------------------------- RIDGE/GARTER STITCH (worked back and forth): Knit all rows. 1 ridge = knit 2 rows. PATTERN: See diagrams A.1 and A.2. The diagrams show all rows in the pattern from the right side. RAGLAN: All increases are worked from the right side! Increase in each transition between the body and sleeves by increasing before/after A.1/A.2. Increases are different on the body and sleeves, so sometimes you increase 8 stitches other times 4 stitches on the increase-row. Increase 1 stitch by making 1 yarn over. On the next row (wrong side) purl the yarns over twisted to avoid holes. Then work the new stitches in stocking stitch. DECREASE TIP (for sleeves): Work until there are 3 stitches left before the marker, knit 2 together, knit 2 (marker sits between these 2 stitches), slip 1 stitch as if to knit, knit 1 and pass the slipped stitch over the knitted stitch. BUTTONHOLES: Work buttonholes on the right band (when the garment is worn). 1 buttonhole = When there are 3 stitches left on a row from the right side, make 1 yarn over. On the next row (wrong side), knit the yarn over to leave a hole and then knit 2 together. The first buttonhole is worked when the rib on the neck measures 3 cm. Then work the other 5-5-6-6-7-7 buttonholes with approx. 9-10-8½-9-8-8½ cm between each one. ------------------------------------------------------- START THE PIECE HERE: ------------------------------------------------------- JACKET – SHORT OVERVIEW OF THE PIECE: The neck and yoke are worked back and forth with circular needle, from mid-front and top down. The yoke is divided for body and sleeves and the body is continued back and forth. The sleeves are worked in the round with double pointed needles, top down. NECK WITH WAVY EDGE: Cast on 101-101-105-109-113-117 stitches with circular needle size 4 mm and 2 strands DROPS Kid-Silk. Purl 1 row from the wrong side, then work as follows from the right side: 6 band stitches in GARTER STITCH – read description above, * knit 1 purl 1 *, work from *-* until there are 7 stitches left, knit 1 and 6 band stitches in garter stitch. Continue this rib for 3 more rows. Work the next row as follows from the right side: 6 band stitches in garter stitch, knit 1, * purl 1, knit 1, purl 1, take the right needle from the front of work and under the cast on edge, use right needle to lift the outermost stitch from left needle to the right needle, then take the right needle back around under the cast on edge (only the outermost stitch on the right needle is wrapped around the cast on edge), place this stitch back on left needle and knit the stitch (make sure the stitch is not twisted) *, work from *-* until there are 6 stitches left and work 6 band stitches in garter stitch. The neck now has small waves along the cast-on edge. Continue the rib as before with knit 1, purl 1 until the rib measures 5 cm after the waves – remember the BUTTONHOLES on the right band – read description above. AT THE SAME TIME on the last row, increase 6-6-2-2-2-2 stitches evenly spaced = 107-107-107-111-115-119 stitches. When the rib is finished insert a marker after the band at the beginning of the row – the yoke is measured from this marker! YOKE: Change to circular needle size 5 mm. Work as follows from the right side: 6 band stitches in garter stitch, 1-1-1-2-3-4 stitches in stocking stitch, A.1 (front piece), * 1 yarn over, knit 1 *, work from *-* 2 more times, 1 yarn over (sleeve), A.1, 3-3-3-5-7-9 stitches in stocking stitch, A.1 (back piece), * 1 yarn over, knit 1 *, work from *-* 2 more times, 1 yarn over (sleeve), A.1, 1-1-1-2-3-4 stitches in stocking stitch and 6 band stitches in garter stitch (front piece). There are 131-131-131-135-139-143 stitches on the needle. Work this pattern back from the wrong side, but without increasing on the sleeves; the 4 yarn overs from the previous row are purled twisted to avoid holes. REMEMBER THE KNITTING TENSION! OVERVIEW OF THE NEXT SECTION – read the whole section before continuing. Continue the pattern with 6 band stitches in garter stitch on each side. When A.1 has been worked 1 time in height, work A.2 over the 25 stitches in A.1. Then repeat A.2 in height. AT THE SAME TIME on row 3 in A.1 start to increase to RAGLAN as explained below. RAGLAN: Increase for RAGLAN by increasing 1 stitch before/afterA.1/A.2 – read description above. The increases on the front/back pieces and sleeves differ as follows: FRONT/BACK PIECES: Increase every 2nd row (each row from the right side) a total of 10-15-19-22-25-30 times, then every 4th row 6-4-3-3-3-1 times. SLEEVES: Increase every 2nd row (each row from the right side) a total of 21-23-25-29-30-31 times. When all the increases are finished there are 279-299-319-351-371-391 stitches. Continue working without further increases until the piece measures 22-24-26-28-30-32 cm from the marker. Now divide for the body and sleeves: Work the first 48-51-54-58-62-66 stitches (front piece), place the next 49-53-57-65-67-69 stitches on a thread for the sleeve, cast on 6-6-8-8-10-10 stitches (in side under the sleeve), work 85-91-97-105-113-121 stitches (back piece), place the next 49-53-57-65-67-69 stitches on a thread for the sleeve, cast on 6-6-8-8-10-10 stitches (in side under the sleeve), work the last 48-51-54-58-62-66 stitches (front piece). The body and sleeves are finished separately. The piece is now measured from here! BODY: = 193-205-221-237-257-273 stitches. Work A.2, stocking stitch and 6 band stitches in garter stitch on each side as before – the 6-6-8-8-10-10 stitches cast on under each sleeve are worked in stocking stitch. Work until the body measures 25 cm from the division – make sure you have 3 or 5 rows of stocking stitch after a row of yarn overs/decreases in A.2. Knit 1 row from the right side where you increase 18-20-22-24-26-26 stitches evenly spaced (do not increase over the bands) = 211-225-243-261-283-299 stitches. Change to circular needle size 4 mm and work as follows from the wrong side: 6 band stitches in garter stitch, * purl 1, knit 1 *, work from *-* until there are 7 stitches left, purl 1 and 6 band stitches in garter stitch. Continue this rib for 5 cm. Cast off a little loosely. The jacket measures approx. 56-58-60-62-64-66 cm from the shoulder down. SLEEVES: Place the 49-53-57-65-67-69 stitches from the thread on the one side of the piece on short circular needle/double pointed needles size 5 mm and knit up 1 stitch in each of the 6-6-8-8-10-10 stitches cast on under the sleeve = 55-59-65-73-77-79 stitches. Insert a marker in the middle of the 6-6-8-8-10-10 stitches under the sleeve. Allow the marker to follow your work onwards; it will be used when decreasing under the sleeve. Start at the marker and work stocking stitch in the round for 4-4-3-3-2-2 cm. Now decrease 1 stitch on each side of the marker – read DECREASE TIP. Decrease like this every 5-4-3-2-2-1½ cm a total of 6-7-9-12-13-13 times = 43-45-47-49-51-53 stitches. Continue working until the sleeve measures 34-33-31-30-28-26 cm from the division. Knit 1 round where you increase 3 stitches evenly spaced = 46-48-50-52-54-56 stitches. Change to double pointed needles size 4 mm. Work rib (knit 1, purl 1) for 5 cm. Cast off a little loosely. The sleeve measures approx. 39-38-36-35-33-31 cm. Work the other sleeve in the same way. ASSEMBLY: Sew the buttons onto the left band. |
|||||||||||||||||||||||||
Diagram explanations |
|||||||||||||||||||||||||
|
|||||||||||||||||||||||||
 |
|||||||||||||||||||||||||
 |
|||||||||||||||||||||||||
Have you finished this pattern?Tag your pictures with #dropspattern #waveromancecardigan or submit them to the #dropsfan gallery. Do you need help with this pattern?You'll find 34 tutorial videos, a Comments/Questions area and more by visiting the pattern on garnstudio.com. © 1982-2026 DROPS Design A/S. We reserve all rights. This document, including all its sub-sections, has copyrights. Read more about what you can do with our patterns at the bottom of each pattern on our site. |
|||||||||||||||||||||||||


With over 40 years in knitting and crochet design, DROPS Design offers one of the most extensive collections of free patterns on the internet - translated to 17 languages. As of today we count 324 catalogues and 12290 patterns translated into English (UK/cm).
We work hard to bring you the best knitting and crochet have to offer, inspiration and advice as well as great quality yarns at incredible prices! Would you like to use our patterns for other than personal use? You can read what you are allowed to do in the Copyright text at the bottom of all our patterns. Happy crafting!
Post a comment to pattern DROPS 232-4
We would love to hear what you have to say about this pattern!
If you want to leave a question, please make sure you select the correct category in the form below, to speed up the answering process. Required fields are marked *.