Comments / Questions (4)
![]() Mariete wrote:
Mariete wrote:
Bij de pijp staat 1st: brei van *-* (bloempatroon) 4x. Daarna moet ik met 5 herh. van het patroon eindigen. Klopt dit wel? Worden naalden en toeren niet met elkaar verwisseld?
28.07.2022 - 09:53DROPS Design answered:
Dag Mariete,
Met een naald breien wordt inderdaad een toer breien bedoeld.
07.08.2022 - 13:56
![]() Val wrote:
Val wrote:
There is something wrong with the chart diagram explanations. On the chart, there is no white square contains a black square - you have charted it as a white square with a black circle. I also found the heel turning instructions to be too vague - it is not clear enough whether you are supposed to work the short rows on the 24 stitches or the 36. An inexperienced knitter would not be able to work this pattern!
14.02.2021 - 07:36
![]() María wrote:
María wrote:
Desde luego si seleccionáis el jersey v55 estos calcetines son un must para tener todo el conjunto. Me parecen encantadores
18.12.2018 - 08:06
![]() Rita Reimann wrote:
Rita Reimann wrote:
Dieses Modell möchte ich nacharbeiten. S it SHR schön.
16.12.2018 - 15:32
Spring Brings#springbringssocks |
|||||||||||||||||||||||||||||||
 |
 |
||||||||||||||||||||||||||||||
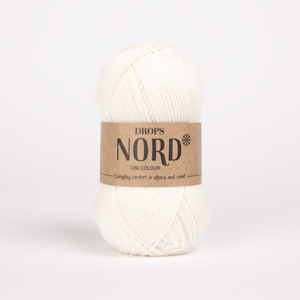
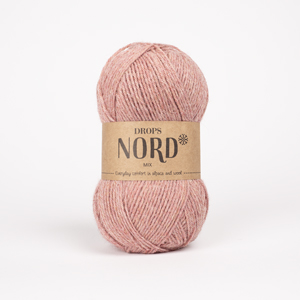
Knitted toe-up socks in DROPS Nord. The piece is worked with stripes and 2-coloured flowers in English rib on the leg. Sizes 35 - 43.
DROPS 198-15 |
|||||||||||||||||||||||||||||||
|
------------------------------------------------------- EXPLANATIONS FOR THE PATTERN: ------------------------------------------------------- PATTERN: See diagram A.1. Choose diagram for your size (applies to A.1A, A.1C and A.1D). The whole of A.1 measures approx. 10 cm in height. INCREASE TIP-1 (for toe): Start 2 stitches before the marker, make 1 yarn over, knit 4 (marker sits in middle of these 4 stitches), 1 yarn over. Repeat at the other marker = 4 stitches increased on round. On the next round knit the yarn overs twisted to avoid holes. INCREASE TIP-2 (evenly spaced): To work out how to increase evenly, count the total number of stitches on the needles (e.g. 52 stitches) and divide by the number of increases to be made (e.g. 4) = 13. In this example increase by making 1 yarn over after each 13th stitch. On the next round work the yarn overs twisted to avoid holes. 2-COLOURED FLOWER PATTERN IN ENGLISH RIB (in the round): The flower pattern is worked in English rib as shown in diagram A.1B. The remaining stitches are worked in stocking stitch with the wrong side out, i.e. the stitches are purled as described in the text. To obtain the 2-coloured effect, you work stripes with alternately 1 round off white and 1 round old pink. A.1 starts on a round with off white as described in the text. Each time you either increase or decrease in A.1 this occurs on a round with old pink. KNITTING TIP-1: To avoid holes in the corner of the heel when working the first round of the leg, lift the horizontal strand before the next stitch (in the transition between heel and the other stitches), onto the left needle and place it twisted on needle. Work this strand together with the next stitch on the left needle. KNITTING TIP-2: All the numbers of stitches given while working the flower pattern in English rib do not include the yarn overs, as the yarn overs belong to the knitted stitch. In other words, knitted stitch + yarn over count as 1 stitch. ------------------------------------------------------- START THE PIECE HERE: ------------------------------------------------------- SOCK - SHORT OVERVIEW OF THE PIECE: The piece is worked in the round with double pointed needles from the toe upwards. Toe and heel are one-coloured, foot and leg are worked in stripes. In addition there is a 2-coloured flower pattern in English rib on leg. TOE: Cast on 8 stitches with double pointed needles size 2.5 mm and old pink. Divide the stitches to 2 stitches on each needle. Work 1 round where you knit 2 stitches in each stitch = 16 stitches. Insert 1 marker after the first 4 stitches on the round and 1 marker after the next 8 stitches. There are 4 stitches left on round after the last marker and the markers sit on each side of the toe. Beginning of round = mid under foot. Work stocking stitch in the round. AT THE SAME TIME on the first round increase on each side of both markers – read INCREASE TIP-1 (= 4 stitches increased). Increase like this every round a total of 2-4-6 times and then every 2nd round a total of 7-6-5 times = 52-56-60 stitches. Continue with stocking stitch without further increases until the piece measures 5-5-6 cm from the cast-on edge. Now work the foot as described below. FOOT: Work stripes in the round in stocking stitch with the wrong side out, i.e. purl alternately 1 round with off white and 1 round with old pink. REMEMBER THE KNITTING TENSION! When the piece measures 17-19-21 cm from the cast-on edge, divide the piece for the heel as follows: Leave the middle 20-22-24 stitches on the needles (i.e. divide the stitches with 10-11-12 stitches on needles 2 and 3). Divide the remaining 32-34-36 stitches onto needles 1 and 4 with 16-17-18 stitches on each needle. Cut the strand and work heel as described below. HEEL: Work stocking stitch back and forth with old pink as follows: ROW 1 (= right side): Knit until there is 1 stitch left, turn the piece. ROW 2 (= wrong side): Slip the first stitch as if to purl, tighten strand and purl until there is 1 stitch left, turn the piece. ROW 3 (= right side): Slip the first stitch as if to knit, tighten strand and knit until there are 2 stitches left, turn the piece. ROW 4 (= wrong side): Slip the first stitch as if to purl, tighten strand and purl until there are 2 stitches left, turn the piece. Continue turning in the same way until there are 14-14-14 stitches left on the needle. Continue back and forth over the heel in the same way, but now work 1 more stitch on each row instead of 1 less (both on right and wrong side as before). To avoid holes in the transition when turning, lift the horizontal strand before the extra stitch onto the left needle and place it twisted on needle. Work this strand together with the next stitch on the left needle (from the right side knit the strand and stitch together, from the wrong side purl the strand and stitch together). Work like this until you have worked over all stitches on heel. Cut the strand, insert a marker in the piece and work the leg as described below. THE PIECE IS NOW MEASURED FROM HERE! LEG: = 52-56-60 stitches. Start mid back on the sock, i.e. between needles 1 and 4. Purl 1 round with the next colour in the stripes on the foot – read KNITTING TIP-1 and increase AT THE SAME TIME 4-0-2 stitches evenly on this round – read INCREASE TIP-2 = 56-56-62 stitches. Continue in the round with stripes in stocking stitch with the wrong side out as before. When the piece measures 3-3-4 cm from the marker on the heel, work the next round as follows (adjust so that the next round is worked with off white - stripes continue as before and the first round in A.1 is worked with off white): Work A.1A (= 6-6-7 purled stitches), * work A.1B (= 1 stitch), A.1C (= 10-10-11 purled stitches) *, work from *-* a total of 4 times, work A.1B (= 1 stitch) and finish with A.1D (= 5-5-6 stitches) = 5 repeats of flowers on the round. Continue this pattern – read 2-COLOURED FLOWER PATTERN IN ENGLISH RIB and KNITTING TIP-2. When the first 6 rounds in A.1 have been worked there are 55-55-61 stitches on the needles. Continue this pattern. When A.1 has been completed there are still 55-55-61 stitches on the needles and the piece measures approx. 13-13-14 cm from the marker on the heel. Continue with stripes and purl and increase AT THE SAME TIME 5-8-5 stitches evenly on the first round = 60-63-66 stitches. When you have worked approx. 3-3-4 cm of stripes after A.1, knit 1 round with old pink where you increase 9-9-9 stitches evenly spaced = 69-72-75 stitches. Work rib in the round (= knit 1 /purl 2) for approx. 2½ to 3 cm. Loosely cast off with knit, but to avoid the cast-off edge being tight you can make 1 yarn over after each 6th stitch (yarn overs cast off as normal stitches). The leg measures approx. 19-19-21 cm from the cast-off edge down to heel. ASSEMBLY: Sew hole at the tip of the toe. Work the other sock the same way. |
|||||||||||||||||||||||||||||||
Diagram explanations |
|||||||||||||||||||||||||||||||
|
|||||||||||||||||||||||||||||||
 |
|||||||||||||||||||||||||||||||
 |
|||||||||||||||||||||||||||||||
Have you finished this pattern?Tag your pictures with #dropspattern #springbringssocks or submit them to the #dropsfan gallery. Do you need help with this pattern?You'll find 24 tutorial videos, a Comments/Questions area and more by visiting the pattern on garnstudio.com. © 1982-2026 DROPS Design A/S. We reserve all rights. This document, including all its sub-sections, has copyrights. Read more about what you can do with our patterns at the bottom of each pattern on our site. |
|||||||||||||||||||||||||||||||


Post a comment to pattern DROPS 198-15
We would love to hear what you have to say about this pattern!
If you want to leave a question, please make sure you select the correct category in the form below, to speed up the answering process. Required fields are marked *.