
Popular categories
Looking for a yarn?


Comments / Questions (73)
![]() Krista Hansen wrote:
Krista Hansen wrote:
I just completed A.2, getting ready for A.3. When I checked my length, I was over the 8-3/4” required up to this point. I started digging through this section of the pattern and found a change in wording in your pattern. For all segments of the body of the sweater, measurements are from the “cast-on edge”. For the A.1 segment, it says “when the piece measures”, which I took to mean the segment length. So, now what do I do? Perhaps the wording of this should be consistent?
21.04.2025 - 18:29DROPS Design answered:
Dear Mrs Hansen, the measurements should be taken from cast-on edge, including before starting A.2. Happy knitting!
22.04.2025 - 16:33
![]() Roshanka wrote:
Roshanka wrote:
Hi. Can you explain below diagonal shoulder part in this pattern please ."Slip stitches on a thread from the side as follows: 4-4-4-5-5-6 stitches 4 times and then the last the last 10-12-12-12-14-14 stitches towards the neck. When all stitches are on a thread, slip stitch back on needle size 5 mm. " thanks in advance.
21.04.2025 - 06:58DROPS Design answered:
Dear Roshanka, the stitches will be first worked then slipped on a thread at the beginning of a row from armhole towards neck, ie for back piece right shoulder, at the beg of a row from RS, for back piece left shoulder, at the beg of a row from WS. See in this video (for another pattern) how to work stitches and slip them on a thread and how to cast off/decrease for neck at the same time. Happy knitting!
22.04.2025 - 15:32
![]() Roshanka wrote:
Roshanka wrote:
Hi. I need help to understand the back piece part. It says ..."continue A.4. With 1 st in garter stitch in each side. On the last row from the right side increase 2sts." What does it mean by the last row? Does it means the last row in A.4?
19.04.2025 - 11:58DROPS Design answered:
Dear Roshanka, yes, it means that you increase on the last row of chart A.4. Happy knitting!
21.04.2025 - 00:03
![]() Martyna wrote:
Martyna wrote:
W opisie skosów ramion mamy "zdejmować oczka na nitkę". Co to dokładnie oznacza? Czy powinnam zamknąć te oczka czy zsunąć je np na agrafkę dziewiarska?
27.03.2025 - 10:38DROPS Design answered:
Witaj Martyno, należy zdejmować te oczka na nitkę, drut pomocniczy czy agrafkę, te oczka nie są jeszcze zamykane. Pozdrawiamy!
27.03.2025 - 13:46
![]() GUNDI wrote:
GUNDI wrote:
HALLO, Ich wundere mich, dass nach dem Bündchen Maschen abgenommen werden, hab ich da irgendwas übersehen oder falsch verstanden,oft ist es ja so, dass dann zugenommen wird.
01.03.2025 - 14:41DROPS Design answered:
Liebe Gundi, für den gleichen Umfang/die gleiche Breite braucht man mehr Maschen für das Bündchen mit den kleineren Nadeln als für das Muster/Glattrechts mit den grösseren Nadeln, deshalb wird man vor Bündchen zunehmen. Viel Spaß beim stricken!
03.03.2025 - 09:01
![]() Lillian wrote:
Lillian wrote:
Hei. Jeg forsøker å skrive ut denne oppskriften, men den blir ikke lastet opp for utskrift. Det har ikke vært noe problem tidligere. Er det endring i muligheten for å skrive ut?
14.01.2025 - 12:21DROPS Design answered:
Hej Lillan, det fungerer fint her... prøv at åbne den i en anden weblæser. Skriv gerne i så fald hvilken som ikke fungerer :)
15.01.2025 - 07:10
![]() Krista Hansen wrote:
Krista Hansen wrote:
The pattern does not indicate which stitch to use for a gauge. Should I use stockinette or something else?
01.01.2025 - 02:42DROPS Design answered:
Hi Krista, you should use relief pattern (select a part of the design and make a swatch). Happy knitting!
01.01.2025 - 20:15
![]() Karen wrote:
Karen wrote:
Do I slip 4 stitches when knit on the wrong side? Or just the right side?
31.12.2024 - 01:23DROPS Design answered:
Dear Karen, if you are still working both shoulders in the same row then you slip the first 4 stitches on the right side for one shoulder and the first 4 stitches on the wrong side for the other shoulder. Since you will later on work each other separately and you need to continue slipping stitches in exactly the same sides as before, you will slip 4 stitches on the right side on one shoulder and slip 4 stitches on the wrong side for the other shoulder. Happy knitting!
31.12.2024 - 19:22
![]() Karen wrote:
Karen wrote:
Regarding my past post, I'm knitting Around Town. Please give me explicit instructions. Where to do short rows, etc. Everything.
30.12.2024 - 13:33DROPS Design answered:
Dear Karen, please see our answers below. Happy knitting!
31.12.2024 - 00:38
![]() Karen wrote:
Karen wrote:
P.S. In addition, I am a very experienced knitter who has knitted many short rows. Can give me explicit instructions as I have knitted so much - to no avail at this point. Step by step, please.
30.12.2024 - 00:12DROPS Design answered:
Dear Karen, as continuation of the previous answer: when working each shoulder separately, you will always slip stitches from the same side for that shoulder (so where the previous stitches were slipped and not from the neck, where stitches were cast off). After having slipped 4 stitches 4 times from each shoulder, slip the last 12 stitches on each shoulder and you should have all of the shoulder stitches in the same thread/needle. Now slip them back and work as indicated over all stitches (since they were slipped to the needles on different rows, the resulting shoulder will have a diagonal shape, from the different heights of the stitches). Happy knitting!
31.12.2024 - 00:16
|
|||||||||||||
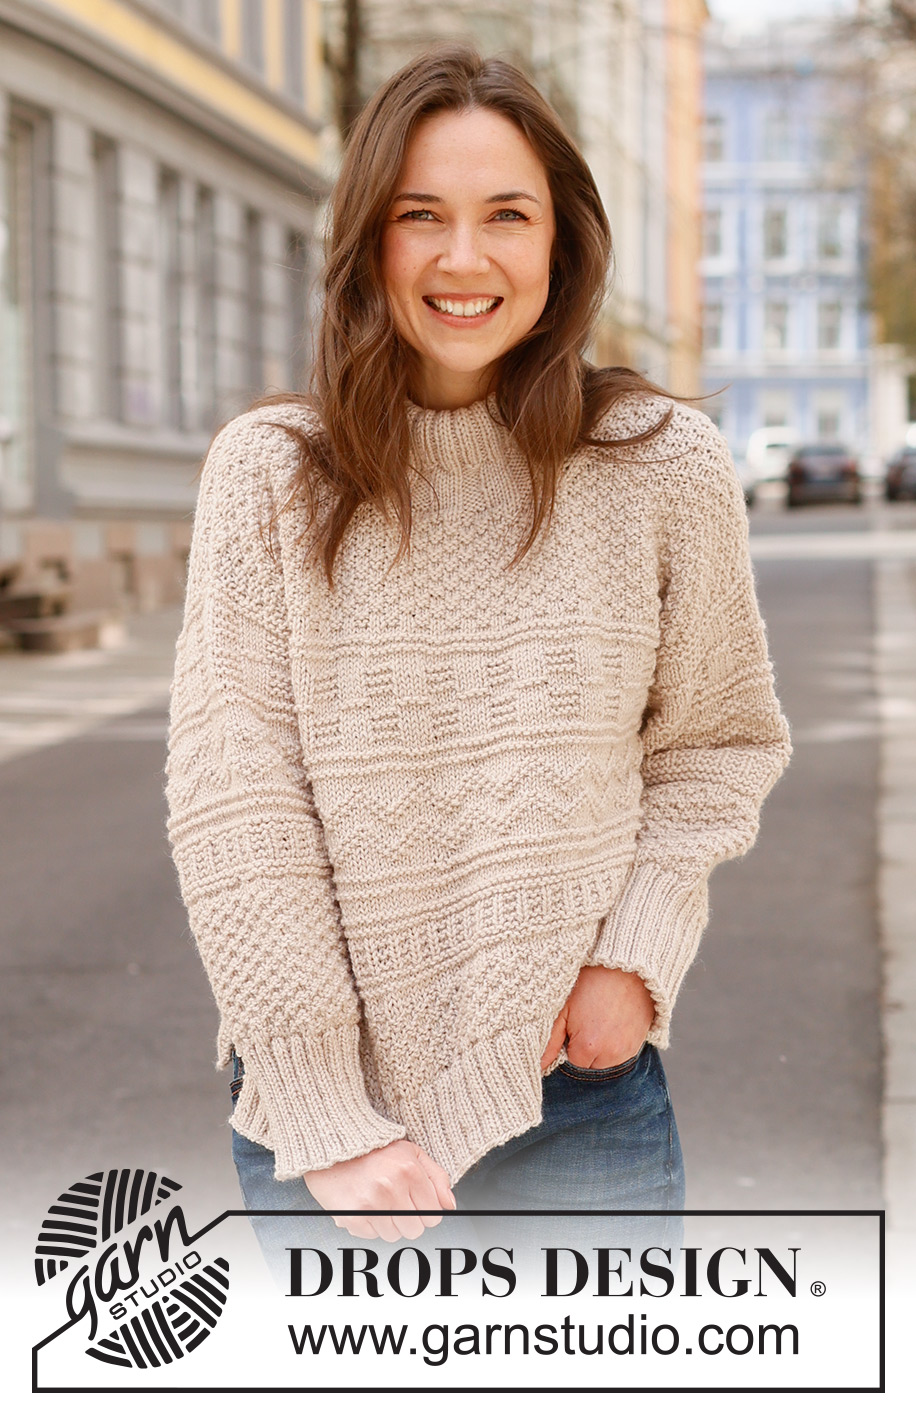
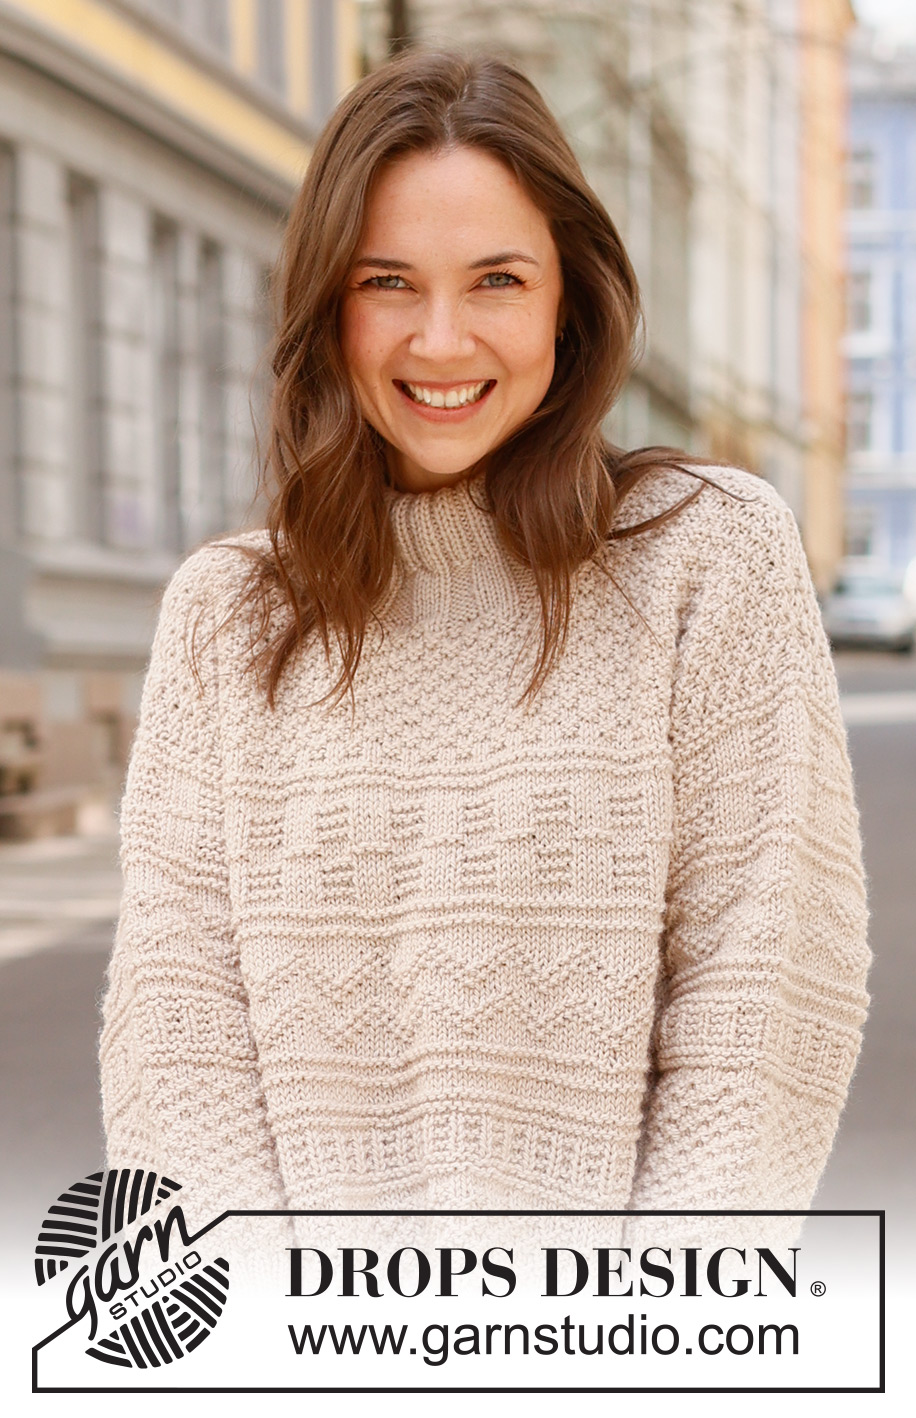
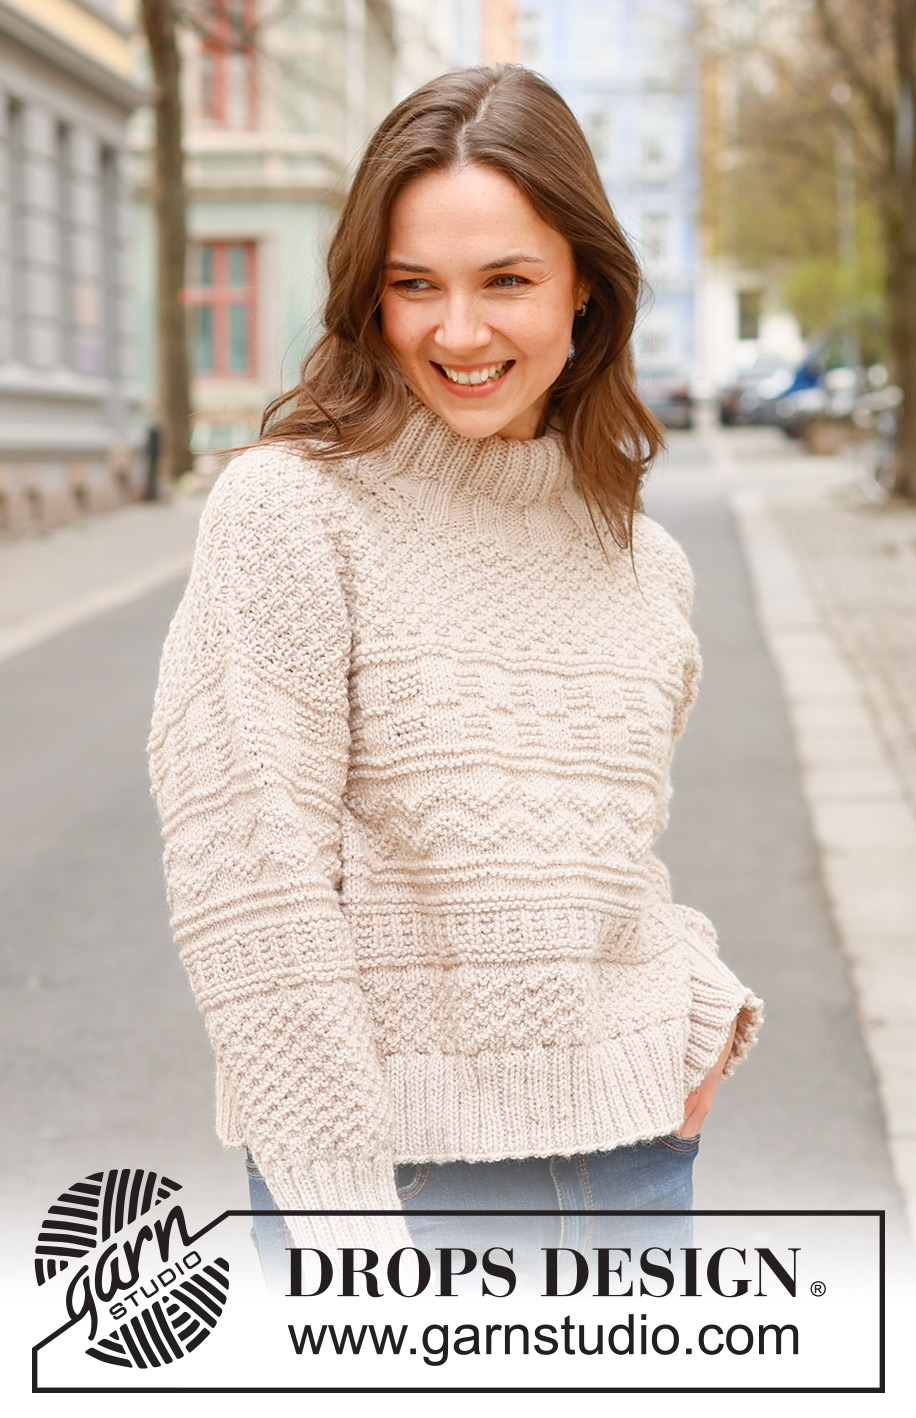
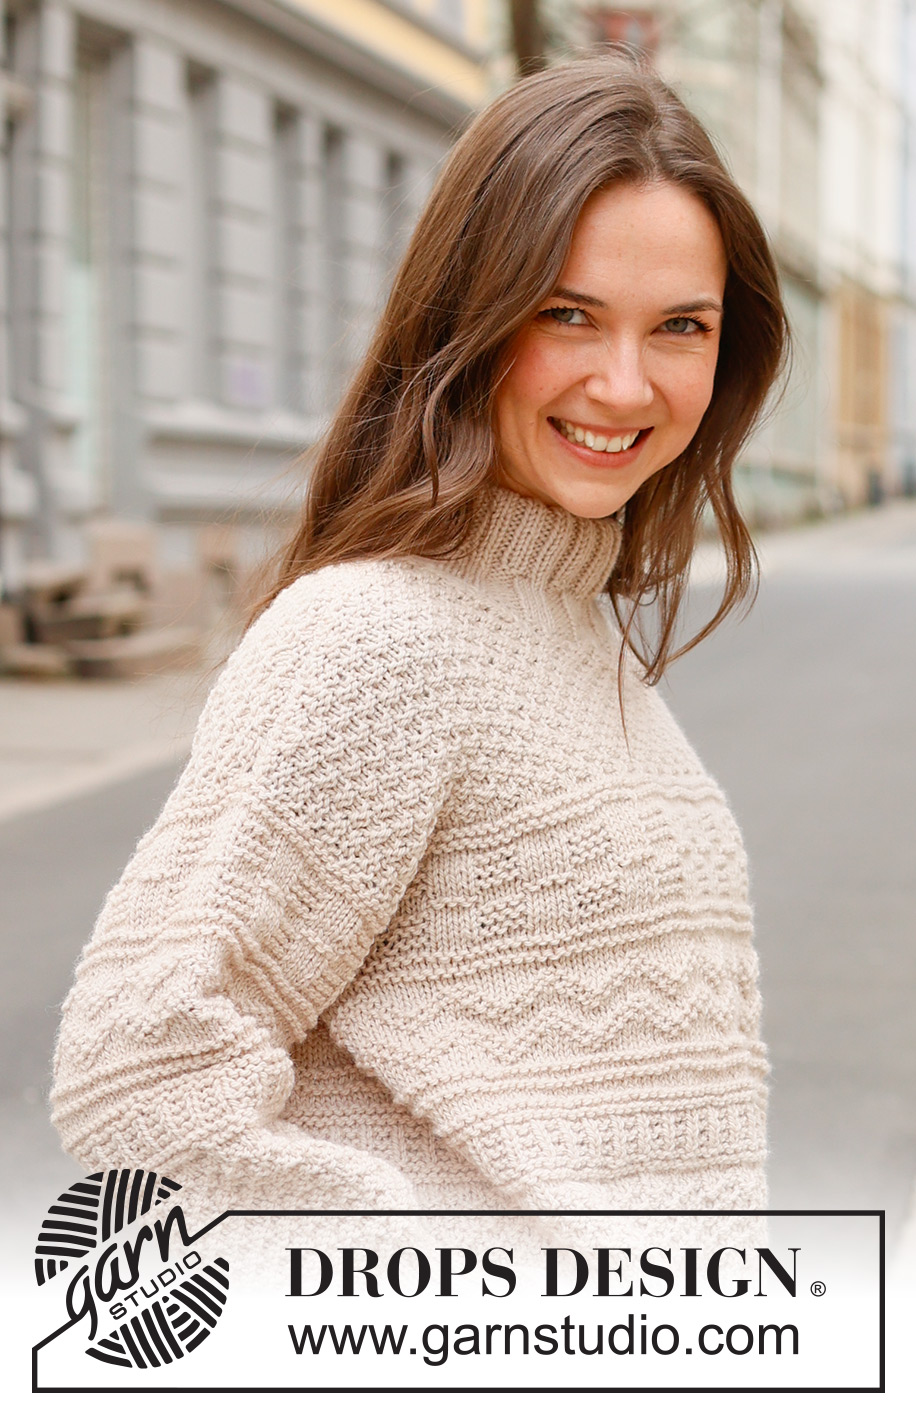
Around Town#aroundtownsweater |
|||||||||||||
 |
 |
||||||||||||
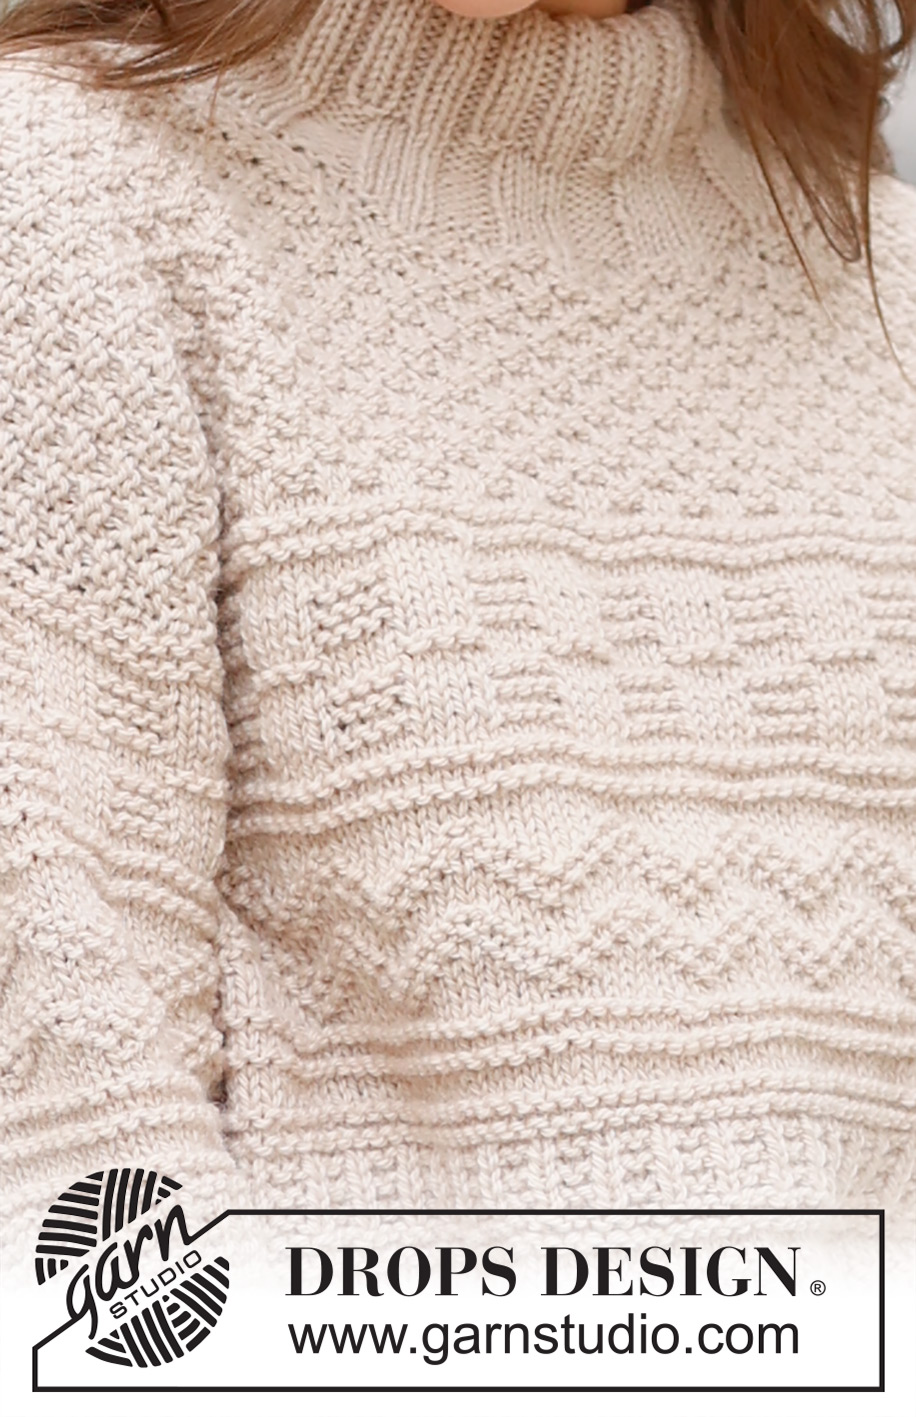
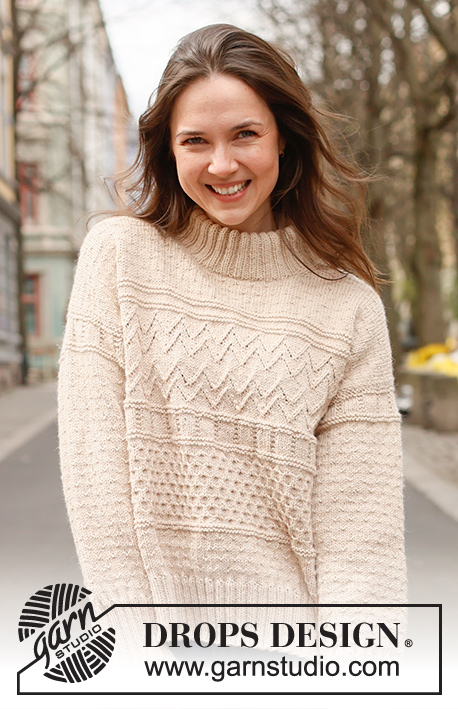
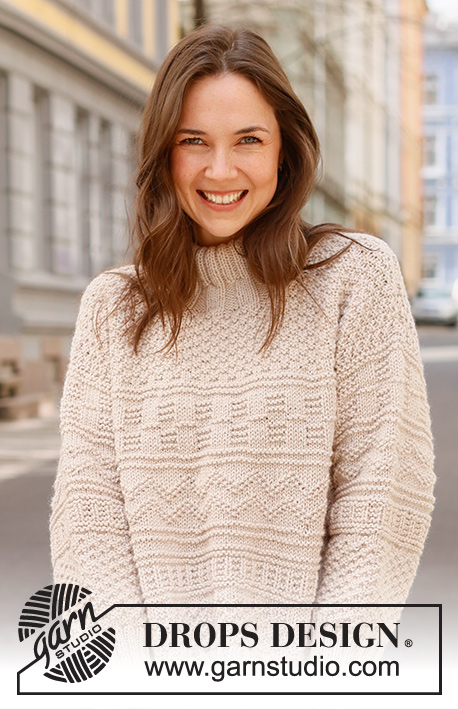
Knitted jumper in DROPS Alaska or DROPS Big Merino. Piece is knitted bottom up with relief pattern and double neck edge. Size XS – XXL.
DROPS 237-7 |
|||||||||||||
|
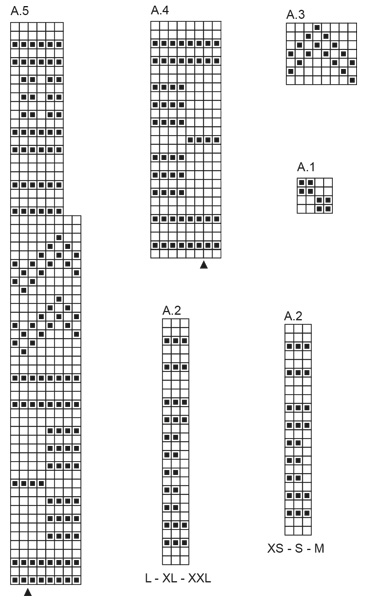
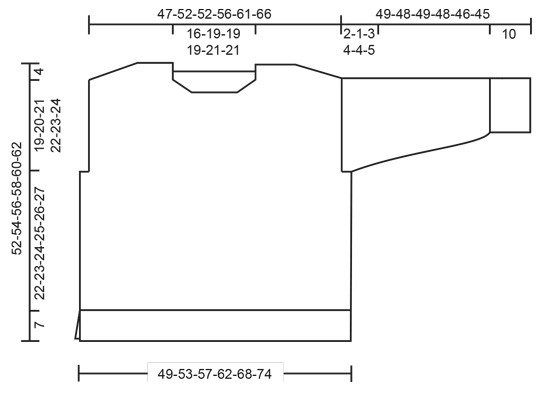
---------------------------------------------------------- EXPLANATION FOR THE PATTERN: ---------------------------------------------------------- GARTER STITCH (back and forth): Knit all rows. 1 ridge vertically = knit 2 rows. PATTERN: See diagrams A.1 to A.5. Choose diagram for your size (applies to A.2). Diagrams show all rows in pattern seen from the right side. DECREASE TIP-1 (applies to neck): All decreases are done from the right side! DECREASE AT BEGINNING OF ROW AS FOLLOWS FROM RIGHT SIDE: Work 2 stitches in stocking stitch, slip 1 stitch knitwise, knit 1, pass slipped stitch over stitch worked (1 stitch decreased). DECREASE AS FOLLOWS AT THE END OF ROW FROM RIGHT SIDE: Work until 4 stitches remain, knit 2 together and 2 stitches in stocking stitch (1 stitch decreased). DECREASE TIP-2 (applies to mid under sleeves): Decrease 1 stitch on each side of marker thread as follows: Work until 2 stitches remain before marker thread, knit/purl 2 together depending on pattern, marker thread, slip 1 stitch knitwise, knit 1, pass slipped stitch over stitch worked/purl 2 twisted together depending on pattern (2 stitches decreased). ---------------------------------------------------------- START THE PIECE HERE: ---------------------------------------------------------- JUMPER - SHORT OVERVIEW OF THE PIECE: Front and back piece back and forth on circular needle, bottom up until rib has been worked, then place piece together. Body is worked in the round on circular needle up to armholes. Then finish back piece and front piece back and forth on circular needle separately until finished measurements. Sew the shoulder seams. Pick up stitches along armholes and work the sleeves top down. Work sleeve cap back and forth on circular needle, work the rest of sleeve in the round on double pointed needles/a short circular needle, top down. Finish with a double neck edge. BACK PIECE: Cast on 110-118-126-138-150-162 stitches on circular needle size 3.5 mm with DROPS Alaska or DROPS Big Merino. Purl 1 row from wrong side. Work next row as follows from right side: 2 stitches in GARTER STITCH - read explanation above - * knit 2, purl 2 *, work from *-* until 4 stitches remain, knit 2 and finish with 2 stitches in garter stitch. Continue rib like this for 7 cm – adjust after a row from wrong side. Put piece aside and work the front piece. FRONT PIECE: Cast on the same number of stitches as on back piece and work piece the same way as back piece until piece measures 7 cm - finish after a row from wrong side. BODY: Put piece together as follows: Knit stitch from front piece and decrease at the same time 26-28-30-32-34-36 stitches evenly, knit over stitch from back piece and decrease at the same time 26-28-30-32-34-36 stitches evenly = 168-180-192-212-232-252 stitches on needle (84-90-96-106-116-126 stitches on front piece and 84-90-96-106-116-126 stitches on back piece). Switch to circular needle size 5 mm. Knit 1 round. Then work A.1 in the round on body. REMEMBER THE KNITTING TENSION! When piece measures 13-13-13-13-15-15 cm, work A.2 in the round - AT THE SAME TIME adjust number of stitches to 168-180-192-213-231-252 on the first round. On last round in A.2 increase 0-4-0-3-1-4 stitches evenly = 168-184-192-216-232-256 stitches. When A.2 has been worked, piece measures approx. 22-22-22-23-25-25 cm from cast-on edge on front/back piece. If the garment is shorter than this, continue in stocking stitch until correct measurements. Then work A.3 in the round on body. Repeat A.3 2-2-3-3-3-4 times in total vertically. When A.3 has been worked, piece measures approx. 27-27-30-31-33-35 cm from cast-on edge. If the garment is shorter than this, continue until correct measurements. Knit 1 round while decreasing 0-4-0-4-0-4 stitches evenly = 168-180-192-212-232-252 stitches. Insert 1 marker thread mid front and 1 marker thread mid back, insert in addition 1 marker in each side on body - this is done as follows: Insert 1 marker at beginning of round, count 42-45-48-53-58-63 stitches, insert 1 marker thread before next stitch (mid front), count 42-45-48-53-58-63 stitches, insert 1 marker before next stitch, count 42-45-48-53-58-63 stitches, insert 1 marker thread before next stitch (mid back). 42-45-48-53-58-63 stitches remain on round after last marker thread. Work A.4 as follows: Count out from symbol marked as the middle in diagram and marker thread mid from where pattern should start in the side, work A.4 as far as you can towards the marker in the side (marker thread mid front should fit symbol for the middle in A.4), then begin A.4 again the same way as on beginning of round, and work A.4 as far as you can until marker at the beginning of round (marker thread mid back should fit symbol for the middle in A.4). Continue pattern like this, and cast off for armholes as explained below. ARMHOLE: When piece measures 29-30-31-32-33-34 cm, cast off for armholes as follows: Begin 3-2-5-6-7-8 stitches remain before marker at the beginning of round, cast off 6-4-10-12-14-16 stitches for armhole, work as before until 3-2-5-6-7-8 stitches remain before marker in the other side, cast off 6-4-10-12-14-16 stitches for armhole, work as before the rest of round. Finish back piece and front piece separately. BACK PIECE: = 78-86-86-94-102-110 stitches. Begin from wrong side and continue A.4 with 1 stitch in garter stitch in each side. On last row from right side, increase 2 stitches evenly in all sizes = 80-88-88-96-104-112 stitches. When A.4 has been worked, A.1 with 1 stitch in garter stitch in each side. Repeat A.1 vertically until finished measurements. Then cast off for diagonal shoulder and neck as explained below. DIAGONAL SHOULDER: When piece measures 48-50-52-54-56-58 cm, slip stitches on a thread in each side for diagonal shoulder (to avoid cutting the yarn work stitches before slipping them on the thread): Slip stitches on a thread from the side as follows: 4-4-4-5-5-6 stitches 4 times and then the last the last 10-12-12-12-14-14 stitches towards the neck. When all stitches are on a thread, slip stitch back on needle size 5 mm. Purl 1 row from wrong side (to avoid a hole in the transitions where stitches where slipped on a thread, pick up the yarn between 2 stitches and purl them twisted together with first stitch on left needle). Cast off knitting from right side. NECK: At the same time when piece measures 49-51-53-55-57-59 cm, cast off the middle 24-28-28-28-32-32 stitches for neck and finish each shoulder separately. Continue A.1, continue to slip stitches on a thread for diagonal shoulder and work in addition the 3 stitches towards the neck in stocking stitch. AT THE SAME TIME on next row from right side, decrease 1 stitch for neck - read DECREASE TIP-1. Decrease like this on every row from right side 2 times in total. When all stitches have been cast off, piece measures approx. 52-54-56-58-60-62 cm from highest point on the shoulder and down. Repeat on the other shoulder. FRONT PIECE: = 78-86-86-94-102-110 stitches. Cast on and work pattern the same way as on back piece. In addition decrease for neck and diagonal shoulder as explained below. NECK: When piece measures 46-48-49-51-52-54 cm, slip the middle 20-24-24-24-26-26 stitches on a thread for neck, and finish each shoulder separately. Continue A.1 but work the outermost 3 stitches towards the neck in stocking stitch. AT THE SAME TIME on next row from right side, decrease 1 stitch for neck - read DECREASE TIP-1. Decrease like this on every row from right side 4-4-4-4-5-5 times in total. DIAGONAL SHOULDER: At the same time when piece measures 48-50-52-54-56-58 cm, slip stitches on a thread for diagonal shoulder the same way as on back piece, i.e. slip 4-4-4-5-5-6 stitches on a thread 4 times then slip the last 10-12-12-12-14-14 stitches towards the neck. When all stitches have been slipped on a thread, purl 1 row from wrong side as on back piece before casting off by knitting from right side. Repeat on the other shoulder. ASSEMBLY: Sew the shoulder seams. SLEEVES: Use circular needle size 5 mm and DROPS Alaska or DROPS Big Merino, pick up from right side 32-34-36-37-39-41 stitches from the bottom of armhole up to shoulder and 32-34-36-37-39-41 stitches from the shoulder and down to the bottom of armhole on the other side = 64-68-72-74-78-82 stitches along armhole. Insert 1 marker thread in the middle of the row - measure sleeve from this marker and use the marker thread when counting to where pattern should begin. Begin from wrong side and work A.5 as follows: Count out from the symbol marked as the middle in diagram and marker thread on sleeve where pattern should begin, and work A.5 back and forth with 1 stitch in garter stitch in each side. When sleeve measures 2-1-3-4-4-5 cm from where marker thread was inserted, put piece together on a short circular needle or double pointed needles size 5 mm – work the rest of sleeve in the round. Insert 1 marker thread at the beginning of round (mid under sleeve). Move marker thread upwards when working. Begin round mid under sleeve and continue pattern in the round (symbol for the middle in diagram should still fit marker thread mid on top of sleeve - pattern does not fit mid under sleeve). When piece measures 5-4-6-7-7-8 cm from where marker thread was inserted mid on top of sleeve, decrease 2 stitches mid under sleeve - read DECREASE TIP-2. Decrease like this every 4-4-3½-3-2½-2 cm 8-9-10-11-12-13 times in total = 48-50-52-52-54-56 stitches. When A.5 has been worked vertically, work A.1 in the round. Work until sleeve measures 39-38-39-38-36-35 cm from marker. 10 cm remain until finished measurements. Try the jumper and work to desired length before rib. Knit 1 round while increasing 12-14-12-16-18-16 stitches evenly = 60-64-64-68-72-72 stitches. Switch to double pointed needles size 3.5 mm. Work rib (knit 2/purl 2) for 10 cm. Loosely cast off. Sleeve measures approx. 49-48-49-48-46-45 cm from marker mid on top of sleeve. Work the other sleeve the same way. Sew bottom of armholes - see chart. DOUBLE NECK EDGE: Begin at one shoulder, use a short circular needle size 3.5 mm and pick up approx. 80-96-96-104-112-112 stitches around the neck inside 1 stitch (including stitches on thread). Work rib in the round (knit 4/purl 4 -adjust beginning of rib so that there are 4 purl stitches or 4 knit stitches on mid front). Insert 1 marker on row when rib measures 4 cm, use marker for measurements. Then work knit 2/purl 2 over all stitches. When rib measures 9-9-9-11-11-11 cm from marker, switch to a short circular needle size 5 mm. Cast off stitches with knit over knit and purl over purl. Fold the rib (knit 2/purl 2) down on the inside of garment. Fasten rib to get a double neck edge of approx. 4-4-4-5-5-5 cm. To avoid a tight neck edge that sticks out it is important to keep the seam elastic. |
|||||||||||||
Diagram explanations |
|||||||||||||
|
|||||||||||||
 |
|||||||||||||
 |
|||||||||||||
 |
|||||||||||||
Have you finished this pattern?Tag your pictures with #dropspattern #aroundtownsweater or submit them to the #dropsfan gallery. Do you need help with this pattern?You'll find 32 tutorial videos, a Comments/Questions area and more by visiting the pattern on garnstudio.com. © 1982-2026 DROPS Design A/S. We reserve all rights. This document, including all its sub-sections, has copyrights. Read more about what you can do with our patterns at the bottom of each pattern on our site. |
|||||||||||||


With over 40 years in knitting and crochet design, DROPS Design offers one of the most extensive collections of free patterns on the internet - translated to 17 languages. As of today we count 324 catalogues and 12290 patterns translated into English (UK/cm). 12290
We work hard to bring you the best knitting and crochet have to offer, inspiration and advice as well as great quality yarns at incredible prices! Would you like to use our patterns for other than personal use? You can read what you are allowed to do in the Copyright text at the bottom of all our patterns. Happy crafting!
Post a comment to pattern DROPS 237-7
We would love to hear what you have to say about this pattern!
If you want to leave a question, please make sure you select the correct category in the form below, to speed up the answering process. Required fields are marked *.