
Popular categories
Looking for a yarn?


Comments / Questions (70)
![]() Corine wrote:
Corine wrote:
Bonjour Je n'obtiens pas le même point lorsque je passe à l'aller retour. Comment remédier à ce problème? Merci.
19.08.2025 - 09:51DROPS Design answered:
Bonjour Corine, comment tricoter des côtes anglaises (avec jetés) en allers et retours vous trouverez ICI. Bon tricot!
19.08.2025 - 10:23
![]() Marianne wrote:
Marianne wrote:
Tror min fråga blev en kommentar. Hoppas inte det gör något tack
11.08.2025 - 20:32
![]() Marianne wrote:
Marianne wrote:
Hej jag har stickat klart hal Sq Thenna och ska börja blanda mönstren. Nu undrar jag om jag räknar omslagen som en maska när jag börjar sticka mönstret? Det känns som att jag får jättemånga maskor i så fall. Tusen tack för fantastiska mönster och mycket bra videos.
11.08.2025 - 20:31DROPS Design answered:
Hei Marianne. Kastene til patentmaskene telles ikke som egne masker, bortsett fra når det skal felles av (slik at avfellingskanten blir løs). mvh DROPS Design
08.09.2025 - 14:33
![]() Valentina wrote:
Valentina wrote:
Thank you, I watched the video and I think I figured out where the mistake was! I was knitting with Italian technique as my grandma taught me, but then I decided to try the continental way and it magically worked! Any idea why? I thought the results would be the same. Anyway I’m happy it worked and I learned a new technique! Will definitely post a picture of the result once I’m done
31.05.2025 - 11:01
![]() Valentina wrote:
Valentina wrote:
Thank you for the answer, I’m actually still knitting the neck. The pattern on paper doesn’t seem misaligned but when I knit it I don’t get nice vertical ribs for some reason… I have no idea why but now I started like the video of working ribs with circular needle and somehow it worked out, I hope this won’t give me problems later on when I arrive to the yoke?
25.05.2025 - 19:05DROPS Design answered:
Dear Valentina, in this video we show how to work English rib in the round; note that in the video, the rounds start with a P stitch while the diagram A.1 starts with a K stitch on first round. Hope this can help. You will also find videos under tab "Videos" showing how to work similar patterns - they might help you. Happy knitting!
26.05.2025 - 09:37
![]() Valentina wrote:
Valentina wrote:
Hello! Somehow I can‘t figure out the pattern… I started with the neck and trying to do the ribs, I followed the A1 pattern and also watched the video but there is something wrong, it‘s like the ribs come not aligned and can‘t figure out what I’m doing wrong. Can you help? Maybe give me some suggestion on how to fix it. I‘m working on circular needles and if I understand correctly all the row of the A1 are worked from the same side right?
25.05.2025 - 15:45DROPS Design answered:
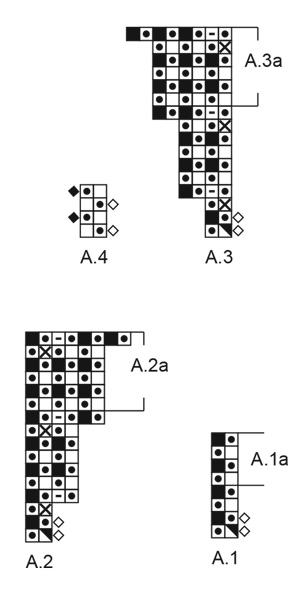
Dear Valentina, at the start of the yoke you will start working in English rib, charts A.1, A.2 and A.3, all in the same round. You work in the round, so all rounds are worked from the right side and the charts are read right to left, from the bottom up. Which of the charts seem misaligned in your case? And which rows are giving you trouble? Happy knitting!
25.05.2025 - 18:48
![]() Olivia wrote:
Olivia wrote:
Hej, när man stickar a1 runt i början när man stickar halsen , ska det stickas en vänlig tät maska varje gång diagrammet börjar om eller ska denna stickas rät med omslaget som alla andra varv? Sen har jag väl egentligen samma fråga som rör delen när man ska börja sticka oket. När man börjar sticka oket och stickar 6 maskor A1 och sen 2 maskor A2 ska man börja A1 och A2 med en vanlig rät maska eller ska man sticka med omslaget här?
22.01.2025 - 15:48
![]() Lisbeth wrote:
Lisbeth wrote:
I forklaringen til opskriften står der at det er ret strik frem og tilbage + at der strikkes ret på alle pinde. Længere nede i start arbejdet her: står der der strikkes rundt. Jeg syntes det er ret misvisende og lidt øv når man ikke er rutineret strikker. I har så mange fede bluser, men jeg syntes jeres forklaringer er ret forvirrende og en af grundene til at jeg ikke bruger jeres side så ofte, som jeg gerne ville.
18.08.2024 - 08:33
![]() Marie Flodman wrote:
Marie Flodman wrote:
Hej, jag är vid OK:et, förstår inte. A1a 6 maskor, A2a 2 maskor, A1a 14 maskor, A3a 2 maskor, A1a 12 maskor, A2a 2 maskor, A1a 14 maskor, A3a 2 maskor, A1a 6 maskor. Ökningen på diagrammet A2a sker i maska 5 men i ok:et stickas bara 2 maskor av diagrammet. Innebär det att ökningen endast sker i diagrammet A3a? Eller missförstår jag allt? //Marie
05.08.2024 - 22:34DROPS Design answered:
Hej Marie, har du set videoerne vi har lavet til oket? Klik på Video øverst i mønsteret, her ser du hvordan man gør :)
14.08.2024 - 14:38
![]() Karina wrote:
Karina wrote:
Esta página es lo más en excelencia, felicitaciones desde Argentina
20.06.2024 - 13:50
|
||||||||||||||||||||||||||||
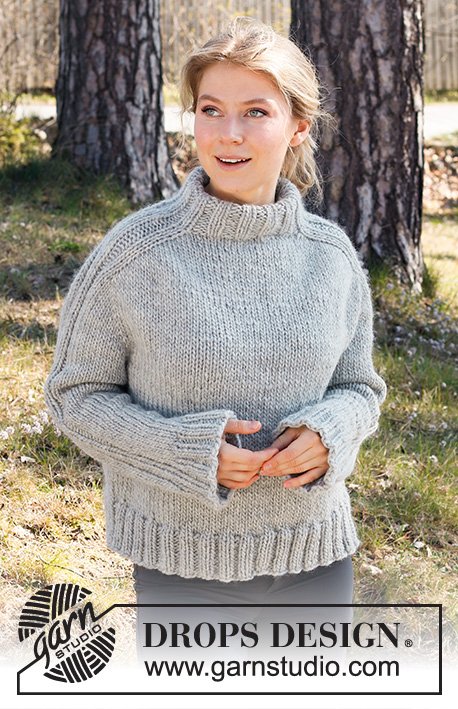
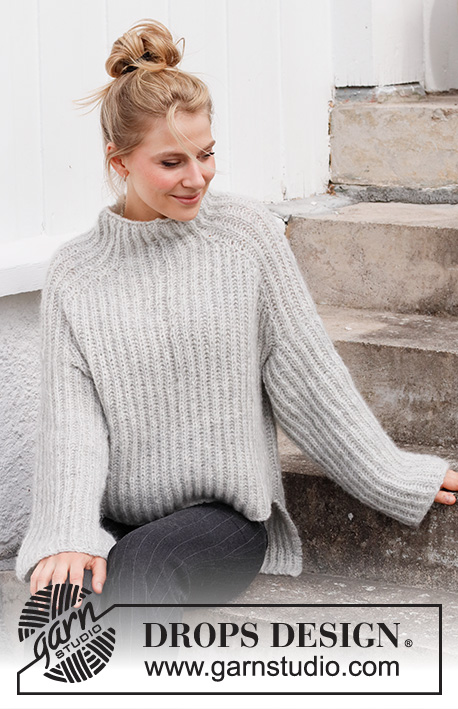
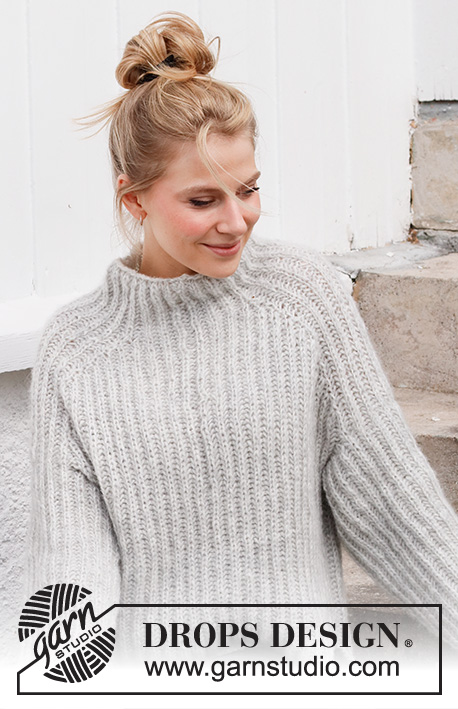
Slippery Slopes Sweater#slipperyslopessweater |
||||||||||||||||||||||||||||
 |
 |
|||||||||||||||||||||||||||
Knitted sweater with English rib in DROPS Air. Worked top down with saddle shoulder.. Size XS–XXL.
DROPS 217-14 |
||||||||||||||||||||||||||||
|
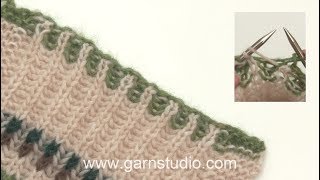
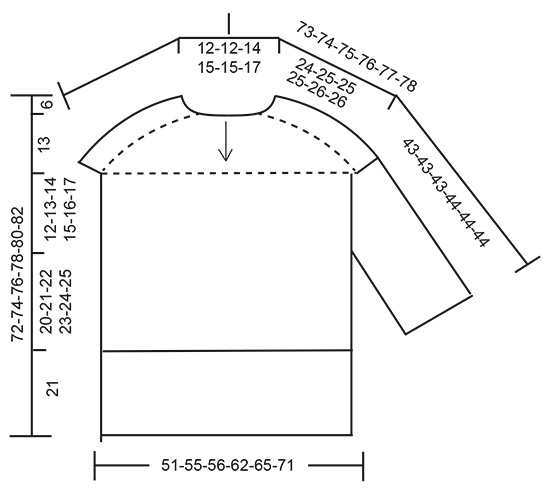
------------------------------------------------------- EXPLANATION FOR THE PATTERN: ------------------------------------------------------- GARTER STITCH (back and forth): Knit all rows. 1 ridge vertically = knit 2 rows. PATTERN: See diagrams A.1 to A.4 (worked in English rib). DECREASE TIP (evenly): To calculate how to decrease evenly, use the total number of stitches on needle (e.g. 62 stitches) and divide stitches by number of decreases to be done (e.g. 10) = 6,2. In this example decrease by purling approx. every 5th and 6th stitch together. ------------------------------------------------------- START THE PIECE HERE: ------------------------------------------------------- SWEATER - SHORT OVERVIEW OF THE PIECE: Work neck edge and yoke in the round on circular needle from mid back, top down. Increase stitches for shoulder on yoke before dividing the piece, and work front and back piece separately until finished measurements. Front piece is shorter than back piece. Work the sleeves at the end. NECK EDGE: Cast on 66-66-70-74-74-78 stitches on circular needle size 6 mm = US 10 with Air. Purl 1 round and decrease 10 stitches evenly – read DECREASE TIP = 56-56-60-64-64-68 stitches. Switch to circular needle size 7 mm = US 10,75. Work A.1 over all stitches. Continue until piece measures 9 cm = 3½". Insert 1 marker here, measure piece from here. YOKE: Work pattern as follows: Work A.1 (= 2 stitches) over the first 6-6-6-8-8-8 stitches (= half back piece), A.2 (= 2 stitches), A.1 over 14 stitches, A.3 (= 2 stitches) (= shoulder), A.1 over 10-10-12-14-14-16 stitches (= front piece), A.2 over 2 stitches, A.1 over 14 stitches, A.3 over 2 stitches (= shoulder), and A.1 over the last 4-4-6-6-6-8 stitches (= half back piece). REMEMBER THE KNITTING GAUGE! When A.1 has been worked 1 time vertically, repeat A.1a vertically. When 2 and A.3 have been worked 1 time vertically, repeat A.2a and A.3a vertically, i.e. continue increases every 6th round, work the increased stitches in English rib. When A.2 and A.3a have been worked 8-9-9-10-11-12 times vertically in total, there are 136-144-148-160-168-180 stitches on needle. Work A.1a over all stitches until piece measures 24-25-25-25-26-26 cm = 9½"-9¾"-9¾"-9¾"-10¼"-10¼" on the longest (i.e. measured along the shoulder), adjust so that next round is a purl round. Now divide piece into front and back piece and bind off shoulder stitches as follows: Work 26-28-28-32-34-36 stitches in English rib, 1 stitch in GARTER STITCH – read explanation above (= half back piece), slip the next 15 stitches on a stitch holder (work them first), work 1 stitch in garter stitch, work 51-55-57-63-67-73 stitches in English rib, 1 stitch in garter stitch (= front piece), slip the next 15 stitches on a stitch holder (work them first), work 1 stitch in garter stitch and work English rib over the last 25-27-29-31-33-37 stitches (= half back piece). Cut the yarn. Let the stitches on front piece sit on needle. BACK PIECE: = 53-57-59-65-69-75 stitches. Work as follows from right side: Work 1 stitch in garter stitch, A.4 (= 2 stitches) until 1 stitch remains (i.e. English rib begins and ends with 1 purl English rib stitch), and finish with 1 stitch in garter stitch. Continue pattern back and forth. When piece measures 12-13-14-15-16-17 cm = 4¾"-5⅛"-5½"-6"-6¼"-6¾" from division, insert 1 marker thread in each side, marks armholes. When piece measures 66-68-70-72-74-76 cm = 26"-26¾"-27½"-28⅜"-29⅛"-30" from the marker in the neck, bind off by knitting, bind off yarn overs as separate stitches (this is done to avoid a tight bind-off edge). FRONT PIECE: Work the 53-57-59-65-69-75 stitches on front piece as on back piece, but bind off when piece measures 45-47-49-51-53-55 cm = 17¾"-18½"-19¼"-20"-21"-21⅝" from marker in the neck (front piece is approx.. 21 cm = 8¼" shorter than back piece). ASSEMBLY: Begin at the marker thread in the side and sew back and front piece together, from marker thread, and approx. 20-21-22-23-24-25 cm = 8"-8¼"-8¾"-9"-9½"-9¾" downwards. Bottom 20 cm = 8" = vent. LEFT SLEEVE: Begin in the side of front piece, at the marker thread, and pick up from right side as follows: Pick up 1 stitch, * make 1 yarn over, pick up 1 stitch, pick up 1 stitch *, repeat from *-* 6-6-7-7-8-8 times in total, slip the 15 stitches from stitch holder back on left needle, and work English rib over these (this is a round that is knitted), pick up 1 stitch from back piece, * make 1 yarn over, pick up 1 stitch, pick up 1 stitch *, repeat from *-* 6-6-7-7-8-8 times in total down towards marker thread in the side on back piece, make 1 yarn over, pick up 1 stitch = 42-42-46-46-50-50 stitches (yarn overs are not counted as separate stitches). On next round work as follows: * Knit 1, purl yarn over and next stitch together *, repeat from *-* over the next 12-12-14-14-16-16 stitches, knit 1, work English rib over the 15 stitches as before (purl this round), * knit 1, purl yarn over and next stitch together *, repeat from *-* over the next 14-14-16-16-18-18 stitches. Continue working in the round over all stitches according to A.1a: When sleeve measures 43-43-43-44-44-44 cm = 17"-17"-17"-17¼"-17¼"-17¼", bind off by knitting, bind off yarn overs as separate stitches (this is done to avoid a tight bind-off edge). RIGHT SLEEVE: Pick up stitches as on left sleeve, but begin on back piece and pick up stitches from right side up towards stitches on stitch holder. |
||||||||||||||||||||||||||||
Diagram explanations |
||||||||||||||||||||||||||||
|
||||||||||||||||||||||||||||
 |
||||||||||||||||||||||||||||
 |
||||||||||||||||||||||||||||
Have you finished this pattern?Tag your pictures with #dropspattern #slipperyslopessweater or submit them to the #dropsfan gallery. Do you need help with this pattern?You'll find 21 tutorial videos, a Comments/Questions area and more by visiting the pattern on garnstudio.com. © 1982-2026 DROPS Design A/S. We reserve all rights. This document, including all its sub-sections, has copyrights. Read more about what you can do with our patterns at the bottom of each pattern on our site. |
||||||||||||||||||||||||||||


With over 40 years in knitting and crochet design, DROPS Design offers one of the most extensive collections of free patterns on the internet - translated to 17 languages. As of today we count 324 catalogs and 12290 patterns - 12280 of which are translated into English (US/in).
We work hard to bring you the best knitting and crochet have to offer, inspiration and advice as well as great quality yarns at incredible prices! Would you like to use our patterns for other than personal use? You can read what you are allowed to do in the Copyright text at the bottom of all our patterns. Happy crafting!
Post a comment to pattern DROPS 217-14
We would love to hear what you have to say about this pattern!
If you want to leave a question, please make sure you select the correct category in the form below, to speed up the answering process. Required fields are marked *.