DROPS Air
DROPS Air
65% Alpaca, 28% Polyamide, 7% Wool
from 4.80 £ /50g
Get the yarn to make this pattern from 33.60£.

The yarn cost is calculated from the pattern’s smallest size and the yarn’s cheapest product type. Looking for an even better price? You might find it on the DROPS Deals!

DROPS SS24

Slippery Slopes Sweater

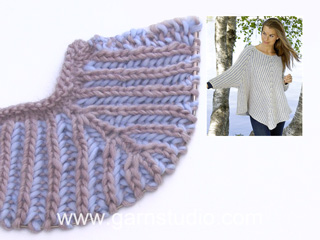
Knitted jumper with English rib in DROPS Air. Worked top down with saddle shoulder. Size XS–XXL.

DROPS 217-14
DROPS design: Pattern ai-302
Yarn group A + A or C
-------------------------------------------------------

SIZE:
XS - S - M - L - XL – XXL

MATERIALS:
DROPS AIR from Garnstudio (belongs to yarn group C)
350-400-400-450-500-550 g colour 03, pearl grey

KNITTING TENSION:
11 stitches in width and 32 rows vertically with English rib = 10 x 10 cm.

NEEDLES:
DROPS CIRCULAR NEEDLE SIZE 7 mm : Length 40 cm and 80 cm for English rib.
DROPS CIRCULAR NEEDLE SIZE 6 mm : Length 40 cm for neck edge.
Needle size is only a suggestion! If you have too many stitches on 10 cm switch to a larger needle size. If you have too few stitches on 10 cm switch to a smaller needle size.

-------------------------------------------------------

Alternative Yarn – See how to change yarns here
Yarn Groups A to F – Use the same pattern and change the yarn here
Yarn usage using an alternative yarn – Use our yarn converter here

-------------------------------------------------------

DROPS Air
DROPS Air
65% Alpaca, 28% Polyamide, 7% Wool
from 4.80 £ /50g
Get the yarn to make this pattern from 33.60£.

The yarn cost is calculated from the pattern’s smallest size and the yarn’s cheapest product type. Looking for an even better price? You might find it on the DROPS Deals!

Pattern instructions

NOTE: This pattern is written in British English. All measurements in charts are in cm. For conversion from cm to inches - click here. There are different terms for crocheting in British and American English. If this pattern includes crochet, click for "crochet terms" here. For this pattern in American English, please click here.
-------------------------------------------------------

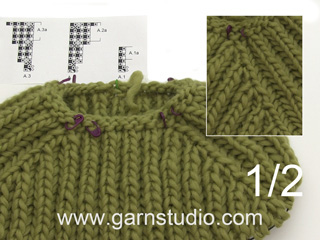
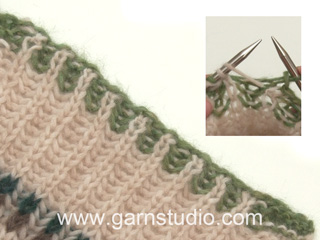
EXPLANATION FOR THE PATTERN:

-------------------------------------------------------

GARTER STITCH (back and forth):
Knit all rows.
1 ridge vertically = knit 2 rows.

PATTERN:
See diagrams A.1 to A.4 (worked in English rib).

DECREASE TIP (evenly):
To calculate how to decrease evenly, use the total number of stitches on needle (e.g. 62 stitches) and divide stitches by number of decreases to be done (e.g. 10) = 6,2.
In this example decrease by purling approx. every 5th and 6th stitch together.

-------------------------------------------------------

START THE PIECE HERE:

-------------------------------------------------------

JUMPER - SHORT OVERVIEW OF THE PIECE:
Work neck edge and yoke in the round on circular needle from mid back, top down. Increase stitches for shoulder on yoke before dividing the piece, and work front and back piece separately until finished measurements. Front piece is shorter than back piece. Work the sleeves at the end.

NECK EDGE:
Cast on 66-66-70-74-74-78 stitches on circular needle size 6 mm with Air. Purl 1 round and decrease 10 stitches evenly – read DECREASE TIP = 56-56-60-64-64-68 stitches. Switch to circular needle size 7 mm. Work A.1 over all stitches.
Continue until piece measures 9 cm. Insert 1 marker here, measure piece from here.

YOKE:
Work pattern as follows: Work A.1 (= 2 stitches) over the first 6-6-6-8-8-8 stitches (= half back piece), A.2 (= 2 stitches), A.1 over 14 stitches, A.3 (= 2 stitches) (= shoulder), A.1 over 10-10-12-14-14-16 stitches (= front piece), A.2 over 2 stitches, A.1 over 14 stitches, A.3 over 2 stitches (= shoulder), and A.1 over the last 4-4-6-6-6-8 stitches (= half back piece). REMEMBER THE KNITTING TENSION!
When A.1 has been worked 1 time vertically, repeat A.1a vertically.
When A.2 and A.3 have been worked 1 time vertically, repeat A.2a and A.3a vertically, i.e. continue increases every 6th round, work the increased stitches in English rib.
When A.2a and A.3a have been worked 8-9-9-10-11-12 times vertically in total, there are 136-144-148-160-168-180 stitches on needle. Work A.1a over all stitches until piece measures 24-25-25-25-26-26 cm on the longest (i.e. measured along the shoulder), adjust so that next round is a purl round.
Now divide piece into front and back piece and cast off shoulder stitches as follows:
Work 26-28-28-32-34-36 stitches in English rib, 1 stitch in GARTER STITCH – read explanation above (= half back piece), slip the next 15 stitches on a stitch holder (work them first), work 1 stitch in garter stitch, work 51-55-57-63-67-73 stitches in English rib, 1 stitch in garter stitch (= front piece), slip the next 15 stitches on a stitch holder (work them first), work 1 stitch in garter stitch and work English rib over the last 25-27-29-31-33-37 stitches (= half back piece).
Cut the yarn.

Let the stitches on front piece sit on needle.

BACK PIECE:
= 53-57-59-65-69-75 stitches.
Work as follows from right side: Work 1 stitch in garter stitch, A.4 (= 2 stitches) until 1 stitch remains (i.e. English rib begins and ends with 1 purl English rib stitch), and finish with 1 stitch in garter stitch.
Continue pattern back and forth. When piece measures 12-13-14-15-16-17 cm from division, insert 1 marker thread in each side, marks armholes. When piece measures 66-68-70-72-74-76 cm from the marker in the neck, cast off by knitting, cast off yarn overs as separate stitches (this is done to avoid a tight cast-off edge).

FRONT PIECE:
Work the 53-57-59-65-69-75 stitches on front piece as on back piece, but cast off when piece measures 45-47-49-51-53-55 cm from marker in the neck (front piece is approx.. 21 cm shorter than back piece).

ASSEMBLY:
Begin at the marker thread in the side and sew back and front piece together, from marker thread, and approx. 20-21-22-23-24-25 cm downwards. Bottom 20 cm = vent.

LEFT SLEEVE:
Begin in the side of front piece, at the marker thread, and pick up from right side as follows: Pick up 1 stitch, * make 1 yarn over, pick up 1 stitch, pick up 1 stitch *, repeat from *-* 6-6-7-7-8-8 times in total, slip the 15 stitches from stitch holder back on left needle, and work English rib over these (this is a round that is knitted), pick up 1 stitch from back piece, * make 1 yarn over, pick up 1 stitch, pick up 1 stitch *, repeat from *-* 6-6-7-7-8-8 times in total down towards marker thread in the side on back piece, make 1 yarn over, pick up 1 stitch = 42-42-46-46-50-50 stitches (yarn overs are not counted as separate stitches). On next round work as follows: * Knit 1, purl yarn over and next stitch together *, repeat from *-* over the next 12-12-14-14-16-16 stitches, knit 1, work English rib over the 15 stitches as before (purl this round), * knit 1, purl yarn over and next stitch together *, repeat from *-* over the next 14-14-16-16-18-18 stitches. Continue working in the round over all stitches according to A.1a: When sleeve measures 43-43-43-44-44-44 cm, cast off by knitting, cast off yarn overs as separate stitches (this is done to avoid a tight cast-off edge).

RIGHT SLEEVE:
Pick up stitches as on left sleeve, but begin on back piece and pick up stitches from right side up towards stitches on stitch holder.

Diagram

symbols = knit
symbols = worked from right side
symbols = worked from wrong side
symbols = make 1 yarn over, pass 1 stitch over on to right needle purlwise
symbols = knit yarn over and stitch together
symbols = purl yarn over and stitch together
symbols = work 3 stitches in knit stitch and yarn over as follows: Knit yarn over and knit stitch together but wait to slip stitch and yarn over off the needle, make 1 yarn over on right needle, knit stitch and yarn over together 1 more time, slip knit stitch and yarn over worked off left needle = 3 stitches
symbols = purl
symbols = knitting direction
diagram
diagram

Each of our patterns has specific tutorial videos to help you.

Do you have a question? See a list of frequently asked questions (FAQ)

Knitting tension is what determines the final measurements of your work, and is usually measured per 10 x 10 cm. It is provided like so: number of stitches in width x number of rows in height - eg: 19 stitches x 26 rows = 10 x 10 cm.

The knitting tension is very individual; some people knit/crochet loosely while others work tightly. You adjust the knitting tension with the needle size, which is why the suggested needle size is only meant as a guide! You need to adjust this (up or down) to ensure that YOUR knitting tension matches the knitting tension provided in the pattern. If you work with a different knitting tension than provided you will have a different yarn consumption, and your work will have different measurements than what the pattern suggests.

The knitting tension also determines which yarns can replace each other. As long as you achieve the same knitting tension you can replace one yarn with another.

See DROPS lesson: How to measure your tension/gauge

See DROPS video: How to make a gauge tension swatch

The required amount of yarn is provided in grams, eg: 450 g. To calculate how many balls you’ll need you first need to know how many grams are in 1 ball (25g, 50g or 100g). This information is available if you click on the individual yarn quality on our pages. Divide the amount required with the amount of each ball. For example, if each ball is 50g (the most common amount), the calculation will be as follows: 450 / 50 = 9 balls.

The important thing when changing from one yarn to another is that the knitting/crochet tension remains the same. This is so that the measurements of the finished piece will be the same as on the sketch provided. It is easier to achieve the same knitting tension using yarns from the same yarn group. It is also possible to work with multiple strands of a thinner yarn to achieve the knitting tension of a thicker one. Please try our yarn converter. We recommend you to always work a test swatch.

Please NOTE: when changing yarn the garment might have a different look and feel to the garment in the photo, due to individual properties and qualities of each yarn.

See DROPS lesson: Can I use a different yarn than the one mentioned in the pattern?

All our yarns are categorised into yarn groups (from A to F) according to thickness and knitting tension – group A contains the thinnest yarns and group F the thickest. This makes it easier for you to find alternative yarns to our patterns, should you wish to switch yarn. All yarns within the same group have a similar knitting tension and can easily replace each other. However, different yarn qualities have different structures and properties which will give the finished work a unique look and feel.

Click here for an overview of the yarns in each yarn group

At the top of all our patterns you’ll find a link to our yarn calculator, which is a helpful tool should you wish to use a different yarn than suggested. By filling in the yarn quality you wish to replace, the amount (in your size) and number of strands, the calculator will present good alternative yarns with the same knitting tension. Additionally it will tell you how much you’ll require in the new qualities and whether you’ll need to work with multiple strands. Most skeins are 50g (some are 25g or 100g).

If the pattern is worked with multiple colours, every colour will have to be calculated separately. Similarly, if the pattern is worked with several strands of different yarns (for example 1 strand Alpaca and 1 strand Kid-Silk) you will have to find alternatives for each, individually.

Click here to see our yarn calculator

Since different yarns have different qualities and textures we have chosen to keep the original yarn in our patterns. However, you can easily find options among our available qualities by using our yarn calculator, or simply pick a yarn from the same yarn group.

It is possible that some retailers still have discontinued yarns in stock, or that someone has a few skeins at home that they would like to find patterns for.

The yarn calculator will provide both alternative yarn as well as required amount in the new quality.

If you think it's hard to decide what size to make, it can be a good idea to measure a garment you own already and like the size of. Then you can pick the size by comparing those measures with the ones available in the pattern's size chart.

You'll find the size chart at the bottom of the pattern.

See DROPS lesson: How to read size chart

The needle size provided in the pattern serves only as a guide, the important thing is to follow the knitting tension. And since knitting tension is very individual, you will have to adjust the needle size to ensure that YOUR tension is the same as in the pattern – maybe you’ll have to adjust 1, or even 2 needle sizes, up or down to achieve the correct tension. For this, we recommend that you work test swatches.

Should you work with a different knitting tension than the one provided, the measurements of the finished garment might deviate from the measurement sketch.

See DROPS lesson: How to measure your tension/gauge

See DROPS video: How to make a tension/gauge swatch

Working a garment top-down provides more flexibility and room for personal adjustment. For example it is easier to try the garment on while working, as well as making adjustments to length of yoke and shoulder caps.

The instructions are carefully explaining every step, in the correct order. Diagrams are adjusted to the knitting direction and are worked as usual.

The diagram depicts all rows/rounds, and every stitch seen from the right side. It is read from bottom to top, from right to left. 1 square = 1 stitch.

When working back and forth, every other row is worked from the right side and every other row is worked from the wrong side. When working from the wrong side, the diagram will have to be worked reversed: from left to right, knit stitches are purled, purl stitches are knit etc.

When working in the round every round is worked from the right side and the diagram are worked from right to left on all rounds.

See DROPS lesson: How to read knitting diagrams

The diagram depicts all rows/rounds, and every stitch seen from the right side. It is worked from bottom to top, from right to left.

When working back and forth every other row is worked from the right side: from right to left and every other row is worked from the wrong side: from left to right.

When working in the round, every row in the diagram are worked from the right side, from right to left.

When working a circular diagram you start in the middle and work your way outwards, counter clockwise, row by row.

The rows usually start with a given number of chain stitches (equivalent to the height of the following stitch), this will either be depicted in the diagram or explained in the pattern.

See DROPS lesson: How to read crochet diagrams

Instructions for working several diagrams after each other on the same row/round, will often be written like so: “work A.1, A.2, A.3 a total of 0-0-2-3-4 times". This means you work A.1 once, then A.2 is worked once, and A.3 is repeated (in width) the number of times provided for your size – in this case like so: S = 0 times, M = 0 times, L=2 times, XL= 3 times and XXL = 4 times.

The diagrams are worked as usual: begin with the first row in A.1, then work the first row in A.2 etc.

See DROPS lesson: How to read knitting diagrams

See DROPS lesson: How to read crochet diagrams

The total width of the garment (from wrist-to-wrist) will be larger in the larger sizes, despite the actual sleeves being shorter. The larger sizes have longer sleeve caps and wider shoulders, so there will be a good fit in all sizes.

The measurement sketch/schematic drawing provides information regarding the full length of the garment. If it’s a jumper or a jacket the length is measured from the highest point on the shoulder closest to the neckline, and straight down to the bottom of the garment. It is NOT measured from the tip of shoulder. Similarly, the length of yoke is measured from the highest point on the shoulder and down to where yoke is split into body and sleeves.

On a jacket measures are never taken along bands, unless specifically stated. Always measure inside band stitches when measuring the length.

See DROPS lesson: How to read a schematic drawing

Diagrams are often repeated on the round or in height. 1 repeat is the diagram the way it appears in the pattern. If it says to work 5 repeats of A.1 in the round, then you work A.1 a total of 5 times after/next to each other in the round. If it says to work 2 repeats of A.1 vertically/in height you work the entire diagram once, then begin again at the start and work the entire diagram one more time.

Chain stitches are slightly narrower than other stitches and to avoid working the cast-on edge too tight, we simply chain more stitches to begin with. The stitch count will be adjusted on the following row to fit the pattern and measurement sketch.

The rib edge is more elastic and will contract slightly compared to, for example, stocking stitch. By increasing before the rib edge, you avoid a visible difference in width between the rib edge and the rest of the body.

It’s very easy to cast off too tightly, and by making yarn overs while casting off (and simultaneously casting these off) you avoid a too tight cast off edge.

See DROPS video: How to bind off with yarn overs (yo)

To achieve an even increase (or decrease) you can increase on, for example: every 3rd and 4th row alternately, like so: work 2 rows and increase on the 3rd row, work 3 rows and increase on the 4th. Repeat this until the increase is complete.

See DROPS lesson: Increase or decrease 1 st on every 3rd and 4th row alternately

Should you prefer to work in the round instead of back and forth, you may of course adjust the pattern. You’ll need to add steeks mid-front (usually 5 stitches), and follow the instructions. When you would normally turn and work from the wrong side, simply work across the steek and continue in the round. At the end you’ll cut the piece open, pick up stitches to work bands, and cover the cut edges.

See DROPS video: How to knit steeks and cut open

Should you prefer to work back and forth instead of in the round, you may of course adjust the pattern so you work the pieces separately and then assemble them at the end. Divide the stitches for the body in 2, add 1 edge stitch in each side (for sewing) and work the front and back pieces separately.

See DROPS lesson: Can I adapt a pattern for circular needles into straight needles?

Pattern repeats can vary slightly in the different sizes, in order to get the correct proportions. If you’re not working the exact same size as the garment in the photo, yours might deviate slightly. This has been carefully developed and adjusted so that the complete impression of the garment is the same in all sizes.

Make sure to follow instructions and diagrams for your size!

If you have found a pattern you like which is available in women’s size it’s not very difficult to convert it to men’s size. The biggest difference will be the length of sleeves and body. Start working on the women size that you think would fit across the chest. The additional length will be worked right before you cast off for the armhole/sleeve cap. If the pattern is worked top-down you can add the length right after the armhole or before the first decrease on sleeve.

Regarding additional yarn amount, this will depend on how much length you add, but it is better with a skein too many than too few.

All yarns will have excess fibres (from production) that might come off as lint or shedding. Brushed yarns (ie hairier yarns) have more of these loose, excess fibres, causing more shedding.

Shedding also depends on what is worn under or over the garment, and whether this pulls at the yarn fibres. It’s therefore not possible to guarantee that there will be no shedding

Below are some tips on how to get the best result when working with hairier yarns:

1. When the garment is finished (before you wash it) shake it vigorously so the looser hairs come off. NOTE: do NOT use a lint roller, brush or any method that pulls at the yarn.

2. Place the garment in a plastic bag and put it in your freezer - the temperature will cause the fibres to become less attached to each other, and excess fibres will come off easier.

3. Leave in the freezer for a few hours before taking it out and shaking it again.

4. Wash the garment according to the instructions on the yarn label.

Pilling is a natural process that happens to even the most exclusive of fibers. It's a natural sign of wear and tear that is hard to avoid, and that is most visible in high friction areas of your garment like a sweater's arms and cuffs.

You can make your garment look as new by removing the pilling, using a fabric comb or a pill/lint remover.

Still can't find the answer you need? Then scroll down and leave your question so one of our experts can try to help you. This will be done normally within 5 to 10 working days.
In the meantime, you can read the questions and answers that others have left to this pattern or join the DROPS Workshop on Facebook to get help from fellow knitters/crocheters!

You might also like...

Post a comment to pattern DROPS 217-14

We would love to hear what you have to say about this pattern!

If you want to leave a question, please make sure you select the correct category in the form below, to speed up the answering process. Required fields are marked *.

Comments / Questions (60)

country flag José wrote:

Bij de hals van 217-14 begin ik met rondbreinaald 6-40 cm en brei daar 1 toer averechts mee. Minder ik in die toer averechts gelijk of komt dat in een tweede toer averechts? Daarna ga ik verder met rondbreinaald 7. Is dit ook weer een 40 cm of pak ik nu de 80 cm? of gebruik ik die 80 cm later?

15.01.2024 - 16:17

DROPS Design answered:

Dag José,

Je mindert direct in de eerste naald averecht 10 steken. Je kunt daarna verder breien met naald 40 cm. Wanneer je op een gegeven moment te veel steken hebt, stap je over op een langere rondbreinaald. Dat merk je vanzelf.

17.01.2024 - 18:12

country flag Sophie wrote:

Hallo, ich beginne grade die Halsblende, wo A1 gestrickt werden soll (mit Nr. 7 steht in der Anleitung, in einem der Kommentare schreiben Sie mit Nr.6 -> was stimmt denn?). In der ersten Reihe werden Umschläge gemacht (ich lese das Diagramm von unten nach oben und links nach rechts), für Größe M dann 30 Umschläge. Das führt am Ende zu 90 Maschen, was mir nicht richtig erscheint. Außerdem, was meint hier das Hinreihe Symbol ?

09.01.2024 - 10:13

DROPS Design answered:

Liebe Sophie, die Maschen werden mit Nadeln Nr 6 angeschlagen, und die 1. Runde wird links mit Abnahmen gestrickt. Danach stricken Sie mit Nadeln Nr 7 weiter. Die Umschläge zählen nicht extra einzeln als Maschen, die werden zusammen mit den abgehobenen gezählt. als die gehörten zusammen. Viel Spaß beim stricken!

11.01.2024 - 08:55

country flag Jeanette Lund wrote:

Hej Jeg har strikke de 66 cm på bagstykket og 45 cm på forstykket og skal nu sy sammen i siden under ærmemarkeringen. Jeg har kun 11 cm at sy sammen på forstykket og 32 cm på bagstykket. Hvad gør jeg galt. Jeg har målt de 66 og de 45 fra Hals markeringen.

31.12.2023 - 00:11

DROPS Design answered:

Hej Jeanette, kan du have strikket stykkerne for kort... Se målene i måleskitsen nederst i opskriften :)

09.01.2024 - 14:21

country flag Anu wrote:

Hei! Kiitos ihanasta ohjeesta! Kysymykseni koskee hihan silmukoita. Poimittuani ne, neulotaanko kaikilla silmukoilla normisti patenttia? Minun oli vaikeaa saada silmukoita tässä vaiheessa täsmäämään ohjeistetun kanssa ja neuloa ohjeen mukaan nuo ensimmäiset 2 kerrosta.

27.12.2023 - 17:08

country flag Maria wrote:

Aiuto!! Ho seguito lo schema alla lettera, ho riguardato i video e non vedo niente di diverso da quello che ho fatto io, eppure la spalla sx è venuta perfetta (sia davanti che dietro) mentre quella destra è "cresciuta" nel verso opposto, ovvero si è allargata la spalla e non il davanti/dietro!! per farlo capire meglio dovrei inviare una foto ma non è possibile in questo box. Vi ho scritto su instagram.. Per favore aiutatemi a capire dove ho sbagliato

22.08.2023 - 16:23

DROPS Design answered:

Buonasera Maria, per lavorare la spalla destra deve riprendere le maglie nel verso opposto di quella sinistra. Buon lavoro!

22.08.2023 - 22:29

country flag Veronika wrote:

Bei anderen Anleitungen wird für drops Air die Nadelstärke 5 angegeben. Ist bei dem Modell 217-14 Nadelstärke 7 wirklich richtig? Vielen Dank

14.03.2023 - 21:10

DROPS Design answered:

Liebe Veronika, ja es stimmt so, beachten Sie nur, daß Ihre Maschenprobe stimmt (siehe hier), es kann auch sein, daß Sie eine andere Nadelgröße brauchen. Viel Spaß beim stricken!

15.03.2023 - 09:51

country flag Iss wrote:

Wenn ich fuer Groesse M 60 Maschen anschlage, gibt das bei einer Maschenprobe von 10M einen Halsumfang von 60 cm, das erscheint mir zuviel!?

28.12.2022 - 16:47

DROPS Design answered:

Liebe Iss, sollte Ihre Maschenprobe (11 Maschen im Vollpatent mit Nadel Nr 7 = 10 cm) dann sollten die unterschiedlichen Maßen in der Skizze auch stimmen (Halsblende wird mit Nadel Nr 6 gestrickt). Viel Spaß beim stricken!

02.01.2023 - 11:25

country flag Mila Baets wrote:

Hallo! ik ben bezig met de PAS en ik vroeg me af wanneer ik precies moet meerderen. Elke 6e naald staat er maar moet ik dit doorheen heel de pas doen of enkel nadat ik begonnen ben aan A. 1a, A.2a, A.3a?

11.11.2022 - 15:02

DROPS Design answered:

Dag Mila,

De meerderingen staan al in de telpatronen, dus als je het telpatroon volgt maak je automatisch meerderingen. Je meerdert dus gelijk al als je begint met A1 t/m A.3 (de symbolen met de kruisjes in het telpatroon).

14.11.2022 - 20:43

country flag Jane Evans wrote:

Ah thank you so much! Sorry to keep bothering you, I just want to get this right... the yarn is so lovely!

11.10.2022 - 09:48

country flag Jane Evans wrote:

Hi. Yes, I understand that bit, but as I\'ve finished the last row, where I cast off the shoulders, it\'s left me in the middle of the back hasn\'t it? So why do I need to cut the yarn? Or do I cut the yarn and then move all the stitches for the back and start from the beginning of the back section? I\'m sorry if I\'m being dull, I just don\'t want to mess it up!

11.10.2022 - 08:04

DROPS Design answered:

Dear Mrs Evans, yes correct, the last round starts and ends on mid back, reason why you now have to cut the yarn to continue working all stitches on back piece starting from the first stitch on the side towards the other side. You can move all stitches for front piece on another needle and now move all stitches on the same needle so that you can work from the first stitch. Happy knitting!

11.10.2022 - 08:09