
Popular categories
Looking for a yarn?


Comments / Questions (10)
![]() Holland wrote:
Holland wrote:
Bonjour, le nombre de mailles mentionné inclu-t-il la maille lisière ? Merci de votre retour et belle journée
11.02.2026 - 20:08DROPS Design answered:
cf ci-dessous :)
12.02.2026 - 17:45
![]() Holland wrote:
Holland wrote:
Le nombre de maille mentionné inclu-t-il la (les) maille lisière? Merci de votre prochaine réponse et meilleures salutations de Genève
11.02.2026 - 20:06DROPS Design answered:
Bonjour Mme Holland, le nombre de mailles à monter comprend toutes les mailles à tricoter, n'en ajoutez pas d'autres. Bon tricot!
12.02.2026 - 17:44
![]() J E Wouda-Jelsma wrote:
J E Wouda-Jelsma wrote:
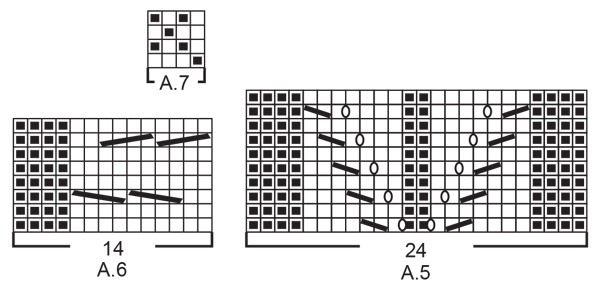
Op teltekening van a4 en a6 staan beide kabels van linksboven naar rechtsonder. Dit klopt dus niet met het antwoord, zie vorig bericht. Groet, Joke Wouda
27.06.2022 - 12:47
![]() Joke Wouda wrote:
Joke Wouda wrote:
M.i. horen figuur A4 en A6 spiegelbeeld te zijn. In patroon staan de kabels dezelfde kant op, klopt dat wel? Joke Wouda DROPS Design answered: Patroon A.4 en A.6 zijn inderdaad ook elkaars spiegelbeeld en de kabels lopen ook gespiegeld aan elkaar. Dit is ook te zien aan hoe de lijntjes in de telpatronen lopen; bij A.6 van links onder naar rechts omhoog en bij A.4 van rechts onder naar links omhoog. Op teltekening beide van linksboven naar rechtsonder
27.06.2022 - 12:45
![]() J E Wouda-Jelsma wrote:
J E Wouda-Jelsma wrote:
M.i. horen figuur A4 en A6 spiegelbeeld te zijn. In patroon staan de kabels dezelfde kant op, klopt dat wel? vriendelijke groet, Joke Wouda
25.06.2022 - 17:32DROPS Design answered:
Dag J E Wouda-Jelsma,
Patroon A.4 en A.6 zijn inderdaad ook elkaars spiegelbeeld en de kabels lopen ook gespiegeld aan elkaar. Dit is ook te zien aan hoe de lijntjes in de telpatronen lopen; bij A.6 van links onder naar rechts omhoog en bij A.4 van rechts onder naar links omhoog.
26.06.2022 - 09:53
![]() Monika Anedda wrote:
Monika Anedda wrote:
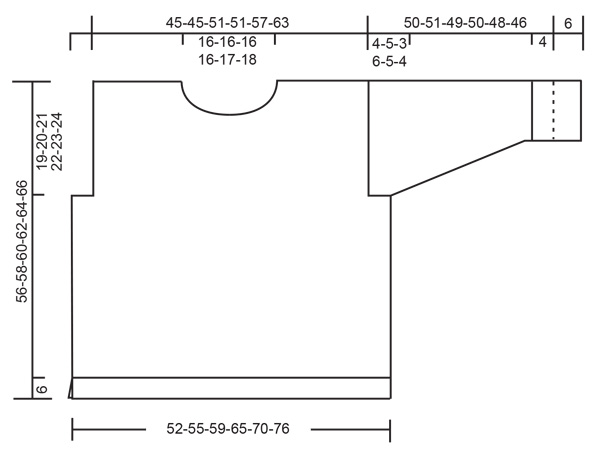
Hallo, kann es sein dass die Zentimeterangabe in der Länge nicht stimmt das wäre bei meiner Größe 84 cm das würde mir bis zu den Knien reichen.
06.02.2021 - 16:20DROPS Design answered:
Liebe Frau Anedda, die gesamte Höhe für diesen Pullover lesen Sie links in die Skizze = 56-58-60-62-64-66 cm (= ca 37-38-39-40-41-42 vor Armausschnitt + 19-20-21-22-23-24 cm Armausschnitt) - hier lesen Sie mehr über die Maßskizze. Viel Spaß beim stricken!
08.02.2021 - 11:38
![]() Almendra wrote:
Almendra wrote:
¿Como se lee el diagrama A.7 para la manga?
20.10.2020 - 01:25DROPS Design answered:
Hola Almendra. El diagrama A.7 se lee de la siguiente manera (como se trabaja en redondo, todas las filas se trabajan por el lado derecho y las filas del diagrama se leen de derecha a izquierda): Fila 1:* 1 revés, 3 derechos*, repetir de * a * toda la vuelta y terminar con 1 revés. Fila 2: *1 derecho, 1 revés", repetir de * a * toda la vuelta terminando con 1 derecho Fila 3: *2 derechos, 1 revés, 1 derecho*, repetir de * a * toda la vuelta y terminar con 1 derecho. Fila 4: Igual que la fila 2.
25.10.2020 - 15:55
![]() Judith wrote:
Judith wrote:
Ik neem aan dat de mouwen, na het boord, ook met nld 4,5 gebreid worden?
19.10.2020 - 20:09DROPS Design answered:
Dag Judith,
Ja, klopt inderdaad, want daar begint het structuurpatroon.
21.10.2020 - 10:51
![]() Joyce Geene wrote:
Joyce Geene wrote:
Kan deze trui - het voor & achterpand direct rond gebreid worden ipv in 2 delen?
22.09.2020 - 20:20DROPS Design answered:
Dag Joyce,
Ja hoor, dat kan. Je zet dan alle steken voor het voor- en achterpand op de rondbreinaald vanaf waar het split begint op de onderkant, waarbij je de kantsteken af kunt kanten. Bij het afkanten van steken voor de mouw brei je de panden dan weer apart van elkaar verder heen en weer.
24.09.2020 - 12:38
![]() Maggan Henriksson wrote:
Maggan Henriksson wrote:
Hej, Stämmer diagrammet till Cool Confidence? Funderar på vad de helt vita rutorna betyder. Betyder det slätstickning istället för, som diagrammet anger, de helt svarta? Några helt svarta rutor hittar jag inte i mönstret. Ska de med 0 i symbolisera omslag?
06.09.2020 - 17:16DROPS Design answered:
Hej Maggan. Tack för info, symbolerna är nu rättade! Mvh DROPS Design
07.09.2020 - 13:11
|
|||||||||||||||||||||||||
Cool Confidence#coolconfidencesweater |
|||||||||||||||||||||||||
 |
 |
||||||||||||||||||||||||
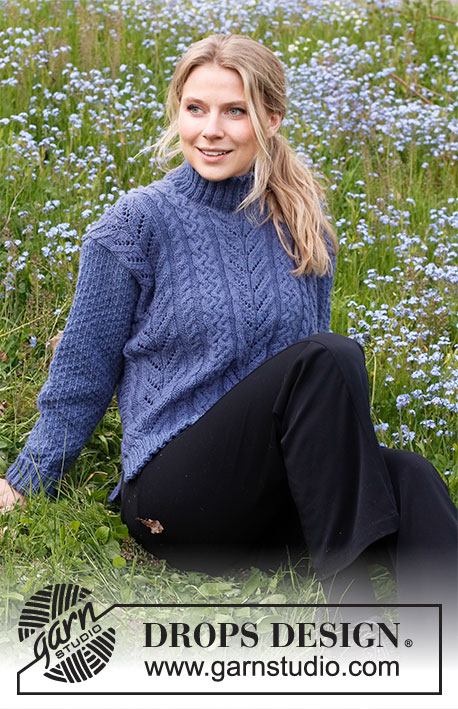
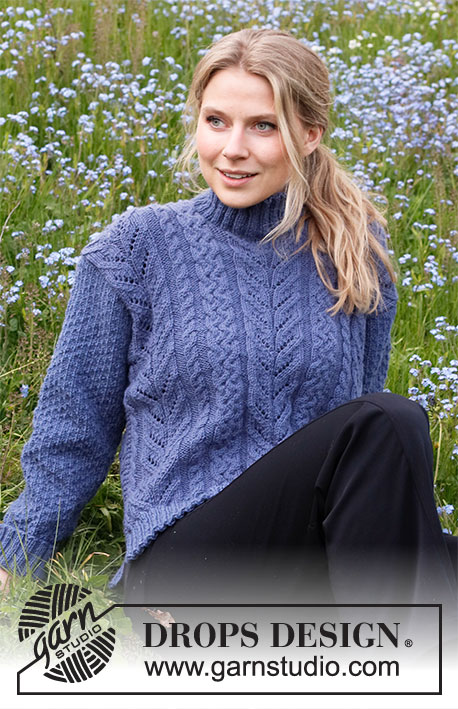
Knitted sweater in DROPS Merino Extra Fine. Piece is knitted with cables, lace pattern, textured pattern and high collar. Size: S - XXXL
DROPS 216-25 |
|||||||||||||||||||||||||
|
------------------------------------------------------- EXPLANATION FOR THE PATTERN: ------------------------------------------------------- GARTER STITCH (back and forth): Knit all rows. 1 ridge vertically = knit 2 rows. PATTERN: See diagrams A.1 to A.7. Diagrams show all rows in pattern seen from the right side. INCREASE TIP-1 (applies to mid under sleeves): Increase 1 stitch on each side of stitch with marker as follows: Work until stitch with marker mid under sleeve, make 1 yarn over, purl stitch with marker as before, make 1 yarn over (= 2 stitches increased). On next round work yarn over twisted to avoid holes. Then work the new stitches in A.7. INCREASE TIP-2 (evenly): To calculate how to increase evenly, use the total number of stitches on row (e.g. 78 stitches) and divide stitches by number of increases to be done (e.g. 18) = 4.3. In this example increase by making 1 yarn over after approx. every 4th stitch. On next round work yarn overs twisted to avoid holes. BIND-OFF TIP: To avoid a tight bind-off edge you may use a larger needle size. If this also is too tight, work a 1 yarn over after approx. every 8th stitch while binding off (bind off yarn overs as regular stitches). ------------------------------------------------------- START THE PIECE HERE: ------------------------------------------------------- SWEATER - SHORT OVERVIEW OF THE PIECE: Work back and front piece back and forth on circular needle separately, bottom up. Work sleeves in the round on double pointed needles / a short circular needle, from the bottom and up to where sleeve cap begins, then work sleeve back and forth on circular needle. Sew garment together. Work a high collar in rib at the end. BACK PIECE: Cast on 122-130-142-158-170-186 stitches on circular needle size 3.5 mm = US 4 with Merino Extra Fine. Purl 1 row (= wrong side). Work next row as follows from right side: 2 edge stitches in GARTER STITCH - read explanation above - * knit 2, purl 2 *, repeat from *-* until 4 stitches remain on needle, knit 2, and finish with 2 edge stitches in garter stitch. Continue rib like this for 6 cm = 2⅜". Purl 1 row from wrong side while decreasing 0-2-2-2-0-0 stitches evenly (work edge stitches in garter stitch) = 122-128-140-156-170-186 stitches. Switch to circular needle size 4.5 mm = US 7. Work next row as follows from right side: 2 edge stitches in garter stitch, purl 1-4-2-2-1-1, work A.1 over the next 8-8-16-24-32-40 stitches (= 1-1-2-3-4-5 repetitions of 8 stitches), work A.2 (= 16 stitches), work A.3 (= 8 stitches), work A.4 (= 14 stitches), work A.5 (= 24 stitches), work A.6 (= 14 stitches), work A.1 (= 8 stitches), work A.2 (= 16 stitches), work A.3 over the next 8-8-16-24-32-40 stitches (= 1-1-2-3-4-5 repetitions of 8 stitches), purl 1-4-2-2-1-1 and finish with 2 edge stitches in garter stitch. Continue pattern like this. REMEMBER THE KNITTING GAUGE! When 1 row remains before piece measures 37-38-39-40-41-42 cm = 14½"-15"-15¼"-15¾"-16⅛"-16½" (and next row is worked from right side), decrease 2-2-4-6-8-10 stitches in each side by working the 4 stitches in each of the outermost 1-1-2-3-4-5 cables in each side knit together 2 by 2 = 118-124-132-144-154-166 stitches remain. On the next 2 rows bind off for armholes by binding off 7-10-6-12-9-7 stitches at the beginning of the next 2 rows = 104-104-120-120-136-152 stitches remain. Continue the pattern as before with 1 edge stitch in garter stitch in each side. When piece measures 54-56-58-60-62-64 cm = 21¼"-2"-22¾"-23⅝"-24⅜"-25¼", bind off the middle 30-30-30-30-32-34 stitches for neck and finish each shoulder separately. Work and bind off 1 stitch on next row from the neck = 36-36-44-44-51-58 stitches remain. When 2 rows remain before piece measures 56-58-60-62-64-66 cm = 22"-22¾"-23⅝"-24⅜"-25¼"-26" (and next row is worked from right side), decrease 5-5-7-7-8-10 stitches on shoulder by knitting stitches in each of the cables in A.1/A.3 and A.4/A.6 together 2 by 2 = 31-31-37-37-43-48 stitches remain. Knit 1 row from wrong side. Bind off by knitting from right side - read BIND-OFF TIP! Back piece measures approx. 56-58-60-62-64-66 cm = 22"-22¾"-23⅝"-24⅜"-25¼"-26" from shoulder and down. Work the other shoulder the same way. FRONT PIECE: Cast on 122-130-142-158-170-186 stitches on circular needle size 3.5 mm = US 4 and purl 1 row (= wrong side). Work next row as follows from right side: 2 edge stitches in garter stitch, * knit 2, purl 2 *, work from *-* until 4 stitches remain on needle, knit 2 and finish with 2 edge stitches in garter stitch. Continue rib like this for 6 cm = 2⅜". Purl 1 row from wrong side while decreasing 0-2-2-2-0-0 stitches evenly (work edge stitches in garter stitch) = 122-128-140-156-170-186 stitches. Switch to circular needle size 4.5 mm = US 7. Work next row as follows from right side: 2 edge stitches in garter stitch, purl 1-4-2-2-1-1, work A.1 over the next 8-8-16-24-32-40 stitches (= 1-1-2-3-4-5 repetitions of 8 stitches), work A.2 (= 16 stitches), work A.3 (= 8 stitches), work A.4 (= 14 stitches), work A.5 (= 24 stitches), work A.6 (= 14 stitches), work A.1 (= 8 stitches), work A.2 (= 16 stitches), work A.3 over the next 8-8-16-24-32-40 stitches (= 1-1-2-3-4-5 repetitions of 8 stitches), purl 1-4-2-2-1-1 and finish with 2 edge stitces in garter stitch. Continue pattern like this. When 1 row remains before piece measures 37-38-39-40-41-42 cm = 14½"-15"-15¼"-15¾"-16⅛"-16½"(and next row is worked from right side), decrease 2-2-4-6-8-10 stitches in each side by working the 4 stitches in each of the outermost 1-1-2-3-4-5 cables in each side knit together 2 by 2 = 118-124-132-144-154-166 stitches remain. On the next 2 rows bind off for armholes by binding off 7-10-6-12-9-7 stitches at the beginning of the next 2 rows = 104-104-120-120-136-152 stitches remain. Continue the pattern as before with 1 edge stitch in garter stitch in each side. When piece measures 49-50-52-53-55-56 cm = 19¼"-19¾"-20½"-21"-21⅝"-22", slip the middle 18-18-18-18-20-22 stitches on 1 stitch holder for neck and finish each shoulder separately. Continue and bind off for neck at the beginning of every row from the neck as follows: Bind off 2 stitches 2 times and 1 stitch 3 times = 36-36-44-44-51-58 stitches remain. When 2 rows remain before piece measures 56-58-60-62-64-66 cm = 22"-22¾"-23⅝"-24⅜"-25¼"-26" (and next row is worked from right side), decrease 5-5-7-7-8-10 stitches on shoulder by knitting stitches in each of the cables in A.1/A.3 and A.4/A.6 together 2 by 2 = 31-31-37-37-43-48 stitches remain. Knit 1 row from wrong side. Bind off by knitting from right side - remember BIND-OFF TIP! Work the other shoulder the same way. SLEEVES: Cast on 40-44-44-48-48-52 stitches on double pointed needles size 3.5 mm = US 4 with Merino Extra Fine. Work rib in the round (= knit 2/purl 2). When rib measures 6 cm = 2⅜", insert 1 marker on round. This marks where sleeve should be folded up and measure sleeve from this marker later. When rib measures 10 cm = 4" from cast-on edge, knit 1 round while increasing 2 stitches evenly = 42-46-46-50-50-54 stitches. Insert 1 new marker in piece, in the first stitch on round. This marker marks mid under sleeve, and purl stitch with marker on every round onwards. Switch to double pointed needles size 4.5 mm = US 7 and work first round as follows: Purl stitches with marker, work A.7 until 1 stitch remains on round, and work last stitch as first stitch in A.7 (so that pattern begins and ends the same way on each side of stitch with marker). Continue pattern like this. AT THE SAME TIME when sleeve measures 10-10-8-6-10-10 cm = 4"-4"-3⅛"-2⅜"-4"-4" from first marker inserted, increase 2 stitches mid under sleeve – read INCREASE TIP-1. Increase like this every 2-2-2-2-1½-1½ cm = ¾"-¾"-¾"-¾"-½"-½" 17-17-19-19-21-21 times in total = 76-80-84-88-92-96 stitches. When sleeve measures 46-46-46-44-43-42 cm = 18"-18"-18"-17¼"-17"-16½" from first marker, work sleeve cap back and forth on circular needle from mid under sleeve – continue A.7 as before with 1 edge stitch in garter stitch in each side until finished measurements (i.e. Work stitch with marker and last stitch on round in garter stitch). Work until sleeve measures 50-51-49-50-48-46 cm = 19¾"-20"-19¼"-19¾"-19"-18" from first marker (and approx. 56-57-55-56-54-52 cm = 22"-22½"-21⅝"-22"-21¼"-20½" from cast-on edge), i.e. There is a vent of approx. 4-5-3-6-5-4 cm = 1½"-2"-1⅛"-2⅜"-2"-1½" at the top of sleeve. Bind off knitting from right side. NOTE! Shorter measurements in the larger sizes because of wider shoulders. Work the other sleeve the same way. ASSEMBLY: Sew shoulder seams inside bind-off edge. Sew side seam on front pieces and back piece from armholes and down to where rib begins, so that there is a vent of approx. 6 cm = 2⅜" at the bottom in each side - sew side seams in outer loops of edge stitches to get a flat seam. Sew sleeve cap to armhole inside 1 edge stitch in garter stitch along armhole. Then sew vent at the top of sleeve to the bottom of armhole – see chart. NECK: Begin from right side by one shoulder, and pick up approx. 78 to 92 stitches around the neck (including stitches on stitch holders at the front) on circular needle size 3.5 mm = US 4. Knit 1 round while increasing 92-96-100-100-104-108 stitches - read INCREASE TIP-2. Then work rib in the round (knit 2/purl 2) for 8-8-9-9-10-10 cm = 3⅛"-3⅛"-3½"-3½"-4"-4" – or desired length. Bind off with knit over knit and purl over purl - remember BIND-OFF TIP! |
|||||||||||||||||||||||||
Diagram explanations |
|||||||||||||||||||||||||
|
|||||||||||||||||||||||||
 |
|||||||||||||||||||||||||
 |
|||||||||||||||||||||||||
 |
|||||||||||||||||||||||||
 |
|||||||||||||||||||||||||
Have you finished this pattern?Tag your pictures with #dropspattern #coolconfidencesweater or submit them to the #dropsfan gallery. Do you need help with this pattern?You'll find 31 tutorial videos, a Comments/Questions area and more by visiting the pattern on garnstudio.com. © 1982-2026 DROPS Design A/S. We reserve all rights. This document, including all its sub-sections, has copyrights. Read more about what you can do with our patterns at the bottom of each pattern on our site. |
|||||||||||||||||||||||||


With over 40 years in knitting and crochet design, DROPS Design offers one of the most extensive collections of free patterns on the internet - translated to 17 languages. As of today we count 324 catalogs and 12290 patterns - 12280 of which are translated into English (US/in).
We work hard to bring you the best knitting and crochet have to offer, inspiration and advice as well as great quality yarns at incredible prices! Would you like to use our patterns for other than personal use? You can read what you are allowed to do in the Copyright text at the bottom of all our patterns. Happy crafting!
Post a comment to pattern DROPS 216-25
We would love to hear what you have to say about this pattern!
If you want to leave a question, please make sure you select the correct category in the form below, to speed up the answering process. Required fields are marked *.