
Popular categories
Looking for a yarn?


Comments / Questions (17)
![]() Minnebois wrote:
Minnebois wrote:
Bj les torsades commence après les cotes,mais entre deux cb de mailles ils fauts à chaque fois. Merci
25.01.2026 - 10:34DROPS Design answered:
Bonjour Mme Minnebois, vous aurez 10 m entre les torsades, mais le nombre de mailles avant la 1ère et après la dernière varie en fonction de votre taille, cf explications du 1er rang sur l'endroit avec l'aiguille circulaire 7. Bon tricot!
26.01.2026 - 08:48Tieske Beertema wrote:
Ik vind hem prachtig. Heb je er een patroon van ?
05.11.2024 - 12:44
![]() Irma Manelius wrote:
Irma Manelius wrote:
Miksi ohjeessa 215-20 kädentien korkeus on eri etu-ja takakappaleessa? Onko virhe vai kuinka tämä toimii?
14.03.2023 - 09:32DROPS Design answered:
Kädentien korkeus on sama etu- ja takakappaleessa. Eli kädentien silmukat päätetään, kun työn pituus on 40-41-42-43-44-45 cm.
20.03.2023 - 16:53
![]() Nicola Warnants wrote:
Nicola Warnants wrote:
I am confused by the instructions for the back piece from where it starts to decrease for the neck - "cast off middle 22 stitches for the neck 'and' each shoulder is finished separately"...onwards to end. Please can you write out again for me so it's clearer English, and explains how you get to 22 stitches. Thanks
26.05.2022 - 09:09DROPS Design answered:
Dear Nicola, you can place a marker between the middle stitches in the back and, from there, count 11 stitches outwards. This way, you will cast off the middle 22 stitches. Then, you will have 23 stitches remaining on each side, for each shoulder. Now you start working each shoulder separately (only work on the 23 stitches on one side first, repeat later on the other side). In the next row from the neck, decrease 1 stitch, obtaining 22 stitches for the shoulder. Happy knitting!
26.05.2022 - 23:07
![]() Thea wrote:
Thea wrote:
Hei, strikker denne nydelige genseren, men stusser på at lengde opp til ermehull er forskjellig for forstykke og bakstykke. Eksempel str S: bakstykke 40cm og forstykke 52cm. Skal det være slik? Og eventuelt hvorfor?
09.04.2022 - 08:16DROPS Design answered:
Hei Thea. Du skal strikke forstykket lik bakstykket (altså felle av til ermhull når arbeidet måler 40-41-42-43-44-45 cm), MEN for og bakstykket strikkes bare likt til arbeidet måler 52-54-56-58-60-62 cm. For da skal det felles 8 masker jevnt fordelt over maskene i A.2 (på forstykket). Deretter settes de midterste 16-16-16-18-18-18 maskene på en tråd til hals, og hver skulder strikkes ferdig for seg. mvh DROPS Design
19.04.2022 - 08:17
![]() Bärbel wrote:
Bärbel wrote:
Förstår inte när ökningen på första a1 ska göras. Över 6 maskor. Ska ju sätta 5 maskor bakom arbetet på flätsticka, sedan bara en kvar av 6…
09.11.2021 - 14:26
![]() Daniella wrote:
Daniella wrote:
Hallo liebes DROPS-Team, können Sie mir kurz schreiben, welche Stärke die Zopfnadel haben sollte? Vielen Dank!
12.09.2021 - 12:23DROPS Design answered:
Liebe Daniella, die Zopfnadel haben wir als 2 Größe, iher können Sie die größere benutzen. Viel Spaß beim stricken!
13.09.2021 - 08:58
![]() Elena wrote:
Elena wrote:
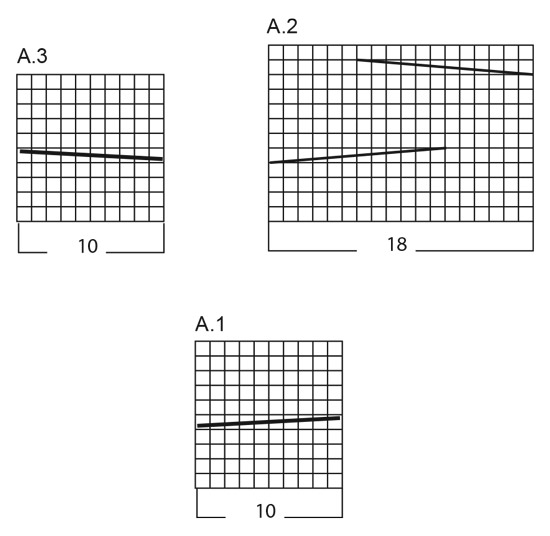
Buonasera nel fare i vari diagrammi A1-A2-A3, non ho capito, su quali maglie eseguire gli aumenti come descritto. Ad esempio A1 devo intrecciare 5 maglie (trasferendo 5 maglie dietro il lavoro ecc e c’è scritto di aumentare 4 maglie su queste maglie … La mia domanda è : gli aumenti ovvero le 4 maglie da aumentare in questo caso devono essere fatti ad esempio sulle maglie che metto dietro il lavoro (5 maglie e anche sulle altre 5 maglie) o come? Grazie
22.05.2021 - 21:16DROPS Design answered:
Buonasera Elena, questi 4 aumenti vanno fatti sul primo ferro di A.1 e A.3 che sono lavorati tutti a diritto, per portare le maglie da 6 a 10. Buon lavoro!
22.05.2021 - 22:51
![]() Krista Buckley wrote:
Krista Buckley wrote:
Is there any reason why this pattern should not be knit in the round?
05.03.2021 - 19:31DROPS Design answered:
Dear Krista, some simply prefer patterns that are knitted in the traditional way, in pieces. There are advantages, like seams ad stability to such a soft and fluffy sweater as this. However, if you want, you can try to knit it, on the round, until the armhole, then separate the stitches, cast off 12 stitches for the armhole, and from there you have to finish the piece back and forth anyway. Happy Knitting!
07.03.2021 - 21:37
![]() Anki wrote:
Anki wrote:
Har stickat denna tröja och blev hur fin som helst. Viktigt dock att läsa beskrivningen noga. Gärna rad för rad när det gäller ökningarna för fätorna. Ser krångligare ut än vad det är. Missade det själv och fick repa upp. Jag stickade bålen på rundsticka och det funkade finemang, räknade bort kantmaskan. Happy knitting
27.11.2020 - 22:44
|
||||||||||||||||
Swirling Smoke#swirlingsmokesweater |
||||||||||||||||
 |
 |
|||||||||||||||
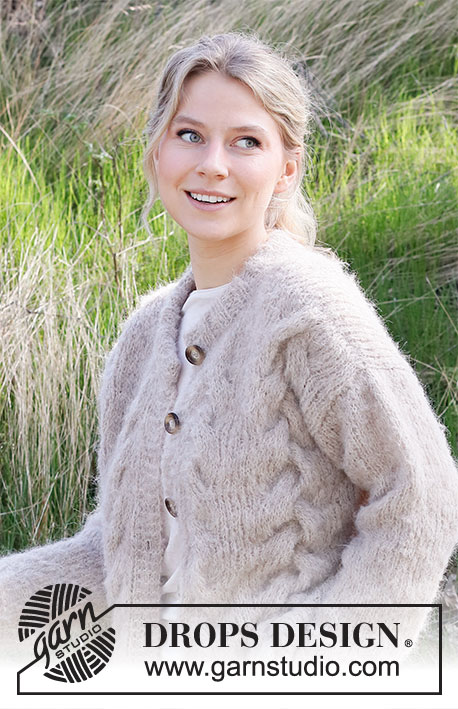
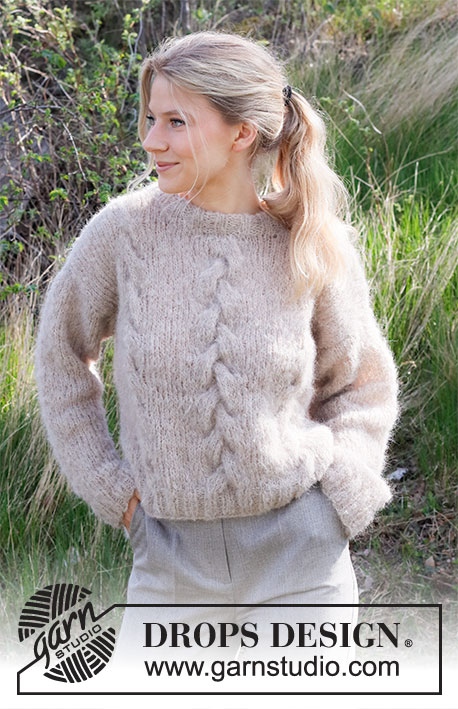
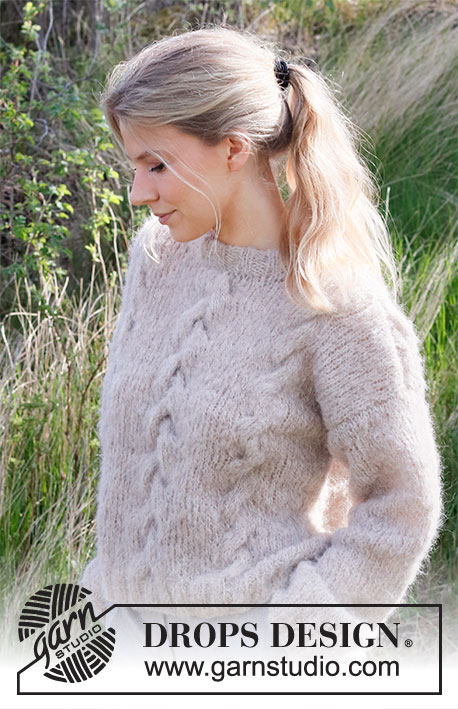
Knitted sweater with stockinette stitch and cables in DROPS Melody. Sizes S - XXXL
DROPS 215-20 |
||||||||||||||||
|
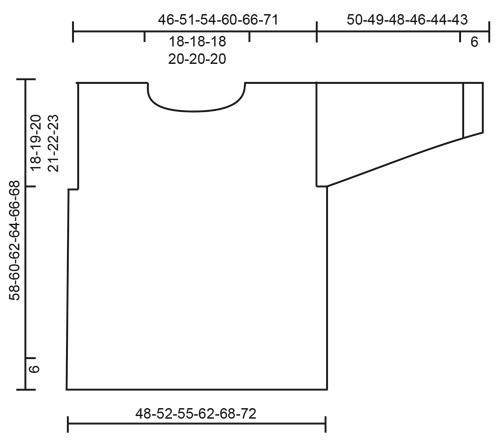
------------------------------------------------------- EXPLANATIONS FOR THE PATTERN: ------------------------------------------------------- PATTERN: See diagrams A.1, A.2 and A.3. DECREASE TIP (for sleeves): Decrease 1 stitch on either side of the marker thread as follows: Work until there are 3 stitches left before the marker thread, knit 2 together, knit 2 (marker thread sits between these 2 stitches), slip 1 stitch as if to knit, knit 1 and pass the slipped stitch over the knitted stitch. RIDGE/GARTER STITCH (worked back and forth): 1 ridge = Knit 2 rows. ------------------------------------------------------- START THE PIECE HERE: ------------------------------------------------------- SWEATER – SHORT OVERVIEW OF THE PIECE: The sweater is worked back and forth in sections and then sewn together. Stitches are knitted up for the sleeves, which are worked in the round with circular needle/double pointed needles, top down. The neck is worked to finish. BACK PIECE: Cast on 66-74-74-82-90-98 stitches with circular needle size 6 mm = US 10 and Melody. Purl 1 row from the wrong side then work as follows from the right side: 1 edge stitch in GARTER STITCH – see description above, knit 1 * purl 2, knit 2 *, repeat from *-* until there are 4 stitches left on the row, purl 2, knit 1 and finish with 1 edge stitch in garter stitch. Continue this rib for 6 cm = 2⅜". Change to circular needle size 7 mm = US 10,75. The next row is worked as follows from the right side: 1 edge stitch in garter stitch, stockinette stitch over the next 11-15-15-19-23-27 stitches, AT THE SAME TIME decrease 1-2-0-0-0-1 stitches evenly over these stitches, A.1 over the next 6 stitches, AT THE SAME TIME increase 4 stitches over these stitches (A.1 = 10 stitches), 10 stitches in stockinette stitch, A.2 over the next 10 stitches, AT THE SAME TIME increase 8 stitches evenly over these stitches (A.2 = 18 stitches), stockinette stitch over the next 10 stitches, A.3 over the next 6 stitches, AT THE SAME TIME increase 4 stitches over these stitches (A.3 = 10 stitches), stockinette stitch over the next 11-15-15-19-23-27 stitches, AT THE SAME TIME decrease 1-2-0-0-0-1 stitches evenly over these stitches and finish with 1 edge stitch in garter stitch = 80-86-90-98-106-112 stitches on the needle. Continue the pattern onwards. NOTE! Insert 1 marker on both sides of each cable; it is easier to position the cables correctly. REMEMBER THE KNITTING GAUGE! When the piece measures 40-41-42-43-44-45 cm = 15¾"-16⅛"-16½"-17"-17¼"-17¾", bind off 2 stitches in each side (mark the armholes) = 76-82-86-94-102-108 stitches. Continue working until the piece measures 56-58-60-62-64-66 cm = 22"-22¾"-23⅝"-24⅜"-25¼"-26". Decrease 8 stitches evenly over the stitches in A.2. Then bind off the middle 22-22-22-24-24-24 stitches for the neck and each shoulder is finished separately. Continue by binding off 1 stitch at the beginning of the next row from the neck = 22-25-27-30-34-37 stitches on the shoulder. Continue working until the piece measures 57-59-61-63-65-67 cm = 22½"-23¼"-24"-24¾"-25½"-26⅜", decrease 4 stitches over A.1/A.3 = 18-21-23-26-30-33 stitches on the shoulder. Work 1 row then bind off the remaining stitches. The piece measures 58-60-62-64-66-68 cm = 22¾"-23⅝"-24⅜"-25¼"-26"-26¾". Work the other shoulder in the same way. FRONT PIECE: Cast on and work in the same way as the back piece until the piece measures 52-54-56-58-60-62 cm = 20½"-21¼"-22"-22¾"-23⅝"-24⅜", (remember to bind off for the armholes) = 76-82-86-94-102-108 stitches. Decrease 8 stitches evenly over the stitches in A.2. Then place the middle 16-16-16-18-18-18 stitches on 1 thread for the neck and each shoulder is finished separately. Then bind off at the beginning of the next row from the neck as follows: 2 stitches 1 time, 1 stitch 2 times = 22-25-27-30-34-37 stitches left on the shoulder. Continue working until the piece measures 57-59-61-63-65-67 cm = 22½"-23¼"-24"-24¾"-25½"-26⅜", then decrease 4 stitches over A.1/A.3 = 18-21-23-26-30-33 stitches left. Work 1 row then bind off the remaining stitches. The piece measures 58-60-62-64-66-68 cm = 22¾"-23⅝"-24⅜"-25¼"-26"-26¾". Work the other shoulder in the same way. ASSEMBLY: Sew the shoulder seams and sew the side seams inside the 1 edge stitch as far as the armholes. LEFT SLEEVE: Start where 2 stitches were bind off for the armhole on the left front piece and knit up 46-50-52-54-58-60 stitches from the right side with Melody and short circular needle 7 mm = US 10,75; knit up first along the front piece, then down the back piece to where you started. Work stockinette stitch in the round. Insert 1 marker thread at the beginning of the round (mid-under the sleeve). When the piece measures 4 cm = 1½", decrease 1 stitch on each side of the marker thread – read DECREASE TIP. Decrease like this every 6-5½-5½-5-4½-4 cm = 2⅜"-2⅛"-2⅛"-2"-1¾"-1½" a total of 6-7-7-7-8-8 times = 34-36-38-40-42-44 stitches. When the sleeve measures 44-43-42-40-38-37 cm = 17¼"-17"-16¾"-15¾"-15"-14½" change to double pointed needles size 6 mm = US 10 and increase 2-4-2-4-2-4 stitches evenly spaced = 36-40-40-44-44-48 stitches. Work rib (knit 2, purl 2) for 6 cm = 2⅜". Bind off. The sleeve measures approx. 50-49-48-46-44-43 cm = 19¾"-19¼"-19"-18"-17¼"-17". RIGHT SLEEVE: Work in the same way as the left sleeve but when knitting up from the bind-off stitches, work first up the back piece and then down the front piece. NECK: Knit up approx. 52 to 64 stitches around the neck (including the stitches on the thread) with circular needle size 6 mm = US 10. Make sure the number of stitches is divisible by 4. Work rib (knit 2, purl 2) for 8 cm = 3⅛". Bind off with knit over knit and purl over purl. ASSEMBLY: Fold the neck double to the wrong side and sew down. To avoid the neck being tight and rolling outwards, it is important that the seam is elastic. |
||||||||||||||||
Diagram explanations |
||||||||||||||||
|
||||||||||||||||
 |
||||||||||||||||
 |
||||||||||||||||
Have you finished this pattern?Tag your pictures with #dropspattern #swirlingsmokesweater or submit them to the #dropsfan gallery. Do you need help with this pattern?You'll find 19 tutorial videos, a Comments/Questions area and more by visiting the pattern on garnstudio.com. © 1982-2026 DROPS Design A/S. We reserve all rights. This document, including all its sub-sections, has copyrights. Read more about what you can do with our patterns at the bottom of each pattern on our site. |
||||||||||||||||


With over 40 years in knitting and crochet design, DROPS Design offers one of the most extensive collections of free patterns on the internet - translated to 17 languages. As of today we count 324 catalogs and 12290 patterns - 12280 of which are translated into English (US/in).
We work hard to bring you the best knitting and crochet have to offer, inspiration and advice as well as great quality yarns at incredible prices! Would you like to use our patterns for other than personal use? You can read what you are allowed to do in the Copyright text at the bottom of all our patterns. Happy crafting!
Post a comment to pattern DROPS 215-20
We would love to hear what you have to say about this pattern!
If you want to leave a question, please make sure you select the correct category in the form below, to speed up the answering process. Required fields are marked *.