
Popular categories
Looking for a yarn?


Comments / Questions (23)
![]() Siguoirt Josiane wrote:
Siguoirt Josiane wrote:
Pouvez vous m'expliquer mieux le raglan pour le Flocking Gulls Jacket?
03.06.2025 - 12:51DROPS Design answered:
Bonjour Mme Siguoirt, on va augmenter pour le raglan d'abord de chaque côté de chacune des 3 mailles des raglans - comme indiqué sous RAGLAN au tout début des explications, on va ainsi augmenter d'abord 8 mailles tous les 2 tours soit tous les rangs sur l'endroit de 20 à 35 fois (cf taille), puis, vous augmenterez encore 1 fois au prochain rang sur l'endroit mais cette fois vous n'augmenterez qu'à la fin du devant gauche + au début et à la fin du dos + à la fin du devant droit (augmentez comme avant). En même temps, tricotez le point ajouré comme indiqué. Bon tricot!
03.06.2025 - 13:16
![]() Siguoirt Josiane wrote:
Siguoirt Josiane wrote:
Je ne comprends pas les explications du raglan pourquoi 3 mailles?
03.06.2025 - 12:47
![]() Anni Johnsen wrote:
Anni Johnsen wrote:
Jeg forstår ikke opskriften. Den er jo umiddelbar simpel, men jeg kan ikke få maskeantallet til at passe. Jeg har strikket de 4 første p, hvor jeg har taget ud til raglan på p 2 og 4. Maskeantallet passer allerede ikke på p 5, hvor hulmønstret starter. Jeg strikker str. S. Jeg forstår heller ikke, hvad det betyder at der skal være 2 masker ret ml. udtagn. til raglan og det yderste omslag mod raglan på 5. og 15. pind. Jeg er ikke nybegynder, men denne kan jeg ikke greje.
13.05.2025 - 22:40
![]() Charo Lebròn wrote:
Charo Lebròn wrote:
No sé qué estoy haciendo mal, sigo paso a paso y todo ok, pero cuando llego al dibujo no coinciden los puntos. Lo he desecho varias veces , y no coinciden los puntos. Podría estar mal explicado el patrón ??? Gracias
23.04.2025 - 22:33
![]() Charo Lebròn wrote:
Charo Lebròn wrote:
Hola .! Estoy intentando tejer el dibujo de la labor, he puesto todos los puntos y aumentado todo correcto, pero cuando lo trabajo no coinciden los puntos… he desecho varias veces y no consigo. La talla es la XL podría haber un error en el patrón ??? Gracias
23.04.2025 - 22:29
![]() Ulla wrote:
Ulla wrote:
Tak for svar. det “kører” nu:)
20.03.2025 - 16:24
![]() Ulla wrote:
Ulla wrote:
Er forvirret. Der står at man skal starte mønster og raglandudtagning samtidig, men de første fire rækker i mønsteret er retstrikket inden mønsteret begynder? Og jeg forstår ikke raglanudtagningens fordeling “indenfor mærketråden”
15.03.2025 - 19:30DROPS Design answered:
Hej Ulla, hvilken størrelse strikker du, så skal vi forklare hvor du sætter mærkerne. Du starter nederst i diagrammerne og de 4 første pinde i A.3 strikkes glatstrik :)
20.03.2025 - 14:07
![]() Christine wrote:
Christine wrote:
Merci pour vos réponses et votre rapidité, j'ai compris.
16.02.2022 - 12:49
![]() Christine wrote:
Christine wrote:
Suite : 2. RAGLAN : le 1er paragraphe dit "1 maille de part et d'autre des 3 mailles" et le 2nd dit "+ 2 mailles" et "+ 1 maille". Comment l'intégrer dans MANCHE GAUCHE et la suite ?
16.02.2022 - 10:59DROPS Design answered:
Bonjour Christine, les augmentations se font différemment sur le dos/devants et les manches; pour les manches vous tricotez ainsi au début de la manche (après le fil marqueur: 2 mailles endroit, 1 jeté (= augmentation); tricotez jusqu'à ce qu'il reste 2 mailles avant le fil marqueur et faites 1 jeté (= augmentation). Vous avez ainsi augmenté 2 mailles pour la manche. Bon tricot!
16.02.2022 - 11:36
![]() Christine wrote:
Christine wrote:
EMPIECEMENT: je commence à augmenter pour le raglan ET je tricote en même temps le point fantaisie. Je suis sur le premier rang et ça bloque : 1. DEVANT GAUCHE : diagramme sur 10 mailles, plus la moitié du diagramme pour arriver à 15 (m end sur 4 rgs) ? "2 m end en commençant par 1e m de A3" ? comprends pas
16.02.2022 - 10:58DROPS Design answered:
Réponses dans le désordre =) Tricotez le devant gauche ainsi: 6 mailles de A.1, 2 m endroit, A.3 (= commencez par la 2ème maille = tricotez les 9 dernières mailles + les 6 premières mailles = 15 mailles), 1 à 5 mailles endroit (augmentez pour le raglan lorsqu'il reste 1 maille avant le fil marqueur). Pour les manches, tricotez A.3 sur 15 mailles ainsi: les 10 mailles du diagramme + les 5 premières. Bon tricot!
16.02.2022 - 11:40
|
|||||||||||||||||||
Flocking Gulls Jacket#flockinggullsjacket |
|||||||||||||||||||
 |
 |
||||||||||||||||||
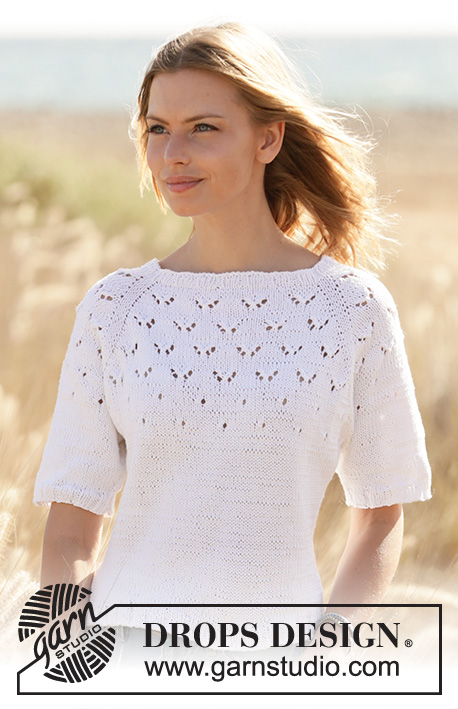
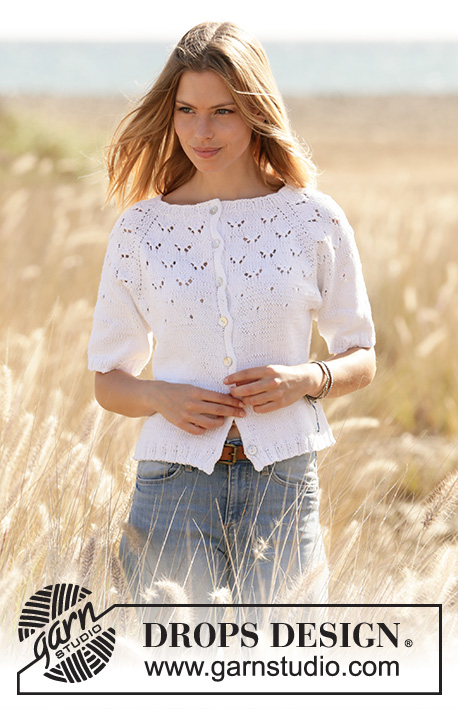
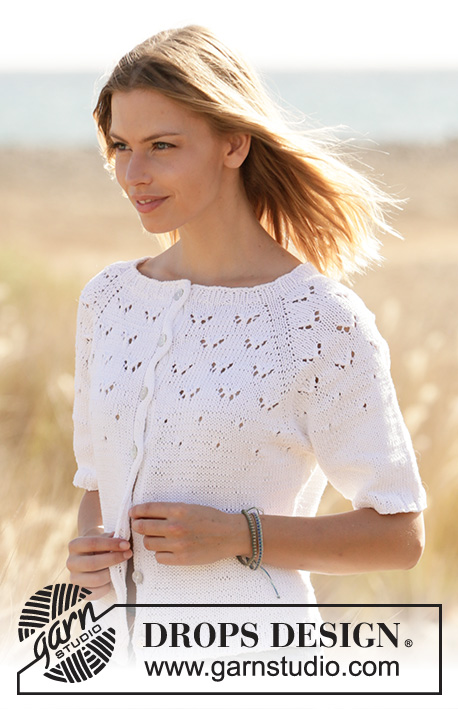
Knitted jacket with raglan in DROPS Muskat. Piece is knitted top down with lace pattern and short sleeves. Size: S - XXXL
DROPS 210-16 |
|||||||||||||||||||
|
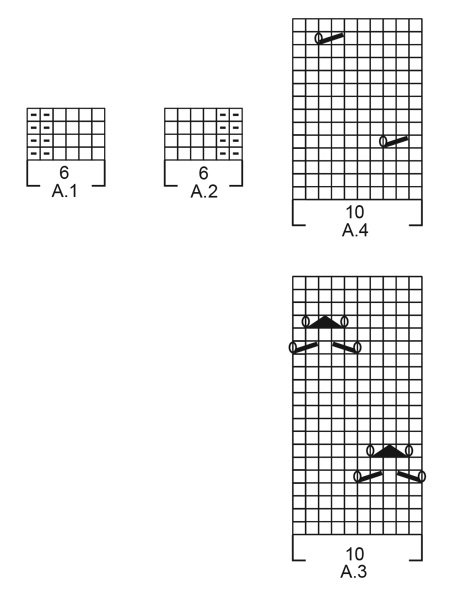
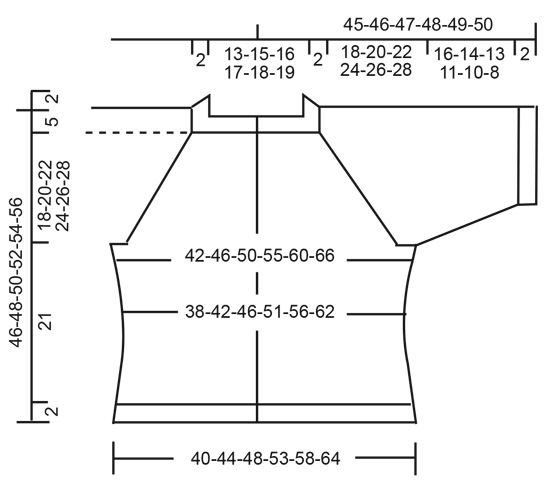
---------------------------------------------------------- EXPLANATION FOR THE PATTERN: ---------------------------------------------------------- PATTERN: See diagrams A.1 to A.4. Diagrams show all rows in pattern seen from the right side. INCREASE TIP-1 (evenly): To calculate how to increase evenly, use the total number of stitches on row (e.g. 110 stitches), minus bands (= e.g. 12 stitches) and divide the remaining stitches by number of increases to be done (e.g. 13) = 7.5. In this example increase by making 1 yarn over after alternately every 7th and 8th stitch, do not increase over bands. On next row work yarn overs twisted to avoid holes. INCREASE TIP-2 (applies to sides of body): All increases are done from the right side. Work until 2 stitches remain before marker thread, 1 yarn over, knit 4 (marker thread is in the middle of these stitches), 1 yarn over. On next row purl yarn overs twisted to avoid holes. Then work the new stitches in stockinette stitch. RAGLAN: Increase 1 stitch on each side of 3 knit stitches in every transition between front pieces/back piece and sleeves (= 8 stitches increased on row). Increase inside marker thread and 2 knit stitches on sleeves and increase inside marker thread and 1 knit stitch on front pieces and back piece. Increase 1 stitch by making 1 yarn over. On next row knit yarn overs twisted to avoid holes. Then work the new stitches in pattern/stockinette stitch. BAND: To make the band even and not stretch in length than the rest of garment it is important to tighten the yarn a little when working band stitches in each side. If the band still is longer that the rest of garment work short rows by beginning for right side as follows: Work pattern as before until band at the end of row, turn, tighten yarn and work back from wrong side until band at the end of row, turn, tighten yarn. Then work pattern back and forth over all stitches on needle. Repeat short rows approx. every 6 cm = 2⅜". DECREASE TIP: All decreases are done from the right side! Decrease 1 stitch on each side of marker thread as follows: Work until 3 stitches remain before marker thread and knit 2 together, knit 2 (marker thread is between these stitches), slip 1 stitch knitwise, knit 1, pass slipped stitch over stitch worked. BIND-OFF TIP: To avoid a tight bind-off edge you may use a larger needle. If this also is too tight, make 1 yarn over after approx. every 5th stitch and bind off these as regular stitches. BUTTONHOLES: Decrease for buttonholes on right band (when garment is worn). Decrease from right side when 5 stitches remain on row as follows: Make 1 yarn over, knit the next 2 stitches together work the rest of stitches in band. On next row knit yarn over to make holes. Decrease first buttonhole when rib in neck measures approx. 1½-2 cm = ½"-¾". Then decrease the next 6-6-7-7-7-7 buttonholes, approx. 6½-6½-6-6½-6½-7 cm = 2½"-2½"-2⅜"-2½"-2½"-2¾" between each. ---------------------------------------------------------- START THE PIECE HERE: ---------------------------------------------------------- JACKET - SHORT OVERVIEW OF THE PIECE: Work neck edge and yoke back and forth on circular needle from mid front, work top down. Now divide yoke for body and sleeves. Work body back and forth on circular needle, top down. Work sleeves in the round on double pointed needles/short circular needle, top down. NECK EDGE: Cast on 110-115-120-125-130-135 stitches (including 6 band stitches in each side towards mid front) on circular needle size 3 mm = US 2,5 with Muskat. Purl 1 row (= wrong side). Work next row as follows from right side: Work A.1 (= 6 stitches), * knit 3, purl 2 *, repeat from *-* until 9 stitches remain on row, knit 3 and finish with A.2 (= 6 stitches). Continue rib like this for 1½-2 cm = ½"-¾" – remember BUTTONHOLES on right band – read explanation above. When rib is done, knit 1 row from right side (work band stitches as before) while increasing 13-8-11-6-17-20 stitches evenly - read INCREASE TIP-1 = 123-123-131-131-147-155 stitches. Purl 1 row from wrong side (purl yarn overs twisted and work bands as before). Switch to circular needle size 4 mm = US 6. Insert 1 marker after band at the beginning of row mid front, measure yoke from this marker! YOKE: Now insert 4 marker threads in the piece as follows: Insert a marker thread 24-24-25-25-27-28 stitches in from each side (= in transition between front pieces and sleeve), insert the next 2 marker threads another 19-19-21-21-25-27 stitches in from marker thread in each side (= in transition between sleeves and back piece). There are now 37-37-39-39-43-45 stitches for back piece between the last 2 marker threads inserted in piece. On next row begin increase for RAGLAN – read explanation above, and work at the same time pattern as follows: Work left front piece as follows: Work A.1 over the first 6 stitches – read BAND, knit 2, begin on 1st stitch in A.3 and work as many stitches of pattern you have room for over the next 15 stitches, knit 1-1-2-2-4-5, marker thread is here. Work left sleeve as follows: Knit 2-2-3-3-5-6, begin on 1st stitch in A.3 and work as many stitches of pattern you have room for over the next 15 stitches, knit 2-2-3-3-5-6, marker thread is here. Work back piece as follows: Knit 1-1-2-2-4-5, begin on 1st stitch in A.3 and work as many stitches of pattern you have room for over the next 35 stitches, knit 1-1-2-2-4-5, marker thread is here. Work right sleeve as follows: Knit 2-2-3-3-5-6, begin on 1st stitch in A.3 and work as many stitches of pattern you have room for over the next 15 stitches, knit 2-2-3-3-5-6, marker thread is here. Work right front piece as follows: Knit 1-1-2-2-4-5, begin on 6th stitch in A.3 and work as many stitches of pattern you have room for over the next 15 stitches, knit 2, A.2 over the last 6 stitches - remember BAND. REMEMBER THE KNITTING GAUGE! READ THE WHOLE NEXT SECTION BEFORE WORKING – increase for raglan and work pattern as follows: Increase for raglan every other row 20-24-27-30-32-35 times in total, then increase 1 more time on front pieces and back piece (but do not increase on sleeves) = 287-319-351-375-407-439 stitches. AT THE SAME TIME when increasing stitches, there is room for more repetitions with lace pattern towards each raglan. There should always be 2-2-3-3-5-6 knit stitches between increase for raglan and the outermost yarn over towards raglan on 5th and 15th round in A.3. When A.3 has been worked 1 time vertically, repeat diagram 1 more time vertically. Then work A.4 (= 10 stitches) over A.3, and work as many lace patterns you can towards every raglan when increasing stitches. When A.4 has been worked vertically, continue with stockinette stitch (and band stitches as before) until finished measurements. When all increases are done, the piece measures approx. 15-18-20-22-24-26 cm = 6"-7"-8"-8¾"-9½"-10¼". Continue to work until piece measures 18-20-22-24-26-28 cm = 7"-8"-8¾"-9½"-10¼"-11". Now divide piece for body and sleeves. In size S, M and L divide piece for body at the marker threads and in size XL, XXL and XXXL work 1-3-4 stitches from each side of sleeve in on front and back piece. Work next row from wrong side as follows: Work the first 45-49-53-57-63-68 stitches (= right front piece), slip the next 59-67-75-79-83-89 stitches on a stitch holder for sleeve, cast on 10-10-10-12-12-14 new stitches on needle (= in the side under sleeve), work the next 79-87-95-103-115-125 stitches (= back piece), slip the next 59-67-75-79-83-89 stitches on a stitch holder (= sleeve), cast on 10-10-10-12-12-14 new stitches on needle (= in the side under sleeve), work the remaining 45-49-53-57-63-68 stitches (= left front piece). Then finish body and sleeves separately. NOW MEASURE PIECE FROM HERE! BODY: = 189-205-221-241-265-289 stitches. Insert 1 marker thread 50-54-58-63-69-75 stitches in from each side (= 89-97-105-115-127-139 stitches between marker threads on back piece). Move the marker threads upwards when working; they are used when increasing and decreasing in the sides later. Continue back and forth with stockinette stitch and band stitches. When piece measures 3 cm = 1⅛" from division, decrease 1 stitch on each side of marker threads - read DECREASE TIP. Decrease like this approx. every 2½ cm = ⅞" 4 times in total = 173-189-205-225-249-273 stitches. When piece measures 14 cm = 5½" from division in all sizes, increase 1 stitch on each side of marker thread - read INCREASE TIP-2. Repeat increase when piece measures 16 cm = 6¼" = 181-197-213-233-257-281 stitches. When piece measures 21 cm = 8¼" from division, increase 14-18-22-22-28-34 stitches evenly = 195-215-235-255-285-315 stitches. Switch to circular needle size 3 mm = US 2,5. Work rib as follows: A.1 over the first 6 stitches, * 3 knit, purl 2 *, work from *-* until 9 stitches remain, knit 3, A.2 over the last 6 stitches. When rib measures 2 cm = ¾", bind off with knit over knit and purl over purl stitch - read BIND-OFF TIP. Jacket measures approx. 46-48-50-52-54-56 cm = 18"-19"-19¾"-20½"-21¼"-22" from shoulder and down. SLEEVES: Slip the 59-67-75-79-83-89 stitches from stitch holder in one side back on a short circular needle/double pointed needles size 4 mm = US 6 and pick in addition up 1 stitch in each of the new 10-10-10-12-12-14 stitches cast on in the side under sleeve = 69-77-85-91-95-103 stitches. Insert a marker thread in the middle of the new stitches cast on under sleeve. Move the marker thread upwards when working. Use marker later when decreasing under sleeve. Work in stockinette stitch in the round. When sleeve measures 3-3-3-3-2-2 cm = 1⅛"-1⅛"-1⅛"-1⅛"-¾"-¾" from division, decrease 1 stitch on each side of marker thread - remember DECREASE TIP. Decrease like this approx. every 3-2-1½1-1-1 cm = 1⅛"-¾"-½"-⅜"-⅜" 5-6-7-7-7-5 times in total = 59-65-71-77-81-93 stitches. When all decreases are done, work in stockinette stitch until sleeve measures 16-14-13-11-10-8 cm = 6¼"-5½"-5⅛"-4⅜"-4"-3⅛" (shorter measurements in the larger sizes because of longer yoke) - or to desired length. Knit 1 round while increasing 1-0-4-3-4-2 stitches evenly = 60-65-75-80-85-95 stitches. Switch to double pointed needles size 3 mm = US 2,5. Work rib (knit 3/purl 2) in the round for 2 cm = ¾". Bind off with knit over knit and purl over purl - remember BIND-OFF TIP. Work the other sleeve the same way. ASSEMBLY: Sew the buttons on to left band. |
|||||||||||||||||||
Diagram explanations |
|||||||||||||||||||
|
|||||||||||||||||||
 |
|||||||||||||||||||
 |
|||||||||||||||||||
Have you finished this pattern?Tag your pictures with #dropspattern #flockinggullsjacket or submit them to the #dropsfan gallery. Do you need help with this pattern?You'll find 26 tutorial videos, a Comments/Questions area and more by visiting the pattern on garnstudio.com. © 1982-2026 DROPS Design A/S. We reserve all rights. This document, including all its sub-sections, has copyrights. Read more about what you can do with our patterns at the bottom of each pattern on our site. |
|||||||||||||||||||


With over 40 years in knitting and crochet design, DROPS Design offers one of the most extensive collections of free patterns on the internet - translated to 17 languages. As of today we count 324 catalogs and 12290 patterns - 12280 of which are translated into English (US/in).
We work hard to bring you the best knitting and crochet have to offer, inspiration and advice as well as great quality yarns at incredible prices! Would you like to use our patterns for other than personal use? You can read what you are allowed to do in the Copyright text at the bottom of all our patterns. Happy crafting!
Post a comment to pattern DROPS 210-16
We would love to hear what you have to say about this pattern!
If you want to leave a question, please make sure you select the correct category in the form below, to speed up the answering process. Required fields are marked *.