
Popular categories
Looking for a yarn?


Comments / Questions (6)
![]() Katarina Lans wrote:
Katarina Lans wrote:
I mönstret 204-19, så är det lite oklart hur man minskar på toppen av vantarna. Jag förstår ingenting! Går det att tydliggöra? T.ex. att man ska minska 3 maskor innnan markören, men det blir bara förvirrande när man ska kombinera beskrivningen och minskningstips 2. Vore enklare att läsa vad man ska göra sticka för sticka.
22.01.2024 - 20:44DROPS Design answered:
Hej Katarina. När du ska börja minska och har satt de 2 markörerna i arbetet så minskar du vid varje markör på följande sätt: Börja 3 maskor före markören, sticka 2 maskor räta tillsammans, sticka 2 rätmaskor (markören sitter mellan dessa 2 maskorna), lyft 1 maska som om den skulle stickas rät, sticka 1 rätmaska, drag den lyfta maskan över maskan som stickades (= 2 maskor minskade vid markören). Detta gör du vid varje markör och varje varv tills du har 4 maskor kvar. Då klipper du av tråden, drar den genom de sista 4 maskorna, drar åt och fäster tråden. Mvh DROPS Design
24.01.2024 - 15:05
![]() Valerie wrote:
Valerie wrote:
Bonjour Lorsque je commence les diminutions le dessin est décalé, dois je ajuster ou continuer selon le schéma ? Merci par avance pour votre aidaient cordialement Valerie
19.10.2023 - 18:51DROPS Design answered:
Bonjour Valérie, au choix, vous pouvez simplement continuer en suivant le diagramme ou bien ajuster le motif pour que les plumetis soient toujours alignés. Bon tricot!
20.10.2023 - 08:08
![]() Marian wrote:
Marian wrote:
When decreasing I find that the pattern is not staying as it should because there are less stitches. Is this correct, if not, how do I adjust? Thank you.
04.09.2023 - 15:33DROPS Design answered:
Dear Marian, continue working the pattern as before over as many stitches as possible - depending on the decrease rounds you might have some difference at the transition of rounds. Happy knitting!
05.09.2023 - 11:43
![]() Nini Nielsen wrote:
Nini Nielsen wrote:
Jeg mener at det er et dårligt design. vanten er alt for vid i den lille størrelse. desuden er karisma ikke egnet til p.3
27.02.2021 - 22:20
![]() Jane wrote:
Jane wrote:
Not to worry I finally found the answer: MITTENS - SHORT OVERVIEW OF THE PIECE: Work piece in the round on double pointed needles, bottom up. Mittens have the same circumference in both sizes but different length. Circumference can be adjusted - read KNITTING TIP-2!
15.11.2019 - 14:33
![]() Jane wrote:
Jane wrote:
The mitten pattern says it is for 2 sizes -s/m and m/l. As far as I can see you cast on 48 stitches for both sizes. I can’t see where you do increases, or make adjustments, to make the larger size, so the pattern is just for one size? How many extra stitches do I cast on for the m/l size? Thank you
15.11.2019 - 14:11DROPS Design answered:
Dear Jane, mittens have the same circumference in both size (only length is different) - to adust circumference see KNITTING TIP-2. Happy knitting!
15.11.2019 - 14:42
|
|||||||
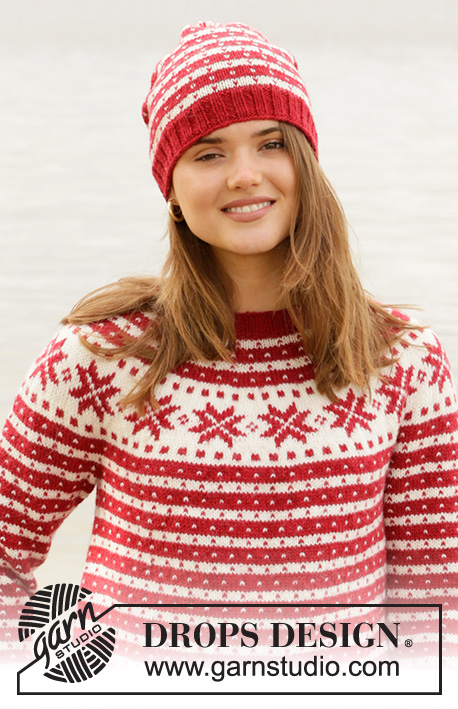
Candy Cane Lane Set#candycanelaneset |
|||||||
 |
 |
||||||
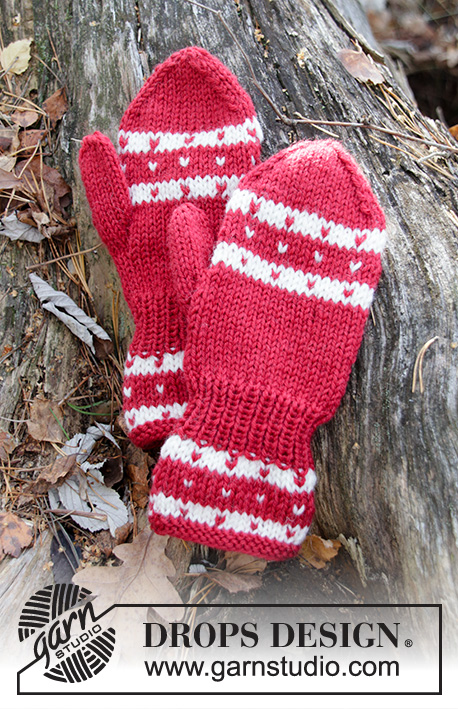
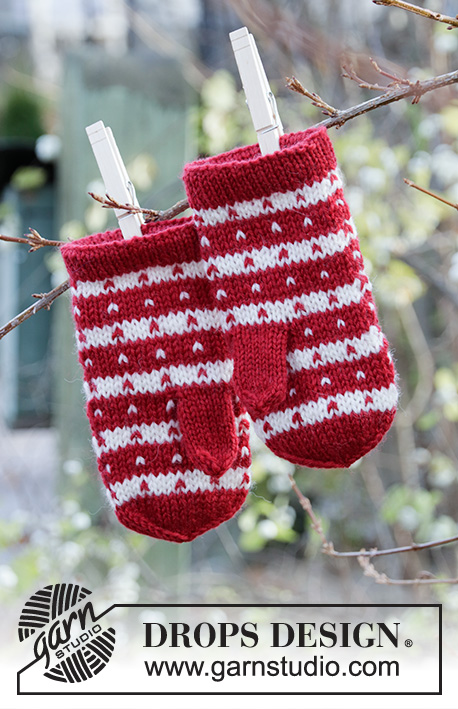
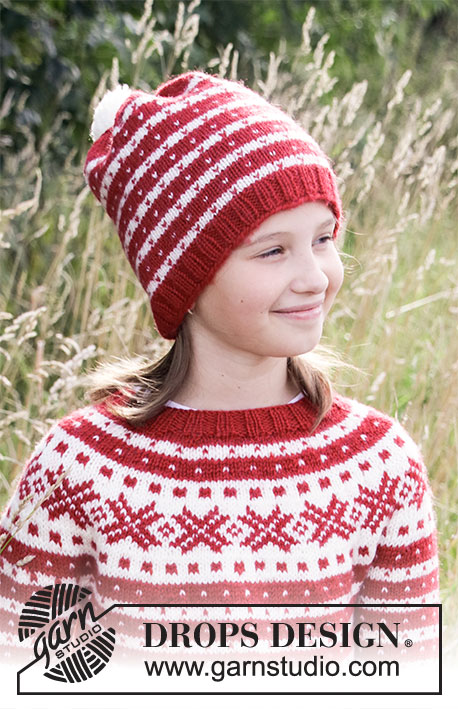
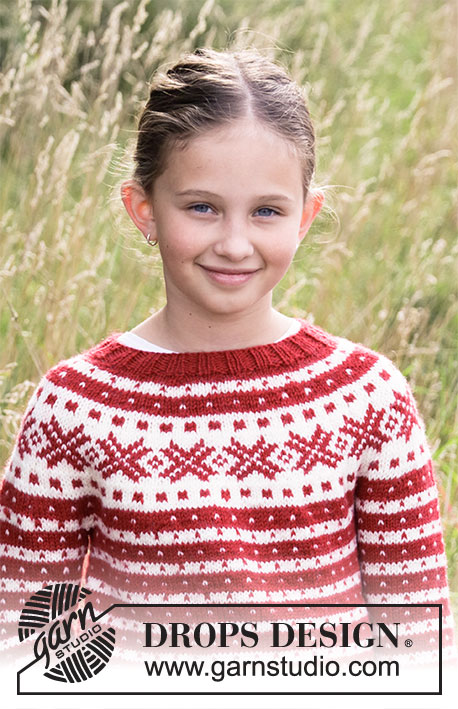
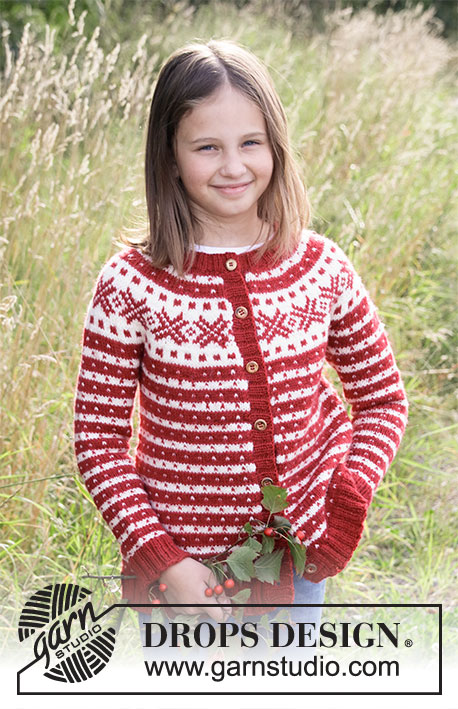
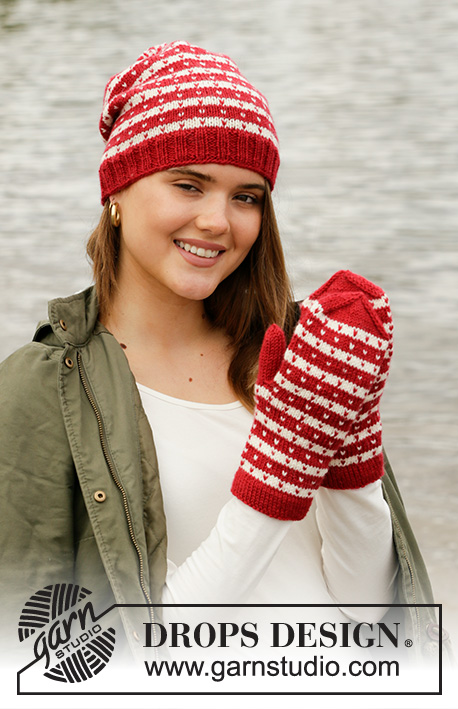
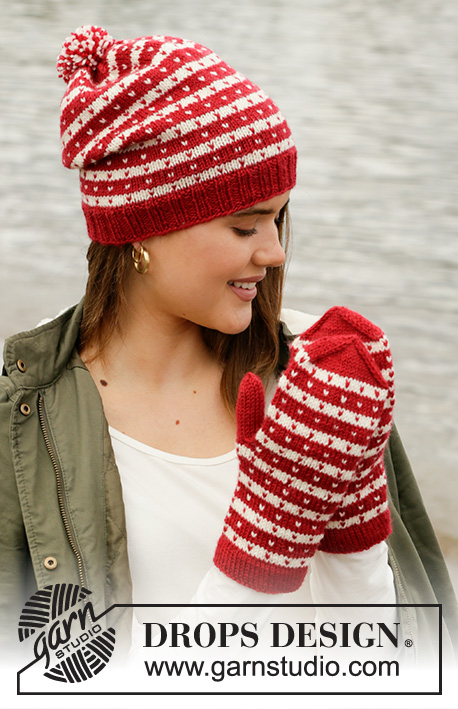
Knitted hat and mittens with Nordic Fana pattern in DROPS Karisma.
DROPS 204-19 |
|||||||
|
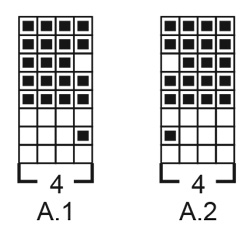
---------------------------------------------------------- EXPLANATION FOR THE PATTERN: ---------------------------------------------------------- PATTERN: Hat: See diagram A.1. Mittens: See diagrams A.1 and A.2. Work the entire pattern in stockinette stitch. DECREASE TIP-1 (applies to top of hat): Work until 2 stitches remain before marker, knit these 2 stitches together (= 1 stitch decreased). DECREASE TIP-2 (applies to top of mittens): Begin 3 stitches before marker thread, knit 2 together, knit 2 (marker thread is between these 2 stitches), slip 1 stitch knitwise, knit 1, pass slipped stitch over stitch worked (= 2 stitches decreased at marker thread). DECREASE TIP-3 (applies to thumbs): Begin 2 stitches before marker thread, knit 2 together, marker thread, slip 1 stitch knitwise, knit 1, pass slipped stitch over stitch worked (= 2 stitches decreased). KNITTING TIP-1: To avoid the knitting gauge to tighten when working pattern, it is important not to tighten the strands on back side of piece. Use a larger needle size when working pattern if needed. KNITTING TIP-2 (applies to mittens): If you want a mitten with a larger circumference the mittens can be worked on half a size or one size larger needle. Half a needle size larger will be 1 cm = ⅜" more in circumference and a one needle size larger will be 2 cm = ¾" more in circumference. KNITTING TIP-3 (applies to mittens): Length before thumb opening begins can be adjusted by working more or less rounds before working marking for thumb opening. ---------------------------------------------------------- START THE PIECE HERE: ---------------------------------------------------------- HAT - SHORT OVERVIEW OF THE PIECE: Worked in the round on a short circular needle, bottom up. Switch to double pointed needles when needed. HAT: Cast on 108-112 stitches on a short circular needle size 3 mm = US 2,5 with wine red. Knit 1 round. Then work rib in the round (= knit 2/purl 2) for 4 cm = 1½". Switch to a short circular needle size 3.5 mm = US 4. Read KNITTING TIP-1 and work A.1 in the round (= 27-28 repetitions of 4 stitches). REMEMBER THE KNITTING GAUGE! Work until piece measures approx. 20 cm = 8" in both sizes but adjust so that next round is a unicolored round straight before or after a round with dots. Insert 6-7 markers in piece 18-16 stitches between every marker. On next round decrease 1 stitch before every marker - read DECREASE TIP-1= 6-7 stitches decreased. Decrease like this every other round 4-6 times in total and then every round 5-4 times in total = 54-42 stitches remain. Knit 3 rounds in stockinette stitch with the color of the last stripe where all stitches are knitted together 2 by 2 on all three rounds = 7-6 stitches remain. Cut the yarn and pull it through the remaining stitches, tighten together and fasten. Piece measures approx. 25-26 cm = 9¾"-10¼" from top and down. ASSEMBLY: Make a pompom with wine red and off white with an approx. diameter of 6 cm = 2⅜" and fasten it at the top of the hat. ---------------------------------------------------------- MITTENS - SHORT OVERVIEW OF THE PIECE: Work piece in the round on double pointed needles, bottom up. Mittens have the same circumference in both sizes but different length. Circumference can be adjusted - read KNITTING TIP-2! LEFT MITTEN: Cast on 48-48 stitches on double pointed needles size 3 mm = US 2,5 with wine red. Work 8 rounds in stockinette stitch for folding edge. Purl 1 round (= folding edge). Measure piece from folding edge! Work 8 rounds in stockinette stitch with wine red. REMEMBER THE KNITTING GAUGE! Read KNITTING TIP-1 and work A.1 in the round (= 12 repetitions of 4 stitches). Repeat A.1 vertically. When piece measures approx. 11 cm = 4⅜" from folding edge (adjust so that next round is a unicolored round with wine red), work a marking for thumb opening as follows - read KNITTING TIP-3: Work 14 stitches in stockinette stitch with wine red, work 8 stitches in stockinette stitch for thumb opening in a different color that stands out from the rest of piece, then work the remaining 26 stitches in stockinette stitch with wine red. Continue pattern as before over all stitches until mitten measures approx. 21-23 cm = 8¼"-9" from folding edge. Approx. 3 cm = 1⅛" remain until finished measurements, try the mitten on and work until desired length - NOTE: Finish after a whole stripe with off white and work with wine red (without dots) until correct measurements. Insert 1 marker thread at beginning of round and 1 marker thread after 24 stitches. Work in stockinette stitch in the round with wine red. AT THE SAME TIME on first round decrease on each side of the 2 marker threads - read DECREASE TIP-2 (= 4 stitches decreased). Decrease like this on every round 11 times in total in both sizes = 4 stitches remain. Cut the yarn and pull it through the remaining stitches, tighten together and fasten. Mitten measures approx. 24-26 cm = 9½"-10¼" from top and down to folding edge. THUMB: Pull out the thread that was worked over the 8 stitches for thumb opening. Pick up 8 stitches on each side of thumb opening with wine red = 16 stitches. Distribute these 16 stitches on double pointed needles size 3 mm = US 2,5. Work in stockinette stitch in the round with wine red. When thumb measures approx. 5-5½ cm = 2"-2⅛", insert 1 marker thread in each side of thumb. Approx. 1 cm = ⅜" remains until finished measurements on thumb, try the mitten on and work until desired length. On next round decrease on each side of both marker threads – read DECREASE TIP-3 (= 4 stitches decreased). Decrease like this every round 3 times in total = 4 stitches remain. Cut the yarn and pull it through the remaining stitches, tighten together and fasten. Thumb measures approx. 6-6½ cm = 2⅜"-2½" from top and down. RIGHT MITTEN: Cast on 48-48 stitches on double pointed needles size 3 mm = US 2,5 with wine red. Work 8 rounds in stockinette stitch for folding edge. Purl 1 round (= folding edge). Work 8 rounds in stockinette stitch with wine red. Remember KNITTING TIP-1 and work A.2 in the round (= 12 repetitions of 4 stitches). Repeat A.2 vertically. When piece measures approx. 11 cm = 4⅜" from folding edge (adjust length according to left mitten), work a marking for thumb opening as follows: Work 26 stitches in stockinette stitch with wine red, work 8 stitches in stockinette stitch for thumb opening in a different color, then work the remaining 14 stitches in stockinette stitch with wine red. Continue pattern as before over all stitches until mitten measures approx. 21-23 cm = 8¼"-9" from folding edge (adjust length according to left mitten). Insert 1 marker thread at beginning of round and 1 marker thread after 24 stitches. Work in stockinette stitch in the round with wine red. AT THE SAME TIME on first round decrease on each side of the 2 marker threads - read DECREASE TIP-2 (= 4 stitches decreased). Decrease like this on every round 11 times in total in both sizes = 4 stitches remain on needles. Cut the yarn and pull it through the remaining stitches, tighten together and fasten. THUMB: Work thumb the same way as on left mitten. ASSEMBLY: Fold the folding edge towards wrong side, and fasten with neat stitches. |
|||||||
Diagram explanations |
|||||||
|
|||||||
 |
|||||||
Have you finished this pattern?Tag your pictures with #dropspattern #candycanelaneset or submit them to the #dropsfan gallery. Do you need help with this pattern?You'll find 20 tutorial videos, a Comments/Questions area and more by visiting the pattern on garnstudio.com. © 1982-2026 DROPS Design A/S. We reserve all rights. This document, including all its sub-sections, has copyrights. Read more about what you can do with our patterns at the bottom of each pattern on our site. |
|||||||


With over 40 years in knitting and crochet design, DROPS Design offers one of the most extensive collections of free patterns on the internet - translated to 17 languages. As of today we count 325 catalogs and 12298 patterns - 12288 of which are translated into English (US/in).
We work hard to bring you the best knitting and crochet have to offer, inspiration and advice as well as great quality yarns at incredible prices! Would you like to use our patterns for other than personal use? You can read what you are allowed to do in the Copyright text at the bottom of all our patterns. Happy crafting!
Post a comment to pattern DROPS 204-19
We would love to hear what you have to say about this pattern!
If you want to leave a question, please make sure you select the correct category in the form below, to speed up the answering process. Required fields are marked *.