
Popular categories
Looking for a yarn?


Comments / Questions (97)
![]() Anke wrote:
Anke wrote:
Ik snap de mindering van de hals niet , hoeveel steken moet ik overhouden bij maat 's?
26.07.2021 - 21:31DROPS Design answered:
Dag Anke,
Je hebt op een gegeven moment 67 (75-75) steken op het voorpand en dan brei je 3 naalden gerstekorrel over de middelste 15 (23-23) steken. In de volgende naald kan je de 9 (17-17) steken af. Je hebt dan dus 58 steken gedeeld door 2 = 29 steken voor elk schouder. Aan beide zijden van de hals kan je dan nog 6 steken af = 23 steken over, daarna in totaal nog 4 steken = 19 steken over.
19.08.2021 - 13:55
![]() Anke wrote:
Anke wrote:
Ik snap het afkanten van de armsgaten niet, er staat Kant af aan de goede kant:voor 3 kantst.:2recht samen. Na 3 kantsteken, haal 1 steek recht af brei 1 st. En de afgehaalde steek over de gebreide steek, maar wat voor kantsteken zijn dit?
20.07.2021 - 19:25DROPS Design answered:
Dag Anke,
De buitenste 3 steken aan beide kanten brei je in gerstekorrel, hiermee worden de kantsteken bedoeld. Je mindert dus naast de kantsteken. Als je aan het begin van de naald bent, meerder je dus vlak na de 3 kantsteken en als je aan het eind van de naald bent, meerder je vlak voor de 3 kantsteken.
21.07.2021 - 18:13
![]() Ellinor wrote:
Ellinor wrote:
Hei, skjønner ikke det med økingen. Jeg leser det slik at det skal økes først 8 masker på første omgang etter tre pinner perlestrikk. Deretter økes 8 nye masker etter 5 cm oppover. Disse skal strikkes inn i mønsteret. Hvor da for at det skal bli pent? Da vil jo noen av stripene med glattstrikk bli bredere enn andre?
15.07.2021 - 21:34DROPS Design answered:
Hej Ellinor. Du ökar 1 m på var sida av merketråden, dvs 4 m ökade per p. Detta gör du på hver 5. cm totalt 4 gånger (dvs totalt 16 m ökade). De økte m strikkes inn i Mønsteret etter hvert, dvs du stickar de enten i perlestikk eller i glattstrik enligt diagram (mönster). Mvh DROPS Design
16.07.2021 - 09:45
![]() Renate Steiner wrote:
Renate Steiner wrote:
Wird das Top in runden gestrickt? Ich hab es aufgetrennt, weil ich dachte es ist falsch und neu begonnen. Sorry, ich finde die Anleitung grottenschlecht. Dann lieber nichts anbieten.
05.07.2021 - 11:54DROPS Design answered:
Liebe Frau Steiner, auch wenn das Top selbst zeitlos ist, handelt es sich bei der Anleitung um eine der älteren, die leider nicht immer den aktuellen Standards entsprechen. Wir bemühen uns, auch solche Anleitungen zu verbessern. Diese Anleitung wurde nun komplett neu übersetzt und ist jetzt hoffentlich übersichtlicher und eindeutiger. Wenn Sie noch Fragen dazu haben, melden Sie sich gerne noch einmal. Gutes Gelingen!
05.07.2021 - 13:11
![]() Ana wrote:
Ana wrote:
Hi, I think I understand the pattern and instructions for DROPS / 60 / 13 . But I have one question. I’m making a size L. Do I start each round as the first round, from the beginning of the chart or should I just keep knitting in the round repeating the chart on and on?
26.06.2021 - 06:26DROPS Design answered:
Dear Ana, for the pattern, start with the first row, then go on according to the diagram. Happy Stitching!
26.06.2021 - 09:15
![]() Eva Angervik wrote:
Eva Angervik wrote:
Vi är några (en person stickar M, den andra L) som har problem med att få mönstret snyggt vid sidorna, dvs mellan fram- och bakstycke. Vi är erfarna stickare och när vi stickat andra modeller har intagningar/ utlägg sett likadant ut på bägge sidor. Mönstret har snyggt anpassats. Detta får vi trots ansträngningar inte till. Vad gör vi för fel?
20.06.2021 - 12:54DROPS Design answered:
Hei Eva. Usikker på hva som blir feil hos dere, men har dere lest Strikketips? Fell slik på retten: Før 3 kantmaskene: 2 rett sammen. Etter 3 kantmasker: 1 maske løs av, strikk 1 rett, løft den løse masken over. Fell slik på vrangen: Før 3 kantmasker: 2 vridd vrang sammen. Etter 3 kantm: 2 vrang sammen. mvh DROPS design
21.06.2021 - 11:52
![]() Anke wrote:
Anke wrote:
Na de gerstekorrel beginnen met meerderen aan de zijkanten maar hoe kan ik dan verder in patroon aan de zijkanten?
22.05.2021 - 16:43DROPS Design answered:
Dag Anke,
Je breit de gemeerderde steken in patroon, volgens de teltekening. Dus als j e na de gerstekorrel meerdert, brei je die steken in tricotsteek. Na 4 keer meerderen heb je 1 patroonherhaling erbij in de breedte.
24.06.2021 - 09:39
![]() Cinzia Quarti wrote:
Cinzia Quarti wrote:
Buongiorno, sto facendo taglia S. Nel primo ferro che si inizia lo schema dopo il punto riso ho aumentato subito accanto al marca punto seguendo sullo schema il punto evidenziato S e ho apportato gli aumenti richiesti ma alla fine del giro con l’ultimo aumento prima del marcapunto finisco con una maglia rovescia e lo schema quindi non mi viene completo continuando con inizio giro con 3 maglie dritte. È giusto che venga così??
10.04.2021 - 12:14DROPS Design answered:
Buongiorno Cinzia, ha iniziato sulla maglia corretta del diagramma? Le ripetizioni successive del diagramma sul gjro sono intere, di 8 maglie. Buon lavoro!
11.04.2021 - 12:03
![]() Annet Voss wrote:
Annet Voss wrote:
Waar moet ik beginnen met het afkanten van de armsgaten, bij de eerste steek van de pen of halverwege (dus bij het volgende armsgat?
03.02.2021 - 13:15DROPS Design answered:
Dag Annet,
Je kunt telkens aan het begin van de naald afkanten voor het armsgat.
06.02.2021 - 11:29
![]() Lorinda wrote:
Lorinda wrote:
So I will work every round this way? Start with the second stitch, complete the round using all eight stitches finish the round with Stitch 1 of the diagram? I guess I would have to in order for the seed stitch to line up, correct?
04.11.2020 - 14:21DROPS Design answered:
Dear Lorinda, yes correct, the first repeat on the round is worked over the last 7 sts, then you repeat the 8 sts and finish with the first stitch in diagram. Happy knitting!
04.11.2020 - 17:02
|
|||||||
Summer Charm |
|||||||
|
|
|||||||
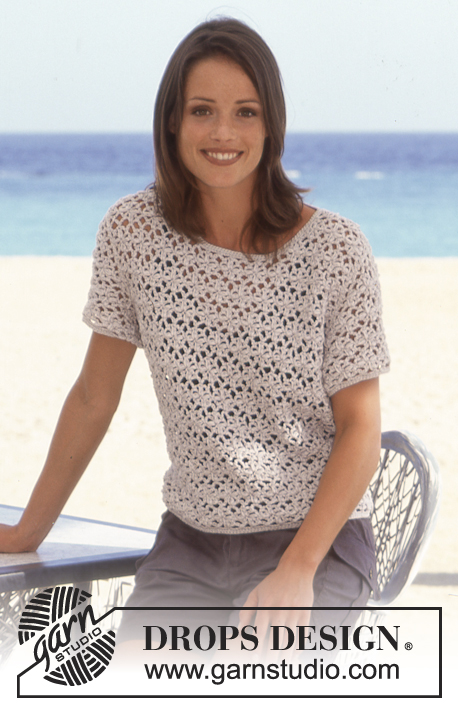
DROPS Sleeveless Top in Muskat.
DROPS 60-13 |
|||||||
|
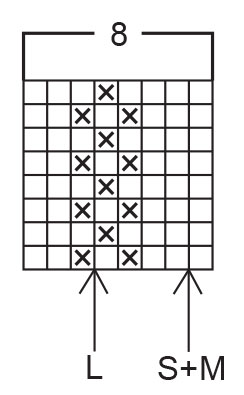
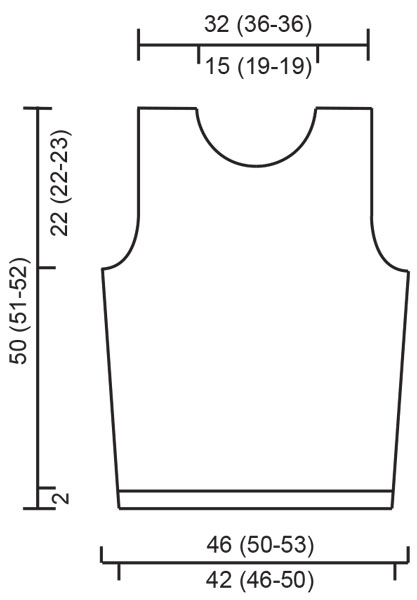
Gauge: 21 sts x 28 rows in stockinette st = 10 x 10 cm [4" x 4"]. Garter st, when knitting flat: Knit all sts, all rows. Seed stitch (on an even number of sts): Row 1: * K 1, P 1 * Row 2: * P 1, K 1 * Seed stitch (on an odd number of sts): All rows: K 1, *P 1, K 1* Seed stitch (worked in the round): Round 1: * knit 1, purl 1 * Round 2: * knit the purl sts from the previous round and purl the knit sts from the previous round * Pattern: See chart (1 chart = 1 repeat). The pattern is seen from the right side. Arrows indicate the starting points on the chart for different sizes. Make decreases as follows on the right side: Before the 3 edge sts: K 2 tog. After the 3 edge sts: sl 1, K 1, psso Make decreases as follows on the wrong side: Before the 3 edge sts: P 2 tog into back of st. After 3 edge sts: P 2 tog. BODY Cast on 176 (192-208) sts; join and place a marker at the join. K1 round, P1 round, then work 3 rounds in seed st. Attach a marker at each side, front = 87 (95-103) sts, back = 89 (97-105) sts. Establish Pattern - start at the appropriate arrow on the chart. After the seed st border, on next round inc 1 st at each side of the markers, repeat every 5 cm [2"] a total of 4 times = 192 (208-224) sts. Front = 95 (103-111) sts, back = 97 (105-113) sts. Work the increased sts into the pattern as you go along. When the work measures 27 (28-28) cm [10⅝" (11" - 11")] work 3 rounds with seed st over 6 (6-7) sts at each side of each marker (work rem sts as before), on next round bind off 3 (3-4) sts for armholes at each side of each marker, and then work back and forth on the needles - front = 89 (97-103) sts, back = 91 (99-105) sts. Front: = 89 (97-103) sts. Dec 1 st for armholes inside 3 edge sts (work the edge sts in seed st throughout) at each side every row 5 (5-8) times, then every other row 4 times, then every 4th row 2 times = 67 (75-75) sts. When the work measures 37 cm [14.5"] work 3 rows with seed st over the center 15 (23-23) sts (work rem sts as before), on next row bind off the center 9 (17-17) sts for the neck, and work each shoulder separately. Continue and dec 1 st at neck edge - dec inside 3 edge sts (work these sts in seed st throughout) on every row 6 times, then on every other row 2 times, then every 4th row 2 times. Bind off when the work measures 50 (51-52) cm [19.75" (20" - 20.5")]. Back: = 91 (99-105) sts. Bind off for armholes inside 3 edge sts as for the front = 69 (77-77) sts. When the work measures 47 (48-49) cm [18.5" (18⅞" - 19.25")] work 3 rows with seed st over the center 33 (41-41) sts (work rem sts as before), on next row bind off the center 27 (35-35) sts for the neck and work each shoulder separately. Continue and dec 1 st at each neck edge inside 3 edge sts (these sts are worked in seed st) every row 2 times. Bind off when the work measures 50 (51-52) cm [19.75" (20" - 20.5")]. Assembly: Sew shoulder seams. Crochet a border around the neck from the right side as follows: 1st round : 1 single crochet (sc), * ch 4 over 2 knit sts, 1 slip st in the 3rd knit st *, repeat * - *. 2nd round : * 4 sc in the ch space, 1 slip st in the slip st from the previous round *, repeat * - *. |
|||||||
Diagram explanations |
|||||||
|
|||||||
 |
|||||||
 |
|||||||
Have you finished this pattern?Tag your pictures with #dropspattern or submit them to the #dropsfan gallery. Do you need help with this pattern?You'll find 22 tutorial videos, a Comments/Questions area and more by visiting the pattern on garnstudio.com. © 1982-2026 DROPS Design A/S. We reserve all rights. This document, including all its sub-sections, has copyrights. Read more about what you can do with our patterns at the bottom of each pattern on our site. |
|||||||


With over 40 years in knitting and crochet design, DROPS Design offers one of the most extensive collections of free patterns on the internet - translated to 17 languages. As of today we count 325 catalogs and 12298 patterns - 12288 of which are translated into English (US/in).
We work hard to bring you the best knitting and crochet have to offer, inspiration and advice as well as great quality yarns at incredible prices! Would you like to use our patterns for other than personal use? You can read what you are allowed to do in the Copyright text at the bottom of all our patterns. Happy crafting!
Post a comment to pattern DROPS 60-13
We would love to hear what you have to say about this pattern!
If you want to leave a question, please make sure you select the correct category in the form below, to speed up the answering process. Required fields are marked *.