
Popular categories
Looking for a yarn?


Comments / Questions (96)
![]() Mia wrote:
Mia wrote:
Nun ist dieses Modell in Größe S fertig. Hatte vorher Größe M gestrickt,da ich etwas fest stricke.Musste dann aber kurz vor der Fertigstellung feststellen,daß es um ca. 16 Maschen zu groß ist. Und wieder habe ich mir jede gestrickete Reihe augeschrieben.Habe hier Muskat in der Farbe Korall verstrickt. Die Farbe Petrol wird für dieses Modell auch noch verstrickt werden.
27.09.2022 - 12:10
![]() Mia wrote:
Mia wrote:
Hi ! Meine Frage bezieht sich auf das "Vorderteil" Ich stricke Größe S. Nun habe ich folgende Abnahme gearbeitet: "4. Reihe je 2 x beidseitig = 67 (75-75) Maschen übrig." Bei einer Gesamtlänge von 37 (37-37) cm .... Meine Gesamtlänge beträgt aber ca. 41cm.Habe ich irgendwo zuviel gestrickt? Maschenprobe ist die gleiche,wie auf der Muskat-Banderole,mit Nadelstärke 4.00mm. Könnt ihr mir bitte weiter helfen? VG Mia
14.09.2022 - 09:59DROPS Design answered:
Liebe Mia, die Abnahmen sollen fertig sein, ( in jeder Reihe je 5 (5-8) x beidseitig, dann in jeder 2. Reihe je 4 x beidseitig und zuletzt in jeder 4. Reihe je 2 x beidseitig = ca 13(13-15) Reihen = 5(5-6) cm. Sollten Sie bei Ihnen nicht fertig sein, dann beginnen Sie Halsausschnitt und gleichzeitig stricken Sie die letzten Abnahmen für den Armausschnitte. Viel Spaß beim stricken!
14.09.2022 - 12:11
![]() Madame Judaique Monique wrote:
Madame Judaique Monique wrote:
Oui je souhaite être prevenu. Peut\'on achete une model?
23.08.2022 - 12:23
![]() Mme Judaique Monique wrote:
Mme Judaique Monique wrote:
Bonjours !je trouve vos tricots vraiment très Beaux ! Je voudrais savoir si est possible d'en acheté.
23.08.2022 - 12:15DROPS Design answered:
Bonjour Mme Judaique et merci, nous ne proposons que les explications gratuites de nos modèles, toutefois, peut-être que nos magasins DROPS pourront vous orienter vers une tricoteuse qui pourra réaliser pour vous les ouvrages de votre choix, n'hésitez pas à les contacter.
23.08.2022 - 13:37
![]() Mia wrote:
Mia wrote:
Hallo Liebes Drops-Team! Ich bin jetzt beim Vorderteil angelangt. Vorderteil:Nun habe ich eine Reihe mit der Abnahme gestrickt. Werden die Maschen der Rückreihe, vom Vorderteil, gestrickt wie die Maschen erscheinen? Oder wird in der Rückreihe auch abgenommen? Da "zuerst in jeder Reihe je 5 (5-8) x beidseitig, " beschrieben ist. Vielen lieben Dank für eure Hilfe Viele Grüße, Mia
08.08.2022 - 21:31DROPS Design answered:
Liebe Mia, bei den Rückreihen stricken Sie die glatt Maschen links (= links über links) und die 3 Maschen dazwischen im Perlmuster (links über rechts und rechts über links). Viel Spaß beim stricken!
09.08.2022 - 08:49
![]() Carmela wrote:
Carmela wrote:
Bonjour... Afin de faciliter l'augmentation sur les côtés, j'ai tricoté le point fantaisie sur les 2 x 3 mailles des côtés en jersey endroit et fait l'augmentation de chaque côté de la 2ème maille. On se retrouve avec une bande jersey que je trouve plus jolie qu'avec le point fantaisie tout décalé. Merci pour vos modèles et toutes vos explications qui me facilitent grandement mon plaisir de tricoter. Cordialement Carmela
18.07.2022 - 13:27
![]() Tiina K wrote:
Tiina K wrote:
Hei! Miten mallineule jatkuu lisäyksien jälkeen? Tuleeko sivuihin pidemmät oikeinneulotut jaksot vai miten?
16.07.2022 - 16:52
![]() Gerd Andersson wrote:
Gerd Andersson wrote:
Undrar om det verkligen skall vara bara 27 cm innan ärmhålets början? Antar att det skall vara 47 cm men då räcker inte angivna garnåtgången.
18.02.2022 - 15:35DROPS Design answered:
Hei Gerd. Jo, 27 cm stemmer og det er det garnmengden er utregnet fra. Hadde det vært 47 cm ville det ha blitt en kortermet tunika, se f.eks DROPS 148-10 og det ville ha manglet ca 150 gram garn i str. S. mvh DROPS Design
21.02.2022 - 10:42
![]() Diane wrote:
Diane wrote:
Bonjour, Comment doit-on tricoter le point fantaisie sur l’envers? Merci.
03.01.2022 - 14:31DROPS Design answered:
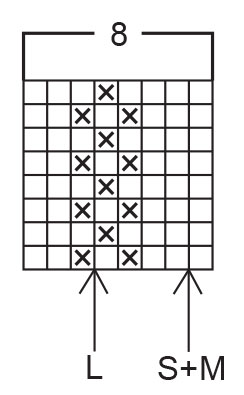
Bonjour Diane, le point fantaisie appelé "Mønster" se tricote sur 8 mailles ainsi: 3 m jersey, 3 m point de riz, 2 m jersey. Autrement dit, les mailles jersey se tricotent à l'envers sur l'envers et pour le point de riz, tricotez les mailles endroit à l'envers et les mailles envers à l'endroit. Bon tricot!
04.01.2022 - 06:42
![]() Anke wrote:
Anke wrote:
Ik snap de mindering van de hals niet , hoeveel steken moet ik overhouden bij maat 's?
26.07.2021 - 21:31DROPS Design answered:
Dag Anke,
Je hebt op een gegeven moment 67 (75-75) steken op het voorpand en dan brei je 3 naalden gerstekorrel over de middelste 15 (23-23) steken. In de volgende naald kan je de 9 (17-17) steken af. Je hebt dan dus 58 steken gedeeld door 2 = 29 steken voor elk schouder. Aan beide zijden van de hals kan je dan nog 6 steken af = 23 steken over, daarna in totaal nog 4 steken = 19 steken over.
19.08.2021 - 13:55
|
|||||||
Summer Charm |
|||||||
|
|
|||||||
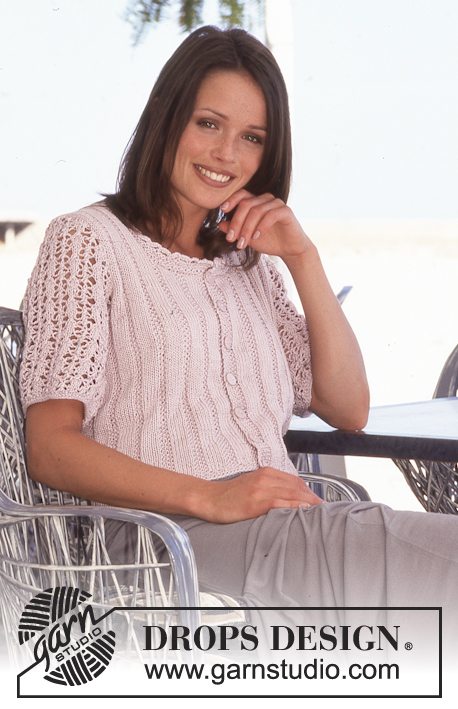
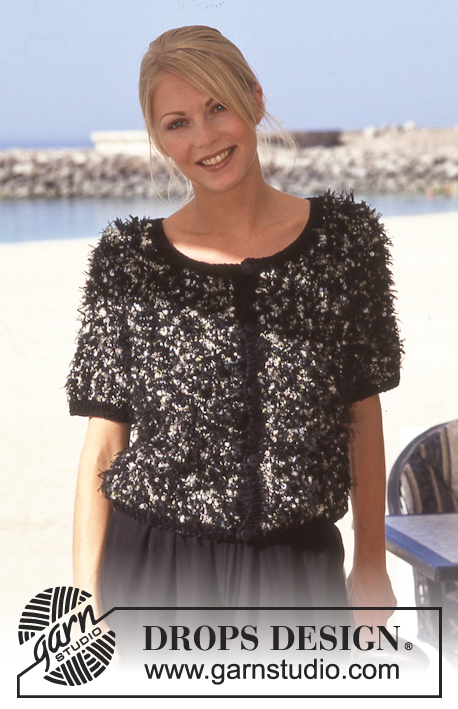
DROPS Sleeveless Top in Muskat.
DROPS 60-13 |
|||||||
|
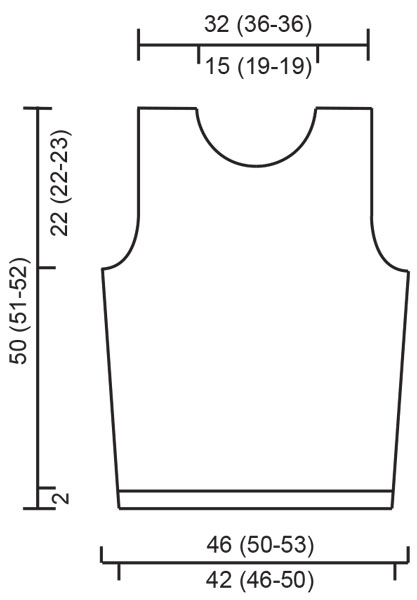
Gauge: 21 sts x 28 rows in stockinette st = 10 x 10 cm [4" x 4"]. Garter st, when knitting flat: Knit all sts, all rows. Seed stitch (on an even number of sts): Row 1: * K 1, P 1 * Row 2: * P 1, K 1 * Seed stitch (on an odd number of sts): All rows: K 1, *P 1, K 1* Seed stitch (worked in the round): Round 1: * knit 1, purl 1 * Round 2: * knit the purl sts from the previous round and purl the knit sts from the previous round * Pattern: See chart (1 chart = 1 repeat). The pattern is seen from the right side. Arrows indicate the starting points on the chart for different sizes. Make decreases as follows on the right side: Before the 3 edge sts: K 2 tog. After the 3 edge sts: sl 1, K 1, psso Make decreases as follows on the wrong side: Before the 3 edge sts: P 2 tog into back of st. After 3 edge sts: P 2 tog. BODY Cast on 176 (192-208) sts; join and place a marker at the join. K1 round, P1 round, then work 3 rounds in seed st. Attach a marker at each side, front = 87 (95-103) sts, back = 89 (97-105) sts. Establish Pattern - start at the appropriate arrow on the chart. After the seed st border, on next round inc 1 st at each side of the markers, repeat every 5 cm [2"] a total of 4 times = 192 (208-224) sts. Front = 95 (103-111) sts, back = 97 (105-113) sts. Work the increased sts into the pattern as you go along. When the work measures 27 (28-28) cm [10⅝" (11" - 11")] work 3 rounds with seed st over 6 (6-7) sts at each side of each marker (work rem sts as before), on next round bind off 3 (3-4) sts for armholes at each side of each marker, and then work back and forth on the needles - front = 89 (97-103) sts, back = 91 (99-105) sts. Front: = 89 (97-103) sts. Dec 1 st for armholes inside 3 edge sts (work the edge sts in seed st throughout) at each side every row 5 (5-8) times, then every other row 4 times, then every 4th row 2 times = 67 (75-75) sts. When the work measures 37 cm [14.5"] work 3 rows with seed st over the center 15 (23-23) sts (work rem sts as before), on next row bind off the center 9 (17-17) sts for the neck, and work each shoulder separately. Continue and dec 1 st at neck edge - dec inside 3 edge sts (work these sts in seed st throughout) on every row 6 times, then on every other row 2 times, then every 4th row 2 times. Bind off when the work measures 50 (51-52) cm [19.75" (20" - 20.5")]. Back: = 91 (99-105) sts. Bind off for armholes inside 3 edge sts as for the front = 69 (77-77) sts. When the work measures 47 (48-49) cm [18.5" (18⅞" - 19.25")] work 3 rows with seed st over the center 33 (41-41) sts (work rem sts as before), on next row bind off the center 27 (35-35) sts for the neck and work each shoulder separately. Continue and dec 1 st at each neck edge inside 3 edge sts (these sts are worked in seed st) every row 2 times. Bind off when the work measures 50 (51-52) cm [19.75" (20" - 20.5")]. Assembly: Sew shoulder seams. Crochet a border around the neck from the right side as follows: 1st round : 1 single crochet (sc), * ch 4 over 2 knit sts, 1 slip st in the 3rd knit st *, repeat * - *. 2nd round : * 4 sc in the ch space, 1 slip st in the slip st from the previous round *, repeat * - *. |
|||||||
Diagram explanations |
|||||||
|
|||||||
 |
|||||||
 |
|||||||
Have you finished this pattern?Tag your pictures with #dropspattern or submit them to the #dropsfan gallery. Do you need help with this pattern?You'll find 22 tutorial videos, a Comments/Questions area and more by visiting the pattern on garnstudio.com. © 1982-2026 DROPS Design A/S. We reserve all rights. This document, including all its sub-sections, has copyrights. Read more about what you can do with our patterns at the bottom of each pattern on our site. |
|||||||


With over 40 years in knitting and crochet design, DROPS Design offers one of the most extensive collections of free patterns on the internet - translated to 17 languages. As of today we count 324 catalogs and 12290 patterns - 12280 of which are translated into English (US/in).
We work hard to bring you the best knitting and crochet have to offer, inspiration and advice as well as great quality yarns at incredible prices! Would you like to use our patterns for other than personal use? You can read what you are allowed to do in the Copyright text at the bottom of all our patterns. Happy crafting!
Post a comment to pattern DROPS 60-13
We would love to hear what you have to say about this pattern!
If you want to leave a question, please make sure you select the correct category in the form below, to speed up the answering process. Required fields are marked *.