
Popular categories
Looking for a yarn?


Comments / Questions (8)
![]() Saskia wrote:
Saskia wrote:
Ik zie geen ingevuld telpatroon???
31.12.2024 - 16:19DROPS Design answered:
Dag Saskia,
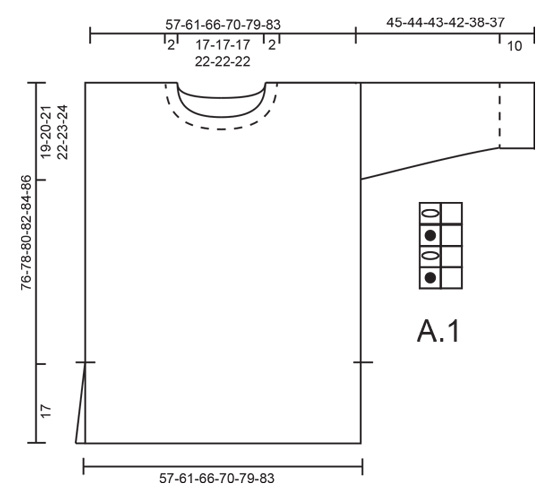
Het telpatroon staat (een beetje verstopt) rechts onder de maattekening.
01.01.2025 - 15:48
![]() Kath wrote:
Kath wrote:
Hoe kan ik een gevallen halve patentsteek oprapen?
12.02.2023 - 20:03
![]() Savalle wrote:
Savalle wrote:
Bonjour une petite questions je comprends pas votre cote anglaise avec des jetés. Pour moi les côtes anglaises c est le point a l endroit en piquant toutes les deux mailles dans le centre de la maille . Merci pour votre reponse
21.02.2022 - 10:12DROPS Design answered:
Bonjour Mme Savalle, il existe différentes techniques pour tricoter des côtes anglaises (cf cette leçon; ici, on va tricoter des côtes anglaises avec jeté, en suivant la technique montrée ici en vidéo. N'hésitez pas à vous entraîner auparavant sur un petit échantillon, ce sera ainsi plus simple après. Bon tricot!
21.02.2022 - 10:31
![]() Datur wrote:
Datur wrote:
Es sobre el patrón . Con lana más delgada cuántos puntos tengo que poner de mas
30.01.2020 - 10:47DROPS Design answered:
Hola Datur. Para calcular los puntos hay que hacer una muestra con la lana elegida y la aguja adecuada a la lana, comparar con la tensión del patrón, y hacer los cálculos necesarios.
23.02.2020 - 23:20
![]() Cristina wrote:
Cristina wrote:
Cómo sería patron en 2 agujas rectas?
27.12.2019 - 14:35DROPS Design answered:
Hola Cristina . Lee nuestra lección aquí de cómo convertir una prenda trabajada con agujas circulares para trabajarla con agujas rectas https://www.garnstudio.com/pattern.php?id=9017&cid=23#question18
29.12.2019 - 00:08
![]() Catharina wrote:
Catharina wrote:
Varför är beskrivningen så jävla omständig??? Kan vara en fördel att skriva hur varven ska stickas!!!
18.04.2019 - 19:44
![]() Anita wrote:
Anita wrote:
Knallfin lang genser. Lurer på om garnet klør ?
21.02.2019 - 17:17DROPS Design answered:
Hei Anita. Eskimo er 100% ull. Det er litt individuelt hvor "sensitiv" man er for kløe i ullgarn, men i utgangspunktet er ikke Eskimo et stikkete garn. Om du likevel vil strikke i noe annet kan du vurdere Andes, som har samme strikkefasthet. Dette garnet inneholder 35% Alpakka, som har tynnere fibre enn saueull (og derfor klør mindre). Vær obs på at Andes har en noe annet tekstur enn Eskimo. God fornøyelse
25.02.2019 - 14:53
![]() Tone Finsådal wrote:
Tone Finsådal wrote:
Kan jeg strikke denne genseren med big merino?? Så ikke det klør
18.02.2019 - 10:41DROPS Design answered:
hei Tone. Det som er viktig ved bytte av garn er at strikkefastheten din blir den samme som den som står i oppskriften. Du kan nok bruke Big Merino til denne, men da må du strikke med 2 tråder for å få tilsvarende strikkefasthet som i Eskimo. Lag deg en prøvelapp så du er sikker. God fornøyelse
18.02.2019 - 13:41
|
||||||||||
Lilly Blush#lillyblushtunic |
||||||||||
 |
 |
|||||||||
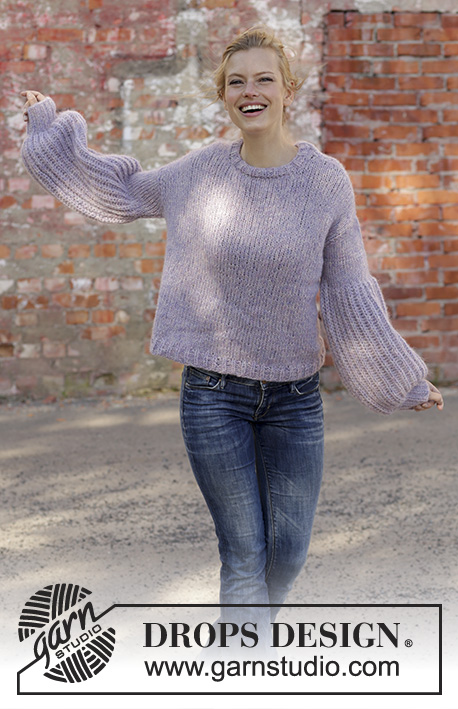
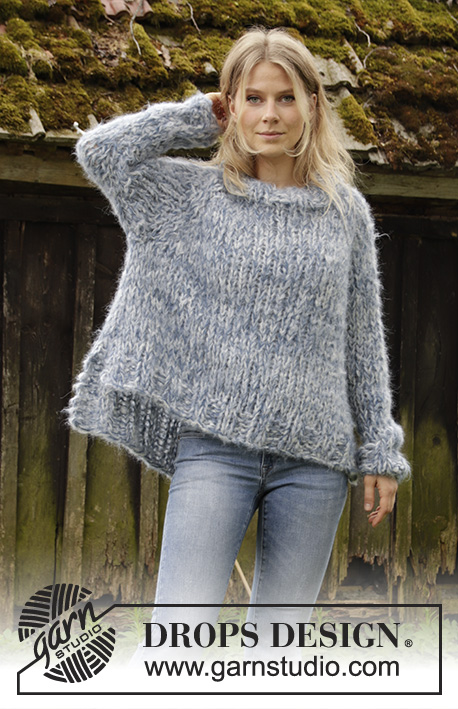
Knitted sweater in DROPS Snow with false English rib. Size: S - XXXL
DROPS 194-23 |
||||||||||
|
---------------------------------------------------------- EXPLANATION FOR THE PATTERN: ---------------------------------------------------------- GARTER STITCH (back and forth): 1 ridge = knit 2 rows. PATTERN: See diagram A.1. Diagrams show all rows in pattern seen from the right side. INCREASE TIP (applies to sleeves): All increases are done from the right side. Work 1 edge stitch in garter stitch, knit 1, 1 yarn over (= 1 stitch increased), knit until 2 stitches remain, 1 yarn over (= 1 stitch increased), knit 1 and finish with 1 edge stitch in garter stitch (= 2 stitches increased in total). Knit yarn overs twisted on next row to avoid holes. ---------------------------------------------------------- START THE PIECE HERE: ---------------------------------------------------------- SWEATER - SHORT OVERVIEW OF THE PIECE: Worked back and forth. Finish front and back piece separately. Work sleeves back and forth on needle. BACK PIECE: Cast on 78-84-90-96-108-114 stitches (including 1 edge stitch in each side) on circular needle size 9 mm = US 13 with Snow. Work first row as follows from right side: Work 1 edge stitch in GARTER STITCH – read explanation above, * knit 1, purl 2 together *, work from *-* until 2 stitches remain, finish with knit 1 and 1 edge stitch in garter stitch = 53-57-61-65-73-77 stitches. Then work as follows from wrong side (read diagram from left towards right): Work 1 edge stitch in garter stitch, A.1 until 1 stitch remains and finish with 1 edge stitch in garter stitch. I.e. pattern begins and ends with 1 knit stitch in false English rib inside 1 edge stitch in garter stitch in each side of piece, seen from right side. Continue pattern like this. REMEMBER THE KNITTING GAUGE! When piece measures 72-74-76-78-80-82 cm = 28⅜"-29⅛"-30"-30¾"-31½"-32¼" (approx. 4 cm = 1½" remain), bind off the middle 19-19-19-23-23-23 stitches for neck with knit over knit and purl over purl (1 yarn over and 1 knit stitch = 1 stitch) = 17-19-21-21-25-27 stitches on each shoulder. Stitch closest to the neck on each shoulder should now be a purl stitch from right side. Now finish each shoulder separately. RIGHT SHOULDER: Work pattern as before 1 stitch in garter stitch closest to the neck until piece measures 76-78-80-82-84-86 cm = 30"-30¾"-31½"-32¼"-33"-33⅞" in total. Bind off on next row from right side. Knit together yarn overs and knit stitches while binding off and purl the purl stitches while binding off. LEFT SHOULDER: Work as right shoulder. FRONT PIECE: Work as back piece until piece measures 66-68-68-70-70-72 cm = 26"-26¾"-26¾"-27½"-27½"-28⅜" (approx. 10-10-12-12-14-14 cm = 4"-4"-4¾"-4¾"-5½" remain). On next row from right side bind off the middle 11-11-11-15-15-15 stitches for neck with knit over knit and purl over purl (1 yarn over and 1 knit stitch = 1 stitch) = 21-23-25-25-29-31 stitches on each shoulder. Stitch closest to the neck on each shoulder should now be a purl stitch from right side. Now finish each shoulder separately. RIGHT SHOULDER: On next row from the neck (= right side) work as follows: Work 1 stitch in garter stitch, slip yarn over and 1 stitch off the needle as if to knit together, purl 1, pass yarn over and stitch over stitch worked (= 1 stitch decreased), work the rest of row as before. Decrease like this on every row from right side 4 times in total = 17-19-21-21-25-27 stitches. Work until piece measures 76-78-80-82-84-86 cm = 30"-30¾"-31½"-32¼"-33"-33⅞" in total. On next row from right side bind off. Knit together yarn overs and knit stitches while binding off and purl the purl stitches while binding off. LEFT SHOULDER: Work as right shoulder by decrease for neck at the end of every row from right side as follows: Work as before until 3 stitches remain (yarn over is not counted as stitch), knit purl stitch, yarn over and knit stitch together (= 1 stitch decreased) and finish with 1 stitch in garter stitch. SLEEVE: Cast on 35-35-38-38-41-41 stitches on circular needle size 9 mm = US 13 with Snow. Work first row as follows from right side: Work 1 edge stitch in garter stitch, * knit 1, purl 2 together *, work from *-* until 1 stitch remains, finish 1 edge stitch in garter stitch = 24-24-26-26-28-28 stitches. Then work as follows from wrong side (read diagram from left towards right): Work 1 edge stitch in garter stitch, A.1 until 1 stitch remains and finish with 1 edge stitch in garter stitch. Continue like this until piece measures 10 cm = 4", adjust to finish with last row from right side. Now work piece in stockinette stitch with 1 edge stitch in garter stitch in each side of piece. When piece measures 12 cm = 4¾", increase 1 stitch inside 1 edge stitch and 1 stitch in each side of piece - read INCREASE TIP! Increase like this every 4-3½-3½-3-2½-2 cm = 1½"-1¼"-1¼"-1⅛"-1"-¾" 8-9-9-10-10-11 times in total = 40-42-44-46-48-50 stitches. Bind off when piece measures 45-44-43-42-38-37 cm = 17¾"-17¼"-17"-16½"-15"-14½". Knit another sleeve the same way. POCKETS: Cast on 20 stitches (including 1 edge stitch in each side of piece) on circular needle size 9 mm = US 13 with Snow. Work in stockinette stitch with 1 edge stitch in garter stitch in each side of piece. When pocket measures 15 cm = 6", increase 5 stitches evenly on next row from right side = 25 stitches. Knit yarn overs twisted on next row to avoid holes! Work as follows on next row from wrong side: 1 edge stitch in garter stitch, * purl 1, knit 1 *, repeat from *-* until 2 stitches remain, purl 1 and 1 edge stitch in garter stitch. Continue with knit over knit, purl over purl and garter stitch over garter stitch until piece measures 18 cm = 7". Bind off stitches with knit over knit and purl over purl. Work another pocket the same way. ASSEMBLY: Sew the shoulder seams. Sew in sleeves (= approx. 19-20-21-22-23-24 cm = 7½"-8"-8¼"-8¾"-9"-9½" down from shoulder seams) and sew sleeve seams and side seams inside 1 edge stitch until approx. 17 cm = 6¾" remain (= vent). Sew on pockets approx. 17 cm = 6¾" from bottom edge and approx. 2 cm = ¾" in from each side. NECK EDGE: Pick up approx. 44 to 56 stitches along neck edge (make sure to avoid a tight edge, pick up more stitches if needed), adjust so that number of stitches is divisible by 2. Work rib (= knit 1/purl 1). Work 2 rounds in total, then bind off with knit over knit and purl over purl. |
||||||||||
Diagram explanations |
||||||||||
|
||||||||||
 |
||||||||||
Have you finished this pattern?Tag your pictures with #dropspattern #lillyblushtunic or submit them to the #dropsfan gallery. Do you need help with this pattern?You'll find 20 tutorial videos, a Comments/Questions area and more by visiting the pattern on garnstudio.com. © 1982-2026 DROPS Design A/S. We reserve all rights. This document, including all its sub-sections, has copyrights. Read more about what you can do with our patterns at the bottom of each pattern on our site. |
||||||||||


With over 40 years in knitting and crochet design, DROPS Design offers one of the most extensive collections of free patterns on the internet - translated to 17 languages. As of today we count 324 catalogs and 12290 patterns - 12280 of which are translated into English (US/in).
We work hard to bring you the best knitting and crochet have to offer, inspiration and advice as well as great quality yarns at incredible prices! Would you like to use our patterns for other than personal use? You can read what you are allowed to do in the Copyright text at the bottom of all our patterns. Happy crafting!
Post a comment to pattern DROPS 194-23
We would love to hear what you have to say about this pattern!
If you want to leave a question, please make sure you select the correct category in the form below, to speed up the answering process. Required fields are marked *.