
Popular categories
Looking for a yarn?


Comments / Questions (51)
![]() Alicja wrote:
Alicja wrote:
Robiąc paski 2, po każdym rzędzie muszę ciąć nitkę? Widzę, że zmiany koloru są co 1 rząd, nie wracam z kolorem na początek, nie ma więc chyba innego wyjścia?
22.09.2021 - 00:25DROPS Design answered:
Witaj Alicjo, niekoniecznie. Możesz użyć po 2 moteczki każdego koloru, a później przesuwać nitkę z boku robótki, zobacz film TUTAJ. Pozdrawiamy!
22.09.2021 - 12:02
![]() Cristina wrote:
Cristina wrote:
Tengo un cierto lío con las lanas propuestas. Hay dos colores el 02 y el 13, pero solo se especifica utilizar gris al Hacer los cuadros, lo que no casa con la fotografía. Que color ea para qué?
14.06.2021 - 14:43DROPS Design answered:
Hola Cristina, en las explicaciones para el patrón, en el apartado Franjas-1 te dicen que se trabaja 1 vuelta con cada color. Cuando mencionan en el patrón trabajar en Franjas-1 quiere decir trabajar 1 vuelta de cada color.
27.06.2021 - 19:31
![]() Mary Weers wrote:
Mary Weers wrote:
Can I get this pattern in written rows instead of the charts. I need to go row for row instead of the chart I would like the squares written out row for row and also the stripes too. Thank you, Mary
14.03.2021 - 03:25DROPS Design answered:
Dear Mary, we are sorry, but we can't provide you with the written out pattern. We use diagrams, not only because they are available in several languages, but also, because unless written out instructions, that only tell you the very next stitch, diagrams also show how stitches and rows relate to each other, therefore well worth the efforst to learn how to work from them. Here we have a lesson on how to read crovhet-diagrams. If you still stuck, you can always ask for help - either in person, or over the phone- in the store where you bought your DROPS yarn from. Happy Crafting!
14.03.2021 - 04:13
![]() Monika wrote:
Monika wrote:
Hallo. Ich häkel 201-28. Frage zu "rechte Seite und Ärmel". Mit welcher Reihe ende ich die Zunahme am Seitenteil? Es steht : ..dass nach der 3. Reihe der Diagramme geendet wird.... Heißt das, Stäbchen, 4 Luftmaschen, Stäbchen, 4 Luftmaschen in grau??? LG
07.12.2020 - 19:03DROPS Design answered:
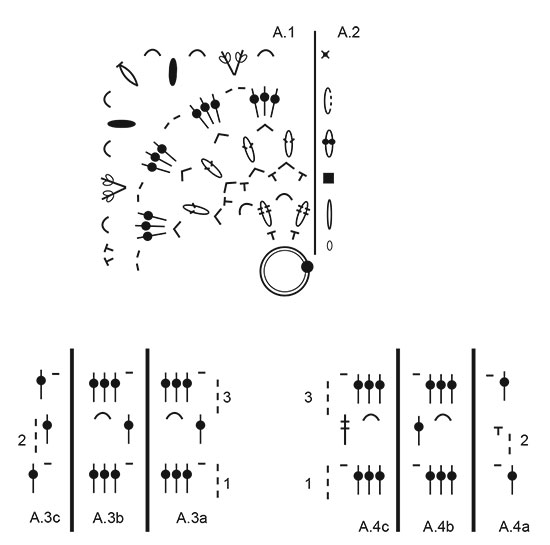
Liebe Monika, die 3. Reihe im A.3 ist die mit der Zahl 3 = 4 Lm, 3 Stb um jeden Luftmaschenbogen und 1 Lm zwischen jeder 3-Stb-Gruppe, enden Sie mit 1 Stb in das 1. Stb. vom vorrigen Reihe. Viel Spaß beim häkeln!
08.12.2020 - 08:36
![]() Monika wrote:
Monika wrote:
Ich häkel gerade 201-28. Das Diagramm A3a-A3c besteht aus 3 Reihen. Soll das heißen, dass ich als 4. Reihe wieder unten (1.Reihe) anfange oder die 2. Rückreihe häkel? Außerdem steht bei "Rechte Seite und Ärmel" : wenn A3a-A3c in der Höhe zu Ende gehäkelt wurde.. soll das heißen, drei Reihen wie im Diagramm? Danach: die letzten 2 Reihen ebenso häkeln..WELCHE letzten 2 Reihen? 2. und 3. Reihe vom Diagramm?
07.12.2020 - 11:10DROPS Design answered:
Liebe Monika, wenn Sie A.3 häkeln, häkeln Sie zuerst die 3 Reihen im Diagram dann wiederholen Sie die 2 letzten Reihen = Reihe 2 + 3, dh als 4. Reihe häkeln Sie wie bei der 2. und bei als 5. Reihe häkeln Sie wie bei der 3. Viel Spaß beim häkeln!
07.12.2020 - 15:47
![]() Nathalie wrote:
Nathalie wrote:
Le diagramme pour les carré est il complet ? Je pensais qu'il y aurai les explications écrite avec ? C'est pour cela que je n'arripas à le comprendre
07.10.2020 - 07:35DROPS Design answered:
Bonjour Nathalie, le diagramme des carrés correspond à A.1 (avec A.2 en début de tour) et pour faire un carré, vous devez répéter 4 fois A.1 en rond (= 4 coins pour le carré) - cf CARRÉS dans les explications et légende du diagramme. Bon crochet!
07.10.2020 - 08:42
![]() Nathalie wrote:
Nathalie wrote:
Bonjour serait il possible d'avoir un diagramme plus explicite pour les carrés je n'arrive pas trop à comprendre merci d'avance Bonne journée
06.10.2020 - 11:49DROPS Design answered:
Bonjour Nathalie, nous n'avons pas d'autre diagramme, toutefois, vous pourrez trouver ici comment lire un diagramme crochet. Bon crochet!
06.10.2020 - 13:03
![]() Lauranne Crickx wrote:
Lauranne Crickx wrote:
Bonjour, je comprends pas le col du tout . Déjà ce qui m'ennuie c'est de commencer le tour avec 2ml et le finir avec une double bride. Ca va pas faire une sacrée différence ? Ensuite commencer sur l'endroit à partir du côté gauche bah j'y arrive pas c'est pas possible si je commence de la gauche je dois travailler sur l'envers. Et puis il y a combien de fois A4b à répéter ? Bref jusque là c'était bon mais ici j'y comprends plus rien.
25.08.2020 - 15:33DROPS Design answered:
Bonjour Mme Crickx, le col se crochète en allers et retours à partir du long du devant gauche, sur l'endroit, on coudra le dernier rang le long du devant droit et le côté des rangs le long du col sera cousu le long de l'encolure dos. Si vous trouvez que les débuts de rangs sont un peu serrés, vous pouvez volontiers ajuster le nombre de mailles en l'air. Bon crochet!
25.08.2020 - 16:27
![]() Jill Voiles wrote:
Jill Voiles wrote:
I love the beautiful patterns
16.05.2020 - 16:17DROPS Design answered:
Dear Jill, we are happy you like our patterns, that is why we work so hard on them. Thank you for letting us know.
17.05.2020 - 08:56
![]() MARIE Christine wrote:
MARIE Christine wrote:
Bonjour. Auriez-vous un croquis qui permettrait de comprendre la forme du col ? Je ne comprends par les explications Merci d'avance
04.01.2020 - 18:11DROPS Design answered:
Bonjour Marie-Christine, quel passage du col ne comprenez-vous pas?
06.01.2020 - 08:05
|
|||||||||||||||||||||||||||||||||||||||||||||||||||||||||||||||||||||||||
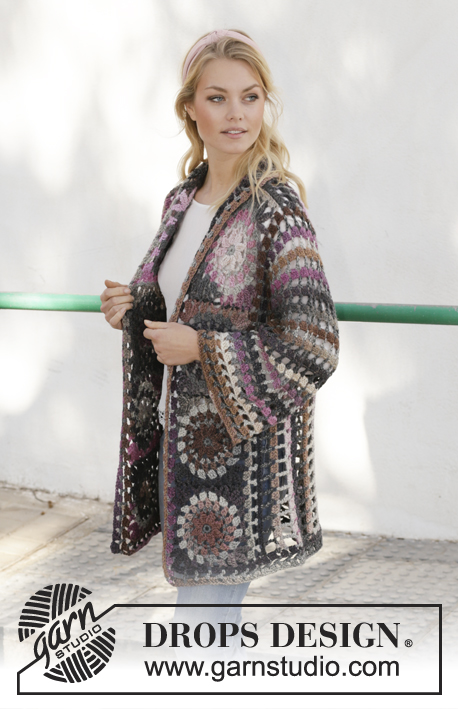
My Wildflower#mywildflowerjacket |
|||||||||||||||||||||||||||||||||||||||||||||||||||||||||||||||||||||||||
 |
 |
||||||||||||||||||||||||||||||||||||||||||||||||||||||||||||||||||||||||
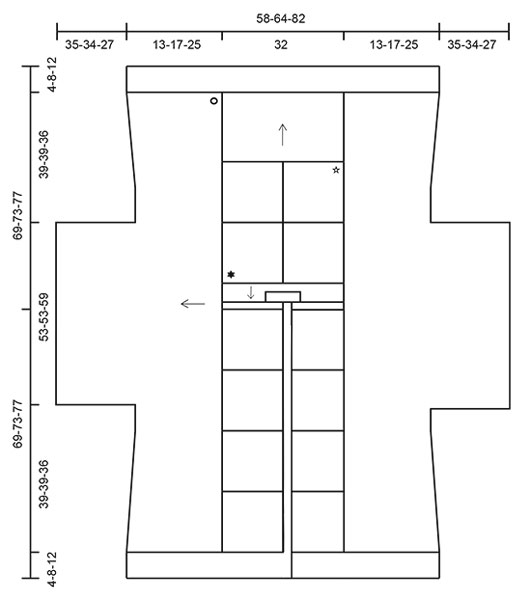
Crocheted long jacket in DROPS Big Delight. Piece is crocheted with stripes and crochet squares. Size: S - XXXL
DROPS 201-28 |
|||||||||||||||||||||||||||||||||||||||||||||||||||||||||||||||||||||||||
|
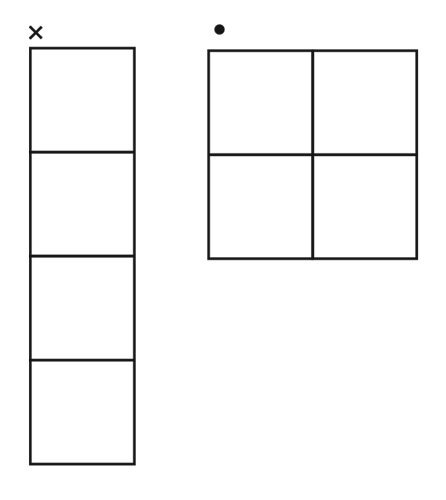
---------------------------------------------------------- EXPLANATION FOR THE PATTERN: ---------------------------------------------------------- PATTERN: See diagrams A.1 to A.4. CROCHET TIP: When working double treble crochets at the beginning of row, work 5 chain stitches instead of 3 chain stitches at the beginning of row. STRIPES-1: * Work 1 round with grey, 1 round with summer meadow *, work from *-*. STRIPES-2: Row from right side (3 double crochets + 1 chain stitch): summer meadow. Row from wrong side (1 double crochet + 4 chain stitches): grey. COLOR CHANGE: When working diagrams A.1 and A.2 you crochet stripes in the round, every other stripe in each color. To avoid having to cut the strand after every round, the strand you’re not currently working with can be pulled along until the next round. When working stripes back and forth the strand needs to be cut and fastened after every row. ---------------------------------------------------------- START THE PIECE HERE: ---------------------------------------------------------- JACKET - SHORT OVERVIEW OF THE GARMENT: Work first 12 crochet squares in total. For front pieces work 4 square together into one long strip. For back piece work 4 squares together into a square, then work down along body and up towards shoulders. When front and back pieces are done, sew shoulder together before working outwards in each side for body and sleeves. Then work collar and band. CROCHET SQUARES: Work 4 chain stitches with grey on hook size 5 mm = US H/8 and form a ring with a slip stitch in first chain stitch. Now work STRIPES-1 - see explanation above, and A.1 4 times in total on round (A.2 shown how round begins and ends). REMEMBER THE CROCHET GAUGE! When A.1 and A.2 have been worked vertically, crochet square measures approx. 16 x 16 cm = 6¼" x 6¼". Work 12 crochet squares in total. SQUARE ASSEMBLY: Back piece: Work 4 crochet squares together into a large square - see illustration with black dot. Place 2 crochet squares with right side against right side and work together from wrong side through both layers with grey as follows: Fasten strand with 1 single crochet in stitch in the corner, 2 chain stitches, 1 single crochet around next chain space, * 4 chain stitches, 1 single crochet around next chain space *, work from *-* 5 times in total, 2 chain stitches, 1 single crochet in stitch in the corner. 2 of the crochet squares are now worked together. Work the other 2 together the same way. Now work the squares together so that there are 2 squares in width and 2 squares vertically: Fasten strand with 1 single crochet in stitch in the corner, 2 chain stitches, 1 single crochet around next chain space, * 4 chain stitches, 1 single crochet around next chain space *, work from *-* 5 times in total, 4 chain stitches, 1 single crochet on next crochet square, * 4 chain stitches, 1 single crochet around next chain space *, work from *-* 5 times in total, 2 chain stitches, 1 single crochet in stitch in the corner. Right and left front piece: Work 4 crochet squares into a strip to get 4 x 1 crochet square - see illustration with cross. Place 2 crochet squares with right side against right side and work together from wrong side through both layers with grey as follows: Fasten strand with 1 single crochet in stitch in the corner, 2 chain stitches, 1 single crochet around next chain space, * 4 chain stitches, 1 single crochet around next chain space *, work from *-* 5 times in total, 2 chain stitches, 1 single crochet in stitch in the corner. 2 of the crochet square are now worked together. Work the other crochet squares together to form a long strip of 1 x 4 crochet squares. Work the other front piece the same way. BACK PIECE: Work down the back as follows: Begin with summer meadow and from right side. Fasten strand with 1 single crochet in the corner with white star - see chart. Work STRIPES-2 and pattern from first row in A.3a to A.3c as follows: Work A.3a around first chain space, A.3b around each of the next 11 chain spaces, finish with A.3c in stitch in the corner. Continue back and forth and repeat the 2 last rows in A.3a - A.3c until piece measures 26 cm = 10¼" from crochet squares – adjust to finish after a row that equals 2nd row in A.3a - A.3c. Now work chain spaces down along the side of rows with A.3a from wrong side and with grey as follows: Work * 3 chain stitches, skip approx. 2½ cm = 1", 1 single crochet *, work from *-* evenly until 10 chain spaces have been worked along the side on back piece up to first crochet square (with white star). Cut the yarn and repeat in the other side. Work shoulder in opposite side of the 4 crochet squares as follows: Begin with summer meadow and from right side. Fasten strand with 1 single crochet in the corner with black star - see chart. Work STRIPES-2 and pattern from first row in A.3a - A.3c as follows: Work A.3a around first chain space, work A.3b around each of the next 11 chain spaces, finish with A.3c in the corner. Continue back and forth until entire diagram has been worked vertically 1 time. Now work left shoulder from 2nd row in diagrams as follows: A.3c, A.3b 3 times in total, A.3a. Turn and work last row from right side. Cut the strand and work right shoulder from 2nd row in diagrams as follows: Skip 4 double crochet groups for neck and fasten yarn (grey) with 1 single crochet around next chain stitch. Work A.3c, A.3b 3 times in total, A.3a. Turn and work last row from right side. Cut the yarn. The back piece is finished. RIGHT AND LEFT FRONT PIECE: Now work 1 row upwards towards the shoulder, along one square at the end of strip with 4 crochet squares. Begin with summer meadow and work from right side. Fasten strand with 1 single crochet in corner, work A.3a around first chain space, A.3b around each of the next 5 chain spaces, finish with A.3c in the corner. Cut and fasten the yarn. Work left front piece the same way as on right front piece. SHOULDER ASSEMBLY: Sew shoulder seams. Start the seam on the outermost end of the shoulder and sew towards the neck, one stitch at a time. RIGHT SIDE AND SLEEVE: Begin with summer meadow and from right side. Fasten strand with a single crochet in the corner with circle - see chart. Work STRIPES-2 and pattern from first row in A.3a - A.3c as follows: Work A.3a around first chain space, A.3b around each of the next 9 chain spaces, continue with A.3b around each chain space along each of the next 2 crochet squares on back piece (= 12 repetitions A.3b), work 3 repetitions A.3b evenly up to shoulder seam and 1 repetition A.3b in last row on front piece, continue with A.3b in every chain space along each crochet square on front piece (= 24 repetitions A.3b), finish with A.3c in the corner at the bottom of front piece. There are now 1 repetition A.3a, 49 repetitions A.3b and 1 repetition A.3c along the side of piece. When entire A.3a – A.3c have been worked vertically, repeat the last 2 rows the same way, but on 2nd row in diagrams work the first 8 double crochets as double treble crochets – read CROCHET TIP, work the next 6 double crochets as treble crochets, work the next 22 double crochets as double crochets as before, work the next 6 double crochets as treble crochets, work the last 8 double crochets as double treble crochets (work 3rd row as shown in diagram). Continue back and forth the same way (ie: on row 2 in the diagram you work double treble crochets and treble crochets in the beginning and end of row as explained, and row 3 is worked as before) until piece measures 13-17-25 cm = 5⅛"-6¾"-9¾" at the bottom of front and back piece - adjust to finish after 3rd row in diagram. Cut the yarn. Now work sleeve, begin from wrong side: Skip the first 15-15-14 double crochet groups (= A.3a/A.3b). Fasten strand (grey) with 1 single crochet around next chain stitch, work 3 chain stitches, 1 double crochet around the same chain stitch (= A.3c), A.3b 19 times in total, A.3c. Turn and work 3rd row back from right side - continue STRIPES-2 as before. Continue back and forth like this until piece measures approx. 48-50-52 cm = 19"-19¾"-20½" from crochet squares – adjust to finish after a row from right side. Cut the yarn. LEFT SIDE AND SLEEVE: Work left side and sleeve the same way as on right side and sleeve but begin from right side in the corner at the bottom of front piece instead of back piece - adjust measurements according to right side and sleeve. ASSEMBLY: Fold the jacket so that right side is against right side and work through both layer from wrong side with summer meadow as follows: Begin at the bottom of sleeve with a single crochet, * work 4 chain stitches, skip approx. 1 cm = ⅜", work 1 single crochet *, work from *-* under sleeve and down along the side. Cut the yarn. Repeat in the other side. EDGE AT THE BOTTOM OF BODY: Begin from right side at the bottom of front piece towards mid front and work with summer meadow as follows: Fasten strand with 1 single crochet in stitch in the corner, work A.3a around first chain space, A.3b around each of the next 5 chain spaces, work A.3b evenly 11-14-20 times along the piece until part on back piece worked down on the 4 crochet squares at the back, work A.3b 12 times in total as before over the next 12 repetitions on back piece, work A.3b 11-14-20 times along the side of piece until crochet square on front piece, work A.3b 6 times in total along crochet square and finish with A.3c around stitches in the corner. There are now 1 repetition A.3a, 45-51-63 repetitions A.3b and 1 repetition A.3c on row. Continue back and forth with the 2 last rows in diagram (continue STRIPES-2 as before) until edge measures 4-8-12 cm = 1½"-3⅛"-4¾" from crochet squares on front piece - adjust to finish after last row in diagrams. Cut the yarn. COLLAR: Work collar back and forth in 1 part from left front piece and sew to neck and right front piece when finished. Work entire collar in summer meadow. Begin from right side with 1 single crochet on the inside at left shoulder seam (towards the neck) on left front piece and work from 2nd row in diagrams as follows: A.4a, A.4b, A.4c (work 2nd row from right side and 3rd row from wrong side). Continue back and forth like this and repeat the last 2 rows until 20 rows have been worked vertically. Then work the next to last row in diagram one more time. Cut the yarn. Sew the last row worked to the edge at the top on right front piece and sew collar along the back of neck (sew with small stitches to avoid a chunky seam). BAND: Begin from right side with summer meadow in the corner at the bottom of front piece. Work 1 single crochet around bottom row on the edge, work 4 chain stitches, 3 double crochets around next row along the edge (= A.3a), work 0-1-2 repetitions A.3b evenly up to first crochet square, continue with A.3b around every chain space along each of the 4 crochet squares on right front piece (= 6 repetitions A.3b along each of the crochet squares), continue with 1 repetition A.3b around every row along the collar (= 20 repetitions), continue down along left band the same way as on right band. When entire A.3a to A.3b have worked vertically, the band is done. Cut and fasten the yarn. |
|||||||||||||||||||||||||||||||||||||||||||||||||||||||||||||||||||||||||
Diagram explanations |
|||||||||||||||||||||||||||||||||||||||||||||||||||||||||||||||||||||||||
|
|||||||||||||||||||||||||||||||||||||||||||||||||||||||||||||||||||||||||
 |
|||||||||||||||||||||||||||||||||||||||||||||||||||||||||||||||||||||||||
 |
|||||||||||||||||||||||||||||||||||||||||||||||||||||||||||||||||||||||||
 |
|||||||||||||||||||||||||||||||||||||||||||||||||||||||||||||||||||||||||
Have you finished this pattern?Tag your pictures with #dropspattern #mywildflowerjacket or submit them to the #dropsfan gallery. Do you need help with this pattern?You'll find 13 tutorial videos, a Comments/Questions area and more by visiting the pattern on garnstudio.com. © 1982-2026 DROPS Design A/S. We reserve all rights. This document, including all its sub-sections, has copyrights. Read more about what you can do with our patterns at the bottom of each pattern on our site. |
|||||||||||||||||||||||||||||||||||||||||||||||||||||||||||||||||||||||||


With over 40 years in knitting and crochet design, DROPS Design offers one of the most extensive collections of free patterns on the internet - translated to 17 languages. As of today we count 324 catalogs and 12290 patterns - 12280 of which are translated into English (US/in).
We work hard to bring you the best knitting and crochet have to offer, inspiration and advice as well as great quality yarns at incredible prices! Would you like to use our patterns for other than personal use? You can read what you are allowed to do in the Copyright text at the bottom of all our patterns. Happy crafting!
Post a comment to pattern DROPS 201-28
We would love to hear what you have to say about this pattern!
If you want to leave a question, please make sure you select the correct category in the form below, to speed up the answering process. Required fields are marked *.