
Looking for a yarn?


Comments / Questions (38)
![]() Britta Froberg wrote:
Britta Froberg wrote:
Jeg vil gerne strikke det sjal, men det skal være meget tyndt og let. Derfor overvejer jeg kun at strikke med en tråd, nemlig silk kid og måske endda på større pinde så det bliver mere åbent, kan man det? Eller har i forslag til en model der er mere "selskabsagtig". Hilsen Britta
09.04.2025 - 16:46DROPS Design answered:
Hej Britta, ja det kan du absolut, det bliver fint. Vi har også nogle fine Lace sjaler som kan strikkes i Kid-Silk lace sjal
10.04.2025 - 08:55
![]() Karin Toftgaard wrote:
Karin Toftgaard wrote:
Må jeg bede om svar på min henvendelse den 2. januar??? "Jeg har fået et DROPS design strikke kit "Lamella af min datter Sanne Jepsen, som hun har købt på nettet. Der var 75 g Kid Silk (farve nr. 5093, som hun valgte) med, men manglede 200 g Drops Delight (som omtalt i opskriften). Hun husker ikke farven. Kan jeg få eftersendt de 200 gram Drops Delight, som mangler, og få lov til at vælge farven? Venlig hilsen Karin Toftgaard
06.01.2025 - 12:25DROPS Design answered:
Hei Karin. Se vårt tidligere svar til deg. mvh DROPS design
07.01.2025 - 16:05
![]() Karin Toftgaard wrote:
Karin Toftgaard wrote:
Jeg har fået et DROPS design strikke kit "Lamella af min datter, som hun har købt på nettet hos jer. Hun hedder Sanne Jepsen. Der var 75 g Kid Silk (farve nr. 5093, som hun har valgt) med, men manglede 200 g Drops Delight (som omalt i opskriften). Hun kan ikke huske farven. Kan jeg få eftersendt de 200 gram Drops Delight, som mangler, og få lov til at vælge farven? Venlig hilsen, Karin Toftgaard
02.01.2025 - 19:42DROPS Design answered:
Hei Karin. Vi sender ikke garn til privatpersoner, så din datter har nok handlet fra en nettbutikk som selger våre garn. Ta kontakt med den butikken, står på bestillingsorderen på Kid-Silk. Garnet DROPS Delight er utgått fra vårt sortiment, men det er mulig noen butikker har igjen. Se oversikten over butikker for selger DROPS garn og forhør deg med dem. mvh DROPS Design
07.01.2025 - 13:18
![]() Maria wrote:
Maria wrote:
Potreste dare delle indicazioni su come lavorare i ferri accorciati quando si deve girare il lavoro? Ho provato a fare l'avvolgi e gira ma non dal lato in cui devo lavorare il gettato e i due punti insieme a dritto. È giusto? Non esiste un video che spiega come lavorare le foglie? Grazie
28.08.2024 - 07:41DROPS Design answered:
Buonasera Maria, a questo link può trovare un video per lavorare i ferri accorciati. Buon lavoro!
29.08.2024 - 22:25
![]() Małgorzata wrote:
Małgorzata wrote:
Proszę o wyjaśnienie wątpliwości 1.Czy po liściu C, dodaniu 18 oczek, zawracam, przerabiam WSZYSTKIE oczka jakie już mam na drucie na prawo i dodaję na końcu 18 oczek? 2. Gdy jest napisane na początku (np. rz. 4, 5 …)„wykonać liść B, ponad 36 pierwszymi oczkami” to czy wykonuję pierwszy rząd 36 oczek prawych (schematA1), dopiero nad nim rzędy skrócone, czy zaczynam od razu rzędy skrócone?
05.08.2024 - 18:58DROPS Design answered:
Witaj Małgosiu, pyt. 1. dokładnie tak. Pyt. 2. najpierw przerabiasz 1-szy rząd schematu czyli 36 oczek prawych na lewej stronie robótki, a następnie zaczynasz rzędy skrócone, cały czas trzymając się schematu A.1. Pozdrawiamy!
12.08.2024 - 20:17
![]() MariAnna wrote:
MariAnna wrote:
Ich habe das Blatt A fertig und jeweils vorne und hinter dem Blatt 18 Maschen angeschlagen. Also 72 Maschen befinden sich auf der Nadel. In der Mitte habe ich einen Markierer angebracht (36 Maschen-Markierer-36 Maschen) Werden die Blätter B und C gleichzeitig in gestrickt? Liebe Grüße an alle, MariAnna
02.07.2024 - 12:58DROPS Design answered:
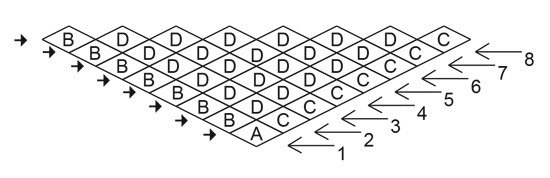
Liebe MariAnna, ja genau, jetzt stricken Sie die 2. Reihe und zwar zuerst das Blatt B über die ersten 36 Maschen dann stricken Sie das Blatt C über die letzten 36 von diesen 72 Maschen - genauso wie in der untere Skizze gezeigt, die 1. Reihe wird immer eine Rückreihe sein, so eine neue Reihe Blätter beginnt immer mit einer Rückreihe (= erste Reihe A.1). Viel Spaß beim Stricken!
02.07.2024 - 15:56
![]() Anne Margrete Gåsvær wrote:
Anne Margrete Gåsvær wrote:
Hei! Jeg står fast….skjønner ikke noenting. Har strikket to blader og skal begynne med blad C, men skjønner ikke hvordan…….
26.02.2023 - 18:49DROPS Design answered:
Hej Anne Margrete, du har 36 masker tilbage på pinden og du strikker A.1 over disse 36 masker. God fornøjelse!
07.03.2023 - 15:37
![]() Stela wrote:
Stela wrote:
I finished the explanation for Start-Row 2 and have 108 stitches. To work Row 3 and begin Leaf B, do I knit 78 stitches and then start Leaf B?
11.02.2023 - 19:27DROPS Design answered:
Dear Stela, you can see that in ROW 3 you work 3 different leaves: Leaf B over the first 36 sts, Leaf D over the next 36 sts and Leaf C over the last 36 sts. Happy knitting!
12.02.2023 - 21:02
![]() Alina wrote:
Alina wrote:
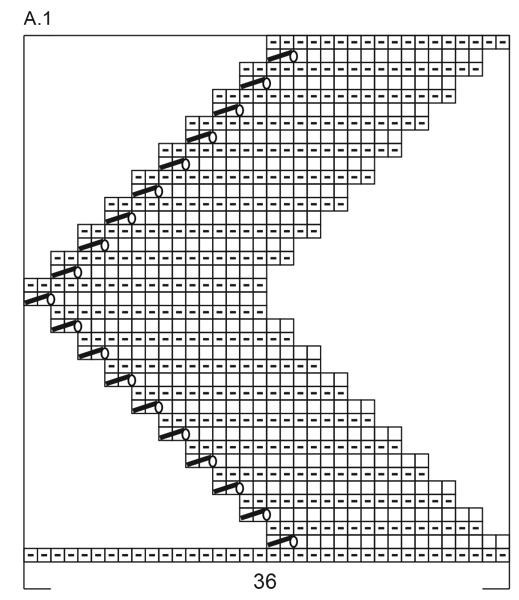
Witam. Mam problem z rozpoczęciem liścia A. Nabieram 36 oczek i przerabiam je na prawo, odwracam robótkę i przerabiam 16 oczek robię narzut i co dalej? Nie mogę rozumieć dalszej części schematu. Proszę o pomoc
25.01.2022 - 13:23DROPS Design answered:
Witaj Alino, przerabiasz 16 oczek prawych, 1 narzut i 2 o. razem na prawo, obracasz robótkę i teraz przerabiasz na lewej jej stronie: 16 oczek prawych (czyli też nie do końca rzędu). Ta technika to rzędy skrócone, nie przerabiasz wszystkich oczek w rzędzie, tylko jakąś ich część. Zobacz filmy video do tego wzoru dotyczące tej techniki. W razie problemów pisz. Pozdrawiamy!
25.01.2022 - 16:36
![]() Carine M wrote:
Carine M wrote:
Suite à la question posée cet AM, j'ai défait la feuille C et je l'ai retricotée. Il s'avère que la première fois, je n'avais pas tricoté le premier rang de la grille. Le motif était donc inversé. Tout est donc bien reparti. Merci pour ce modèle, il est magnifique. Un peu technique également, ce qui le rend d'autant plus intéressant.
01.01.2022 - 19:56
|
|||||||||||||||||||
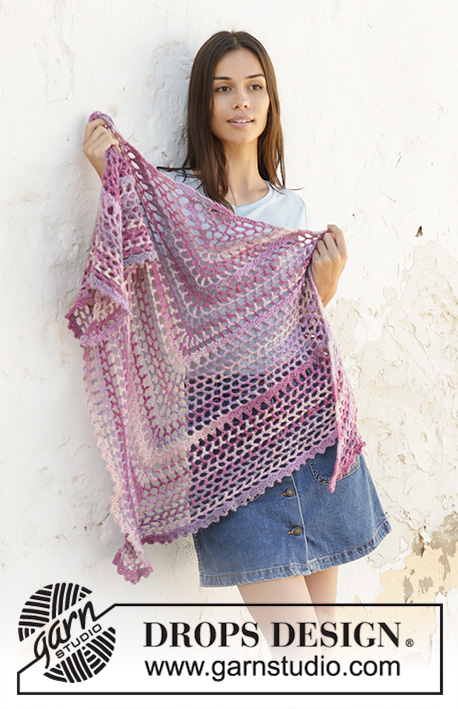
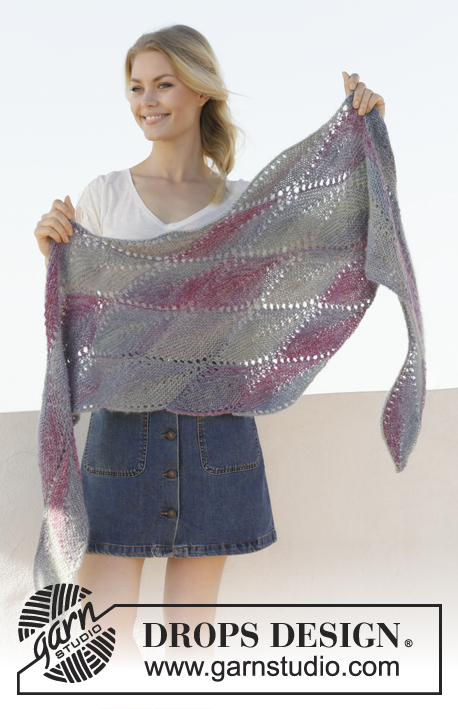
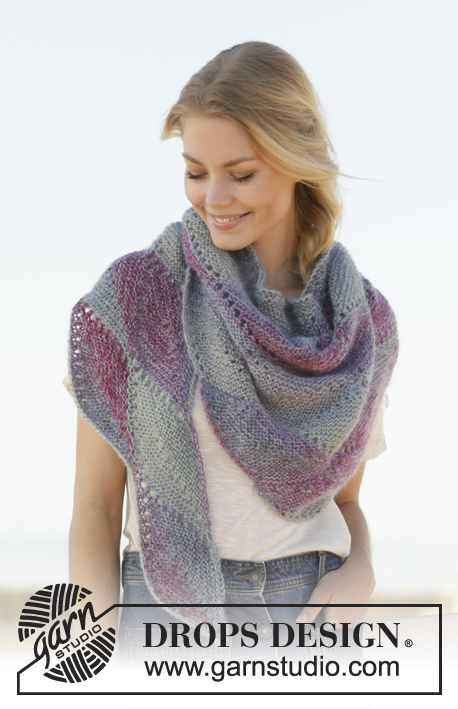
Lamella#lamellawrap |
|||||||||||||||||||
 |
 |
||||||||||||||||||
Knitted shawl in DROPS Delight and DROPS Kid-Silk. The whole piece is worked in garter stitch with short rows.
DROPS 201-24 |
|||||||||||||||||||
|
------------------------------------------------------- EXPLANATIONS FOR THE PATTERN: ------------------------------------------------------- RIDGE/GARTER STITCH (worked back and forth): 1 ridge = Knit 2 rows. INFORMATION ABOUT MEASUREMENTS: There are 8 leaves on the 8th/last row of the shawl. As there is no row above, the length of the leaves can be longer than suggested in the pattern. The length of 1 leaf is approx. 22 cm = 8¾", but can be as much as 24 cm = 9½" when bind off on the last row. ------------------------------------------------------- START THE PIECE HERE: ------------------------------------------------------- SHAWL - SHORT OVERVIEW OF THE PIECE: The piece is worked back and forth with circular needle, working from the bottom point upwards, in rows with different numbers of leaves. You work short rows over one leaf at a time. The whole piece is worked in GARTER STITCH – read description above. You will be using markers, inserted between and in the middle of leaves as you work. The markers sit on the row and follow your work onwards. They make it easier to see where the leaves will be worked. ROW 1: Cast on 36 stitches with 1 strand Delight and 1 strand Kid-Silk and circular needle size 5.5 mm = US 9. Then work as follows: LEAF A: Work diagram A.1, the first row in the diagram is from the wrong side. Work the diagram 1 time in height = 1 leaf. Row 1 with leaves is now finished (= 1 leaf), do not turn the piece. REMEMBER THE KNITTING GAUGE! In the transition between rows 1 and 2 with leaves, work START-ROW 1. START-ROW 1: Cast on 18 new stitches at the end of the row. Turn and knit 18, insert 1 marker here, knit 36. Insert 1 marker here, do not turn the piece, but cast on 18 new stitches at the end of the row. Now you are ready to work row 2 with leaves and there are 72 stitches on the row. Turn the piece. ROW 2: LEAF B: Work A.1 over the first 36 stitches on the row. The last row is from the wrong side, insert 1 marker here. Do not turn the piece, the next leaf is worked from here. LEAF C: Work A.1 over the last 36 stitches on the row. The last row is from the wrong side. Row 2 with leaves is now finished (= 2 leaves), do not turn the piece. In the transition between rows 2 and 3 with leaves, work START-ROW 2. START-ROW 2: Cast on 18 new stitches at the end of the row. Turn and knit 18, insert 1 marker here, knit 72. Insert 1 marker here, do not turn the piece but cast on 18 new stitches at the end of the row. Now row 2 with leaves is finished and there are 108 stitches on the needle. Turn the piece. ROW 3: LEAF B: Work A.1 over the first 36 stitches on the row; make sure you have a marker after the first 36 stitches. The last row is from the wrong side, do not turn the piece, the next leaf is worked from here. LEAF D: Work A.1 over the next 36 stitches on the row; make sure you have a marker after these 36 stitches. The last row is from the wrong side, do not turn the piece, the next leaf is worked from here. LEAF C: Work A.1 over the last 36 stitches on the row. The last row is from the wrong side. Row 3 with leaves is now finished (= 3 leaves), do not turn the piece. In the transition between rows 3 and 4 with leaves, work NEW START-ROW. NEW START-ROW: Cast on 18 new stitches at the end of the row. Turn and knit 18, insert 1 marker here, knit to end of row, insert 1 new marker here and cast on 18 new stitches at the end of the row. Now you are ready for the next row of leaves. Turn the piece. ROW 4: Work LEAF B over the first 36 stitches, LEAF D over the next 72 stitches (= 2 times in width), work LEAF C over the last 36 stitches. Row 4 with leaves is now finished (= 4 leaves), do not turn the piece. Work NEW START-ROW. ROW 5: Work LEAF B over the first 36 stitches, LEAF D over the next 108 stitches (= 3 times in width), LEAF C over the last 36 stitches. Row 5 with leaves is now finished (= 5 leaves), do not turn the piece. Work NEW START-ROW. ROW 6: Work LEAF B over the first 36 stitches, LEAF D over the next 144 stitches (= 4 times in width), LEAF C over the last 36 stitches. Row 6 with leaves is now finished (= 6 leaves), do not turn the piece. Work NEW START-ROW. ROW 7: Work LEAF B over the first 36 stitches, LEAF D over the next 180 stitches (= 5 times in width), LEAF C over the last 36 stitches. Row 7 with leaves is now finished (= 7 leaves), do not turn the piece. Work NEW START-ROW. ROW 8: Work LEAF B over the first 36 stitches, LEAF D over the next 216 stitches (= 6 times in width), LEAF C over the last 36 stitches. Row 8 with leaves is now finished (= 8 leaves). FINISH: Turn the piece so that the next row is worked from the right side. Knit 1 row over all stitches, turn and bind off loosely with knit on the next row from the wrong side. Cut and fasten the strands. |
|||||||||||||||||||
Diagram explanations |
|||||||||||||||||||
|
|||||||||||||||||||
|
|||||||||||||||||||
|
|||||||||||||||||||
Have you finished this pattern?Tag your pictures with #dropspattern #lamellawrap or submit them to the #dropsfan gallery. Do you need help with this pattern?You'll find 13 tutorial videos, a Comments/Questions area and more by visiting the pattern on garnstudio.com. © 1982-2025 DROPS Design A/S. We reserve all rights. This document, including all its sub-sections, has copyrights. Read more about what you can do with our patterns at the bottom of each pattern on our site. |
|||||||||||||||||||


With over 40 years in knitting and crochet design, DROPS Design offers one of the most extensive collections of free patterns on the internet - translated to 17 languages. As of today we count 314 catalogs and 11821 patterns - 11811 of which are translated into English (US/in).
We work hard to bring you the best knitting and crochet have to offer, inspiration and advice as well as great quality yarns at incredible prices! Would you like to use our patterns for other than personal use? You can read what you are allowed to do in the Copyright text at the bottom of all our patterns. Happy crafting!
Post a comment to pattern DROPS 201-24
We would love to hear what you have to say about this pattern!
If you want to leave a question, please make sure you select the correct category in the form below, to speed up the answering process. Required fields are marked *.