
Popular categories
Looking for a yarn?


Comments / Questions (57)
![]() Barbara wrote:
Barbara wrote:
Tusen takk for denne flotte oppskriften! Er kommet til bolen nå og så langt har anvisningen vært problemløs. Men følgende setning er litt uklart for meg: "Sett 1 merketråd i hver side, midt i de 10-10-12-12-14-14 maskene som ble lagt opp under hvert erme." Betyr det at jeg setter merke foran og bak de (i mitt tilfelle) 10 ekstramaskene? Under FELLETIPS høres det ut som om det er bare et merke i midten av ekstramaskene. Blir glad hvis dokker kan forlkare dette litt mer :-)
21.07.2022 - 17:22DROPS Design answered:
Hei Barbara, Du setter 1 merke under hvert erme (i midten av de nye maskene) slik at du har 1 merker i hver side av bolen. God fornøyelse!
22.07.2022 - 07:43
![]() Aina Egholm wrote:
Aina Egholm wrote:
Det var umulig for meg å få til en fin avslutning med 2 riller på denne jakken , det bare rullet seg, samme hvor løst jeg felte. Så jeg endret til 4 riller, og elastisk avfelling, det ble finere. Kanten fikk da og lik bredde som stolpen nederst.
18.04.2022 - 10:55
![]() Eveline wrote:
Eveline wrote:
Ich stricke Cardigan blue nostalgia Habe 128 Maschen. Wenn ich jetzt die Arbeit aufteile, habe ich 2 Maschen übrig. Was mache ich falsch.? 5 Bündchen, 17 VT, 1U , 2 re, 21 Ärm, 2 re, 1 U, 34 Rücken, 1U, 2 re , 21 Ärm, 2 re, 1U, 17 VT, 5 Bündchen. Gibt 126 Maschen und nicht 128. Besten dank für Ihre Hilfe. Freundliche Grüsse Eveline
04.04.2022 - 20:21DROPS Design answered:
Liebe Eveline, so bekomme ich aber 128 M: 5 Bündchen, 17 VT, 2 re, 21 Ärm, 2 re, 34 Rücken, 2 re , 21 Ärm, 2 re, 17 VT, 5 Bündchen= 5+17+2+21+2+34+2+21+2+17+5=128 Maschen (+ die 4 Umschläge + die Zunahmen in A.1 = 136 Maschen). . Viel Spaß beim stricken!
05.04.2022 - 09:29
![]() Alice wrote:
Alice wrote:
Is there a reason that the body and sleeves are divided on a wrong side row? I’ve always seen this done on a right side row in other patterns.
15.11.2021 - 19:19DROPS Design answered:
Dear Alice, on the sleeve you will then work the diagrams starting with a right side row. Happy knitting!
16.11.2021 - 08:47
![]() Shellie Achtman wrote:
Shellie Achtman wrote:
I am on the first row of the lace sleeve, A.1, of this pattern . According to the diagram there should be 21 stitches. We are coming up with 27 stitches. Please explain what we are doing wrong. Up to this point my stitch count and the pattern stitch count are the same. I really love this sweater so I hope I can understand what needs to be done. If possible, can you please write out the sleeve instructions for me. That might make it easier to follow. Thank you!
08.07.2021 - 21:15DROPS Design answered:
Dear Shellie, we use the diagrams (instead of the written out instructions) because we believe they show not only the very next step, but also how stitches and rows relate to each other en large. Please understand that we cannot provide written out or modified instructions for each individual requests. Since we don't see your knitting it is hard to say, what you are doing wrong, but, for example, it can be, that you do not have to do extra yarnovers at the raglan lines, as for the sleeves they are included in the diagrams. Happy Stitching!
08.07.2021 - 21:45
![]() Silje wrote:
Silje wrote:
Det blir riktig å strikke 7 m glattstrikk før og etter mønsteret, og ikke 2 ettersom maskene som er plukket opp under armen må telles med.
07.07.2021 - 09:18
![]() Silje wrote:
Silje wrote:
Jeg er ferdig med bolen og begynner på ermene, størrelse M. Det stemmer ikke om omg begynner med 2 r og så mønster A3, A4 og A5. Maskene som telles opp blir 75 m og ikke 85, som er riktig maskeantall om man teller med 10 m under ermet.
06.07.2021 - 20:08DROPS Design answered:
Hej Silje, du har 75 masker fra tråden, strikker 1 maske i hver af de 10 under ærmet = 85 masker. Mønsteret skal stemme hvis du strikker 2r+A3=10m+A4=60m+A5=11m+2r God fornøjelse!
14.07.2021 - 10:34
![]() Lene Jochumsen wrote:
Lene Jochumsen wrote:
Ordet "inklusiv" betyder +. Hvad I mente at skrive er "dette maskeantal inkludere 5 masker i start og slut til kant ", går jeg ud fra???
16.05.2021 - 12:07
![]() Monica Sørensen wrote:
Monica Sørensen wrote:
Hei,i str xl står det at man først skal strikke 19 masker, og avslutte runden med 19,men gjelder det kun første runde,eller alle rundene til man er ferdig med mønsterdelen? Jeg starter med 19, men på slutten av runden øker det med 4 rettmasker for hver runde🙄
15.04.2021 - 16:17DROPS Design answered:
Hej Monica, efterhånden som du tager ud i hver raglanovergang vil der også blive flere glatstrikkede masker på for og bagstykket. God fornøjelse!
28.04.2021 - 14:51
![]() Barbara Cardinali wrote:
Barbara Cardinali wrote:
Grazie mille!
13.04.2021 - 11:23
|
|||||||||||||||||||||||||
Blue Nostalgia Cardigan#bluenostalgiacardigan |
|||||||||||||||||||||||||
 |
 |
||||||||||||||||||||||||
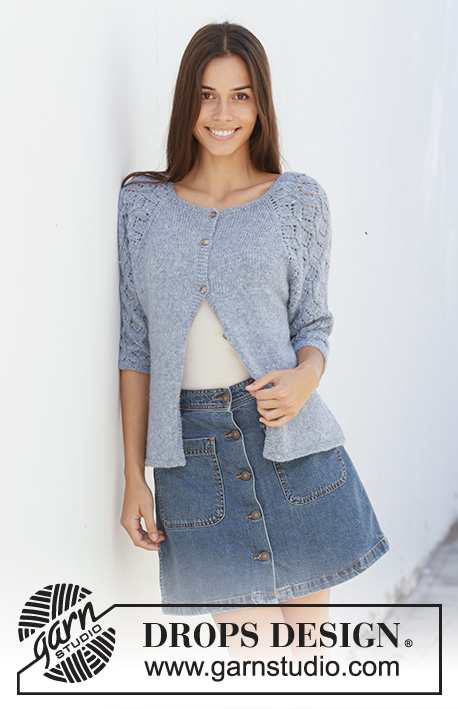
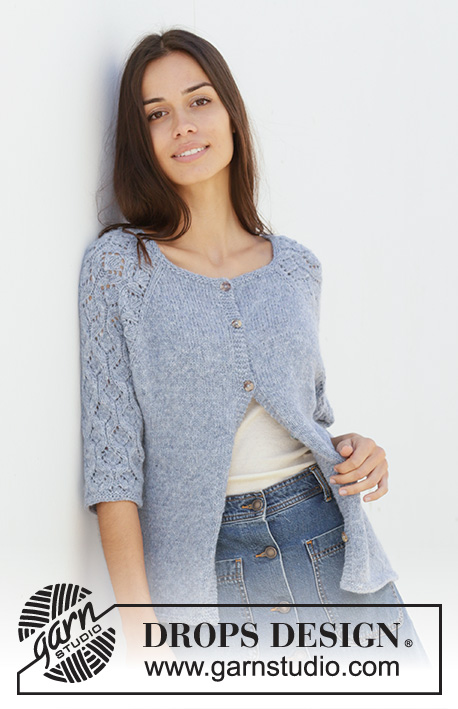
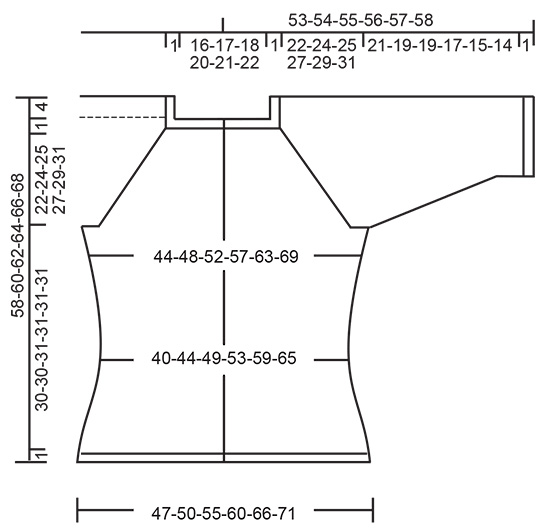
Knitted jacket with raglan in DROPS Sky. The piece is worked top down with lace pattern on sleeves. Sizes S – XXXL.
DROPS 199-4 |
|||||||||||||||||||||||||
|
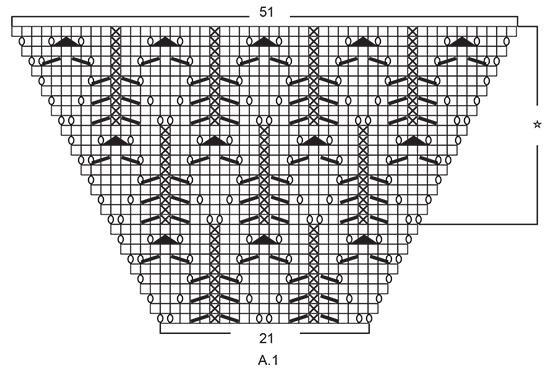
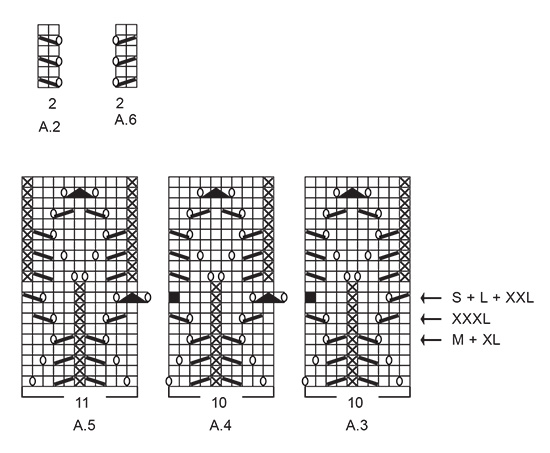
------------------------------------------------------- EXPLANATIONS FOR THE PIECE: ------------------------------------------------------- RIDGE/GARTER STITCH (worked back and forth): Knit all rows. 1 ridge in height = Knit 2 rows. INCREASE TIP-1 (evenly spaced): To work out how to increase evenly, count the total number of stitches on the needle (e.g. 110 stitches), minus bands (e.g. 10 stitches) and divide the remaining stitches by the number of increases to be made (e.g. 10) = 10. In this example, increase by making 1 yarn over after each 10th stitch. On the next row (wrong side) purl the yarn overs twisted to avoid holes. Do not increase on the bands. PATTERN: See diagrams A.1 to A.6. Find your size in the diagrams (applies to A.3 to A.5). The diagrams show all the rows in the pattern seen from the right side. BUTTONHOLES: Work buttonholes on right band (when garment is worn). Work from the right side when there are 3 stitches left on the row as follows: Make 1 yarn over, knit the next 2 stitches together and knit the last stitch. On the next row knit the yarn over to leave a hole. The first buttonhole is worked when the piece measures approx. 1½-2 cm = ½" from the cast-on edge. Then work the other 5-5-5-6-6-6 buttonholes with approx. 9-9-9-8½-8½-8½ cm = 3½"-3½"-3½"-3¼"-3¼"-3¼" between each one. DECREASE TIP (for sides of body and sleeves): All decreases worked from the right side! Work until there are 3 stitches left before the marker thread, knit 2 together, knit 2 (marker thread sits between these 2 stitches), slip 1 stitch as if to knit, knit 1 and pass the slipped stitch over the knitted stitch. INCREASE TIP-2 (for sides of body): All increases are worked from the right side! Work until there are 2 stitches left before the marker thread, 1 yarn over, knit 4 (marker thread sits in middle of these stitches), 1 yarn over. On the next row (wrong side) purl the yarn overs twisted to avoid holes. Then work the new stitches in stockinette stitch. RIDGE/GARTER STITCH (worked in the round): 1 ridge in height = 2 rounds; i.e. knit 1 round and purl 1 round ------------------------------------------------------- START THE PIECE HERE: ------------------------------------------------------- JACKET - SHORT OVERVIEW OF THE PIECE: Yoke and body are worked back and forth with circular needle from mid front, top down. The sleeves are worked in the round with short circular needle/double pointed needles, top down. YOKE: Cast on 110-116-120-126-130-136 stitches (including 5 band stitches on each side towards mid front) with circular needle size 3.5 mm = US 4 and Sky. Work 2 RIDGES – read description above. Knit 1 row from the right side where you increase 10-8-8-10-10-8 stitches evenly spaced – read INCREASE TIP-1 = 120-124-128-136-140-144 stitches. Change to circular needle size 4mm = US 6. Purl 1 row from the wrong side with 5 band stitches in garter stitch on each side. The next row is worked as follows from the right side: 5 band stitches in garter stitch, stockinette stitch over the next 15-16-17-19-20-21 stitches (= front piece), 1 yarn over, 2 stitches stockinette stitch, A.1 over 21 stitches (= sleeve), 2 stitches stockinette stitch, 1 yarn over, 30-32-34-38-40-42 stitches stockinette stitch (= back piece), 1 yarn over, 2 stitches stockinette stitch, A.1 over 21 stitches (= sleeve), 2 stitches stockinette stitch, 1 yarn over, stockinette stitch over the next 15-16-17-19-20-21 stitches and finish with 5 band stitches in garter stitch (= front piece). There are now 128-132-136-144-148-152 stitches on the needle. Continue this pattern onwards. In other words, increase on the sleeves on each side as shown in A.1. On the next row (wrong side) purl the yarn overs on the sleeves (= holes) and the increased stitches are worked into the pattern as shown in A.1. On front and back pieces, you increase with a yarn over before/after the 2 stitches in stockinette stitch (there will be 2 stitches in stockinette stitch between each raglan increase). On the next row (wrong side) purl these yarn overs twisted (= no holes) and the increased stitches are then worked in stockinette stitch. Increase like this every 2nd row (i.e. each row from right side). You increase a total of 8 stitches on each increase row (= 4 yarn overs + 4 yarn overs increased in A.1). REMEMBER THE KNITTING GAUGE and remember BUTTONHOLES on right band – read description above. When A.1 has been worked 1 time in height there are 240-244-248-256-260-264 stitches on the needle. Continue this pattern, i.e. the pattern repeats as shown in A.1. Each time you have worked 20 rows in height there is room for 1 more repeat with lace pattern in width on each sleeve. When you have increased a total of 24-27-29-32-34-38 times on each side of A.1 there are 312-340-360-392-412-448 stitches on the needle and the piece measures approx. 18-20-22-24-25-28 cm = 7"-8"-8¾"-9½"-9¾"-11" from the cast on edge mid front. Continue with band stitches in garter stitch, stockinette stitch and pattern as before, but without increasing. In other words over the 69-75-79-85-89-97 stitches in A.1 work as follows: Work A.2 (= 2 stitches), 2-0-2-0-2-1 stitches stockinette stitch, start on row marked with arrow in your size and work A.3 (= 10 stitches), A.4 over the next 40-50-50-60-60-70 stitches (= 4-5-5-6-6-7 repeats of 10 stitches), A.5 (= 11 stitches), 2-0-2-0-2-1 stitches stockinette stitch and A.6 (= 2 stitches). Continue working until the piece measures 23-25-26-28-30-32 cm = 9"-9¾"-10¼"-11"-11¾"-12½" from the cast-on edge mid front. The next row is worked as follows from the wrong side: Work 5 band stitches in garter stitch, 41-45-49-54-59-65 stitches stockinette stitch (= front piece), place the next 69-75-77-83-83-89 stitches on 1 thread for sleeve, cast on10-10-12-12-14-14 new stitches on the needle (= in side under sleeve), 82-90-98-108-118-130 stitches in stockinette stitch (= back piece), place the next 69-75-77-83-83-89 stitches on 1 thread for sleeve, cast on 10-10-12-12-14-14 new stitches on needle (= in side under sleeve), 41-45-49-54-59-65 stitches stockinette stitch and 5 band stitches in garter stitch (= front piece). Body and sleeves are continued separately. THE PIECE IS NOW MEASURED FROM HERE! BODY: = 194-210-230-250-274-298 stitches. Insert 1 marker thread in each side, in the middle of the 10-10-12-12-14-14 stitches cast on under each sleeve. Allow them to follow your work onwards; they will be used later when decreasing/increasing. Work stockinette stitch, with 5 band stitches in garter stitch on each side of the piece. When the piece measures 2 cm = ¾" from the division, decrease 1 stitch on each side of both marker threads - read DECREASE TIP = 4 stitches decreased. Decrease like this every 3 cm = 1⅛" a total of 4 times = 178-194-214-234-258-282 stitches. Continue until the piece measures 14 cm = 5½" from the division. Now increase 1 stitch on each side of both marker threads – read INCREASE TIP-2 = 4 stitches increased. Increase like this every 2 cm = ¾" a total of 7 times = 206-222-242-262-286-310 stitches. Continue until the piece measures 30-30-31-31-31-31 cm = 11¾"-11¾"-12¼"-12¼"-12¼"-12¼" from the division. Change to circular needle size 3.5 mm = US 4. Work 2 ridges back and forth over all stitches. Loosely bind off with knit, but to avoid the bind-off edge being tight you can bind off with size 4 mm = US 6 needle. The jacket measures approx. 58-60-62-64-66-68 cm = 22¾"-23⅝"-24⅜"-26¼"-26"-26¾" from the shoulder down. SLEEVE: Place the 69-75-77-83-83-89 stitches from the thread on one side of the piece on short circular needle/double pointed needles size 4 mm = US 6 and knit up 1 stitch in each of the 10-10-12-12-14-14 stitches cast on under sleeve = 79-85-89-95-97-103 stitches. Insert 1 marker thread in the middle of the 10-10-12-12-14-14 stitches under the sleeve and allow the marker thread to follow your work onwards; it will be used later when decreasing. Start the round by the marker thread. Start on the correct round in the diagrams so that the pattern continues on from the yoke and work as follows: Work 4-2-4-2-3-1 stitches stockinette stitch, A.3 (= 10 stitches), A.4 over the next 50-60-60-70-70-80 stitches (= 5-6-6-7-7-8 repeats of 10 stitches), A.5 (= 11 stitches) and 4-2-4-2-3-1 stitches stockinette stitch. Continue this pattern. When the piece measures 2 cm = ¾" from the division, decrease 2 stitches mid under sleeve – remember DECREASE TIP. Decrease like this every 3rd-3rd-3rd-2nd-2nd-2nd round a total of 14-15-15-16-15-16 times = 51-55-59-63-67-71 stitches. The stitches which do not fit into the pattern as you decrease are worked in stockinette stitch, but make sure when decreasing in the pattern you also make 1 yarn over. Continue until the piece measures 21-19-19-17-15-14 cm = 8¼"-7½"-7½"-6¾"-6"-5½" from the division (shorter measurements in larger sizes due to longer yoke). Change to double pointed needles size 3.5 mm = US 4. Work 2 RIDGES in the round – read description above. Loosely bind off with knit, but to avoid the bind-off edge being tight you can bind off with size 4 mm = US 6 needles. The sleeve measures approx. 22-20-20-18-16-15 cm = 8¾"-8"-8"-7"-6¼"-6" from the division. Work the other sleeve in the same way. ASSEMBLY: Sew buttons onto left band. |
|||||||||||||||||||||||||
Diagram explanations |
|||||||||||||||||||||||||
|
|||||||||||||||||||||||||
 |
|||||||||||||||||||||||||
 |
|||||||||||||||||||||||||
 |
|||||||||||||||||||||||||
Have you finished this pattern?Tag your pictures with #dropspattern #bluenostalgiacardigan or submit them to the #dropsfan gallery. Do you need help with this pattern?You'll find 27 tutorial videos, a Comments/Questions area and more by visiting the pattern on garnstudio.com. © 1982-2026 DROPS Design A/S. We reserve all rights. This document, including all its sub-sections, has copyrights. Read more about what you can do with our patterns at the bottom of each pattern on our site. |
|||||||||||||||||||||||||


With over 40 years in knitting and crochet design, DROPS Design offers one of the most extensive collections of free patterns on the internet - translated to 17 languages. As of today we count 324 catalogs and 12290 patterns - 12280 of which are translated into English (US/in).
We work hard to bring you the best knitting and crochet have to offer, inspiration and advice as well as great quality yarns at incredible prices! Would you like to use our patterns for other than personal use? You can read what you are allowed to do in the Copyright text at the bottom of all our patterns. Happy crafting!
Post a comment to pattern DROPS 199-4
We would love to hear what you have to say about this pattern!
If you want to leave a question, please make sure you select the correct category in the form below, to speed up the answering process. Required fields are marked *.