
Popular categories
Looking for a yarn?


Comments / Questions (11)
![]() Gitte Berg wrote:
Gitte Berg wrote:
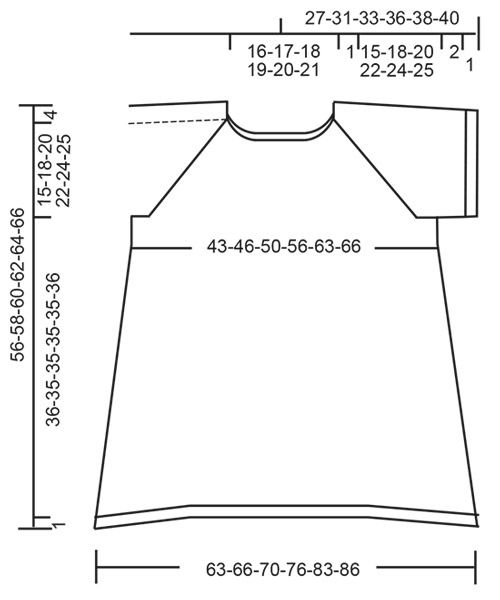
Hvor kan jeg se, hvad brystmålet er på de forskellige størrelser
01.05.2025 - 10:11DROPS Design answered:
Hei Gitte. Scroll deg helt nederst i oppskriften. Der finner du målskissen til toppen med de forskjellige cm målene. mvh DROPS Design
05.05.2025 - 13:59
![]() Bep Bruil wrote:
Bep Bruil wrote:
Beste Hoe kom ik bij de instructie filmpjes?Vriendelijke groet Bep
21.02.2025 - 21:47DROPS Design answered:
Dag Bep,
De instructiefilmpjes die van toepassing zijn op het patroon staan onder de link met de naam 'Video's", welke te vinden is bovenaan rechts naast de foto.
23.02.2025 - 19:27
![]() Evelyne Louaked wrote:
Evelyne Louaked wrote:
Bonsoir,je tricote la taille S du modèle.je suis arrivée à l exécution du dos/devant faut il tricoter A2 sur 60m.a partir du 1er rang du motif ou continuer après la flèche ? Par avance je vous remercie
18.04.2023 - 23:49DROPS Design answered:
Bonjour Mme Louaked, continuez A.2 comme avant, autrement dit, tricotez le rang ajouré suivant après la flèche et quand A.2 est terminé en hauteur, reprenez-le au 1er rang. Bon tricot!
19.04.2023 - 07:59
![]() Céline Francoeur wrote:
Céline Francoeur wrote:
Bonjour j'ai suivi les instructions pour le premier et deuxième tour et j'arrive tel qu'indiqué. par contre au 3ième tour à la fin il reste plus qu'une maille à la fin du tour...j'ai fait tel qu'indiqué et quand j'arrive au dernier A3, il devrait rester une maille à tricoter endroit mais j'en ai plus? Je fais quoi? j'ai fait une endroit, A1 et une autre endroit...Je suis confuse. Merci
03.04.2022 - 14:18DROPS Design answered:
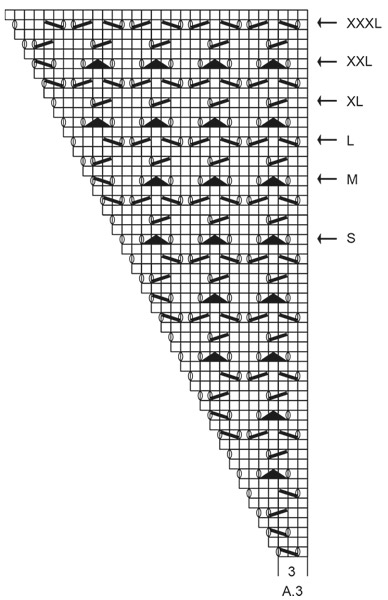
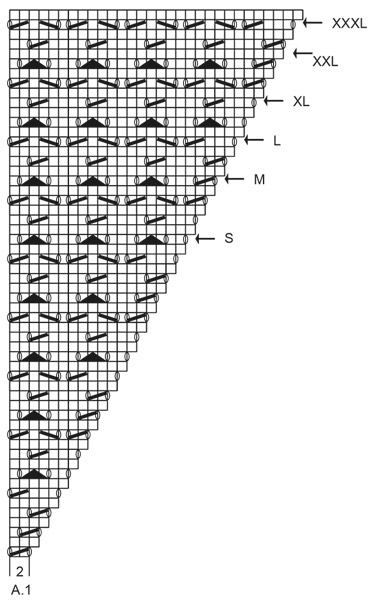
Bonjour Mme Francoeur, difficile de vous dire ce qui s'est passé, essayez de placer des marqueurs pour bien délimiter chaque diagramme sur votre aiguille, ainsi, vous pourrez vérifier le nombre de mailles de A.1 (=3 m après le 1er rang) et de A.3 (= 4 m après le 1er rang) et de A.6 - vous devez toujours avoir 2 mailles endroit entre chaque pièce/partie = mailles des raglans, et vous augmenterez de chaque côté de ces 2 mailles endroit (vous commencez toujours le tour par 1 m endroit et le terminez par 1 m endroit). Bon tricot!
04.04.2022 - 09:58
![]() Maili911 wrote:
Maili911 wrote:
This is a follow up to my previous question. From the point where the last round on the yoke ends to the "front" of the piece, there are only 106 stitches. Pattern states to start body on left side for a total of 113 stitches. If I start first body round at this point, after casting on second underarm stitches, it will run into the "front" of the piece by 7 stitches. Then, all stitches under right arm (14) will be in pattern, while stitches under left arm (14) will be stockinette.
29.03.2021 - 13:58DROPS Design answered:
Dear Maili911, you can cut the yarn and start round as explained so that you will have 113 sts for each back and frpnt piece. Happy knitting!
06.04.2021 - 08:58
![]() Maili911 wrote:
Maili911 wrote:
Yoke final round ends after added cast on stitches on transition between left sleeve and back. Pattern indicates body starts on left side after marking front and back in the middle of added cast on stitches under each sleeve. What do I knit from end of yoke to middle point under left sleeve to start knitting body as per pattern, stockinette?
29.03.2021 - 00:52DROPS Design answered:
Hi Maili, You continue in the round from where you are after casting on the stitches under the left sleeve. The markers are there for when increasing stitches under the sleeve later. Happy knitting!
29.03.2021 - 07:50
![]() Maili911 wrote:
Maili911 wrote:
Yoke final round ends at transition between left sleeve and back. Do I just do plain knitting to get past left sleeve middle marker to start knitting the body as per pattern (on left side)?
29.03.2021 - 00:31DROPS Design answered:
Dear Maili911, last round on yoke end with front piece (= stocking stitch) + the new sts cast on mid under 2nd sleeve, then join in the round and continue as explain under BODY. Happy knitting!
06.04.2021 - 08:40
![]() Lene wrote:
Lene wrote:
Forstår ikke opskriften. Efter at have sat mærker i efter halsen. Skal mønster begynde ved de 13 masker, eller ved omg start? og A2 over de næste 24 masker 4 gange?? som jeg ser det vil det betyde hulmønster over forstokket også, men på billedet er der kun mønster på ærmerne?? skal diagrammerne komme lige efter hinanden eller hvordan?
15.07.2020 - 06:44DROPS Design answered:
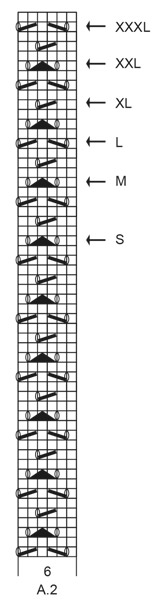
Hej Lene, Du starter ved ærmet og strikker mønsteret A2 over ærmet, A1 og A.3 er selve raglanudtagningerne som strikkes i hver overgang. God fornøjelse!
30.07.2020 - 14:21
![]() Dagmar wrote:
Dagmar wrote:
How come the diagram explanation doesn’t show the stitches, I see blank squares where it should show how to knit stitches together
19.02.2020 - 15:22DROPS Design answered:
Dear Dagmar, this lesson about knitting diagrams should help you to understand how to read diagrams. Happy knitting!
19.02.2020 - 16:14
![]() Rikke wrote:
Rikke wrote:
Hei Jeg strikker i str S, og jeg får ikke første økningene til raglan til å stemme på maskmakørene. Jeg treffer ikke på dem slik oppskriften tilsier. Jeg har en maske for lite. Er det en feil her i oppskriften, eller er det bare jeg sm driver å gjør feil? :)
13.01.2019 - 00:11DROPS Design answered:
Hei Rikke. Du har 88 masker på pinnen, fordelt slik med merker mellom, 31 (bakstykke), 13 (erme), 31 (forstykke), 13 (erme). Du strikker bakstykket slik: 1 rett, A.1 (2 m), A.2 over 24 m, A.3 (3 m), 1 rett (merket sitter etter denne) = 31 m + 2 kast. Ermet strikkes slik: 1 rett, A.1, A.2, A.3, 1 rett (merket sitter etter denne) = 13 m + 2 kast. Forstykket: 1 rett, 1 kast, 29 rett, 1 kast, 1 rett (merket sitter etter denne) = 31 m + 2 kast. Siste erme strikkes som det første. Du har strikket over alle 88 m, og du har også økt 8 masker til raglan. God fornøyelse
16.01.2019 - 11:22
|
||||||||||||||||
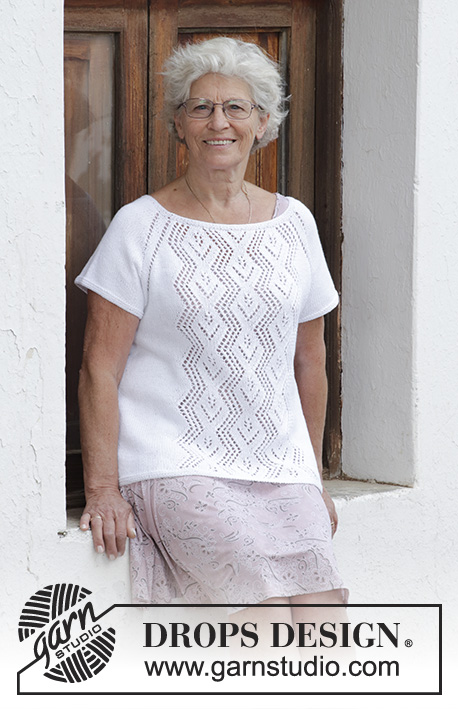
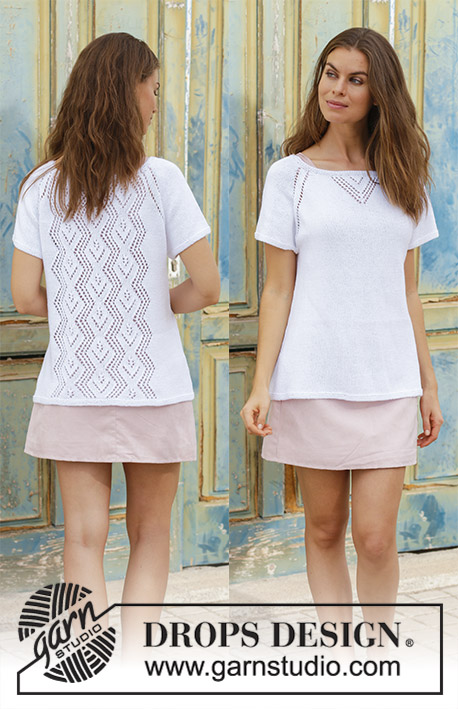
Summer Romance#summerromancetop |
||||||||||||||||
 |
 |
|||||||||||||||
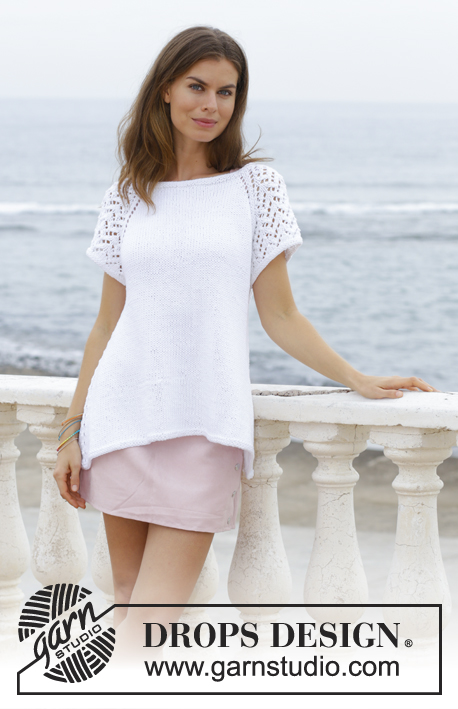
Knitted top with raglan and lace pattern, worked top down. Size: S - XXXL Piece is knitted in DROPS Paris.
DROPS 188-22 |
||||||||||||||||
|
INFORMATION FOR PATTERN: GARTER STITCH (worked in the round): 1 ridge = 2 rounds. Knit 1 round and purl 1 round. PATTERN: See diagrams A.1 to A.3. RAGLAN: Increase 8 stitches on round. On back piece and sleeve the increases are shown in diagrams A.1 and A.3. Increase on front piece as follows: After marker thread: Knit 1, make 1 yarn over. Before marker thread: Work until 1 stitch remain before marker thread, make 1 yarn over, knit 1, marker thread is here. On next round knit the yarn overs to make holes. INCREASE TIP-1 (evenly): To calculate how to increase evenly, use the total number of stitches on row (e.g. 82 stitches) and divide stitches by number of increases to be done (e.g. 6) = 13.7. In this example increase after approx. every 14th stitch. Increase with yarn over after stitch and knit yarn over twisted on next round. INCREASE TIP-2: Work until 1 stitch remains before marker thread, make 1 yarn over, knit 2 (marker thread is in the middle of these 2 stitches), make 1 yarn over. Repeat in the other side (= 4 stitches increased on round). On next round knit the yarn overs to make holes. ---------------------------------------------------------- TOP: Worked in the round on circular needle, top down. Sleeves are worked in the round on double pointed needles. Work lace pattern on sleeves and back piece. Work front piece in stockinette stitch. YOKE: Cast on 82-85-88-92-95-99 stitches on a short circular needle size 4.5 mm / US 7 with Paris. Work 2 ridges in GARTER STITCH - see explanation above. Knit 1 round while increasing 6-3-0-8-17-13 stitches evenly - read INCREASE TIP-1 (evenly) = 88-88-88-100-112-112 stitches. Switch to circular needle size 5 mm / US 8. Now insert 4 marker threads in the piece without working as follows: Insert a marker thread at beginning of round (= in transition between back piece and left sleeve), insert next marker thread after another 31-31-31-37-43-43 stitches, (= back piece), insert a marker thread after another 13 stitches (= right sleeve), insert a marker thread after another 31-31-31-37-43-43 stitches (= front piece), 13 stitches now remain after last marker thread for left sleeve. Work pattern as follows: Knit 1, A.1 (= 2 stitches), A.2 over the next 24-24-24-30-36-36 stitches (= 4-4-4-5-6-6 repetitions of 6 stitches), A.3 (= 3 stitches), knit 2 (marker thread is in the middle of these 2 stitches), A.1 (= 2 stitches), A.2 (= 6 stitches), A.3 (= 3 stitches), knit 2 (marker thread is in the middle of these 2 stitches), make 1 yarn over, knit the next 29-29-29-35-41-41 stitches, make 1 yarn over, knit 2 (marker thread is in the middle of these 2 stitches), A.1 (= 2 stitches), A.2 (= 6 stitches), A.3 (= 3 stitches), knit 1 (marker thread at beginning of round is here). First increase for RAGLAN - see explanation above, is now done. REMEMBER THE GAUGE! Continue pattern in the round and increase every other round 17-20-22-24-26-28 times in total (including the first increase explained above = 224-248-264-292-320-336 stitches. When all increases for raglan are done and round with arrow for your size in A.1 - A.3 has been worked, piece measures approx. 16-19-21-23-25-26 cm / 6¼"-7⅜"-8¼"-9"-9¾"-10¼" from cast-on edge and down mid front on top. Work next round as follows: Work next round in diagram (= knitted round) over the first 65-71-75-85-95-99 stitches, slip the next 47-53-57-61-65-69 stitches on a stitch holder (= sleeve), cast on 8-8-10-10-12-14 new stitches in the side under sleeve, work in stockinette stitch as before over the next 65-71-75-85-95-99 stitches, slip the next 47-53-57-61-65-69 stitches on a stitch holder (= sleeve), cast on 8-8-10-10-12-14 new stitches in the side under sleeve. NOW MEASURE PIECE FROM HERE! BODY: = 146-158-170-190-214-226 stitches. Insert a marker thread in the middle of the new stitches cast-on under sleeves in each side (= 4-4-5-5-6-7 new stitches on each side of marker thread). Begin round in left side and continue pattern in the round as follows: Knit 6-3-6-2-5-2, continue A.2 over the next 60-72-72-90-96-108 stitches (= 10-12-12-15-16-18 repetitions of 6 stitches), knit 7-4-7-3-6-3 (marker thread in the side is here), knit the 73-79-85-95-107-113 stitches on front piece. Continue pattern in the round like this. When piece measures 4 cm / 1½", increase 1 stitch on each side of marker thread in each side - READ INCREASE TIP-2. Increase like this every 4th round 17 times in total = 214-226-238-258-282-294 stitches. AT THE SAME TIME every time 6 new stitches are increased in each side work 2 repetitions more in width on back piece. Then knit the new stitches on front piece. When piece measures 36-35-35-35-35-36 cm / 14⅛"-13 ¾"-13 ¾"-13 ¾"-13 ¾"-14⅛", switch to circular needle size 4.5 mm / US 7. Work 2 ridges. Bind off - make sure that the bind-off edge is not too tight. To avoid a tight bind-off edge you may use a needle ½ needle size larger. Piece measures approx. 56-58-60-62-64-66 cm / 22"-22¾"-23⅝"-24⅜"-25¼"-26" from shoulder and down. SLEEVES: = 47-53-57-61-65-69 stitches. Slip the stitches from stitch holder in one side of piece on double pointed needles size 5 mm / US 8 and pick in addition up 1 stitch in each of the 8-8-10-10-12-14 new stitches cast on under sleeves = 55-61-67-71-77-83 stitches. Begin round mid under sleeve and work pattern in the round as follows: Knit 0-3-0-2-5-2, A.2 9-9-11-11-11-13 times in total (NOTE: Make sure that pattern on sleeve continues as before and to begin on correct round in pattern), knit 1-4-1-3-6-3. Continue in the round like this for 2 cm / ¾". Switch to double pointed needles size 4.5 mm / US 7. Work 2 ridges. Bind off - make sure that the bind-off edge is not too tight. To avoid a tight bind-off edge you may use a needle ½ needle size larger. |
||||||||||||||||
Diagram explanations |
||||||||||||||||
|
||||||||||||||||
 |
||||||||||||||||
 |
||||||||||||||||
 |
||||||||||||||||
 |
||||||||||||||||
Have you finished this pattern?Tag your pictures with #dropspattern #summerromancetop or submit them to the #dropsfan gallery. Do you need help with this pattern?You'll find 25 tutorial videos, a Comments/Questions area and more by visiting the pattern on garnstudio.com. © 1982-2026 DROPS Design A/S. We reserve all rights. This document, including all its sub-sections, has copyrights. Read more about what you can do with our patterns at the bottom of each pattern on our site. |
||||||||||||||||


With over 40 years in knitting and crochet design, DROPS Design offers one of the most extensive collections of free patterns on the internet - translated to 17 languages. As of today we count 325 catalogs and 12298 patterns - 12288 of which are translated into English (US/in).
We work hard to bring you the best knitting and crochet have to offer, inspiration and advice as well as great quality yarns at incredible prices! Would you like to use our patterns for other than personal use? You can read what you are allowed to do in the Copyright text at the bottom of all our patterns. Happy crafting!
Post a comment to pattern DROPS 188-22
We would love to hear what you have to say about this pattern!
If you want to leave a question, please make sure you select the correct category in the form below, to speed up the answering process. Required fields are marked *.