
Looking for a yarn?


Comments / Questions (19)
![]() Bożena wrote:
Bożena wrote:
Gdy zostanie dodana wystarczająca liczba oczek, aby przerobić jeden cały schemat, zostaje jeszcze do wykonania 16-20-24-27-29-32 dodania oczek na reglan – przerabiać te oczka na prawo. Nie bardzo to rozumię. Jeden schemat na wysokość ma12 dodań na reglan , dlaczego zostaje jeszcze 20?Robię rozmiar M. Pozdrawiam Bozena
20.06.2025 - 06:25DROPS Design answered:
Witaj Bożeno, zaczynając schemat nie przerabiałaś w nim 4 oczek z każdej strony. Za każdym kolejnym razem gdy dodajesz oczka na reglan, przerabiasz o 1 oczko więcej w schemacie A.1, od strony reglanu na tyle i przodzie. Gdy zostanie dodana wystarczająca liczba oczek, aby przerobić jeden cały schemat NA SZEROKOŚĆ (po 4 powtórzeniach dodawania na reglan), w rozmiarze M zostaje jeszcze do wykonania 20 powtórzeń z dodawaniem oczek na reglan. Miłej pracy!
20.06.2025 - 08:59
![]() Louise wrote:
Louise wrote:
Modèle 188-16,Diiagramme A1 Transition manche/dos, on demande de tricoter *2end, 1 jeté, 1end. 49 m centrale de A1(Saute 4m de chaque côté du diagramme ( je pense qu\'on ne doit pas les tricoter) Alors si on a enlevé 4 m de ch côté comment peut-on tricoter les 57 mailles du 3e rang.\r\nJe pense qu\'on ne doit pas tenir compte des (2 end, 1jeté, 1end qui se trouvent après les 49m centrale
27.03.2025 - 14:53DROPS Design answered:
Bonjour Louise, vous devez effectivement ne tricoter que les 49 mailles centrales du diagramme jusqu'à ce que vous ayez suffisamment de mailles pour tricoter le motif. Autrement dit, au 3ème rang, vous pourrez tricoter les 51 mailles centrales de A.1, au 5ème rang les 53 m centrales, au 7ème rang les 55 m centrales et au 9ème rang, vous pourrez tricoter les 57 m du diagramme - les augmentations suivantes seront simplement tricotées en jersey, placez un marqueur au début et à la fin de chaque A.1 pour bien repérer où commence le point fantaisie. Bon tricot!
27.03.2025 - 15:56
![]() Connie Bach wrote:
Connie Bach wrote:
Der er ikke fordi jeg ikke forstår diagrammet ! Det er de masker FØR OG EFTER det er galt med, jeg er i tvivl om alle de rk med mønster, skal laves som 1. rk ?
16.04.2024 - 11:32DROPS Design answered:
Hej Connie, alle masker på hver side af diagrammet strikkes i glatstrik. Men for at du skal få mønsteret som på billedet, er du nødt til at følge hver maske ifølge diagrammet. Så pind 3 i diagrammet starter 1 maske tidligere end på pind 1 (og ser lidt anderledes ud), men det kan du jo så selv se når du følger diagrammet :)
16.04.2024 - 11:48
![]() Connie Bach wrote:
Connie Bach wrote:
Ang. starten på diagrammet, så har jeg de to første rk men hvad nu med rk 3 osv Skal man starte de rk med mønster ligesom den første : *2m ret, slå om, strik 8 m ret, strik de midterste 49 m osv Jeg kan simpelthen ikke få 3. rk. til at gå op med det der står i mønstret Den forklaring der er skrevet nedenunder fatter jeg ikke ! Der er jo masker før og efter mønstret !!
16.04.2024 - 08:50DROPS Design answered:
Hej Connie, jo hvis du sætter et mærke på hver side af de 57 masker diagrammet, så skal hver maske strikkes ifølge diagrammet (jeg beskrev starten på række 3 i tidligere svar)
16.04.2024 - 11:19
![]() Connie Bach wrote:
Connie Bach wrote:
Ang. starten på diagrammet, så har jeg de to første rk men hvad nu med rk 3 osv Skal man starte de rk med mønster ligesom den første : *2m ret, slå om, strik 8 m ret, strik de midterste 49 m osv Jeg kan simpelthen ikke få 3. rk. til at gå op med det der står i mønstret
14.04.2024 - 15:53DROPS Design answered:
Hej Connie, jo hvis du sætter et mærke på hver side af de 57 masker som du kan se i selve diagrammet, så strikker du hver maske på hver pind ifølge diagrammet. Det vil sige at på første pind skal du have 5 ret før de første 2r sm. På 3.pind har du 4 ret før de første 2r sm :)
16.04.2024 - 08:03
![]() Cesardig wrote:
Cesardig wrote:
N1casino Finland
29.04.2023 - 16:33
![]() Eva-Lisa Johnsson wrote:
Eva-Lisa Johnsson wrote:
Hej! Jag har börjat på denna top. Ska börja på mönstret,har stickat en omgång av diagrammet-49 maskor,sticka 8 maskor,1 omslag,4 maskor och då ska markören komma mittemellan de fyra m men då har jag 11 maskor kvar till markören….vad gör jag fel?
06.07.2022 - 21:48DROPS Design answered:
Hej Eva-Lisa du har 69 masker på forstykket/bagstykket: Du strikker således imellem mærkerne. Mærke, 2ret, 1omslag, 8ret, 49 A.1, 8ret, 1omslag 2ret, mærke.
07.07.2022 - 08:51
![]() Danuta wrote:
Danuta wrote:
Proszę o dodatkowe wyjaśnienie, czy ażur ma być taki sam z przodu i z tyłu bluzki? Wg zdjęć, wywnioskowalam, że z tyłu powinien być tylko mały fragment na karczku. Natomiast z opisu wynika, że nie, no i brak schematu do tego małego ażuru. Czy ja dobrze rozumiem? Bardziej podoba mi się wersja z małym ażurkiem z tylu. Będę wdzięczna za szybką odpowiedź, gdyż jestem już w trakcie robótki (początek). Danuta
31.05.2022 - 10:50DROPS Design answered:
Witaj Danusiu, na tyle i przodzie jest identyczny ażur. Pozdrawiamy!
31.05.2022 - 13:03
![]() Kerstin wrote:
Kerstin wrote:
Ich habe Probleme mit den Größen. Was Entspricht Damengröße 48?\r\nDanke
24.05.2022 - 10:36DROPS Design answered:
Liebe Kerstin, am besten messen Sie ein ähnliches Top, das Sie gerne tragen und vergleichen Sie alle Maßen mit den in der Skizze - hier lesen Sie mehr. Viel Spaß beim stricken!
24.05.2022 - 13:50
![]() HELENA MATŁOSZ wrote:
HELENA MATŁOSZ wrote:
Chcę wykonać ten top w rozmiarze XL. W schemacie robótki z zaznaczonymi miarami jest pokazane obniżenie dekoltu z przodu o 3 cm, a w opisie wykonania karczku, tyłu/przodu nie znalazłam informacji jak to zrobić. Podane jest łączenie oczek tyłu i przodu (po oddzieleniu oczek na rękawy) po wykonaniu takiej samej ilości rzędów z tyłu i z przodu robótki. Lubię mieć większy dekolt z przodu, a ten top jest piękny. Będę wdzięczna za poradę, pozdrawiam
14.02.2022 - 22:16DROPS Design answered:
Witaj Heleno, aby dekolt tyłu był wyżej, a przodu niżej, musiałabyś wykonać rzędy skrócone ponad oczkami tyłu, stopniowo wydłużając je i kończąc prawie na końcu rękawów. To nie byłoby trudne, gdyby ażur był tylko z przodu. Tutaj ażur mamy na przodzie i na na tyle sweterka, i rzędy skrócone zaburzą wzór. Ja zrobiłabym tył dżersejem i z rzędami skróconymi. Pozdrawiam!
15.02.2022 - 09:34
|
||||||||||||||||
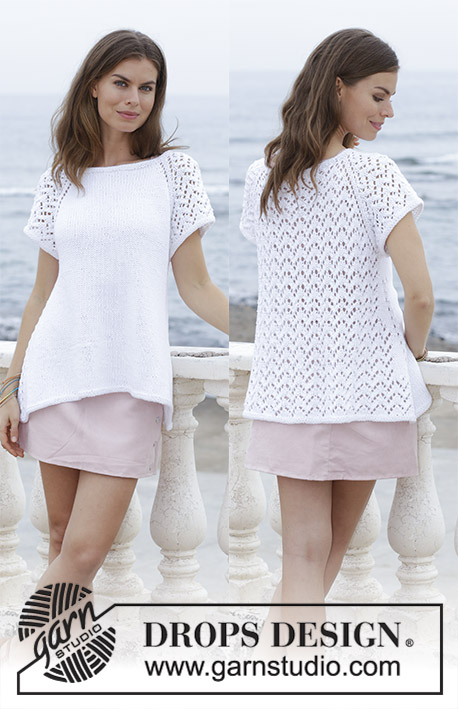
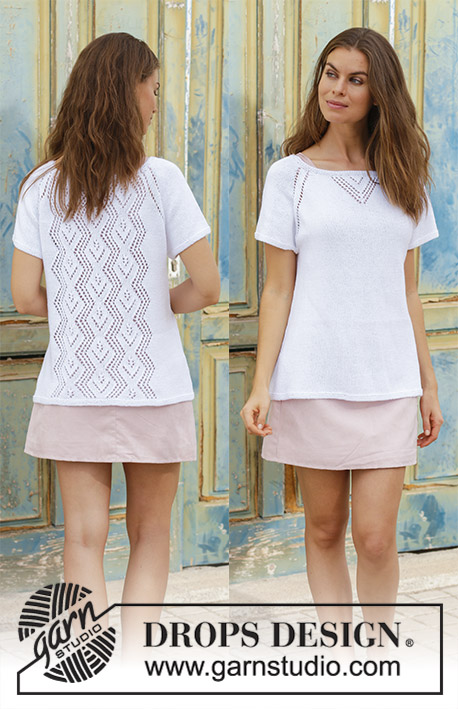
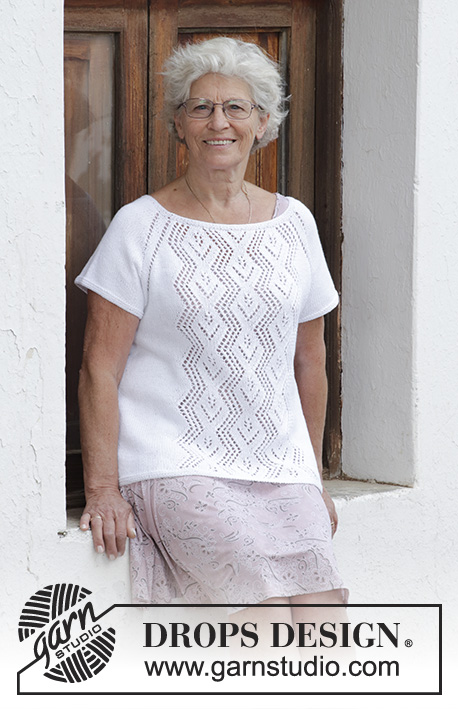
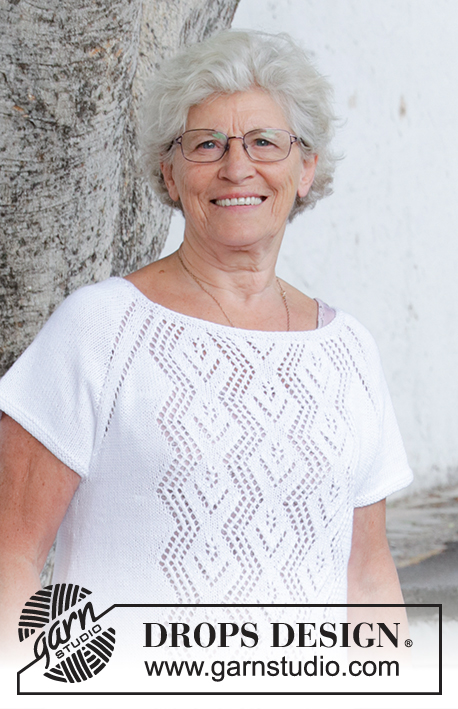
Diamonds in Lace Top#diamondsinlacetop |
||||||||||||||||
 |
 |
|||||||||||||||
Top with lace pattern, raglan and A-shape, knitted top down. Size: S - XXXL Piece is knitted in DROPS Safran.
DROPS 188-16 |
||||||||||||||||
|
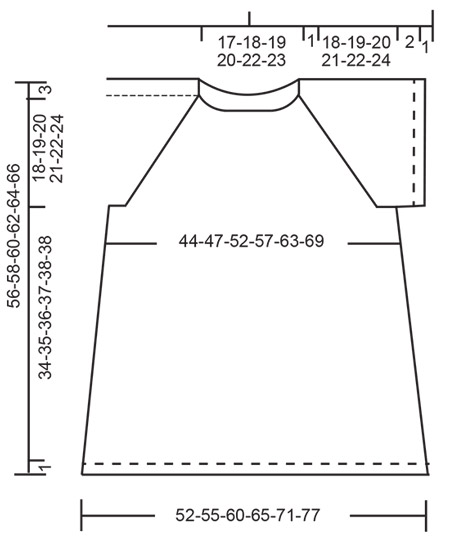
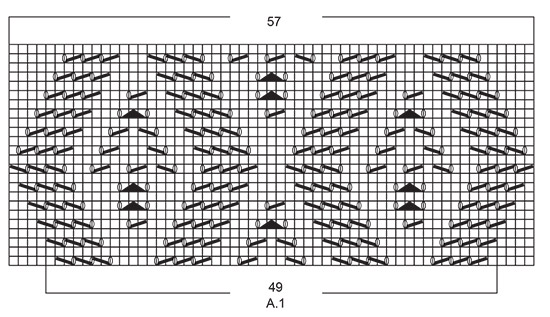
INFORMATION FOR PATTERN: GARTER STITCH (worked in the round): 1 ridge = 2 rounds. Knit 1 round and purl 1 round. INCREASE TIP (evenly): To calculate how to increase evenly, use number of stitches on row (e.g. 110 stitches) and divide number of stitches by number of increases to be done (e.g. 44) = 2.5. In this example increase by making a yarn over after alternately approx. every 2nd and 3rd stitch. On next round work yarn overs twisted to avoid holes. PATTERN: See diagram A.1. Diagrams show all rows in pattern seen from the right side. RAGLAN: Increase in every transition between body and sleeves (= 8 stitches increased on round). Work until 2 stitches remain before marker thread, make 1 yarn over, knit 4 (marker thread is in the middle of these 4 stitches), make 1 yarn over (= 2 stitches increased). On next round knit the yarn overs to make holes. Then knit the new stitches. INCREASE TIP (applies to sides of body): Work until 2 stitches remain before marker thread, make 1 yarn over, knit 4 (marker thread is in the middle of these 4 stitches), make 1 yarn over. Repeat in the other side (= 4 stitches increased on round). On next round knit yarns over twisted to avoid holes. ---------------------------------------------------------- TOP: Worked in the round on circular needle, top down. Sleeves are worked in the round on double pointed needles. YOKE: Cast on 110-115-120-125-130-137 stitches on circular needle size 3 mm / US 2.5 with Safran. Work 3 ridges in GARTER STITCH - see explanation above. Knit 1 round while increasing 44-39-38-41-56-65 stitches evenly - read INCREASE TIP (evenly spaced) = 154-154-158-166-186-202 stitches. Switch to circular needle size 3.5 mm / US 4. Insert 4 marker threads in piece without working as follows: Insert a marker thread at beginning of round (= in transition between sleeve and back piece), insert next marker thread after 53-53-55-59-69-77 stitches, (= back piece), insert next marker thread after another 24 stitches (= sleeve), insert next marker thread after another 53-53-55-59-69-77 stitches (= front piece), 24 stitches (= sleeve) now remain after last marker thread. Round begins in transition between sleeve and back piece. Now work pattern as follows: * Knit 2, make 1 yarn over, knit 0-0-1-3-8-12, work the middle 49 stitches in A.1 (i.e. skip the outermost 4 stitches in each side of diagram), knit 0-0-1-3-8-12 (= back piece/front piece), make 1 yarn over, knit 4 (marker thread is in the middle of these 4 stitches), make 1 yarn over, knit 20 (= sleeve), make 1 yarn over, knit 2 (marker thread is here) *, work from *-* 1 more time. REMEMBER THE KNITTING GAUGE. First increase for RAGLAN - explanation above, is now done (= 8 stitches increased on round). Continue pattern like this and increase every other round 20-24-28-31-33-36 times in total (including first increase explained above) = 314-346-382-414-450-490 stitches. NOTE! For every increase for raglan there is room for one more stitch of pattern A.1 towards raglan lines on back piece and front piece. When enough stitches have been increased to work all stitches in diagrams, 16-20-24-27-29-32 increases remain for raglan – knit these stitches. Repeat diagram A.1 vertically until finished measurements. When all increases are done, the piece should measure 15-17-20-22-23-25 cm / 6"-6¾"-8"-8¾"-9⅛"-9¾" from cast-on edge mid front. Continue without increase for raglan until piece measures 19-20-21-22-23-25 cm / 7½"-8"-8⅜"-8¾"-9⅛"-9¾" from cast-on edge mid front (if the knitting gauge is correct vertically this measurement is already achieved in size XL, XXL, and XXXL). Work next row as follows: Work first 93-101-111-121-135-149 stitches (= back piece), slip the next 64-72-80-86-90-96 stitches on a stitch holder (= sleeve), cast on 8-8-8-10-10-10 new stitches in the side under sleeve, work the next 93-101-111-121-135-149 stitches (= front piece), slip the next 64-72-80-86-90-96 stitches on a stitch holder (= sleeve), cast on 8-8-8-10-10-10 new stitches in the side under sleeve. NOW MEASURE PIECE FROM HERE! BODY: = 202-218-238-262-290-318 stitches. Insert a marker thread in each side, i.e. in the middle of the 8-8-8-10-10-10 new stitches cast on in each side under sleeves (= 101-109-119-131-145-159 stitches on both back and front piece). Continue in the round with pattern A.1 as before and work in stockinette stitch over the remaining stitches on round. When piece measures 4 cm / 1½", increase 2 stitches in each side - read INCREASE TIP. Increase like this approx. every 3-3-3-4-4-4 cm / 1⅛"-1⅛"-1⅛"-1½"-1½"-1½" 9 times in total = 238-254-274-298-326-354 stitches. When piece measures approx. 34-35-36-37-38-38 cm / 13½"-14"-14⅜"-14¾"-15⅛"-15⅛" from division, switch to circular needle size 3 mm / US 2.5. Work 3 ridges. Bind off. To avoid at tight bind-off edge bind off with a larger sized needle. Top measures approx. 56-58-60-62-64-66 cm / 22"-22¾"-23⅝"-24⅜"-25¼"-26" from shoulder and down. SLEEVE: Slip the 64-72-80-86-90-96 stitches from stitch holder in one side of piece on double pointed needles size 3.5 mm / US 4 and pick in addition up 1 stitch in each of the 8-8-8-10-10-10 new stitches cast on under sleeve = 72-80-88-96-100-106 stitches. Insert 1 marker thread in the middle of the 8-8-8-10-10-10 new stitches under sleeve. Begin round here and work in stockinette stitch in the round. When sleeve measures 2 cm / ¾" from division, switch to double pointed needles size 3 mm / US 2.5. Work 3 ridges. Bind off. To avoid at tight bind-off edge bind off with a larger sized needle. Work the other sleeve the same way. |
||||||||||||||||
Diagram explanations |
||||||||||||||||
|
||||||||||||||||
|
||||||||||||||||
|
||||||||||||||||
Have you finished this pattern?Tag your pictures with #dropspattern #diamondsinlacetop or submit them to the #dropsfan gallery. Do you need help with this pattern?You'll find 26 tutorial videos, a Comments/Questions area and more by visiting the pattern on garnstudio.com. © 1982-2025 DROPS Design A/S. We reserve all rights. This document, including all its sub-sections, has copyrights. Read more about what you can do with our patterns at the bottom of each pattern on our site. |
||||||||||||||||


With over 40 years in knitting and crochet design, DROPS Design offers one of the most extensive collections of free patterns on the internet - translated to 17 languages. As of today we count 314 catalogs and 11822 patterns - 11812 of which are translated into English (US/in).
We work hard to bring you the best knitting and crochet have to offer, inspiration and advice as well as great quality yarns at incredible prices! Would you like to use our patterns for other than personal use? You can read what you are allowed to do in the Copyright text at the bottom of all our patterns. Happy crafting!
Post a comment to pattern DROPS 188-16
We would love to hear what you have to say about this pattern!
If you want to leave a question, please make sure you select the correct category in the form below, to speed up the answering process. Required fields are marked *.