
Popular categories
Looking for a yarn?


Comments / Questions (24)
![]() Polini Franca wrote:
Polini Franca wrote:
Buongiorno Drops Design, ho iniziato il cardigan Kyliena Mod n° ai-101 con il filato da voi suggerito Air (stesso colore modello) acquistato in questo sito. Ho stampato le vostre istruzioni ma ho qualche difficoltà. Ho letto che ci sono 7 video tutorial, mi potete indicare come consultarli? Grazie
22.10.2025 - 08:31DROPS Design answered:
Buonasera Franca può trovare i video proprio sotto il titolo, cliccando a destra delle spiegazioni. Buon lavoro!
23.10.2025 - 00:28
![]() Kristen wrote:
Kristen wrote:
Is there a way to print this pattern so that the whole thing shows up in the printout? When I use the print button at the top of the page, it prints the pattern but cuts off 2-3 lines of text at the end of every page.
30.09.2025 - 21:29
![]() Mel wrote:
Mel wrote:
Is this a beginner pattern?
18.06.2025 - 13:07DROPS Design answered:
Hi Mel! It might be too complicated for a beginner. Please review tutorials and videos before beginning.
18.06.2025 - 17:18
![]() Alice wrote:
Alice wrote:
All'inizio della parte destra dice "Poi lavorare come segue – dal rovescio del lavoro: A.3 (= 3 maglie alte), A.2 sulle 81-90-99 maglie alte successive (= 9-10-11 ripetizioni), finire con A.1 (= 3 maglie alte)."... dopo devo continuare A3-A2-A1 oppure invertire, come nella parte sinistra, facendo A1-A2-A3? Grazie
13.09.2024 - 11:41DROPS Design answered:
Buonasera Alice, deve invertire, perchè il lavoro è in piano. Buon lavoro!
17.09.2024 - 20:44
![]() Christel wrote:
Christel wrote:
Je reformule ma question! Vous dites de commencer le rang marqué par une étoile par A3 (donc on est sur l’envers), donc il est impossible de commencer le rang 1 de AX par A1 puisqu’on est sur l’envers à nouveau. Il y a 6 rangs au total en hauteur, on commence sur l’envers donc après un nombre pair de rang on se retrouve forcément sur l’envers à nouveau??? Je ne comprends pas..
18.05.2023 - 10:21DROPS Design answered:
Bonjour Christel, dites-nous si les explications ci-dessous ont pu vous aider - en d'autres termes, les rangs avec les groupes de brides sont des rangs sur l'endroit. et le tout 1er rang des diagrammes (celui après l'étoile) est donc bien un rang sur l'envers, mais A.X commence ensuite (rang 1 de A.X) sur l'endroit. Bon crochet!
19.05.2023 - 08:02
![]() Christel wrote:
Christel wrote:
Côté gauche,, après 18-22cm vous dites de finir un diagramme AX et de continuer sur L’ENDROIT (pour que les emmanchures soient plus fermes..) mais on est OBLIGATOIREMENT sur l’envers quand on finit un AX complet?? Et pourquoi l’étoile sur le premier rang envers, alors que dans le texte descriptif vous dites de faire ce rang?
18.05.2023 - 10:10DROPS Design answered:
Bonjour Christel, le tout premier rang avec l'étoile est le premier rang de brides crocheté au début et se fait sur l'endroit, le 1er rang des diagramme se fait ainsi sur l'envers et A.X commence sur l'endroit pour se terminer sur l'envers. Le 1er rang suivant après A.X sera donc bien un rang sur l'endroit. Bon crochet!
19.05.2023 - 08:00
![]() Lisa wrote:
Lisa wrote:
Buongiorno, segnalo che la scritta: "Kyliena by DROPS Design. Cardigan lavorato ai ferri con motivo traforato" non è corretta in quanto si tratta di un lavoro ad uncinetto.
13.12.2022 - 09:56DROPS Design answered:
Buonasera Lisa, grazie per la segnalazione: abbiamo corretto il testo. Buon lavoro!
14.12.2022 - 21:49
![]() Heike wrote:
Heike wrote:
Laut Beschreibung linker Teil 105 Luftmaschen, dann eine Reihe 87 Stb, dann zweite Reihe 81 Stb. Danach (3.Reihe) gegengleich häkeln d.h. A1,A2 enden mit A3 soll eine Hinreihe sein. Somit ist die Reihe mit Sternchen aber eine Rückreihe? Wenn 1 eine Hinreihe sein soll, dann ist auch die Sternchenreihe eine Hinreihe?
13.09.2022 - 19:51DROPS Design answered:
Liebe Heike, die erste Reihe (= mit dem Sternchen) ist eine Hinreihe (87 Stb), dann häkeln Sie die 1. Reihe von den Diagrammen von der Rückseite (A.3, dann A.2 wiederholen und mit A.1 enden); die 2. Reihe wird dann eine Hinreihe sein (mit A.1 beginnen und mit A.3 enden), usw so daß die 1. Reihe in A.X (=1) ist eine Hinreihe und die letzte Reihe in A.x (= 4) ist eine Rückreihe. Viel Spaß beim häkeln!
14.09.2022 - 09:04
![]() Heike wrote:
Heike wrote:
Wenn A.1 bis A.3 1x in der Höhe gehäkelt ist, ist die letzte Reihe eine Hinreihe und es geht mit einer Rückreihe in A.X weiter, oder? Somit ist die Reihe 1 in A.X eine Rückreihe, also damit das Muster passt links im Diagramm starten und nicht bei der 1, oder? Die Beschreibung mit Hin und Rückreihe verwirrt. Nach den 21 Stb wieder am Anfang der Reihe anfangen, aber dann geht der Luftmaschenbogen über das letzte Stb und dieses hat keinen Halt nach oben???
12.09.2022 - 18:30DROPS Design answered:
Liebe Heike, die 1. Reihe in A.1-A.3 ist eine Rückreihe (die nach der mit dem Sternchen), so wird die lezte Reihe eine Hinreihe sein, dann wiederholen Sie nur A.X von Reihe 1 bis 4. Nach der Hinreihe mit den 21 Stäbchen wird der Faden abgeschnitten und dann wieder Diagramme wie zuvor häkeln, und mit einer Hinreihe anfangen. Viel Spaß beim häkeln!
13.09.2022 - 09:31
![]() Lydia wrote:
Lydia wrote:
Few questions on left piece: "Cut the strand and start from the beginning of the row again - from the right side and from the first row in A.X": What exactly does this mean? Does it mean right above the 21 dc I just did previously? "Work A.1, work A.5 over the next 18 dc...": Same question as above. Also, does A.5 include dc, or is that just mentioning the one I should have done by then? Thank you in advance!
27.02.2021 - 17:14DROPS Design answered:
Dear Lydia, to make the top of armhole somewhat firmer, you will now work one extra row over the first 21 stitches towards armhole; cut the yarn after 18-20-22 cm (make sure to have finished a complet repeat of A.x in height), then work 21 sts from RS (A.4 shows how to crochet the dc over the lace pattern); cut the yarn. Now start from RS again and work the armhole on next row. Remember the row with a star shouldn't be worked, it only shows how to crochet the next row in the stitches from previous row (see diagram key to the star). Happy crocheting!
01.03.2021 - 08:30
|
|||||||||||||||||||||||||||||||
Kyliena#kylienajacket |
|||||||||||||||||||||||||||||||
 |
 |
||||||||||||||||||||||||||||||
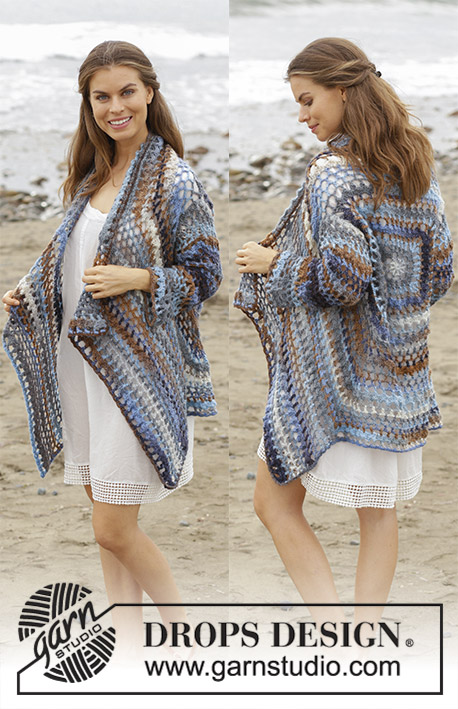
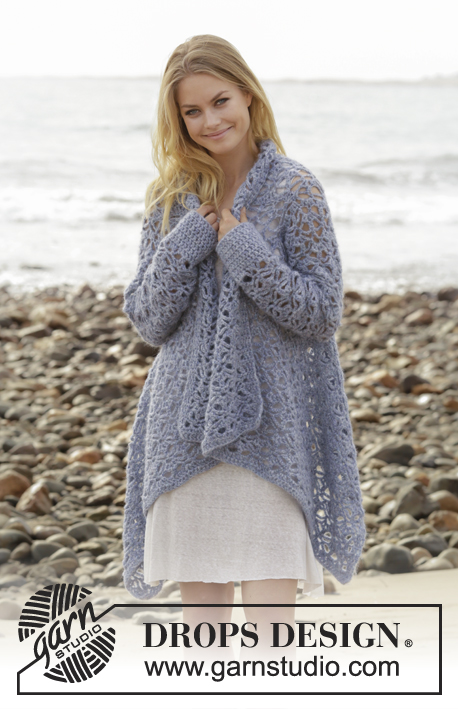
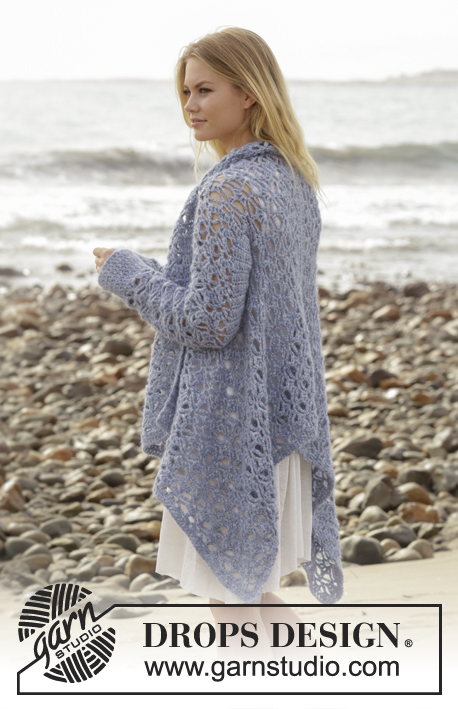
Crocheted jacket with lace pattern. Sizes S - XXXL. The piece is worked in DROPS Air.
DROPS 186-33 |
|||||||||||||||||||||||||||||||
|
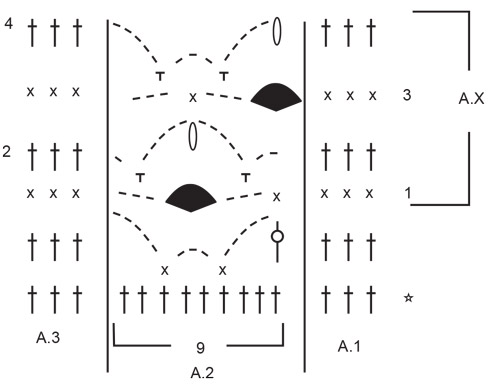
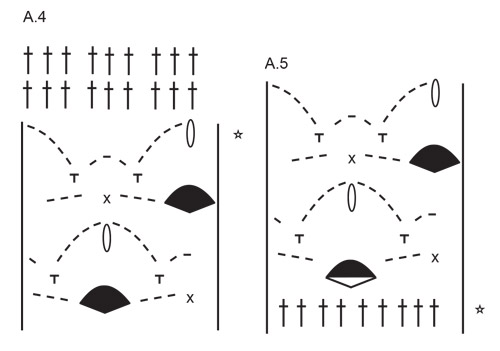
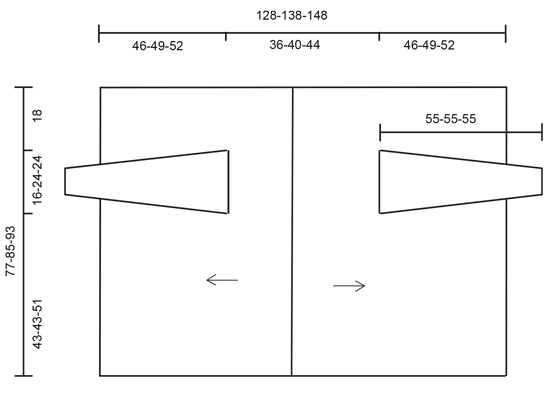
INFORMATION FOR THE PATTERN: PATTERN: See diagrams A.1 to A.5. CROCHET INFO: The first double crochet at the beginning of the row/round is replaced by 3 chain stitches. The round finishes with 1 slip stitch in the 3rd chain stitch at beginning of row/round. The first single crochet at the beginning of a row is replaced by 1 chain stitch. DECREASE TIP: Decrease 1 double crochet by working the next 2 double crochets together as follows: Work 1 double crochet, but wait with the last yarn over and pull through (= 2 stitches on hook), then work the next double crochet but when working the last pull through, pull the strand through all 3 stitches on the hook (= 1 double crochet decreased). ---------------------------------------------------------- JACKET: The piece is worked in 2 parts which are sewn together mid back. Work back and forth, from mid back and out to the sides. The sleeves are worked in the round, top down. LEFT PIECE: Work 105-116-127 chain stitches with hook size 6 mm / J/10 and Air. Turn and work 1 double crochet in the 4th chain stitch from the hook (= 2 double crochets), work 1 double crochet in each of the next 5-4-3 chain stitches, * skip the next chain stitch, work 1 double crochet in each of the next 5 chain stitches *, repeat from *-* to end of row = 87-96-105 double crochets. READ CROCHET INFO! Then work as follows – from the wrong side: A.3 (= 3 double crochets), A.2 (= 9 double crochets) over the next 81-90-99 double crochets (= 9-10-11 repeats), finish with A.1 (= 3 double crochets). On the next row (= from the right side) work in reverse, i.e. work A.1, A.2 and finish with A.3. When A.1 to A.3 has been worked 1 time in height, repeat rows 1 - 4 upwards (= A.X). Continue until the piece measures approx. 18-20-22 cm / 7"-8"-8¾"; adjust to after a complete repeat of A.X. Then work as follows – from the right side: So that the jacket is firmer over the armhole, you need to work an extra row of double crochets just over the first stitches on the jacket (= collar). Work A.1 + 18 double crochets over the first 2 repeats of A.2 (see A.4 for how to work double crochets over A.2) = 21 double crochets. Cut the strand and start from the beginning of the row again – from the right side and from the first row in A.X. Work A.1, work A.5 over the next 18 double crochets (= 2 repeats of 9 stitches), work 18-27-27 chain stitches and skip the next 2-3-3 repeats of A.2, work to end of row as before (i.e. 5-5-6 repeats of A.2 and A.3). On the next row (= row 2 in A.X) work 2-3-3 repeats of A.2 around the 18-27-27 new chain stitches. When A.5 has been worked 1 time in height, work A.2 as before over these stitches. Continue until the piece measures approx. 61-66-71 cm / 24"-26"-28"; adjust to after a complete repeat of A.X. Then work as follows: A.1, double crochets over the 9-10-11 repeats of A.2 (see A.4), finish with A.3 = 87-96-105 double crochets. Work a total of 2 rows of double crochets as shown in A.4, cut and fasten the strand. RIGHT PIECE: Work 105-116-127 chain stitches with hook size 6 mm / J/10 and Air. Turn and work 1 double crochet in the 4th chain stitch from the hook (= 2 double crochets), work 1 double crochet in each of the next 5-4-3 chain stitches, * skip the next chain stitch, work 1 double crochet in each of the next 5 chain stitches *, repeat from *-* to end of row = 87-96-105 double crochets. Then work as follows - from the wrong side: A.3 (= 3 double crochets), A.2 over the next 81-90-99 double crochets (= 9-10-11 repeats), finish with A.1 (= 3 double crochets). When A.1 to A.3 have been worked 1 time in height, repeat rows 1 to 4 upwards (= A.X). Continue until the piece measures approx. 18-20-22 cm / 7"-8"-8¾"; adjust to after a complete repeat of A.X. Then work as follows – from the right side: So that the jacket is firmer over the armhole, you need to work an extra row of double crochets just over the last stitches on the jacket (= collar - this will be at the top of the jacket when the parts are sewn together). Cut the strand. Skip A.1 and the first 7-8-9 repeats of A.2, work 18 double crochets over the last 2 repeats of A.2 and finish with A.3 (see A.4 for how to work double crochets over A.2) = 21 double crochets. Cut the strand and start from the beginning of the row again – from the right side and the first row in A.X. Work A.1, work the first 5-5-6 repeats of A.2, work 18-27-27 chain stitches and skip the next 2-3-3 repeats of A.2, work A.5 over the next 18 double crochets, finish with A.3. On the next row (= row 2 in A.X) work 2-3-3 repeats of A.2 around the 18-27-27 new chain stitches. When A.5 has been worked 1 time in height, work A.2 as before over these stitches. Continue until the piece measures approx. 61-66-71 cm / 24"-26"-28"; adjust to after a complete repeat of A.X. Then work as follows: A.1, A.4 over the 9-10-11 repeats of A.2, finish with A.3 = 87-96-105 double crochets. Work a total of 2 rows of double crochets as shown in A.4, cut and fasten the strand. ASSEMBLY: Sew the jacket together mid back. SLEEVES: Work the sleeve in the round as follows – start mid under the sleeve: 1 single crochet, *4 chain stitches, skip 2 cm / ¾", 1 single crochet, *, repeat from *-* around the whole armhole, finish with a slip stitch in the first single crochet = approx. 12-18-18 chain-spaces. Then work 45-64-64 double crochets evenly spaced around the chain-spaces (work 3 or 4 double crochets around each space). Then work as follows – from mid under sleeve: A.1 (=double crochets) over the first 9-14-14 double crochets, A.2 over the next 27-36-36 double crochets, A.3 (=double crochets) over the last 9-14-14 double crochets. REMEMBER THE CROCHET INFO! Insert 1 marker thread mid under sleeve; the piece is now measured from here. Continue this pattern. When the piece measures 4 cm / 1½" decrease 1 double crochet on each side of the marker thread – read DECREASE TIP. Decrease every 5-3½-3½ cm / 2"-1¼"-1¼" a total of 9-14-14 times. After all the decreases there are 27-36-36 double crochets left on the round, now work double crochets over all stitches (see A.4). Continue until the piece measures 55-55-55 cm / 21½"-21½"-21½", cut and fasten the strand. Work the other sleeve in the same way. |
|||||||||||||||||||||||||||||||
Diagram explanations |
|||||||||||||||||||||||||||||||
|
|||||||||||||||||||||||||||||||
 |
|||||||||||||||||||||||||||||||
 |
|||||||||||||||||||||||||||||||
 |
|||||||||||||||||||||||||||||||
Have you finished this pattern?Tag your pictures with #dropspattern #kylienajacket or submit them to the #dropsfan gallery. Do you need help with this pattern?You'll find 7 tutorial videos, a Comments/Questions area and more by visiting the pattern on garnstudio.com. © 1982-2026 DROPS Design A/S. We reserve all rights. This document, including all its sub-sections, has copyrights. Read more about what you can do with our patterns at the bottom of each pattern on our site. |
|||||||||||||||||||||||||||||||


With over 40 years in knitting and crochet design, DROPS Design offers one of the most extensive collections of free patterns on the internet - translated to 17 languages. As of today we count 325 catalogs and 12298 patterns - 12288 of which are translated into English (US/in).
We work hard to bring you the best knitting and crochet have to offer, inspiration and advice as well as great quality yarns at incredible prices! Would you like to use our patterns for other than personal use? You can read what you are allowed to do in the Copyright text at the bottom of all our patterns. Happy crafting!
Post a comment to pattern DROPS 186-33
We would love to hear what you have to say about this pattern!
If you want to leave a question, please make sure you select the correct category in the form below, to speed up the answering process. Required fields are marked *.