
Popular categories
Looking for a yarn?


Comments / Questions (35)
![]() Rianne wrote:
Rianne wrote:
Ik heb vorig jaar deze jurk gebreid en draag hem met veel plezier!
30.07.2019 - 15:46
![]() Line Vesterheim wrote:
Line Vesterheim wrote:
Sitter å strikker på str XL og får ikke delingen til bol og armer til å stemme med maskeantallet😏 Når det deles inn på begynnelsen er det 34 til for og bakstykke og 20 til armene. Etter 22 økninger skal det være 78 til for og bakstykke og 64 til ermer. Hvordan skal jeg da kunne sette 82 til for og bakstykke og 60 til ermer??? Får ikke det regnestykket til å gå opp😔
22.07.2019 - 02:56DROPS Design answered:
Hej. Det är för att några av maskorna från raglanökningarna nu räknas till fram- och bakstycke istället för till ärmarna. Om du bara följer oppskriften så blir det riktigt. Lycka till!
22.08.2019 - 09:47
![]() Mercedes Palacios Gil wrote:
Mercedes Palacios Gil wrote:
Buenos días , no entiendo el empiece del vestido , no está detallado el cambio de color , no me encaja con el dibujo me lo podrían explicar? Gracias
09.06.2019 - 06:39DROPS Design answered:
Hola Mercedes. El vestido se trabaja de arriba abajo. La cenefa del escote se trabaja con dark wash ( un total de 5 vueltas). Cuando comenzamos el canesú, cambiamos el color según el apartado RAYAS DEL CANESÚ.
09.06.2019 - 22:30
![]() Andrea wrote:
Andrea wrote:
Hvor mange garn bør jeg kjøpe hvis jeg skal erstatte med: baby merino, 50g, 3tråder? Kalkulatoren hadde ikke svar. På forhånd takk:-)
20.05.2019 - 10:56DROPS Design answered:
Hei Andrea. Du trenger kun 2 tråder med Baby Merino for å oppnå samme strikkefasthet som Paris. Det er omtrent 8 meter mer garn på 50 g Baby Merino enn 50 g Alpaca - Alpaca står oppgitt i garnkalkulatoren. Dvs om du kjøper like mange gram som det står du trenger i Alpaca vil du hvertfal ha nok. Om du vil regne ut nøyaktig hvor mange gram du trenger kan du bruke fremgangsmåten her. OBS: merino er velig elastisk og trekkes fort ut av fasong. En kjole er et relativt tungt plagg, så det er sannsynlig at merino vil strekke seg en del i dette plagget. God fornøyelse
20.05.2019 - 14:07
![]() Sabine Thomas wrote:
Sabine Thomas wrote:
Hallo! Nach der Teilung soll nach den 3 Abnahmen nach 16 cm 28x zunehmen u. gleichzeitig nach 43-44-43-44-43-43 cm schon die Seitenschlitze beginnen...diese sollen lt. Diagramm in Gr M 18 cm lang sein. Wie komme ich dann auf eine Geamtlänge von 86 cm (Gr. M)??? Vielen Dank für die Antwort und herzlichen Dank für die ansonsten tollen Anleitungen!!!!
29.10.2018 - 21:45DROPS Design answered:
Liebe Frau Thomas, die 86 cm Gesamtlänge sind so verteilt: 6 cm Schulter + 18 cm Passe + 44 cm Rumpfteil (= mit Ab- dann Zunahmen) + 18 Schlitz = 86 cm. Viel Spaß beim stricken!
30.10.2018 - 08:37
![]() Heike wrote:
Heike wrote:
Hallo, ich soll an jeder Seite des kleides 28 x zunehmen. Das heißt ich habe 4 x 14 zunahmen, oder? Also an jeder Seite insgesamt 28 x. ???
31.08.2018 - 10:51DROPS Design answered:
Liebe Heike, Sie nehmen in 28 Runden/Reihen jeweils 4 Maschen zu, d.h. an beiden Seiten des Kleides jeweils 2 Maschen. Insgesamt nehmen Sie also 112 Maschen zu. Gutes Gelingen weiterhin!
31.08.2018 - 11:53
![]() Sandra wrote:
Sandra wrote:
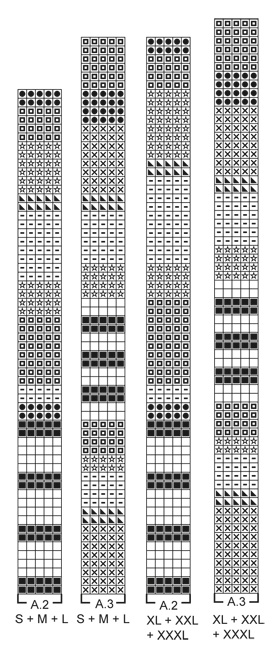
Werden im Muster A2 und A3 alle Reihen oder nur jede 2. Reihe angezeigt?
08.08.2018 - 07:19DROPS Design answered:
Liebe Sandra, in jedem Diagram steht 1 Kästchen für 1 Maschen und 1 Reihe = alle Reihe sind im Diagram gezeichnet. Viel Spaß beim stricken!
08.08.2018 - 08:31
![]() Line Due wrote:
Line Due wrote:
Er lige startet på opskriften, og nået til striber. Men diagram og billed passer ikke sammen i forhold til farver eller omgange?
16.05.2018 - 17:20DROPS Design answered:
Hej Line, du du starter med Striber bærestykke som du finder øverst i opskriften: STRIBER BÆRESTYKKE: Striberne strikkes i glatstrik således: 2-2-2-2-2-2 omgange sennep, 5-6-6-8-8-9 omgange lys isblå, 2-4-4-4-6-6 omgange mørk gammelrosa, 5-6-6-8-8-9 omgange lyng, 2-2-2-2-2-2 omgange sennep, 10-12-14-14-14-16 omgange koral, 2-2-2-2-2-2 omgange støvrosa, ca 4-4-6-6-8-8 omgange mørk gammelrosa, dvs strik glatstrik med mørk gammelrosa til bærestykket er strikket færdig, derefter strikkes A.2 og A.3 som forklaret i opskriften. God fornøjelse!
17.05.2018 - 14:50
![]() Marchal Christina wrote:
Marchal Christina wrote:
Bonjour, pourriez vous, dans l'explication, précisez qu'il faut tricoter l'ensemble au jersey. J'ai tricoté pendant longtemps au point mousse sans m'apercevoir que le modèle était au jersey. Pour les prochains utilisateurs, peut être que ça peut les aider. Merci
16.04.2018 - 19:23
![]() Ulrike wrote:
Ulrike wrote:
Ich bin etwas enttäuscht. Habe nach Anleitung die Wolle bestellt. Nun komme ich mit der Farbe 60 nicht bis zum Ende und müsste nachbestellen. Dafür habe ich von Senf und Eisblau je ein Knäuel übrig.
27.03.2018 - 17:37
|
||||||||||||||||||||||||||||||||||
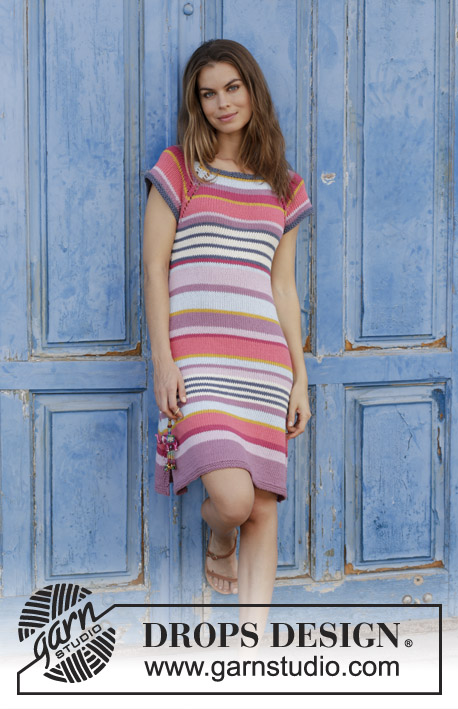
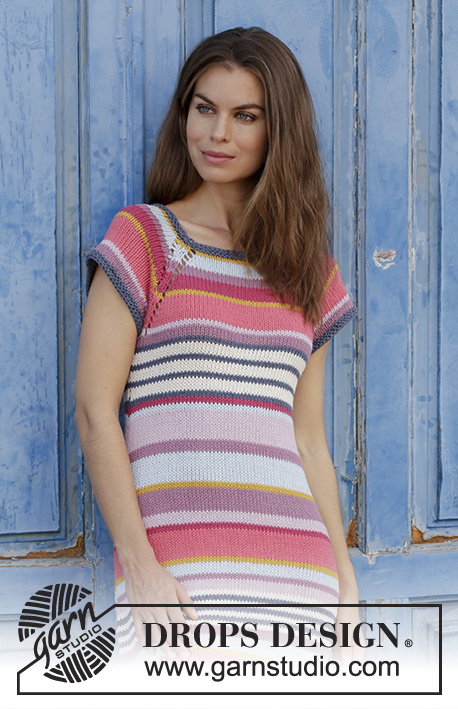
Verona#veronadress |
||||||||||||||||||||||||||||||||||
 |
 |
|||||||||||||||||||||||||||||||||
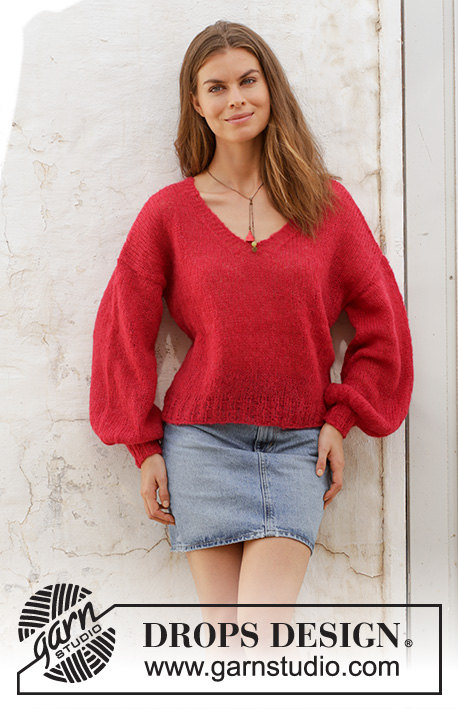
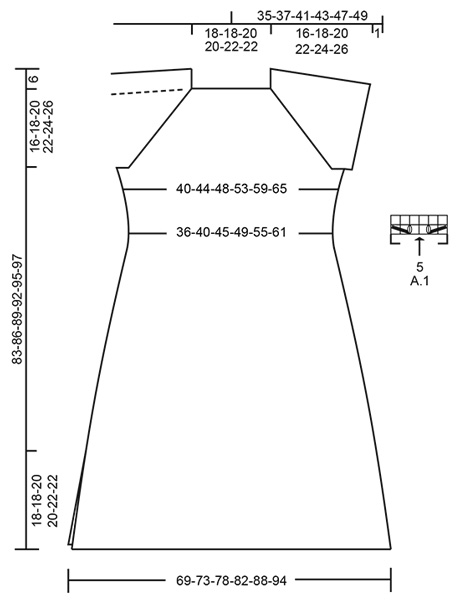
Dress with stripes, raglan and vent in the sides, worked top down. Size: S - XXXL Piece is knitted in DROPS Paris.
DROPS 187-1 |
||||||||||||||||||||||||||||||||||
|
INFORMATION FOR PATTERN: GARTER STITCH (worked in the round): 1 ridge = 2 rounds. Knit 1 round and purl 1 round. GARTER STITCH (back and forth): 1 ridge = knit 2 rows. INCREASE TIP-1 (applies to yoke): To calculate how to increase evenly, use the total number of stitches on row (e.g. 88 stitches) and divide stitches by number of increases to be done (e.g. 12) = 7.3. In this example increase after approx. every 7th stitch by making 1 yarn over. On next round knit yarn overs twisted to avoid holes. PATTERN (applies to raglan): See diagram A.1. STRIPES YOKE: The stripes are worked in stockinette as follows: 2-2-2-2-2-2 rounds mustard, 5-6-6-8-8-9 rounds light ice blue, 2-4-4-4-6-6 rounds dark old pink, 5-6-6-8-8-9 rounds heather, 2-2-2-2-2-2 rounds mustard, 10-12-14-14-14-16 rounds raspberry, 2-2-2-2-2-2 rounds powder pink, approx. 4-4-6-6-8-8 rounds in dark old pink, i.e. work stockinette with dark old pink until yoke is done, then work A.2 and A.3 as explained in pattern. STRIPES BODY: See diagrams A.2 and A.3. Choose diagram for your size. The stripes are worked in stockinette. RAGLAN: Increase for raglan on each side of the 4 marker threads as follows: Work until 1 stitch remain before marker thread, make 1 yarn over, knit 2 (marker thread is in the middle of these 2 stitches), make 1 yarn over (= 2 stitches increased). On next round knit the yarn overs to make holes. DECREASE TIP (applies to sides of dress): Begin 5 stitches before marker and knit 2 together, knit 6 (marker thread is in the middle of these 6 stitches), slip 1 stitch knitwise, knit 1, pass slipped stitch over stitch worked (= 2 stitches decreased). INCREASE TIP-2 (applies to sides of dress): Begin 3 stitches before marker thread, make 1 yarn over, knit 6, 1 yarn over (= 2 stitches increased). On next round work yarn overs twisted to avoid holes. ---------------------------------------------------------- DRESS: Worked in the round on circular needle, top down until vent begins. Then finish front and back piece back and forth separately until finished measurements. Work sleeve edges in the round on double pointed needles. NECK EDGE: Cast on 88-88-96-96-102-102 stitches on a short circular needle size 4 mm / US 6 with dark wash. Work 2 ridges in GARTER STITCH in the round - see explanation above. Switch to circular needle size 5 mm / US 8. Knit 1 round while increasing 12-12-12-12-14-14 stitches evenly - read INCREASE TIP-1 = 100-100-108-108-116-116 stitches. Insert 4 marker threads for raglan in the piece as follows: Insert first marker thread after the first 15-15-17-17-19-19 stitches (= ½ back piece), insert 2nd marker thread after the next 20 stitches (= sleeve), insert third marker thread after the next 30-30-34-34-38-38 stitches (= front piece), and insert fourth marker thread after the next 20 stitches (= sleeve), 15-15-17-17-19-19 stitches remain on round after last marker. Then work yoke as explained below. YOKE: Work STRIPES YOKE - see explanation above. AT THE SAME TIME on next round increase for RAGLAN – see explanation above, on each side of the 4 marker threads (= 8 stitches increased). Increase like this every other round 14-17-18-22-23-26 times in total. REMEMBER THE GAUGE! After last increase there are 212-236-252-284-300-324 stitches on needle. Continue with stripes yoke without increasing for raglan but to avoid breaking the lace edges along each raglan line when increase is no longer done, work A.1 in every transition between body and sleeve edges (arrow in A.1 marks marker thread in raglan line). When piece measures 16-18-20-22-24-26 cm /6¼"-7"-8"-8¾"-9½"-10¼" from cast-on edge mid front, divide piece for body and sleeves. Work with dark old pink as follows: Work the first 31-34-37-41-45-49 stitches (= ½ back piece), slip the next 44-50-52-60-60-64 stitches on 1 stitch holder for sleeve, cast on 6-6-8-8-10-12 stitches on needle (= in the side under sleeve), work the next 62-68-74-82-90-98 stitches (= front piece), insert the next 44-50-52-60-60-64 stitches on 1 stitch holder for sleeve, cast on 6-6-8-8-10-12 stitches on needle (= in the side under sleeve) and work the remaining 31-34-37-41-45-49 stitches (= ½ back piece). Cut the yarn. Finish body and sleeve edges separately. NOW MEASURE THE PIECE FROM HERE! BODY: = 136-148-164-180-200-220 stitches. Insert 1 marker in the middle of the 6-6-8-8-10-12 stitches cast on in each side = 68-74-82-90-100-110 stitches between marker threads. Begin round at the marker thread in the right side of piece (when garment is worn). Work A.2 in the round. When A.2 has been worked, work A.3, then work in stockinette with dark old pink until finished measurements. AT THE SAME TIME when piece measures 2 cm / ¾" from division, decrease 2 stitches in each side - read DECREASE TIP (= 4 stitches decreased). Decrease like this every 2 cm / ¾" 3 times in total in each side = 124-136-152-168-188-208 stitches. When piece measures 16 cm / 6¼" from division, increase 2 stitches in each side - read INCREASE TIP-2 (= 4 stitches increased). Increase like this every 1½ cm / ½" 28 times in total in each side. AT THE SAME TIME when piece measures 43-44-43-44-43-43 cm / 17"-17¼"-17"-17¼"-17"-17", divide piece at both marker threads and finish front and back piece separately. Leave the stitches on back piece on the needle or slip them on 1 stitch holder. Continue with stockinette stitch and stripes as before but work the 3 edge stitches in each side in GARTER STITCH - see explanation above. NOTE! When dividing for vent in each side, increases will still remain in each side but now increase inside the 3 edge stitches in garter stitch in each side. After last increase there are 118-124-132-140-150-160 stitches on needle. Work with dark old pink until piece measures approx. 81-84-87-90-93-95 cm / 32"-33"-34¼"-35"-36⅝"-37⅜" from shoulder. Work 3 ridges back and forth over all stitches and bind off by knitting from right side. Work back piece the same way. SLEEVE EDGE: Slip the 44-50-52-60-60-64 stitches from stitch holder in one side of piece on double pointed needles size 4 mm / US 6 and pick in addition up 1 stitch in each of the 6-6-8-8-10-12 new stitches cast on under sleeve = 50-56-60-68-70-76 stitches. Work 2 ridges in the round with dark wash and bind off by knitting. Work the other sleeve edge the same way. |
||||||||||||||||||||||||||||||||||
Diagram explanations |
||||||||||||||||||||||||||||||||||
|
||||||||||||||||||||||||||||||||||
 |
||||||||||||||||||||||||||||||||||
 |
||||||||||||||||||||||||||||||||||
Have you finished this pattern?Tag your pictures with #dropspattern #veronadress or submit them to the #dropsfan gallery. Do you need help with this pattern?You'll find 28 tutorial videos, a Comments/Questions area and more by visiting the pattern on garnstudio.com. © 1982-2026 DROPS Design A/S. We reserve all rights. This document, including all its sub-sections, has copyrights. Read more about what you can do with our patterns at the bottom of each pattern on our site. |
||||||||||||||||||||||||||||||||||


With over 40 years in knitting and crochet design, DROPS Design offers one of the most extensive collections of free patterns on the internet - translated to 17 languages. As of today we count 325 catalogs and 12298 patterns - 12288 of which are translated into English (US/in).
We work hard to bring you the best knitting and crochet have to offer, inspiration and advice as well as great quality yarns at incredible prices! Would you like to use our patterns for other than personal use? You can read what you are allowed to do in the Copyright text at the bottom of all our patterns. Happy crafting!
Post a comment to pattern DROPS 187-1
We would love to hear what you have to say about this pattern!
If you want to leave a question, please make sure you select the correct category in the form below, to speed up the answering process. Required fields are marked *.