
Popular categories
Looking for a yarn?


Comments / Questions (17)
![]() Grethe Hebo Jensen wrote:
Grethe Hebo Jensen wrote:
Hvilket garn kan jeg anvende til drops 65-7 da det foreslåede er udgået ?? hilsen Grethe
17.01.2022 - 17:03
![]() Carina wrote:
Carina wrote:
Hola. Cuando dice "cerrar 3 pts al inicio de cada fila 5 vcs" no se disminuyen en total 15 pts? No lo entiendo bien. Gracias por la respuesta
14.04.2021 - 00:48DROPS Design answered:
Hola Carina. Cerrando 3 puntos al inicio de cada fila y repitiendo 5 veces tenemos un total de 30 puntos cerrados. 15 puntos al inicio de la fila por el lado derecho y 15 puntos al inicio de la fila por el lado revés.
24.04.2021 - 20:27
![]() Jojanneke wrote:
Jojanneke wrote:
Hallo, zou je dit patroon ook met een Belle garen kunnen breien? Die staat nl niet bij de garenvervangers maar zit wel in dezelfde categorie B.
29.06.2020 - 22:42DROPS Design answered:
Dag Jojanneke,
Ja, deze zou je inderdaad ook prima met Belle kunnen breien. Maak wel even een proeflapje om te controleren of de stekenverhouding overeenkomt.
30.06.2020 - 15:49
![]() Noemi wrote:
Noemi wrote:
I do not understand the instruction: After 6 rows inc 1 st at each side 3 times every 6th row. Please explain '3 times every 6th row'. Thank you!
19.05.2020 - 05:35DROPS Design answered:
Dear Noemi, after these first 6 rows increase 1 stitch on each side of next row, work 5 rows without increasing - repeat these 6 rows one more time, and increase 1 stitch on each side on next row = you have now icnreased 3 sts on each side (6 more sts on needle). Happy knitting!
19.05.2020 - 07:57
![]() Elisa wrote:
Elisa wrote:
Buongiorno! Innanzitutto vi ringrazio per i vostri bellissimi modelli. Sono alle prime armi con i ferri e mi trovo a questo punto: Diminuire ora da ciascun lato prima / dopo le 2 m vivagno ogni 2 ferri, come segue: 2 m 5 volte, 1 m 27-31-35-39 volte. Devo contare 2 diminuzioni su ogni ferro dritto (5 dim= 2 ferri e mezzo), oppure devo considerare il ferro (5 dim= 5 ferri)? Sembrerà un dubbio banale, ma non riesco a uscirne. Grazie in anticipo!
17.04.2020 - 13:26DROPS Design answered:
Buongiorno Elisa. Deve diminuire un ferro sì, un ferro no. Quindi Ferro1 (diritto del lavoro): diminuisce 2 maglie dopo le 2 m vivagno all'inizio e 2 m prima delle 2 m vivagno alla fine. Ferro 2 (sul rovescio del lavoro): nessuna diminuzione. Ferro 3: come il ferro 1. Ferro 4: come il ferro 2 e così via. Buon lavoro! Buon lavoro!
17.04.2020 - 14:18
![]() Hillevi wrote:
Hillevi wrote:
Hej! Jag är nybörjare och vad jag förstår gör man en hålkant med hjälp av omslag. Vad jag däremot inte förstår är hur man ska göra därefter eftersom man får fler maskor på nästkommande varv och beskrivningen verkar inte räkna med detta. Ska man inte sticka omslagen som vanligt sedan när man fortsätter med slätstickning?
10.03.2017 - 14:15DROPS Design answered:
Hej Hillevi. Du skal tage ud i hver side 3 gange i hver 6e pind. Der er flere maade du kan göre det paa. Du kan strikke 2 masker i förste / sidste maske. Du kan lave et omslag efter förste og för sidste m paa pinden (og strikke omslaget drejet i naeste p saa der ikke kommer hul), eller du kan slaa 1 ny maske op i beg af p, strik pinden ud, vend og slaa 1 ny m op i begyndelsen af naeste p. Vaelg hvad du selv synes er nemmest eller paenest.
13.03.2017 - 12:00
![]() Cinzia wrote:
Cinzia wrote:
Grazie! Ora è tutto più chiaro
06.01.2017 - 10:12
|
|
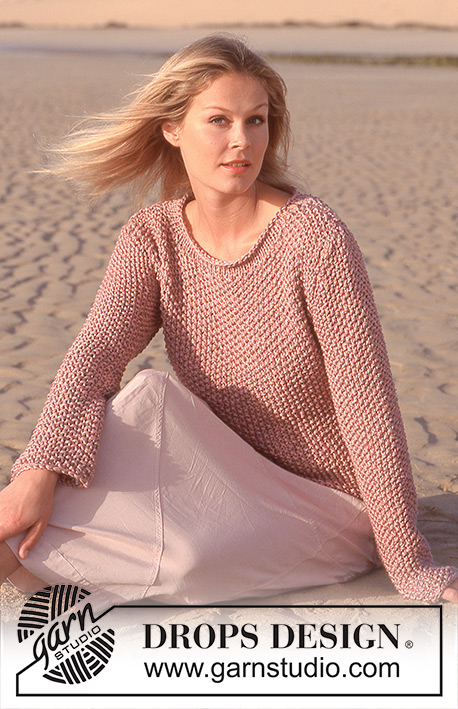
Mar Azul Top#marazultop |
|
 |
 |
DROPS Garter Stitch Halter Top in Den-M-Nit.
DROPS 65-7 |
|
|
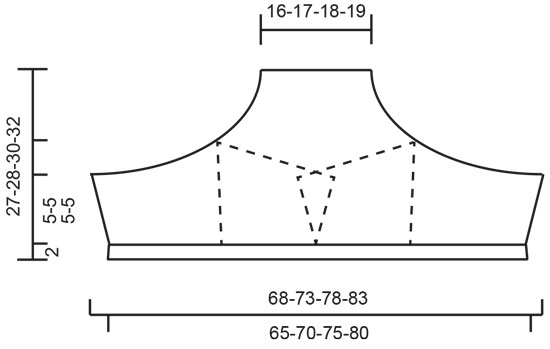
Gauge: 20 sts x 39 rows in garter st = 10 x 10 cm [4" x 4"]. Lace border: K 1, * K 2 tog, yo *, repeat from * - *, end with K 1. Garter st, when knitting flat: Knit all sts, all rows. Tip decreasing: All decreasing takes place on the right side of the work. Dec 2 sts as follows: After 2 edge sts: slip 1, K 2 tog, pass the slipped st over (psso). Before 2 edge sts: K 3 tog. Dec 1 st as follows: After 2 edge sts: slip 1, K 1, psso. Before 2 edge sts: K 2 tog. Body: Cast on 130-140-150-160 sts and knit lace border - see instructions above. Continue with garter st over all sts. After 6 rows, inc 1 st at each side 3 times every 6th row = 136-146-156-166 sts. After 20 rows (the work measures approx. 5 cm [2"]), bind off 3 sts at the beginning of every row 5 times. Then dec at each side inside 2 edge sts every other row - see Tip for decreasing: 2 sts 5 times, 1 st 27-31-35-39 times = 32-34-36-38 sts. The work now measures approx. 25-26-28-30 cm [9⅞"-10.25"-11"-11.75"]. Knit lace border, bind off. Assembly: Crochet a buttonhole-loop at the top of each side (center back) as follows: 1 single crochet (sc), ch 4, fasten with 1 sc 1 cm [⅜"] further down. Try on the top to see where the buttons should be sewed on - 1 on the inside of the left back piece and 1 on the outside of the right back piece. Twisted cord: Cut a strand approx. 4 meters [4-3/8 yards] long, fold it double. Tie one end to a stationary object. Twist the strand until it resists, fold it double and it will twist itself. Tie a knot in each end. Pull it through the lace border at the top. |
|
 |
|
Have you finished this pattern?Tag your pictures with #dropspattern #marazultop or submit them to the #dropsfan gallery. Do you need help with this pattern?You'll find 12 tutorial videos, a Comments/Questions area and more by visiting the pattern on garnstudio.com. © 1982-2026 DROPS Design A/S. We reserve all rights. This document, including all its sub-sections, has copyrights. Read more about what you can do with our patterns at the bottom of each pattern on our site. |
|


With over 40 years in knitting and crochet design, DROPS Design offers one of the most extensive collections of free patterns on the internet - translated to 17 languages. As of today we count 324 catalogs and 12290 patterns - 12280 of which are translated into English (US/in).
We work hard to bring you the best knitting and crochet have to offer, inspiration and advice as well as great quality yarns at incredible prices! Would you like to use our patterns for other than personal use? You can read what you are allowed to do in the Copyright text at the bottom of all our patterns. Happy crafting!
Post a comment to pattern DROPS 65-7
We would love to hear what you have to say about this pattern!
If you want to leave a question, please make sure you select the correct category in the form below, to speed up the answering process. Required fields are marked *.