
Popular categories
Looking for a yarn?


Comments / Questions (17)
![]() Anna Jonsson wrote:
Anna Jonsson wrote:
Hej. Jag förstår inte avmaskningen för ärmhålet. Jag ser att flera av frågorna handlar om detta. Det är svårt att förstå beskrivningen. Hoppas att ni kan förklara så jag förstår. Vänlig hälsning från Anna.
25.05.2025 - 15:55DROPS Design answered:
Hej Anna, hvad er det du ikke forstår? Hvilken størrelse strikker du? Har du lukket de 8 masker af til ærmegab i den ene side?
27.05.2025 - 13:29
![]() Elisabetta Natali wrote:
Elisabetta Natali wrote:
Come avviare il lavoro a coste 2/ 3 ?
15.09.2024 - 16:53DROPS Design answered:
Buonasera Elisabetta, deve avviare il lavoro normalmente e poi iniziare a lavorare come indicato. Buon lavoro!
28.09.2024 - 22:00
![]() Friedhelm Gabriel wrote:
Friedhelm Gabriel wrote:
Ich verstehe das Abnehmen für den Armausschnitt nicht. Neben 7 Maschen 1 Masche mit der 3. Linksmasche zusammen stricken. Wo bleiben die anderen Maschen. Bitte, eine Erklärung.Danke im voraus Mechtild
26.04.2024 - 04:02DROPS Design answered:
Lieber Herr Friedheim, für das Armoch wird man die 7. und die 8. Masche ab der Seite zusammenstricken, so werden die 3 ersten Maschen (Linkes Vorderteil) so gestrickt: 2 M links, 2 M rechts, 3 M links (= 2 M links + 2 M links zusammen, wenn man abnehmen soll). Viel Spaß beim Stricken!
26.04.2024 - 07:55
![]() Paula Mena Santos wrote:
Paula Mena Santos wrote:
Buenas tardes: Necesito saber cómo aumentar la talla de este modelo. Muchas gracias!
18.12.2021 - 16:36DROPS Design answered:
Hola Paula, nosotros no hacemos patrones personalizados. Puedes utilizar reglas de tres para hacer cálculos de los puntos necesarios para la talla deseada. En la fila de montaje, por ejemplo, cada talla tiene una diferencia de 5 puntos por lo que puedes, según los cm que necesites aumentar, añadir una cantidad de 5 puntos proporcional a la talla necesaria.
18.12.2021 - 20:56
![]() Catherine wrote:
Catherine wrote:
Bonjour je ne comprends pas où diminuer les mailles pour former l'encolure : DANS les côtes avant les torsades ou DANS les torsades ? Grand merci pour votre aide, je suis bloquée depuis plusieurs jours ... Catherine
08.08.2020 - 18:10DROPS Design answered:
Bonjour Catherine, (pour le devant gauche) au 1er marqueur, vous tricotez la dernière m de M.2 ensemble à l'envers avec la 1ère des 9 m de bordure devant - (= 6 fois au total, on diminue M.2) - au 2ème marqueur, on tricote ensemble à l'endroit la dernière maille de M.3 avec la 1ère maille de M.2 (= 15 fois au total - on diminue avant M.2). Bon tricot!
10.08.2020 - 09:24
![]() Anneli wrote:
Anneli wrote:
Förstår inte avm vid ärmhålen, (maska av 1 m innanför 7 m) ribbstickningen blir ju inte så fin då
23.05.2020 - 19:32DROPS Design answered:
Hej Anneli, har du set vores Avmaskningstips? Avmaskningstips (gäller ärmhålsavm): Alla avm sker från rätsidan! Maska av 1 m så här: Sticka den m som skall avm avig tills med den första av de 3 aviga m som är på utsidan av avm.
29.05.2020 - 15:21
![]() Chantal wrote:
Chantal wrote:
Bonjour je ne comprends pas ces explications pour un coté "les 9 dernières m = bordure devant." faut-il tricoter ces 9 dernières mailles en jersey ? Merci
27.12.2019 - 18:19DROPS Design answered:
Bonjour Chantal, les 9 dernières mailles sur l'endroit du devant gauche sont la bordure devant et se tricotent ainsi: 3 m env, 5 m end, 1 m point mousse (en début de rang sur l'envers, tricotez ces mailles ainsi: 1 m point mousse, 5 m env, 3 m end. Bon tricot!
02.01.2020 - 11:43
![]() Maria Cecilia wrote:
Maria Cecilia wrote:
Querida equipe, tenho uma sugestão construtiva. Estive procurando modelos de peças com trançados complexos estilo irlandês e me deparei que muitos têm os gráficos em má resolução, ou são pequenos demais ou estão pouco nítidos. Se em algum momento pudessem revisar eu e muitas outras fãs desse estilo agradeceríamos! Adoro esta página e obrigada pela generosidade de dispor de modelos gratuitos!
11.03.2019 - 08:19
![]() Karen Remington wrote:
Karen Remington wrote:
Neck shaping instructions for LEFT front: Your instructions say the LEFT front neck shaping starts with center front and all decreases are on RS and the first decrease is in Pattern 2 (cable). How can that be when the RS stitches on the needle start with side edge with Pattern 3? Are your written instructions for neck shaping actually for RIGHT front? What decrease method do I use when a knit stitch is next to a purl stitch? k2tog, p2tog, or ssk?
14.01.2019 - 18:08DROPS Design answered:
Dear Mrs Remington, you are right, there is something wrong in the pattern, you should decrease before the 9 edge sts on left front piece, a correction will be added. Thank you. Happy knitting!
16.01.2019 - 12:45
![]() Karen Remington wrote:
Karen Remington wrote:
If row 1 is the right side, how can the left front neck shaping instructions start with center front when the center front stitches are LAST on the right side? Armhole shaping: Do I purl together the 7th & 8th stitch every time? I tried it and it looks awful. Should the 15 stitch decrease for left front be done on WS, so that bind off is done on RS to allow for neckband? May I have instructions on how to properly decrease on K2P3 and K3P3 ribbing so it looks good?
14.01.2019 - 03:47DROPS Design answered:
Dear Mrs Remington, right front piece is worked reversed, ie you start RS rows with front band sts and end with 1 edge st = towards seam to back piece, ie: 9 front band sts (= 1 edge st, K5, P3), M1, 43+48-53 sts in M.3, K1, 1 edge st in garter st. Then cast off for armhole at the beg of a WS row, and dec for armhole at the end of RS rows inside the last 7 sts (: P3, K2, K2), Ptog the 8th st from end with the 7 st (= 1st of P3). Happy knitting!
14.01.2019 - 12:48
|
|||||||||||||||||||
Oceans Song |
|||||||||||||||||||
|
|
|||||||||||||||||||
Knitted jacket with cable pattern in DROPS Alpaca. Size: S-L
DROPS 66-6 |
|||||||||||||||||||
|
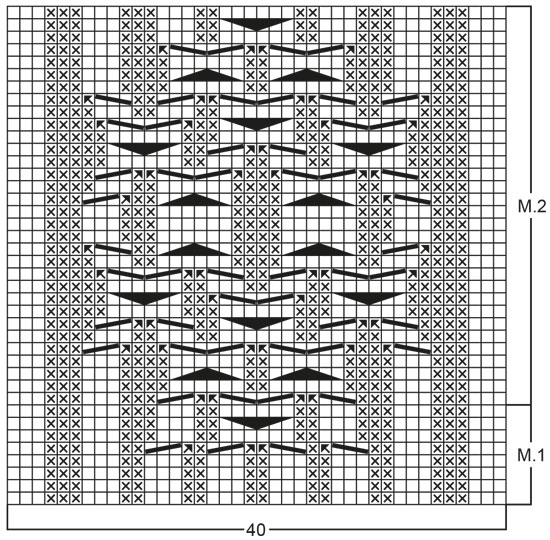
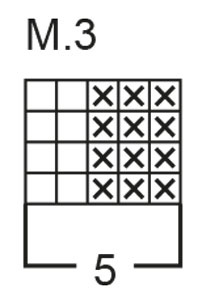
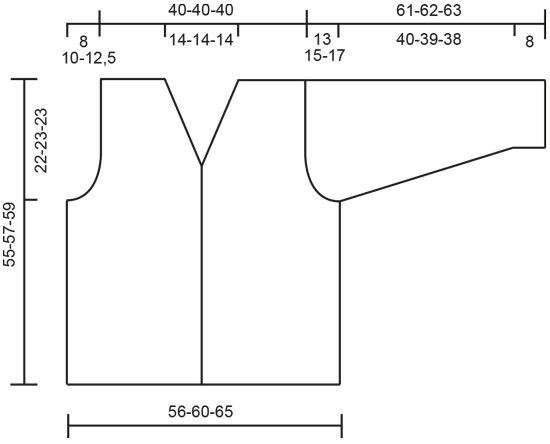
Gauge: 24 sts x 32 rows in stockinette st = 10 x 10 cm [4" x 4"]. Garter st, when knitting flat: Knit all sts, all rows. Pattern: See charts. The pattern is seen from the right side. Knitting tip (for decreasing for armholes): All decs are made on right side rows, inside the 7 sts at the edge (P2, K2, P3). Purl the 7th and 8th sts together. Left front: At first marker towards mid front decrease by purling together the stitch to decrease with the first stitch in M.2 and at the 2nd marker increase by knitting together the stitch to decrease in M.2 with the first front band stitch. Cast on 94-99-104 sts. Row 1 (right side) knit as follows from side edge: K 1 (edge st knit in garter st throughout), K 1, 43-48-53 sts of Pattern 3, Pattern 1 (40 sts), P 3, K 5, K 1 (edge st knit in garter st throughout) – the last 9 sts are the button band. Continue with pattern as established over all sts. After Pattern 1 is complete, continue in Pattern 2. When the piece measures 33-34-36 cm [13"-13⅜"-14⅛"] bind off 8 sts at the side for armhole = 86-91-96 sts. Continue decreasing 1 st at armhole edge 10-15-20 times every other row - see knitting tips! At the same time, when the piece measures 36-37-38 cm [14⅛"-14.5"-14⅞"] shape the neck as follows: Put 1 marker at each side of Pattern 2. Now dec at markers as follows: at the first marker (center front), dec in Pattern 2, (before the 9 edge sts), at the second marker dec in Pattern 3 (after Pattern 2). All decs are on the right side row. Dec 1 st every other row 6-6-6 times at the first marker and at the same time 1 st every other row 15-15-15 times at the second marker = 55-55-55 sts remain on each shoulder. When the piece measures 55-57-59 cm [21⅝"-22.5"-23.25"] dec 14-14-14 sts by K 2 tog across the 28 sts over cables and at the same time dec 1 st over de 3 K sts on the right side of cables = 40-40-40 sts. On the next row bind off all sts except the 6 sts at the center front. Cast on 1 new sts on the shoulder side of these sts = 7 sts. Knit in stockinette st keep 1 st in garter st at each side, for 7 cm [2.75"] - bind off. This band goes across the back neck. Right front: Knit the same as the left, reversing all shaping. Make buttonholes as follows: on wrong side row bind off the 8th and 9th sts from center front and on the next row cast on 2 new sts over the bound off sts. Make buttonholes when the piece measures: 1-1-1 cm [⅜"], 8-9-9 cm [3⅛"-3.5"-3.5"], 15-16-17 cm [5⅞"-6.25"-6.75"], 22-23-24 cm [8⅝"-9"-9.5"], 29-30-31 cm [11⅜"-11.75"-12.25"] and 36-37-38 cm [14⅛"-14.5"-14⅞"]. Back: Cast on 137-147-157 sts. Establish rib pattern as follows: K 2, Pattern 3 until 2 sts remain, K 2. Continue in rib as established over all sts. When the piece measures 33-34-36 cm [13"-13⅜"-14⅛"] bind off 8 sts at each side for armhole, then dec 1 st at each armhole edge every other row 10-15-20 times = 101-101-101 sts. When the piece measures 53-55-57 cm [20⅞"-21⅝"-22.5"] bind off the center 27-27-27 sts for the neck. Bind off 3 sts at each neck edge on the next row = 34-34-34 sts remain on each shoulder. When the piece measures 55-57-59 cm [21⅝"-22.5"-23.25"] bind off all sts. Sleeve: Cast on 55-60-60 sts on double-pointed needles. Join and place a marker at the join; knit Pattern 3 over all sts. When the piece measures 8 cm [3⅛"] inc 1 st each side of marker 20-20-20 times every 6 rows = 95-100-100 sts (work the increased sts into pattern as you go along). When the piece measures 48-47-46 cm [18⅞"-18.5"-18⅛"] bind off 8 sts each side of marker and knit back and forth on needles. Continue to bind off for armhole at each side every other row: 2 sts 3-3-1 times, 1 st 13-16-23 times, 2 sts 3-3-1 times, 3 sts 1-1-1 time. Bind off, the piece measures approx. 61-62-63 cm [24"-24⅜"-24.75"]. Assembly: Sew shoulder seams - see that the rib sts line up. Sew together the band at center back and then sew to back neck edge using edge st as a seam allowance. Fold the 3 outermost button band sts to wrong side and stitch down. Sew together side seams using edge sts as seam allowance. Sew in sleeves using 2 edge sts on Body as seam allowance. Sew on buttons. |
|||||||||||||||||||
Diagram explanations |
|||||||||||||||||||
|
|||||||||||||||||||
 |
|||||||||||||||||||
 |
|||||||||||||||||||
 |
|||||||||||||||||||
Have you finished this pattern?Tag your pictures with #dropspattern or submit them to the #dropsfan gallery. Do you need help with this pattern?You'll find 19 tutorial videos, a Comments/Questions area and more by visiting the pattern on garnstudio.com. © 1982-2026 DROPS Design A/S. We reserve all rights. This document, including all its sub-sections, has copyrights. Read more about what you can do with our patterns at the bottom of each pattern on our site. |
|||||||||||||||||||


With over 40 years in knitting and crochet design, DROPS Design offers one of the most extensive collections of free patterns on the internet - translated to 17 languages. As of today we count 324 catalogs and 12290 patterns - 12280 of which are translated into English (US/in).
We work hard to bring you the best knitting and crochet have to offer, inspiration and advice as well as great quality yarns at incredible prices! Would you like to use our patterns for other than personal use? You can read what you are allowed to do in the Copyright text at the bottom of all our patterns. Happy crafting!
Post a comment to pattern DROPS 66-6
We would love to hear what you have to say about this pattern!
If you want to leave a question, please make sure you select the correct category in the form below, to speed up the answering process. Required fields are marked *.