
Popular categories
Looking for a yarn?


Comments / Questions (69)
![]() Margret wrote:
Margret wrote:
Modell Nr. vs-002-bn Garngruppe B Ich würde gerne diese wunderschöne Jacke für meine Enkelin stricken. Leider verstehe ich überhaupt nicht wo ich mit der Maschenzunahme beginnen soll und wie das mit dem Maschenmarkierer setzen gemeint ist
12.02.2021 - 09:13DROPS Design answered:
Liebe Magret, von welchen Zunahmen sprechen Sie? Die von dem ZUNAHMETIPP - dieses Tipp gilt für Rumpfteil: nach der Verteilung setzen Sie eine Markierer auf beiden Seiten von der Jacke, in der Mitte von den 6 neuen Maschen, die unter den Ärmeln angeschlagen waren = 4 Zunahmen pro Zunahmenrunde. Kann es Ihnen weiterhelfen?
12.02.2021 - 11:41
![]() Carla wrote:
Carla wrote:
Buongiorno, potrebbe chiarire quando cominciare gli aumenti per il raglan e dove inserire i markers? grazie in anticipo
21.11.2020 - 18:21DROPS Design answered:
Buonasera Carla, a quale parte del lavoro fa riferimento? I segnapunti vanno inseriti ai lati, al centro delle nuove maglie avviate. Buon lavoro!
21.11.2020 - 20:56
![]() Sonia wrote:
Sonia wrote:
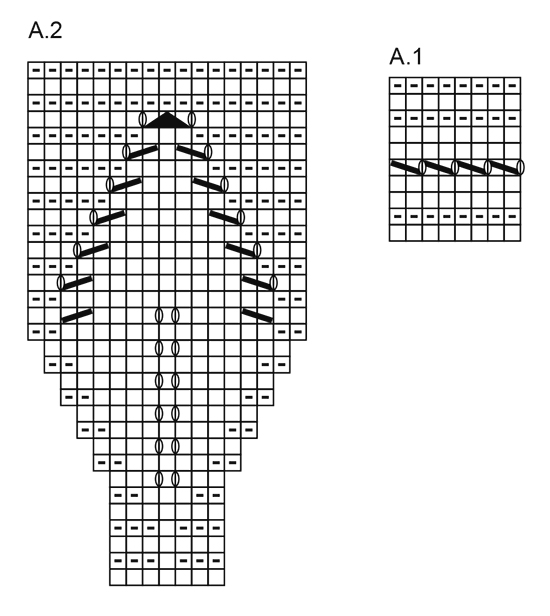
Hola, cuando tejo el patrón de A2 me da 6 repeticiones no 13 como dice la instrucción, eso es porque el patrón es de 14 puntos no de 7 como dice la explicación, está bien eso ?
21.07.2020 - 20:38DROPS Design answered:
Hola Sonia. El diagrama A.2 comienza con 7 puntos y termina con 14 puntos. Los aumentos están incluidos en el diagrama. El diagrama se lee de abajo arriba de derecho a la izquierda por el lado derecho y de izquierda a derecha por el lado revés.
09.09.2020 - 20:59
![]() Anne wrote:
Anne wrote:
Bonjour, à la fin de l'empiècement j'ai 219 m. taille 5/6ans 110/116 si je comprends juste je dois encore augmenter de 3 m. Pour en avoir 222. C'est bien ça ? Merci de votre réponse. Meilleures salutations.
22.04.2020 - 16:12DROPS Design answered:
Bonjour Anne, tout à fait, à la fin des diagrammes vous avez 219 m, vous tricotez 1 rang endroit en augmentant 3 mailles à intervalles réguliers (voir comment faire ici) = vous avez maintenant 222 m. Bon tricot!
22.04.2020 - 16:34
![]() Heather Gooding wrote:
Heather Gooding wrote:
Hi, this jacket is going well BUT- I've reached the increase section after the leaves. It says increase 1 stitch mid repeat -how? Then double increase (yo, k1, yo) on each repeat. THEN it says repeat twice more. This is the bit I'm unclear about. Do I repeat both lots of increase ie the I stitch mid repeat & the yo, K1, yo or just the yo, k1, yo. Thanks
18.03.2020 - 19:15DROPS Design answered:
Dear Mrs Gooding, you will make the first increases on first row from RS after A.2, then repeat these increases 2 more times (= 3 times in total) every 1,5 or 2 cm (see size), ie you increase 1 stitch in the middle of each A.2 (= apporx in the middle of each leaf you can knit front and back of stitch or 1 yarn over before or after the middle stitch), *work 1,5-2 cm, work one more row with incrases* repeat from *-* 1 more time. Happy knitting!
19.03.2020 - 09:41
![]() Anne Oneal wrote:
Anne Oneal wrote:
I am just working on A 1 and I have followed the diagram but it looks like I have not done it correctly. I am not sure if I am to read it from bottom up or top down. Help would be greatly appreciated.
13.01.2020 - 00:02DROPS Design answered:
Hi Anne, The patterns are worked from the bottom right corner to the left and then (when working back and forth) the second row will be worked from the left to the right. Row 3 from the right to the left and so-on upwards. Happy knitting!
13.01.2020 - 07:19
![]() Melanie wrote:
Melanie wrote:
Where do you place the markers and on which row
12.12.2019 - 13:51DROPS Design answered:
Dear Melanie, when working the first row on body (after divding sleeves), you insert 1 marker in the middle of the new 6 stitches cast on mid under each sleeve (= 2 markers, 1 one each side of the jacket). Happy knitting!
12.12.2019 - 14:22
![]() Ramona wrote:
Ramona wrote:
Muss man wirklich am Ärmel abnehmen? leider ist der ärmel durch die insg. 6 abnahmen so eng geworden das sie darunter nichts mehr anziehen kann. maschenzahl stimmt. ich werde nochmal ribbeln und den ärmel versuchen ohne abnahmen fertig zu bekommen....vor der abnahme hat der ärmel (12cm einfach gemessen) nach den 6 abnahmen 9cm (einfach gemessen)
23.07.2019 - 17:39DROPS Design answered:
Liebe Ramona, in Größe 9/10 Jahre müsste der Ärmel unten (nach allen Abnahmen) einen Umfang von 19 cm haben und in Größe 11/12 Jahre einen unteren Umfang von 20 cm, laut Maschenprobe. Wenn der Ärmel bei Ihnen zu eng ist, versuchen Sie, eine oder zwei Abnahmen weniger zu machen (z.B. zwei Abnahmen weniger würden ca. 2 cm mehr Umfang bedeutet, da Sie dann 4 Maschen mehr haben), d.h. Sie vergrößern die Abstände zwischen den Abnahmen. Zur Formgebung sollten Sie aber nicht ganz auf die Abnahmen verzichten. Gutes Gelingen!
23.07.2019 - 23:21
![]() Sieglinde wrote:
Sieglinde wrote:
Danke fürs helfen. Projekt ist gestartet
29.04.2019 - 09:14
![]() Sieglinde wrote:
Sieglinde wrote:
Gleichzeitig in der mitte des Rapports zunehmen. Steht bei der Passe in der Anleitung. Wie mach ich das?? Hab noch nie von oben nach unten etwas gestrickt. Bitte um Hilfe! Danke
26.04.2019 - 21:09DROPS Design answered:
Liebe Sieglinde, bei der 1. Reihe nach A.2 machen Sie 1 Umschlag in der mitte jede A.2 (= 11-12-13 A.2 in der Reihe = 11-12-13 Umschläge/Zunahmen). Viel Spaß beim stricken!
29.04.2019 - 08:11
|
|||||||||||||||||||
Sweet Bay Jacket#sweetbayjacket |
|||||||||||||||||||
 |
 |
||||||||||||||||||
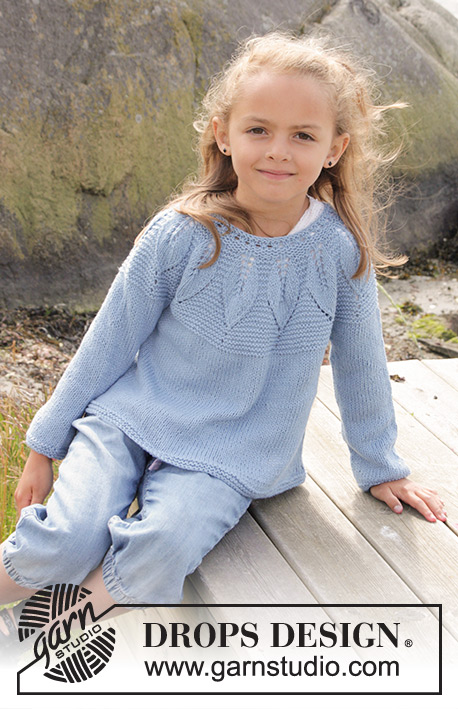
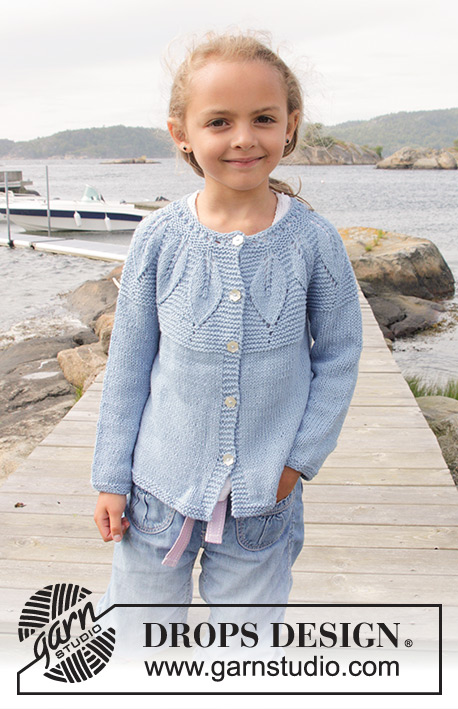
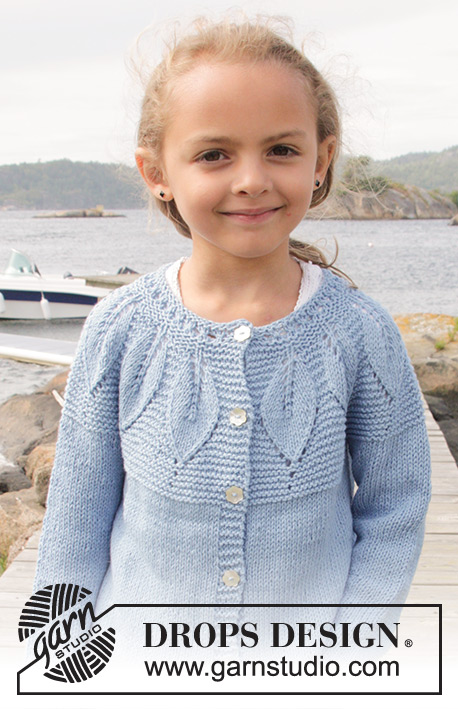
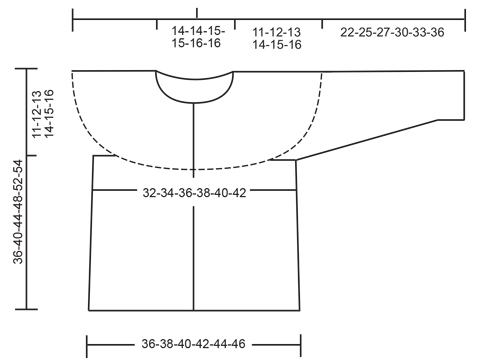
Knitted cardigan in garter st with leaf pattern and round yoke, worked top down in DROPS Belle. Size children 3 - 14 years
DROPS Children 27-24 |
|||||||||||||||||||
|
GARTER ST (back and forth): K all rows. 1 ridge = K2 rows. GARTER ST (worked in the round): 1 ridge = 2 rounds. * K 1 round and P 1 round *, repeat from *-*. PATTERN: See diagrams A.1 and A.2. The diagrams show all rows in pattern seen from RS. INCREASE TIP: Inc 1 sts on each side of every marker (= 8 inc sts). Beg 1 st before marker and work as follows: 1 YO, K 2 (marker is between these 2 sts), 1 YO. On next row P the YO to make a hole. BUTTONHOLES: Dec for buttonholes on right band (i.e. band at the end of row seen from RS). 1 buttonhole = K tog third and fourth st from edge and make 1 YO. Dec for buttonholes when piece measures (from cast-on edge and along the band): SIZE 3/4: 2, 8, 14, 22 and 28 cm SIZE 5/6: 2, 8, 14, 22 and 28 cm SIZE 7/8: 2, 8, 14, 22, 28 and 36 cm SIZE 9/10: 2, 8, 14, 22, 28 and 36 cm SIZE 11/12: 2, 8, 14, 22, 28, 36 and 42 cm SIZE 13/14: 2, 8, 14, 22, 28, 36 and 42 cm ---------------------------------------------------------- JACKET: Worked back and forth on circular needle, top down. YOKE: Cast on 87-87-94-94-101-101 sts on circular needle size 3.5 mm / US 4 with Belle. Dec for BUTTONHOLES on right band - see explanation above. Work 5 sts in GARTER ST - see explanation above (= band), A.1 until 5 sts remain, 5 sts in garter st (= band). On row with YOs in A.1 finish with 1 st K before band. When A.1 has been worked 1 time vertically, continue as follows: 5 sts in garter st, A.2 (= 7 sts), repeat A.2 11-11-12-12-13-13 times in total, finish with 5 sts in garter st. REMEMBER THE KNITTING GAUGE When A.2 has been worked 1 time vertically there is 197-197-214-214-231-231 sts on needle and piece measures approx. 10 cm / 4". Continue with garter st, AT THE SAME TIME inc 1 st in the middle of every repetition (= 11-11-12-12-13-13 sts inc), inc with YO, K YO on next row to make holes. Repeat inc every 1-1-1½-1½-2-2 cm / ⅜"-⅜"-½"-½"-¾"-¾" 0-1-1-2-1-2 more times = 208-219-238-250-257-270 sts. K 1 row while adjusting the no of sts to 210-222-234-250-262-276. Continue in garter st until piece measures 11-12-13-14-15-16 cm / 4⅜"-4¾"-5⅛"-5½"-6"-6¼". Continue to work as follows (from RS): Work the first 36-38-40-42-44-45 sts (= front piece), slip the next 38-40-42-46-48-52 sts on a stitch holder (= sleeve), cast on 6 new sts under sleeve, work the next 62-66-70-74-78-82 sts (= back piece), slip the next 38-40-42-46-48-52 sts on a stitch holder (= sleeve), cast on 6 new sts under sleeve, work the remaining 36-38-40-42-44-45 sts (= front piece). BODY: There are now 146-154-162-170-178-184 sts for body. Insert a marker in each side of body where new sts were cast on under sleeve (= 3 new sts on each side of marker). NOW MEASURE THE PIECE FROM HERE. Switch to circular needle size 4 mm / US 6. Continue in stockinette st and garter st on bands. When piece measures 4 cm / 1½", inc 1 st on each side of each marker (= 4 sts inc) - READ INCREASE TIP! Repeat inc every 5-6-7-8-9-10 cm / 4" 3 more times = 162-170-178-186-194-200 sts. Continue in stockinette st and garter st until piece measures 24-27-30-33-36-37 cm / 9½"-10½"-11½"-13"-14¼"-14½", work 3 ridges. Bind off. SLEEVE: Slip sts from stitch holder back on double pointed needles size 4 mm / US 6 (= 38-40-42-46-48-52 sts). Pick up 1 st in each of the 6 sts cast on under sleeve = 44-46-48-52-54-58 sts. Insert 1 marker mid under sleeve. Now measure the piece from here. Work in stockinette st. When piece measures 3 cm / 1" dec 1 st on each side of marker, repeat dec every 7-5-5-4-4-4 cm / 2¾"-2"-2"-1½"-1½"-1½" 2-3-3-5-5-7 more times = 38-38-40-40-42-42 sts. Continue in stockinette st until sleeve measures 21-24-26-29-32-35 cm / 8¼"-9½"-10¼"-11½"-12½"-13¾", work 3 ridges and bind off. ASSEMBLY: Sew the buttons on to left front piece. |
|||||||||||||||||||
Diagram explanations |
|||||||||||||||||||
|
|||||||||||||||||||
 |
|||||||||||||||||||
 |
|||||||||||||||||||
Have you finished this pattern?Tag your pictures with #dropspattern #sweetbayjacket or submit them to the #dropsfan gallery. Do you need help with this pattern?You'll find 24 tutorial videos, a Comments/Questions area and more by visiting the pattern on garnstudio.com. © 1982-2026 DROPS Design A/S. We reserve all rights. This document, including all its sub-sections, has copyrights. Read more about what you can do with our patterns at the bottom of each pattern on our site. |
|||||||||||||||||||


With over 40 years in knitting and crochet design, DROPS Design offers one of the most extensive collections of free patterns on the internet - translated to 17 languages. As of today we count 324 catalogs and 12290 patterns - 12280 of which are translated into English (US/in).
We work hard to bring you the best knitting and crochet have to offer, inspiration and advice as well as great quality yarns at incredible prices! Would you like to use our patterns for other than personal use? You can read what you are allowed to do in the Copyright text at the bottom of all our patterns. Happy crafting!
Post a comment to pattern DROPS Children 27-24
We would love to hear what you have to say about this pattern!
If you want to leave a question, please make sure you select the correct category in the form below, to speed up the answering process. Required fields are marked *.