
Popular categories
Looking for a yarn?


Comments / Questions (74)
![]() Lisa Lebrija wrote:
Lisa Lebrija wrote:
Hej igen Jeg har desværre ingen Drops butik, her på Amager jeg kan få hjælp i. Garnet er købt i en symaskineforretning og på nettet. Så jeg må jo bare vente. 😏
31.01.2017 - 15:51DROPS Design answered:
Hej Lisa. Ok, vi gör vores bedste ;-)
31.01.2017 - 16:04
![]() Lisa Lebrija wrote:
Lisa Lebrija wrote:
Hej Hvornår får jeg svar på mit spørgsmål, så jeg kan komme videre med mit strikketøj? Jeg skrev til jer d. 16.1.
27.01.2017 - 15:01DROPS Design answered:
Hej Lisa. Det er en travl periode med rigtig mange spörgsmaal paa de gratis opskrifter. Dit spörgsmaal kraever hjaelp fra vores Designafdeling, og jeg kan ikke sige hvornaar jeg faar svar. Saa du maa have lidt taalmodighed lige nu. Eller du kan gaa til din DROPS butik for hjaelp :)
30.01.2017 - 15:44
![]() Lisa Lebrija wrote:
Lisa Lebrija wrote:
Hej. De 19x8 masker har jeg fra vendingerne. 1.p siger efter mønsteret: strik 43 m ret. VEND= 55 m på p. Det passer også, nu er der 55 m på p i venstre hånd. På 4. p efter mønsteret står der strik 45 m ret. VEND= 59 m på p. Efter de 45 m er der 8 masker tilbage på venstre p når jeg skal vende. Derved får jeg de 19x8 masker. Der står jo ikke noget om at jeg også skal strikke over dem! Håber du forstår mig nu. 😊
19.01.2017 - 10:34DROPS Design answered:
Hej Lisa. Nu har jeg testet og du laeser forkert. Du starter pind 1 med: Strik 1 m ret, slå om, strik 7 m r, strik 1 m ret (= m med mærketråd), slå om, 1 ret, slå om, strik 45 m r = du er nu paa slut af pinden og har i alt 59 m paa pinden. Du har altsaa strikket alle m denne gang og taget 4 m ud. Saa vender du og strikker tilbage over alle m. (pind 2). I pind 3 og 4 strikker du kun over de förste 10 m (altsaa forkortet p) og i p 5 og 6 tager du ud igen og strikker alle m p pinden. I p 7 og 8 strikker du igen forkortede p over de förste 10 m. Herefter gentager du p 1-8 og tager ud som beskrevet. Du faar altsaa flere m paa pinden i p 1 og 5, men du strikker alle m i disse p.
23.02.2017 - 14:04
![]() Lisa Lebrija wrote:
Lisa Lebrija wrote:
Hej, jeg kan stadig ikke se hvornår jeg skal strikke over spidsens 19x8 masker efter vendingerne? Hvordan får jeg strikket de bredere striber i siderne? Dem jeg har på pinden er jo kun 10 m brede! Dem der fremkommer ved at strikke 2. og 4. pind med 8/10 masker. Hvor kommer skulderen og ærmegabet? Trist man ikke kan sende et billede med.
17.01.2017 - 18:53DROPS Design answered:
Hej Lisa. Se mit svar herunder. Jeg tror du gör noget forkert, naar du strikker.
18.01.2017 - 15:53
![]() Lisa Lebrija wrote:
Lisa Lebrija wrote:
Hej igen, Hvorfor skal jeg ikke strikke hen over de 19x8 masker der hele tiden er på pinden efter vendingerne på de forkortede pinde? Og når jeg har strikket kraven, så skal jeg kun strikke 1 cm og lukke af, hvorefter jeg skal strikke til knaphuller. Hvornår skal sidestykkerne strikkes, dem der går den anden vej? Det jeg har strikket nu er jo ikke ret stort/bredt!!!
17.01.2017 - 16:35DROPS Design answered:
Hej Lisa. Du strikker jo hele forstykket i ét stykke - ogsaa det som har pilen nedad paa diagrammet. Fordi du tager ud med omslagene og har de forkortede pinde, strikker du formen paa forstykket, saa starten af pinden för dine udtagninger er det som pejer nedad og resten er det som pejer ud mod midten (maalskitsen). Du strikker 19x8 pinde i mönstret, der staar ikke masker i opskriften. Jeg forstaar ikke hvor du har 19x8 masker fra - det kan vaere det som gaar galt for dig.
18.01.2017 - 15:53
![]() Lisa Lebrija wrote:
Lisa Lebrija wrote:
Hej. Jeg har nu strikket de 8 mønsterpinde 19 gange og skal til den næste p som strikkes som 1. p i mønstret. Mit spørgsmål er, hvornår skal jeg strikke over alle de 8 masker som der er strikket kortere ved vendingerne? Og hvordan bliver sidestykkerne strikket? Jeg kan slet ikke se hvor jeg er nu på højre forstykke.
12.01.2017 - 21:50DROPS Design answered:
Hej Lisa. Du strikker forstykket fra siden (se diagram) mod midtfor. Du har taget ud i höjre side af arbejdet, saa du har en spids der gaar ned mod midtfor neders. Du starter igen paa en ny pind fra retten og strikker som 1e mönsterpind. Dvs, du tager ud igen som för og naar du har strikket pinden ud og skal vende saetter du de nye masker op til kraven (det er den der "stikker op" paa diagrammet) og du har 223 m paa p. Saa fortsaetter du igen med mönstret 8 gange til + nu med kravemaskerne.
17.01.2017 - 14:50
![]() Rita Stainhauser wrote:
Rita Stainhauser wrote:
Danke für die Antwort, aber das heisst doch dann, dass die markierte Masche sich immer um 2 Maschen verschiebt - und so stimmt das dann mit der Erklärung nicht wirklich überein - da steht nämlich nichts von dieser Verschiebung...
15.12.2016 - 13:14DROPS Design answered:
Liebe Frau Stainhauser, wenn Sie die R 1-8 wiederholen, werden Sie dann Maschen vor und nach dem Markierer (R 1 + 5) zunehmen. Es wird dann mehr Maschen vor und nach dem Markierer geben. Siehe Punktierungen im Schnittübersicht (= Markierer). Viel Spaß beim stricken!
15.12.2016 - 14:46
![]() Rita Stainhauser wrote:
Rita Stainhauser wrote:
Hallo, Ich habe nun ein gutes Stück vom Vorderteil gestrickt. Bei mir nehmen bloss die Maschen nach den Löchern zu (die gestrickten Umschläge) - vor den Löchern sollte es doch auch mehr Maschen geben... Was mache ich falsch?
15.12.2016 - 10:34DROPS Design answered:
Liebe Frau Steinhauser, bei den R. 1 + 5 nehmen Sie 4 M zu: 2 M vor dem Markierer + 2 M nach dem Markierer - so sollen Sie mehr 2 M mehr vor und nach dem Markierer bei jeder Zunahmen-Reihe haben. Viel Spaß beim stricken!
15.12.2016 - 12:10
![]() Evelyne wrote:
Evelyne wrote:
Bonjour, Pouvez-vous donner quelques explications supplémentaires pour coudre correctement le col sur le dos du gilet. Je n'y arrive pas... Merci
06.12.2016 - 10:10DROPS Design answered:
Bonjour Evelyne, assemblez d'abord entre elles les mailles du col des 2 devants, puis cousez le col le long de l'encolure dos (la couture précédente doit se trouver au milieu de l'encolure dos). Bon assemblage!
06.12.2016 - 10:25
![]() Judith wrote:
Judith wrote:
Bonjour, Dans vos explications, je ne trouve pas comment faire le bas du Gilet drops. Apparent, il ne se tricote pas dans le mème sens que le haut et les rayures semblent plus grosses. Pouvez vous me donner des indications ? Cordialement
21.11.2016 - 19:01DROPS Design answered:
Bonjour Judith, quand on a 230-337 m (cf taille), on tricote séparément le bas du devant (sur les 86-132 m) en suivant les rayures comme avant. Puis on reprend les mailles en attente pour tricoter comme avant en terminant par la la bordure devant. Les rayures seront ainsi les mêmes sur les 2 parties. Bon tricot!
22.11.2016 - 08:49
|
|
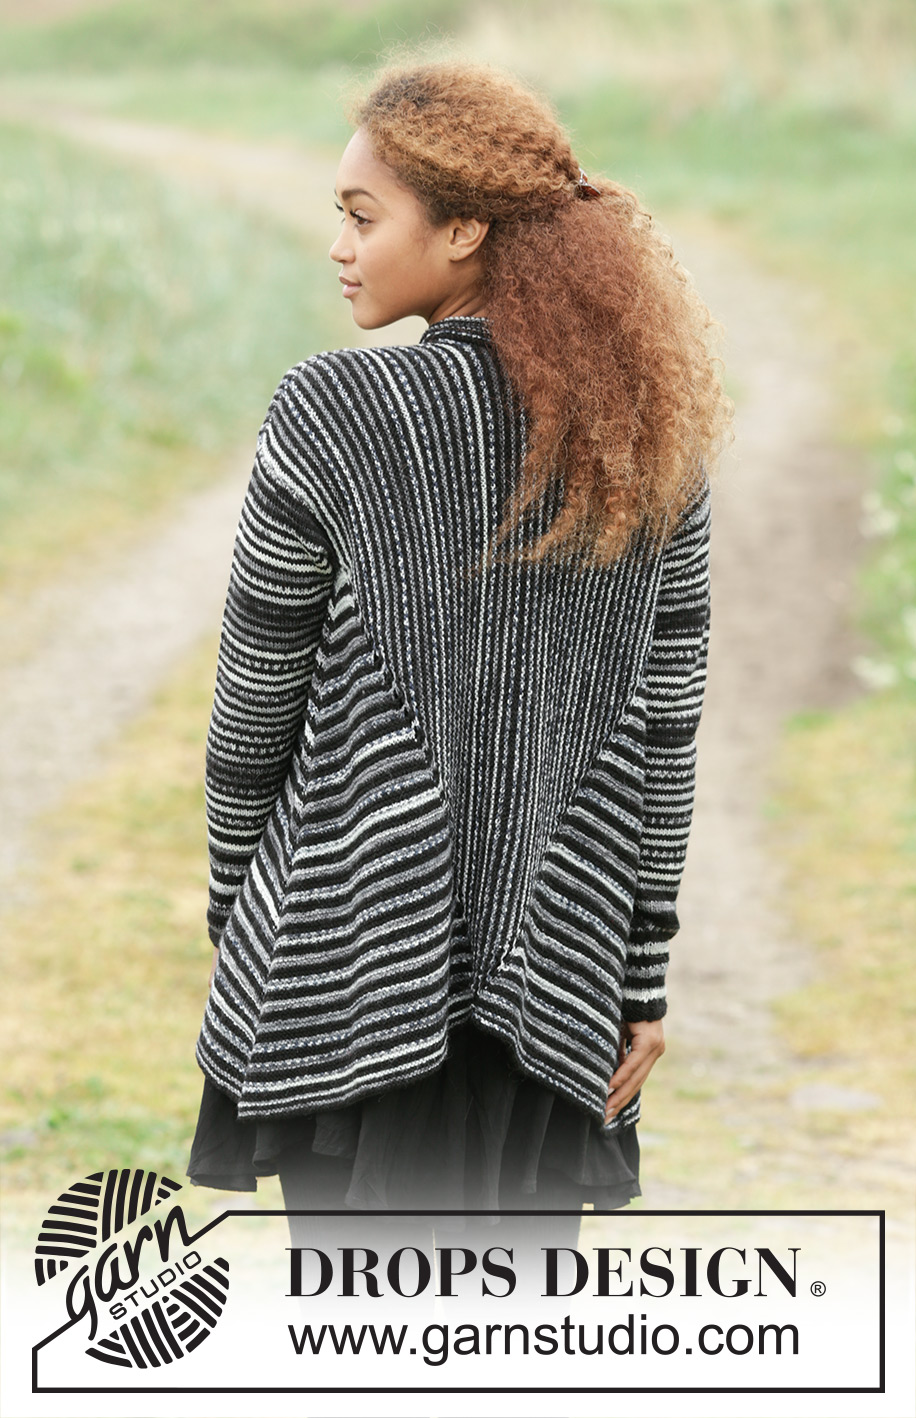
Midnight Roads#midnightroadscardigan |
|
 |
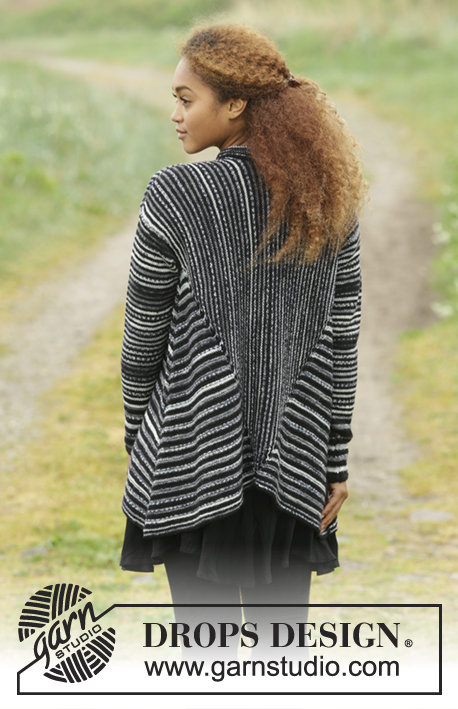 |
Knitted DROPS jacket in garter st with shawl collar, worked sideways in ”Fabel”. Size: S - XXXL.
DROPS 173-14 |
|
|
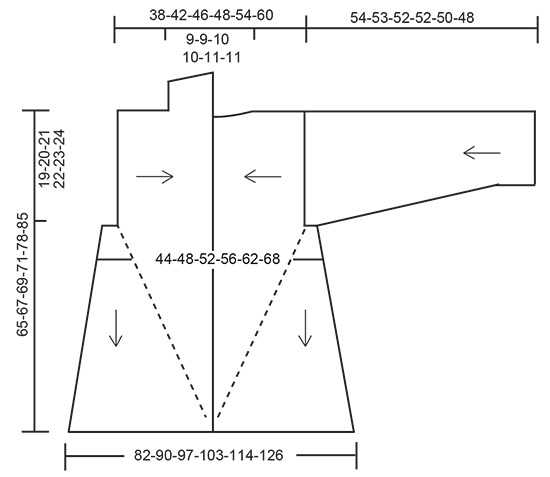
GARTER ST (back and forth on circular needle): K all rows. 1 ridge = K2 rows. GARTER ST (worked in the round): 1 ridge = 2 rounds. * K 1 round and P 1 round *, repeat from *-*. STRIPES BODY: ROW 1: K with salt and pepper ROW 2: K with salt and pepper ROW 3: K with black ROW 4: K with black STRIPES SLEEVE: Work as follows for 14 cm / 5½": 4 rounds with black 4 rounds with salt and pepper Then work as follows until finished measurements: 2 rounds black 2 rounds salt and pepper ---------------------------------------------------------- RIGHT FRONT PIECE: Worked back and forth on circular needle from the side and towards mid front. Arrows on chart show the knitting direction. Cast on 46-49-51-55-57-59 sts on circular needle size 4 mm / US 6 with salt and pepper. K 1 row from WS over all sts. Insert 1 marker in the 7th-7th-7th-9th-9th-9th st (seen from RS). Then work as follows: ROW 1 (from RS with salt and pepper): K 1, 1 YO, K 5-5-5-7-7-7, 1 YO, K 1 (= st with marker), 1 YO, K 1, 1 YO, K 38-41-43-45-47-49. Turn = 50-53-55-59-61-63 sts on needle. ROW 2 (from WS with salt and pepper): K all sts. Always K YOs from WS to make holes. ROW 3 (from RS with salt and pepper): K the first 8-8-8-10-10-10 (until st with marker), turn. ROW 4 (from WS with salt and pepper): Tighten yarn and K 8-8-8-10-10-10. ROW 5 (from RS with black): K 1, 1 YO, K 7-7-7-9-9-9, 1 YO, K 1 (= st with marker), 1 YO, K 1, 1 YO, K 40-43-45-47-49-51. Turn = 54-57-59-63-65-67 sts on needle. ROW 6 (from WS with black): K all sts. ROW 7 (from RS with black): K the first 10-10-10-12-12-12 (until st with marker), turn. ROW 8 (from WS with black): Tighten yarn and K 10-10-10-12-12-12. Work these 8 rows (= pattern, work 8 rows before marker and 4 rows after marker) 15-17-19-20-23-25 times in total, there are now 166-185-203-215-241-259 sts on needle. REMEMBER THE KNITTING GAUGE On next row from RS (worked as 1st row in pattern), cast on 15-15-17-17-19-19 new sts at the end of row (= collar) = 185-204-224-236-264-282 sts. Continue pattern 5-5-5-5-5-6 more times (the 8 rows in pattern have been worked 20-22-24-25-28-31 times in total), on every row worked as 1st or 5th row work 2 sts in last st - there are now 230-249-269-281-309-337 sts on needle. Slip the last 144-155-167-173-189-205 sts on a stitch holder, now only work over the first 86-94-102-108-120-132 sts on needle (= bottom edge). Work in garter st back and forth over these sts for 8-5-2-1-1-1 cm / 3"-2"-¾"-½"-½"-½" with STRIPES BODY – see explanation above, finish after 2 rows black. Bind off. Pick up 16-10-4-2-2-2 sts towards mid front (along short side on the 8-5-2-1-1-1 cm / 3"-2"-¾"-½"-½"-½" worked in bottom edge), and slip the 144-155-167-173-189-205 sts from stitch holder back on needle = 160-165-171-175-191-207 sts. Work in garter st back and forth over all sts for 1 cm / ⅜" with STRIPES BODY. On next row from RS dec for buttonholes as follows: K 16-18-18-18-10-10, * K 2 tog, 1 YO, K 16 *, repeat from *-* 3-3-3-3-4-4 times, K 2 tog, 1 YO, work the rest of row = 4-4-4-4-5-5 button holes. Work 1 cm / ⅜" over all sts, finish after 2 rows black. Bind off. LEFT FRONT PIECE: Cast on 46-49-51-55-57-59 sts on circular needle size 4 mm / US 6 with salt and pepper. K 1 row from WS over all sts. Insert 1 marker in the 40th-43rd-45th-47th-49th-51st st (seen from RS). Then work as follows: ROW 1 (from RS with salt and pepper): K 38-41-43-45-47-49, 1 YO, K 1, 1 YO, K 1 (= st with marker), 1 YO, K 5-5-5-7-7-7, 1 YO, K 1 = 50-53-55-59-61-63 sts on needle. ROW 2 (from WS with salt and pepper): K the first 8-8-8-10-10-10 (until st with marker), turn. ROW 3 (from RS with salt and pepper):Tighten yarn and K 8-8-8-10-10-10. ROW 4 (from WS with salt and pepper): K all sts. Always K YOs from WS to make holes. ROW 5 (from RS with black): K 40-43-45-47-49-51, 1 YO, K 1, 1 YO, K 1 (= st with marker), 1 YO, K 7-7-7-9-9-9, 1 YO, K 1. Turn = 54-57-59-63-65-67 sts on needle. ROW 6 (from WS with black): K the first 10-10-10-12-12-12 (until st with marker), turn. ROW 7 (from RS with black):Tighten yarn and K 10-10-10-12-12-12. ROW 8 (from WS with black): K all sts. Work these 8 rows (= pattern, work 8 rows over sts before marker and 4 rows over sts after marker) 15-17-19-20-23-25 times in total, there are now 166-185-203-215-241-259 sts on needle, on last row (= from WS) cast on 14-14-16-16-18-18 new sts at the end of row (= collar, i.e. 1 stitch less is cast on for collar on left front piece to get the right amount of stitches) == 180-199-219-231-259-277 sts. Continue pattern 5-5-5-5-5-6 more times (the 8 rows in pattern have been worked 20-22-24-25-28-31 times in total), at the end of every row worked as 4th or 8th row work 2 sts in last st on row - there are now 230-249-269-281-309-337 sts on needle. Slip the first 144-155-167-173-189-205 sts on a stitch holder, now only work over the last 86-94-102-108-120-132 sts on needle (= bottom edge). Work in garter st back and forth over these sts for 8-5-2-1-1-1 cm / 3"-2"-¾"-½"-½"-½" with STRIPES BODY – see explanation above, finish after 2 rows black. Bind off. Slip the 144-155-167-173-189-205 sts from stitch holder back on needle, and pick up 16-10-4-2-2-2 sts towards mid front (along short side on the 8-5-2-1-1-1 cm / 3"-2"-¾"-½"-½"-½" worked in bottom edge) = 160-165-171-175-191-207 sts. Work in garter st back and forth over all sts for 2 cm / ¾" with STRIPES BODY, finish after 2 rows black (do not dec for buttonholes). Bind off. LEFT BACK PIECE: Worked back and forth on circular needle from the side and towards mid back. Cast on 46-49-51-55-57-59 sts on circular needle size 4 mm / US 6 with salt and pepper. K 1 row from WS over all sts. Insert 1 marker in the 7th-7th-7th-9th-9th-9th st (seen from RS). Then work as follows: ROW 1 (from RS with salt and pepper): K 1, 1 YO, K 5-5-5-7-7-7, 1 YO, K 1 (= st with marker), 1 YO, K 1, 1 YO, K 38-41-43-45-47-49. Turn = 50-53-55-59-61-63 sts on needle. ROW 2 (from WS with salt and pepper): K all sts. Always K YOs from WS to make holes. ROW 3 (from RS with salt and pepper): K the first 8-8-8-10-10-10 (until st with marker), turn. ROW 4 (from WS with salt and pepper): Tighten yarn and K 8-8-8-10-10-10. ROW 5 (from RS with black): K 1, 1 YO, K 7-7-7-9-9-9, 1 YO, K 1 (= st with marker), 1 YO, K 1, 1 YO, K 40-43-45-47-49-51. Turn = 54-57-59-63-65-67 sts on needle. ROW 6 (from WS with black): K all sts. ROW 7 (from RS with black): K the first 10-10-10-12-12-12 (until st with marker), turn. ROW 8 (from WS with black): Tighten yarn and K 10-10-10-12-12-12. Work these 8 rows (= pattern, work 8 rows before marker and 4 rows after marker) 15-17-19-20-23-25 times in total, there are now 166-185-203-215-241-259 sts on needle. Work 1st row in pattern = 170-189-207-219-245-263 sts on needle. At beg of next row (= 2nd row in pattern) bind off the first 4 sts on row (= neck), then K the rest of row = 166-185-203-215-241-259 sts. Continue pattern 5-5-5-5-5-6 more times (the 8 rows in pattern have been worked 20-22-24-25-28-31 times in total) - there are now 202-221-239-251-277-303 sts on needle. Slip the last 116-127-137-143-157-171 sts on a stitch holder, now only work over the first 86-94-102-108-120-132 sts on row (= bottom edge), work in garter st back and forth over these sts for 8-5-2-1-1-1 cm / 3"-2"-¾"-½"-½"-½" with STRIPES BODY – see explanation above, finish after 2 rows black. Bind off. Bind off sts from the stitch holder. RIGHT BACK PIECE: Cast on 46-49-51-55-57-59 sts on circular needle size 4 mm / US 6 with salt and pepper. K 1 row from WS over all sts. Insert 1 marker in the 40th-43rd-45th-47th-49th-51st st (seen from RS). Then work as follows: ROW 1 (from RS with salt and pepper): K 38-41-43-45-47-49, 1 YO, K 1, 1 YO, K 1 (= st with marker), 1 YO, K 5-5-5-7-7-7, 1 YO, K 1 = 50-53-55-59-61-63 sts on needle. ROW 2 (from WS with salt and pepper): K the first 8-8-8-10-10-10 (until st with marker), turn. ROW 3 (from RS with salt and pepper):Tighten yarn and K 8-8-8-10-10-10. ROW 4 (from WS with salt and pepper): K all sts. Always K YOs from WS to make holes. ROW 5 (from RS with black): K 40-43-45-47-49-51, 1 YO, K 1, 1 YO, K 1 (= st with marker), 1 YO, K 7-7-7-9-9-9, 1 YO, K 1. Turn = 54-57-59-63-65-67 sts on needle. ROW 6 (from WS with black): K the first 10-10-10-12-12-12 (until st with marker), turn. ROW 7 (from RS with black):Tighten yarn and K 10-10-10-12-12-12. ROW 8 (from WS with black): K all sts. Work these 8 rows (= pattern, work 8 rows before marker and 4 rows after marker) 15-17-19-20-23-25 times in total, there are now 166-185-203-215-241-259 sts on needle. At beg of next 1st row in pattern bind off the first 4 sts on row (= neck), then K the rest of row with inc as before = 166-185-203-215-241-259 sts. Continue pattern 5-5-5-5-5-6 more times (the 8 rows in pattern have been worked 20-22-24-25-28-31 times in total) - there are now 202-221-239-251-277-303 sts on needle. Bind off the first 116-127-137-143-157-171 sts, now only work over the last 86-94-102-108-120-132 sts on row (= bottom edge), work in garter st back and forth over these sts for 8-5-2-1-1-1 cm / 3"-2"-¾"-½"-½"-½" with STRIPES BODY – see explanation above, finish after 2 rows black. Bind off. SLEEVE: Worked in the round on double pointed needles. Cast on 40-42-44-46-48-50 sts on double pointed needles size 4 mm / US 6 with black. Work 3 ridges in GARTER ST - see explanation above. Insert 1 marker at beg of round = mid under sleeve. Then work in stockinette st and STRIPES SLEEVE. When piece measures 8-8-8-12-12-10 cm / 3"-3"-3"-4¾"-4¾"-4", inc 1 st on each side of marker under sleeve. Inc every 2-2-2-1½-1½-1½ cm / ¾"-¾"-¾"-½"-½"-½" 19-21-22-23-24-25 times in total = 78-84-88-92-96-100 sts. When piece measures 51-50-49-48-46-44 cm / 20"-19¾"-19¼"-19"-18"-17¼", continue piece back and forth on needle. Continue to work until sleeve measures 54-53-52-52-50-48 cm / 21¼"-21"-20½"-20½"-19¾"-19". Bind off. ASSEMBLY: Sew back piece tog mid back. Sew the shoulder seams. Sew in sleeves, sew the top 3-3-3-4-4-4 cm / 1⅛"-1⅛"-1⅛"-1½"-1½"-1½" of sleeve to the 7-7-7-9-9-9 sts (= where the marker is) on cast on edge to front and back piece. Sew side seams in outer loops of edge sts. Sew the collar tog mid back and sew it to the back piece. Sew the buttons on to left front piece. |
|
 |
|
Have you finished this pattern?Tag your pictures with #dropspattern #midnightroadscardigan or submit them to the #dropsfan gallery. Do you need help with this pattern?You'll find 26 tutorial videos, a Comments/Questions area and more by visiting the pattern on garnstudio.com. © 1982-2026 DROPS Design A/S. We reserve all rights. This document, including all its sub-sections, has copyrights. Read more about what you can do with our patterns at the bottom of each pattern on our site. |
|


With over 40 years in knitting and crochet design, DROPS Design offers one of the most extensive collections of free patterns on the internet - translated to 17 languages. As of today we count 324 catalogs and 12290 patterns - 12280 of which are translated into English (US/in).
We work hard to bring you the best knitting and crochet have to offer, inspiration and advice as well as great quality yarns at incredible prices! Would you like to use our patterns for other than personal use? You can read what you are allowed to do in the Copyright text at the bottom of all our patterns. Happy crafting!
Post a comment to pattern DROPS 173-14
We would love to hear what you have to say about this pattern!
If you want to leave a question, please make sure you select the correct category in the form below, to speed up the answering process. Required fields are marked *.