
Popular categories
Looking for a yarn?


Comments / Questions (149)
![]() Lily Ruiz wrote:
Lily Ruiz wrote:
Cual es la mitad izquierda de la espalda?? ... cual es el frente izquierdo?? ... como debo mirar la prenda para determinar el lado izquierdo o derecho?? Mil gracias por la respuesta
18.06.2022 - 15:04DROPS Design answered:
Hola Lily, el lado izquierdo y derecho de la prenda son los que estarían a la izquierda y a la derecha cuando tienes la prenda puesta.
18.06.2022 - 15:35
![]() Randi Eibye wrote:
Randi Eibye wrote:
Forstår jeg det rigtigt, at det er vrangsiden af det færdige arme, der vender udad, og den glatte/ret- side, der vender indad?
13.06.2022 - 21:32DROPS Design answered:
Hej Randi, ja du syr ærmerne i så det glatstrikkede vender indad mod vrangen :)
15.06.2022 - 15:48
![]() Kim wrote:
Kim wrote:
Hallo, ik ben met het voorpand bezig. Ik begrijp deze zin niet: “ Minder dan elke nld langs hals 1 st naast 3 kant st elke nld aan de goede kant ”. Wat wordt bedoeld met “1 st naast 3 kant st”? Hoe moet ik hier minderen?
12.03.2022 - 21:15
![]() Anneli Mäkelä wrote:
Anneli Mäkelä wrote:
Jag håller på och stickar Drops-modellen 173-4 i XS. Jag har stickat de båda dominorutorna och lagt dem på en rundsticka. Men så kom följande : Arb stickas tills med m från mitt bak (dvs spetsen av dominorutan) och åt sidan, ned till spetsen mitt fram, upp åt sidan och ned till mitt bak. Lägg upp 16 m på rundst 3,5 med grå. Jag förstår inte VAR jag skall lägga upp 16 m. På en ny rundsticka eller mellan dominorutorna. Tacksam för svar.
17.11.2021 - 22:58DROPS Design answered:
Hej Anneli, du lägger upp 16 nya maskor, efterhand som du stickar över de 16 nya maskorna, stickas de ihop med var annat varv, från spetsen mitt bak, som det står under VÄNSTER BAKST NEDERKANT - osv. Lycka till :)
23.11.2021 - 15:43
![]() Martine wrote:
Martine wrote:
Bij de onderkant van het linkervoorpand staat onderaan dat bij de 8e of 2e naald bij de laatste herhaling de eerste 3 st van de hulpdraad terug op de naald moet worden gezet. Ik heb alleen niets op een hulpdraad. Wat wordt er precies mee bedoeld? Dit geld ook voor de onderkant van het rechterpand.
21.09.2021 - 17:50DROPS Design answered:
Dag Martine,
Dat is inderdaad niet duidelijk, maar volgens mij wordt er bedoeld dat je de laatste 3 steken op de naald zet in plaats van ze samen te breien. Dit is dus bij de zijnaden.
22.10.2021 - 17:52
![]() Jette Ottesen wrote:
Jette Ottesen wrote:
Hej Garnstudio, Jeg forstår ikke jeres oplysninger om materialer. I skriver, at der skal bruges grå og sand, men så vidt jeg kan se, er der flere nuancer, bl.a. brun. Kan I hjælpe? Mvh. Jette
18.01.2021 - 21:10DROPS Design answered:
Hej Jette, hvis du kigger på DROPS Fabel farvekortet, så kan du se at farve 200 grå er ensfarvet og 651 sand er flerfarvet. Sand er dog ved at udgå men det kan være nogle af vores forhandlere som stadigvæk har det. Ellers må du vælge en af de andre flotte flerfarvede fra farvekortet. God fornøjelse!
19.01.2021 - 15:45
![]() Maaike Joustra wrote:
Maaike Joustra wrote:
Hallo, en bedankt voor het snelle antwoord over de korte ribbels. Ben nu de instructies van de mouw aan het doorlezen. Begrijp ik het goed dat er eerst in het rond word gebreid en dan op een gegeven moment heen en weer? Hoe gaat dat in z’n werk? Alvast bedankt.
27.11.2020 - 10:11DROPS Design answered:
Dag Maaike,
Ja, dat klopt, het laatste deel, de kop van de mouw, wordt heen en weer gebreid.
30.11.2020 - 20:27
![]() Maaike Joustra wrote:
Maaike Joustra wrote:
Hallo, ik ben begonnen met de achterkant, her stuk boven de domino. Ik brei maar L. Volgens de beschrijving zouden er voor maar L-XXXL extra ribbels gebreid moeten worden, maar ik zie alleen maar 0 keer op verschillende plaatsen in de tekst. Wat is de bedoeling?
16.11.2020 - 11:54DROPS Design answered:
Dag Maaike,
Waar het getal 0 staat hoef je inderdaad 0 cm ribbels steken te breien, maar er staat alleen een 0 voor maat S en M (de getallen van alle maten zijn weergegeven.
18.11.2020 - 12:12
![]() Ute Ortland wrote:
Ute Ortland wrote:
Vielen, vielen herzlichen Dank. Da habe ich total falsch gedacht. Jetzt habe ich es begriffen. Danke für die Geduld
05.08.2020 - 18:12
![]() Ute Ortland wrote:
Ute Ortland wrote:
Das heißt, ich stricke durch das Vorderteil mit grau durch und dann Mit der ersten Reihe beginnen?
05.08.2020 - 09:59DROPS Design answered:
Liebe Frau Ortland, die 1. Reihe ist eine normale Reihe über alle Maschen (keine verkürzte Reihe = die 8. Reihe am Rückenteil wird über alle Maschen gestrickt) - die 2 ersten Reihen stricken Sie mit Grau (1. Reihe = Hinreihe) - dann stricken Sie REihe 3 bis 8 mit Sand, und die Reihe 1 bis 8 wiederholen. Viel Spaß beim stricken!
05.08.2020 - 16:19
|
||||||||||||||||
Tauriel#taurielsweater |
||||||||||||||||
|
|
||||||||||||||||
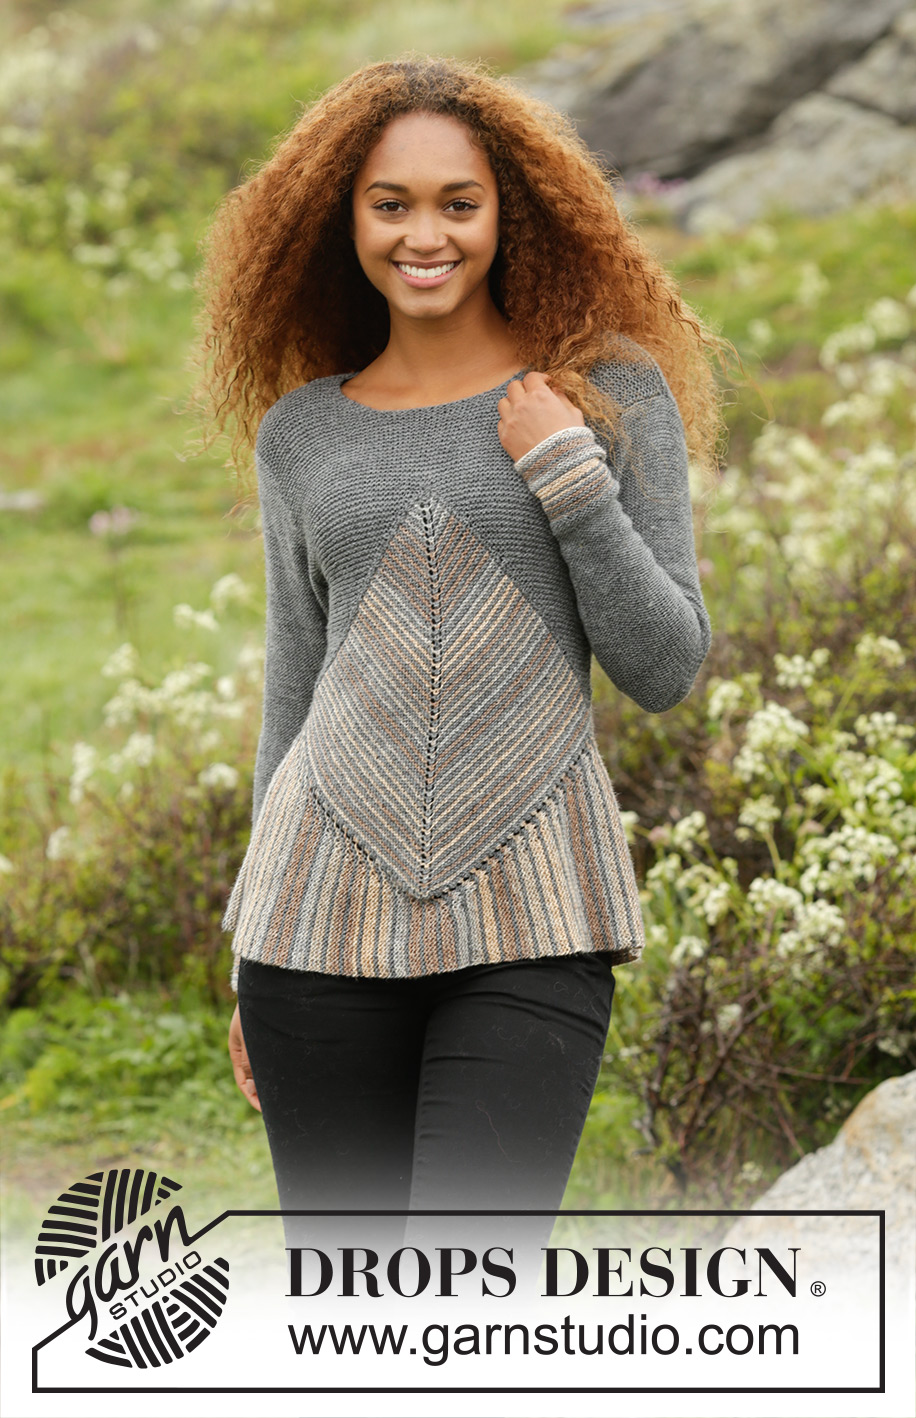
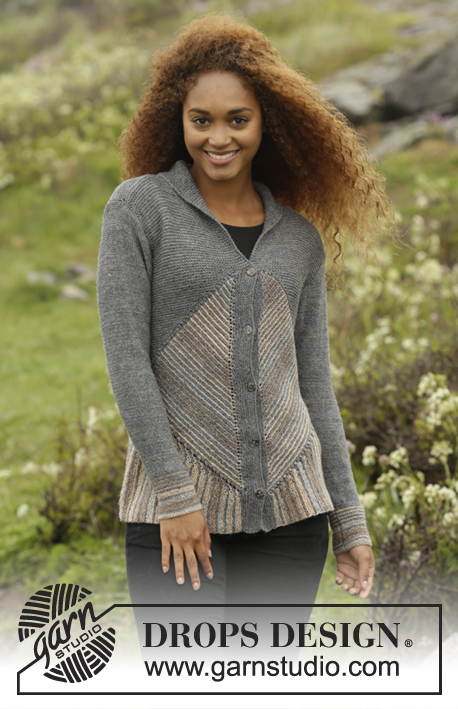
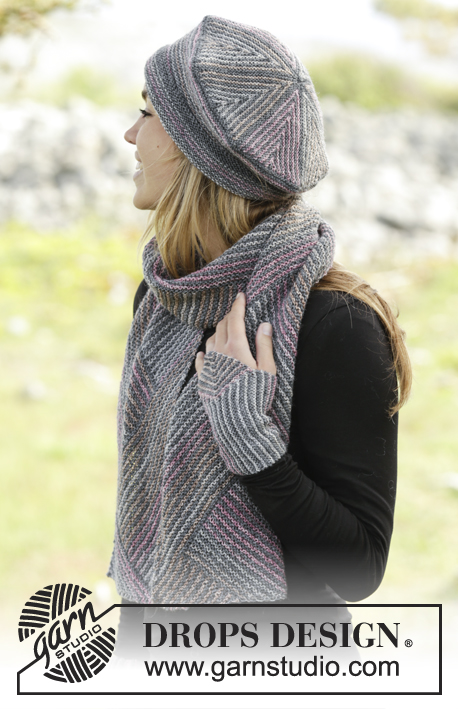
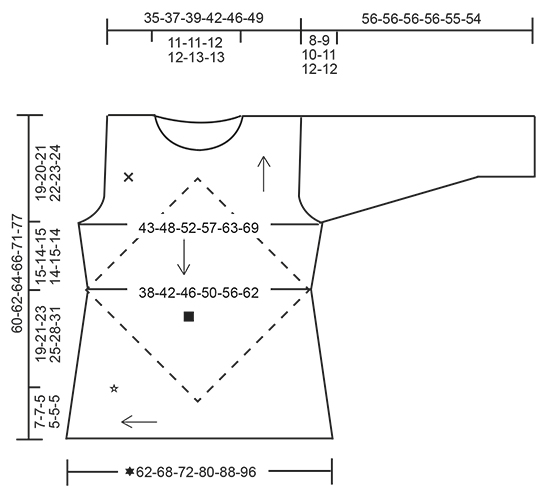
Knitted DROPS jumper in garter st with domino squares and stripes in ”Fabel”. Size: S - XXXL.
DROPS 173-4 |
||||||||||||||||
|
GARTER ST (back and forth): K all rows. 1 ridge = K2 rows. STRIPES: * Work 1 ridge in GARTER ST - see explanation above, with sand. Work 1 ridge with gray. *, repeat from *-* until finished measurements. First row with new color is always from RS. DOMINO SQUARE: Insert 1 marker in the middle st. ROW 1 (= RS): K until st with marker, 1 YO, K 1 (st with marker), 1 YO, K the rest of row (= 2 sts inc). ROW 2 (= WS): K all sts. Repeat 1st and 2nd row, i.e. inc 2 sts in the middle of the square on every row from RS. INCREASE TIP (applies to sleeve): All inc are done from RS. Work until 2 sts remain before marker, 1 YO (= 1 st inc), K 4 (marker is in the middle of these sts), 1 YO (= 1 sts inc). Work YO twisted on next round. PATTERN (applies to sleeve): Work * 3 ridges with sand, work 1 ridge with gray *, repeat from *-* 4 times in total, then work stripes as follows: Work * 1 ridge with sand, work 1 ridge with gray *, repeat from *-* 4 times in total. Now work piece in gray until finished measurements. Turn piece inside out to that WS is outwards and continue in stockinette st. ---------------------------------------------------------- JUMPER: Work first 2 domino squares – see square on chart, then work 1 edge to sts on domino square (i.e. bottom edge of jumper) with short rows - see star on chart. Edge is worked from mid back to mid front and mid back again. Finally work a yoke on jumper over domino square - se cross on chart. BACK PIECE: DOMINO SQUARE: Cast on 5 sts on circular needle size 3.5 mm / US 4 with gray. K 1 row from WS. Switch color to sand and work DOMINO SQUARE - see explanation above, back and forth and STRIPES – see explanation above. REMEMBER THE KNITTING GAUGE Work Domino square and stripes until piece measures 38-42-46-50-56-62 cm / 15"-16½"-18"-19 3/4"-22"-24½" at the widest = approx. 62-68-74-82-90-100 ridges, adjust so that last ridge is with sand, and approx. 64-70-76-84-92-102 sts on each side of st with marker (= approx. 129-141-153-169-185-205 sts in total on needle). Work 1 ridge with gray and inc as before (i.e. 1 st on each side of st with marker) and inc 4 sts evenly on each side of mid st on row from RS (= 10 sts inc in total on row from RS) = approx. 69-75-81-89-97-107 sts on each side of st with marker (= approx. 139-151-163-179-195-215 sts in total on needle). Slip sts on a stitch holder and work front piece domino square. FRONT PIECE: DOMINO SQUARE: Cast on and work as back piece domino square. Slip sts from domino on back piece back on needle tog with sts from front piece domino square. Insert 1 marker between transition between them (= 2 markers) = approx. 278-302-326-358-390-430 sts in total. BOTTOM EDGE: Work piece tog with sts from mid back (i.e. tip of domino) and to the side, down to tip mid front, up to the side and down to mid back. Cast on 16-16-12-12-12-12 sts on circular needle size 3.5 mm / US 4 with gray. Work short rows and stripes as follows: LEFT BACK PIECE BOTTOM EDGE: Work tog with sts from tip mid back and out to marker in the side as follows: ROW 1 (= RS): K 1, 1 YO and K rest of row (= 1 st inc). ROW 2 (= WS): K until 1 st remains on row, work next st tog with the first 2 sts from domino (= K 3 tog = 2 sts dec from domino) Switch to sand. ROW 3 (= RS): As 1st row. ROW 4 (= WS): K until 5 sts remain on row, turn piece. ROW 5 (= RS): K all sts. ROW 6 (= WS): K until 3 sts remain on row, turn piece. ROW 7 (= RS): K all sts. ROW 8 (= WS): K until 1 st remains on row, work next st tog with the first 2 sts from domino (= K 3 tog = 2 sts dec from domino). Switch color to gray. Repeat 1st to 8th row until all sts from tip of domino out to the side until marker has been worked tog with the edge. LEFT FRONT PIECE BOTTOM EDGE: Worked tog with sts from the side and down to tip of domino square on front piece as follows: ROW 1 (= RS): K 1, 1 YO, K 2 twisted tog, K 2 twisted tog, K the rest of row (= 1 st dec). ROW 2 (= WS): K until 1 st remains on row, work next st tog with the first 2 sts from domino (= K 3 tog = 2 sts dec from domino). Switch to sand. ROW 3 (= RS): As 1st row. ROW 4 (= WS): K until 5 sts remain on row, turn piece. ROW 5 (= RS): K all sts. ROW 6 (= WS): K until 3 sts remain on row, turn piece. ROW 7 (= RS): K all sts. ROW 8 (= WS): K until 1 st remains on row, work next st tog with the first 2 sts from domino (= K 3 tog = 2 sts dec from domino) Switch color to gray. Repeat 1st to 8th row down to tip mid front. NOTE: On last repetition of 8th or 2nd row slip the first 3 sts from stitch holder back on needle. RIGHT FRONT PIECE BOTTOM EDGE: Work tog with sts from tip of domino square on front piece and out to marker in the side as left back piece bottom edge. RIGHT BACK PIECE BOTTOM EDGE: Worked tog with sts from the side and down to tip of domino square on front piece as left front piece bottom edge. Adjust so that last stripe is with sand. Bind off. BACK PIECE: Now work yoke on back piece with gray as follows: RIGHT BACK PIECE: Pick up 64-70-76-84-92-102 sts with gray from RS on needle size 3.5 mm / US 4 on one side of domino, pick up 2 sts on tip of domino, pick up 64-70-76-84-92-102 sts down the other side of domino = 130-142-154-170-186-206 sts. K 1 row from WS and inc 15-13-13-11-13-9 sts evenly on each side of tip (= 30-26-26-22-26-18 sts inc in total) = 80-84-90-96-106-112 sts on each side (= 160-168-180-192-212-224 sts in total). Then work over the first 80-84-90-96-106-112 sts (i.e. in right side of piece seen from RS) as follows: READ ALL OF THE FOLLOWING SECTION BEFORE CONTINUING! WORK SHORT ROWS, SHORT RIDGES AND INC IN THE SIDE AT THE SAME TIME AS FOLLOWS: Row 1 (= RS): K the first 2 sts tog, turn piece (= 1 st). Row 2 (= WS): K back. Row 3 (= RS): K 1, insert 1 marker, K the next 2 sts from domino tog, turn piece (= 2 sts). Move the marker upwards when working. Row 4 (= WS): K back. Row 5 (= RS): K 2, K the next 2 sts tog, turn piece (= 3 sts). Row 6 (= WS): K back. Row 7 (= RS): K 3, K the next 2 sts tog, turn piece (= 4 sts). Row 8 (= WS): K back. Continue the short rows like this, i.e. work over 2 sts more on every row from RS but work them 2 K tog, i.e. 2 sts become 1 st. Continue like this until all sts up to tip of domino have been worked. SHORT RIDGES: Applies only to size L-XL-XXL-XXXL: When piece measures 0-0-2-2-2-2 cm / 0"-0"-3/4"-3/4"-3/4"-3/4", work 0-0-1-1-1-1 short ridge (i.e. work from RS until where the last turn was, turn piece and work back = 2 rows = 1 short ridge) over the sts already worked, work short ridge every 0-0-5-4-3-2 cm / 0"-0"-2"-1½"-1"-3/4" 0-0-4-6-8-11 times in total. INC IN THE SIDE: When yoke measures 1 cm / 3/8'', inc 1 st inside 1 edge st at beg of next row from RS. Inc like this every 1½-1-1-½-½-½ cm/½"-3/8"-3/8"-1/4"-1/4"-1/4" 9-12-14-17-19-22 times in total = 10-13-15-18-20-23 sts before marker. When yoke measures 15-14-15-14-15-17 cm / 6"-5½"-6"-5½"-6"-6 3/4" (measured along the side), bind off for armhole at beg of every row from RS as follows: bind off 3 sts a total of 1-1-2-2-2-3 times, 2 sts a total of 1-2-2-3-4-4 times and 1 st a total of 4-5-4-5-5-5 times (i.e. 1 st remains before marker). Piece measures approx. 19-21-23-25-28-31 cm / 7½"-8 1/4"-9"-9 3/4"-11"-12 1/4" measured in the side from domino and up. When the short rows have been worked, there are 40-42-45-48-53-56 sts in total on needle. Slip sts on 1 stitch holder and work left back piece. LEFT BACK PIECE: = 80-84-90-96-106-112 sts. READ ALL OF THE FOLLOWING SECTION BEFORE CONTINUING! WORK SHORT ROWS, SHORT RIDGES AND INC IN THE SIDE AT THE SAME TIME AS FOLLOWS: SHORT ROWS: Row 1 (= WS): Work the first 2 sts from domino, turn piece. Row 2 (= RS): Work the 2 sts K tog (= 1 st). Row 3 (= WS): K 1, insert 1 marker, work the next 2 sts from domino, turn piece (= 3 sts). Move the marker upwards when working. Row 4 (= RS): K 2 tog, K 1 (= 2 sts). Row 5 (= WS): K 2, work the next 2 sts from domino, turn piece (= 4 sts). Row 6 (= RS): K 2 tog, K the rest of row. Row 7 (= WS): K, work the next 2 sts from domino, turn piece (= 4 sts). Row 8 (= RS): K 2 tog, K the rest of row. Continue the short rows like this, i.e. work over 2 sts more from domino on every row from WS and dec 1 st at beg of the every row from RS, i.e. 2 sts become 1 st. Continue like this until all sts up to tip of domino have been worked. SHORT RIDGES: Applies only to size L-XL-XXL-XXXL: When piece measures 0-0-2-2-2-2 cm / 0"-0"-3/4"-3/4"-3/4"-3/4", work 0-0-1-1-1-1 short ridge (i.e. work from WS until where the last turn was, turn piece and work back = 2 rows = 1 short ridge) over the sts already worked, work short ridge every 0-0-5-4-3-2 cm / 0"-0"-2"-1½"-1"-3/4" 0-0-4-6-8-11 times in total. INC IN THE SIDE: When yoke measures 1 cm / 3/8'', inc 1 st inside 1 edge st at end of next row from RS. Inc like this every 1½-1-1- ½-½-½ cm/½"-3/8"-3/8"-1/4"-1/4"-1/4" 9-12-14-17-19-22 times in total = 10-13-15-18-20-23 sts before marker. When yoke measures 15-14-15-14-15-17 cm / 6"-5½"-6"-5½"-6"-6 3/4" (measured along the side), bind off for armhole at beg of every row from WS as follows: bind off 3 sts a total of 1-1-2-2-2-3 times, 2 sts a total of 1-2-2-3-4-4 times and 1 st a total of 4-5-4-5-5-5 times (i.e. 1 st remains after marker). Piece measures approx. 19-21-23-25-28-31 cm / 7½"-8 1/4"-9"-9 3/4"-11"-12 1/4" measured in the side from domino and up. When the short rows have been worked, there are 40-42-45-48-53-56 sts in total on needle. BACK PIECE: Slip sts from right and left back piece on to same needle = 80-84-90-96-106-112 sts. Work in garter st. When piece measures 13-11-11-9-8-8 cm / 5"-4½"-4½"-3½"-3½"-3" from tip of domino (approx. 2 cm / 3/4'' remain), bind off the middle 34-34-38-38-40-40 sts for neck and finish each shoulder separately = 23-25-26-29-33-36 sts remain on shoulder. On next row from the neck dec 1 st = 22-24-25-28-32-35 sts. Work in garter st until piece measures 15-13-13-11-10-10 cm / 6"-5"-5"-4½"-4"-4'' from tip of domino. Bind off. The whole piece measures approx. 60-62-64-66-71-77 cm / 23½"-24½"-25 1/4"-26"-28"-30½". Work the other shoulder the same way. FRONT PIECE: RIGHT FRONT PIECE: Work as left back piece. LEFT FRONT PIECE: Work as right back piece. FRONT PIECE: Slip sts from right and left front piece on to same needle = 80-84-90-96-106-112 sts. Work in garter st. When piece measures 8-6-4-2-1-1 cm / 3"-2 1/4"-1½"-3/4"-½"-½" from tip of domino, loosely bind off the middle 20 sts for neck and finish each shoulder separately = 30-32-35-38-43-46 sts remain on shoulder. Then dec on every row from neck by dec 1 st inside 3 edge sts on every row from RS 8-8-10-10-11-11 times in total = 22-24-25-28-32-35 sts remain on shoulder. Work in garter st until piece measures 7-7-8-8-9-9 cm / 2¾''-2¾''-3 1/8''-3 1/8''-3½''-3½'' in total from the 20 sts bind off for neck, bind off. The whole piece measures approx. 60-62-64-66-71-77 cm / 23½"-24½"-25 1/4"-26"-28"-30½". Work the other shoulder the same way. SLEEVE: Worked in the round on double pointed needles. Cast on 46-48-50-54-56-58 sts on double pointed needles size 3.5 mm / US 4 with sand. Work PATTERN - see explanation above. When piece measures 14-12-10-8-3 cm / 5½"-4 3/4"-4"-3"-1", insert 1 marker at beg of round, inc 1 st on each side of marker – see INCREASE TIP. Inc like this every 1½ cm / ½'' 21-22-23-24-25-26 times in total = 88-92-96-102-106-110 sts. When piece measures 48-47-46-45-43-42 cm / 19"-18½"-18"-17 3/4"-17"-16½" (shorter measurements in the larger sizes because of longer sleeve cap and wider shoulders). Continue to work back and forth and bind off for sleeve cap at beg of every row in each side of piece as follows: bind off 4 sts 2 times, 2 sts 3 times and 1 st 2 times, then bind off 2 sts in each side until piece measures 56-56-56-56-55-54 cm / 22"-22"-22"-22"-21½"-21½", then bind off 3 sts 1 time in each side of piece. Bind off the remaining sts. Make another sleeve the same way. ASSEMBLY: Assemble with gray. Sew bottom edge tog mid back in outer loop of outermost st. Sew the shoulder seams. Sew in sleeves with WS outwards, i.e. stockinette st is turned inwards. Sew side seams down to bottom edge in outer loop of edge sts. |
||||||||||||||||
Diagram explanations |
||||||||||||||||
|
||||||||||||||||
 |
||||||||||||||||
Have you finished this pattern?Tag your pictures with #dropspattern #taurielsweater or submit them to the #dropsfan gallery. Do you need help with this pattern?You'll find 26 tutorial videos, a Comments/Questions area and more by visiting the pattern on garnstudio.com. © 1982-2026 DROPS Design A/S. We reserve all rights. This document, including all its sub-sections, has copyrights. Read more about what you can do with our patterns at the bottom of each pattern on our site. |
||||||||||||||||


With over 40 years in knitting and crochet design, DROPS Design offers one of the most extensive collections of free patterns on the internet - translated to 17 languages. As of today we count 324 catalogs and 12290 patterns - 12280 of which are translated into English (US/in).
We work hard to bring you the best knitting and crochet have to offer, inspiration and advice as well as great quality yarns at incredible prices! Would you like to use our patterns for other than personal use? You can read what you are allowed to do in the Copyright text at the bottom of all our patterns. Happy crafting!
Post a comment to pattern DROPS 173-4
We would love to hear what you have to say about this pattern!
If you want to leave a question, please make sure you select the correct category in the form below, to speed up the answering process. Required fields are marked *.