
Popular categories
Looking for a yarn?


Comments / Questions (56)
![]() Mieke Baras wrote:
Mieke Baras wrote:
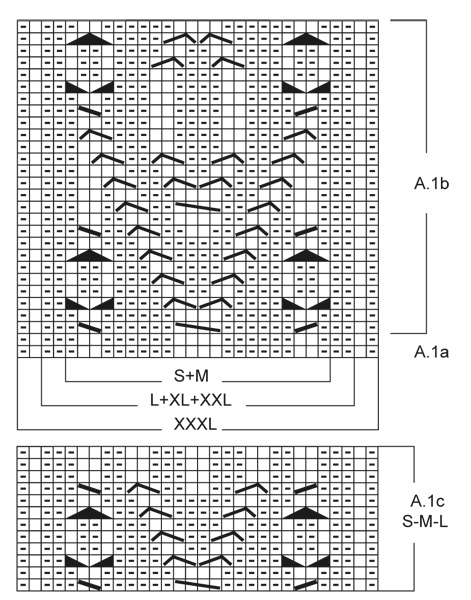
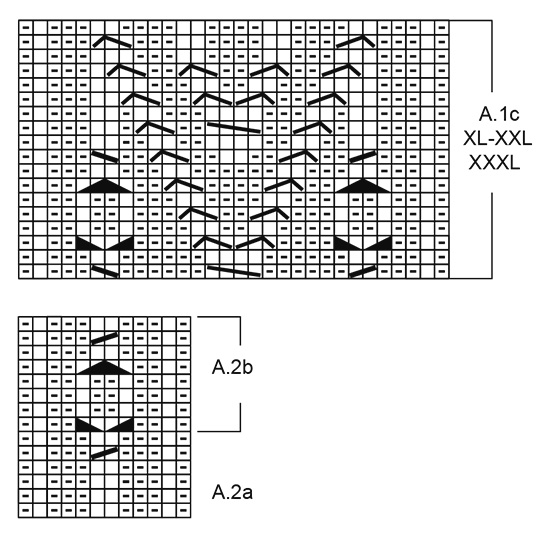
Ik denk dat er een fout zit in het schema A2a/b: 1. het schema online heeft 16 naalden, dat van het boekje slechts 15. Online gaat A2a van 1 tem 7 en A2b van 8 tem 16. A2a is juist, maar A2b loopt van 8 tem 15. Klopt dat? In het boekje begint A2b vanaf 7 en dat is fout volgens mij.
08.11.2016 - 16:46DROPS Design answered:
Hoi Mieke. Kijk onder correcties. Dit gedeelte is aangepast op 18/10 en 31/10. Wij kunnen de afgedrukte versies niet aanpassen, daarom is de online versie is altijd de nieuwste en juiste.
09.11.2016 - 14:17
![]() Sofia Apollonov wrote:
Sofia Apollonov wrote:
Hi Drops team. I have a few questions about the increases, in the increases in the raglan sleeve. How do you increases within the cable design? It is making the design look a bit strange and loosing the stitch definition. Also when you reach the 30 stitches mark what do you mean using the increases in the knitted section. And one last question, with the increases either side of the marker, are they included in the sleeve increases or the body increase. Sorry for the many questions. Thanks
24.10.2016 - 15:57DROPS Design answered:
Dear Mrs Apollonov, you first work diagram A.1a for your size, then inc working sts on each side as in diagram until the 30 sts in A.1a has been worked, then work all sts in stocking st. In larger size, you are working the 30 sts in A.1a from the beg, you will then work all inc sts in stocking st. Happy knitting!
24.10.2016 - 16:00
![]() Susanne wrote:
Susanne wrote:
Liebes Drops-Team, kommentarfeld gesprengt, daher kürzer: Wie verteile ich bei der Ärmelzunahme 26 neue Maschen zwischen 22 bestehende? Danke und herzliche Grüße Susanne
16.10.2016 - 13:18DROPS Design answered:
Liebe Suzanne, bei der Raglanzunahmen an den Ärmel werden die ersten M zuerst wie in Muster A.1b getrickt und dann wenn Sie insg. 30 M. für jeden Ärmel haben, dann stricken Sie die Zunahmen glatt re.
17.10.2016 - 10:00
![]() Lena wrote:
Lena wrote:
Er der ikke en P for meget i diagram A2b? Det bliver ikke symmetrisk med med 1p før og 2p efter snoningen over 2 masker
10.10.2016 - 23:29DROPS Design answered:
Hej Lena. Vi har rettet det. Det var egentlig taenkt saadan, men jeg er enig i det bliver paenere naar alle har samme antal p mellem snoningerne
18.10.2016 - 15:09
![]() Margret Kortstegge wrote:
Margret Kortstegge wrote:
Den Pullover habe ich gerade fertiggestellt. Die Zunahmen am Rumpfteil habe ich aber auf meine Größe "S" umgerechnet und ende mit 192 Maschen. Die Ärmel habe ich nach Anleitung fertig gestellt. Die fallen aber im Gegensatz zum Rumpf ehr eng aus. Schade!
08.10.2016 - 17:23DROPS Design answered:
Liebe Frau Korstegge, haben Sie die richtige Grösse gewählt? Hier können Sie lesen, wie man die Masse für jede Grösse prüfen kann.
10.10.2016 - 10:29
![]() De Jong wrote:
De Jong wrote:
Als alle meerderingen gemaakt zijn, staan er 292-328-356-384-408-436 st op de nld." Echter kom ik met geen mogelijkheid aan die 292 steken. Het meerderen om de naald 24 keer, houdt dat in dat er in totaal 48 toeren zijn? Hetzelfde geldt voor de 16 keer van de mouwen. Ook begrijp ik niet hoe je ruimte moet maken voor een hele patroonherhaling van 30 steken, terwijl het voor maat S maar om 22 steken gaat.
26.09.2016 - 09:35DROPS Design answered:
Hoi De Jong. Je begint met 105 st. Je meerdert 11 st gelijkmatig = 116 st. Je plaatst 4 markeerders in het werk = raglan. Je meerdert op het lijf 24 keer = 24x4 = 96 nieuwe st op het lijf. Je meerdert op de mouwen eerst 16 keer en dan 4 keer = 20x4 = 80 nieuwe st op de mouwen: 116+96+80 = 292 st. Voor de patroonherhaling. Kijk op het telpatroon. Maat S+M is gemaarkeerd en loopt alleen over 22 st, voor XXXL is het 30 st. Jij breit alleen de gemarkeerde 22 st.
26.09.2016 - 14:54
![]() Pia Kock Andersen wrote:
Pia Kock Andersen wrote:
Der synes at være en fejl i diagram A.1b i 8. linie? Skal der ikke være symmetri i ret- og vrangmaskerne på hver side af midten? I højre side er der 2 af hver indtil midten, hvor der pludselig er 3 vrangm i venstre side? Vh Pia
25.09.2016 - 04:02DROPS Design answered:
Hej Pia, jeg tror du har ret, vi lægger et nyt diagram ud så der er 3 ret masker på hver side af de 4 vrang masker i midten på 8.række i A.1
27.09.2016 - 15:59
![]() Anette Skov wrote:
Anette Skov wrote:
Der er noget galt med jeres printfunktion. Printversionerne af denne og en del andre opskrifter deler ofte lige midt i et diagram eller skærer linjer igennem. Det er svært at strikke efter et diagram, der er delt over to sider og hvor der er delt midt i en linje. Kan I ændre dette, så der tages hensyn til "horeunger" i udskriftsversionerne?
16.09.2016 - 15:07DROPS Design answered:
Hej Anette. Jeg tror det ligger i dine printindstillinger. Jeg kan printe dette diagram uden problemer. Jeg kan desvaerre ikke hjaelpe dig med at tilpasse dette.
16.09.2016 - 16:02
![]() Nica Viterbo wrote:
Nica Viterbo wrote:
Buonasera, sto realizzando questo splendido modello Drops 173/2 Irish Plaits e ho notato un errore di battitura (sono andata a controllare dal norvegese😳😄) nella spiegazione del diagramma sul penultimo simbolo che indica"trasferire 1m su un ferro ausiliario sul davanti del lavoro, 1m a rov, 2 dir dal f ausiliario" anzichè "trasferire 2 m su un ferro ausiliario ecc". Grazie.
08.09.2016 - 18:53DROPS Design answered:
Buonasera Nica. Abbiamo corretto il testo. La ringraziamo per la segnalazione. Buon lavoro!
08.09.2016 - 19:26
![]() Sabine wrote:
Sabine wrote:
Ich stricke dieses schöne Modell gerade aus selbstgesponnenem Garn in passender Stärke. Wie schon andere hier habe ich mich über die vielen Zunahmen zum unteren Ende gewundert, sie aber trotzdem gestrickt. Mit dem Ergebnis, dass der Pullover einen unschönen welligen Abschluss bekam, den ich schnellstens wieder aufgemacht habe. Nun habe ich nach der Taille nur 15 (statt 23) Mal die beschriebene Zunahme gestrickt. Vor dem Bündchen habe ich nur so viel zugenommen, dass das Muster aufgeht.
05.09.2016 - 08:22
|
||||||||||||||||||||||||||||
Irish Plaits#irishplaitssweater |
||||||||||||||||||||||||||||
 |
 |
|||||||||||||||||||||||||||
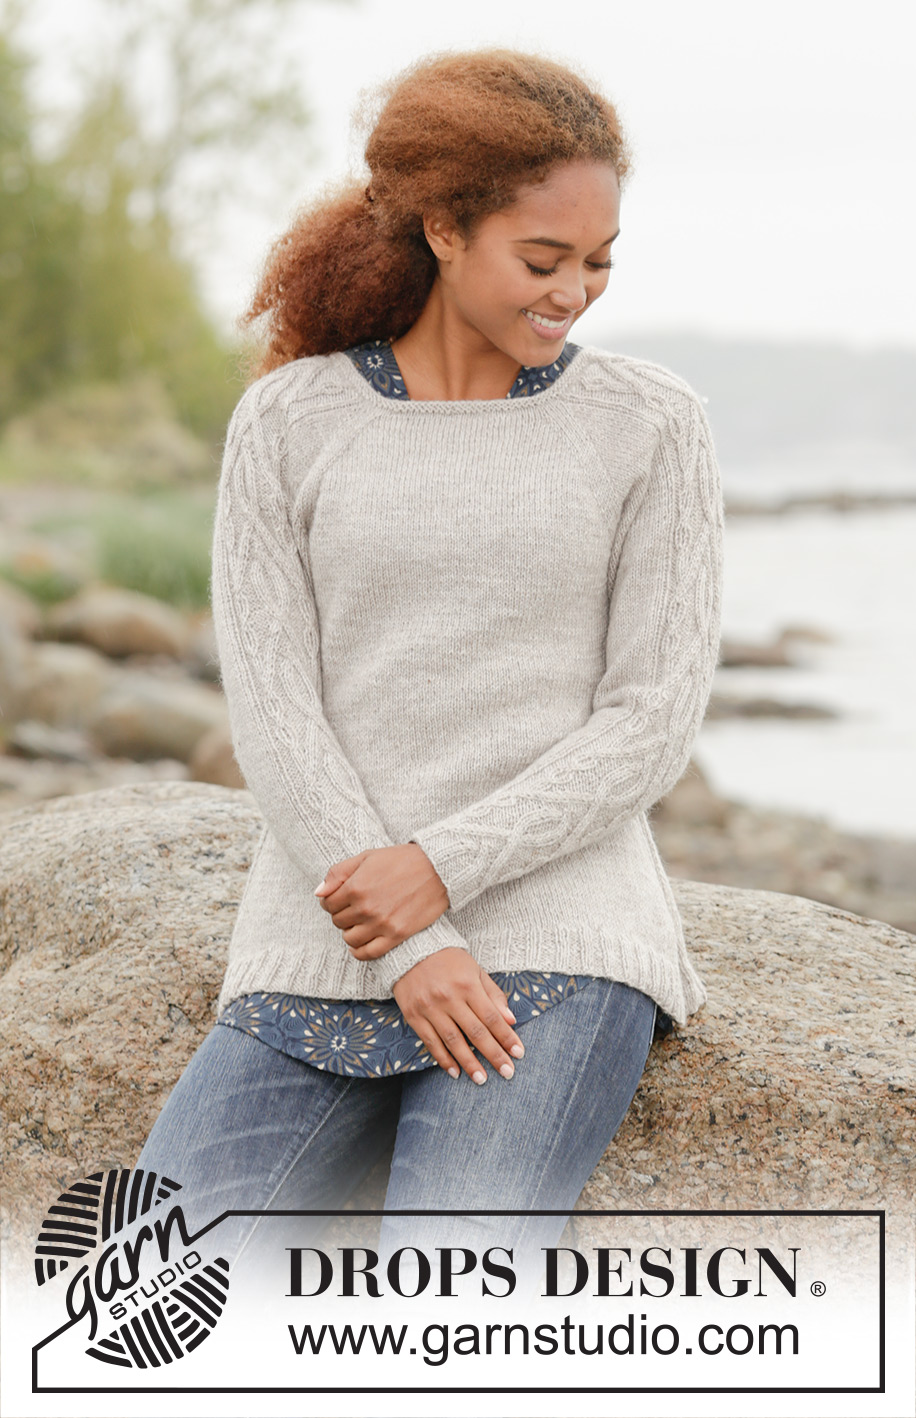
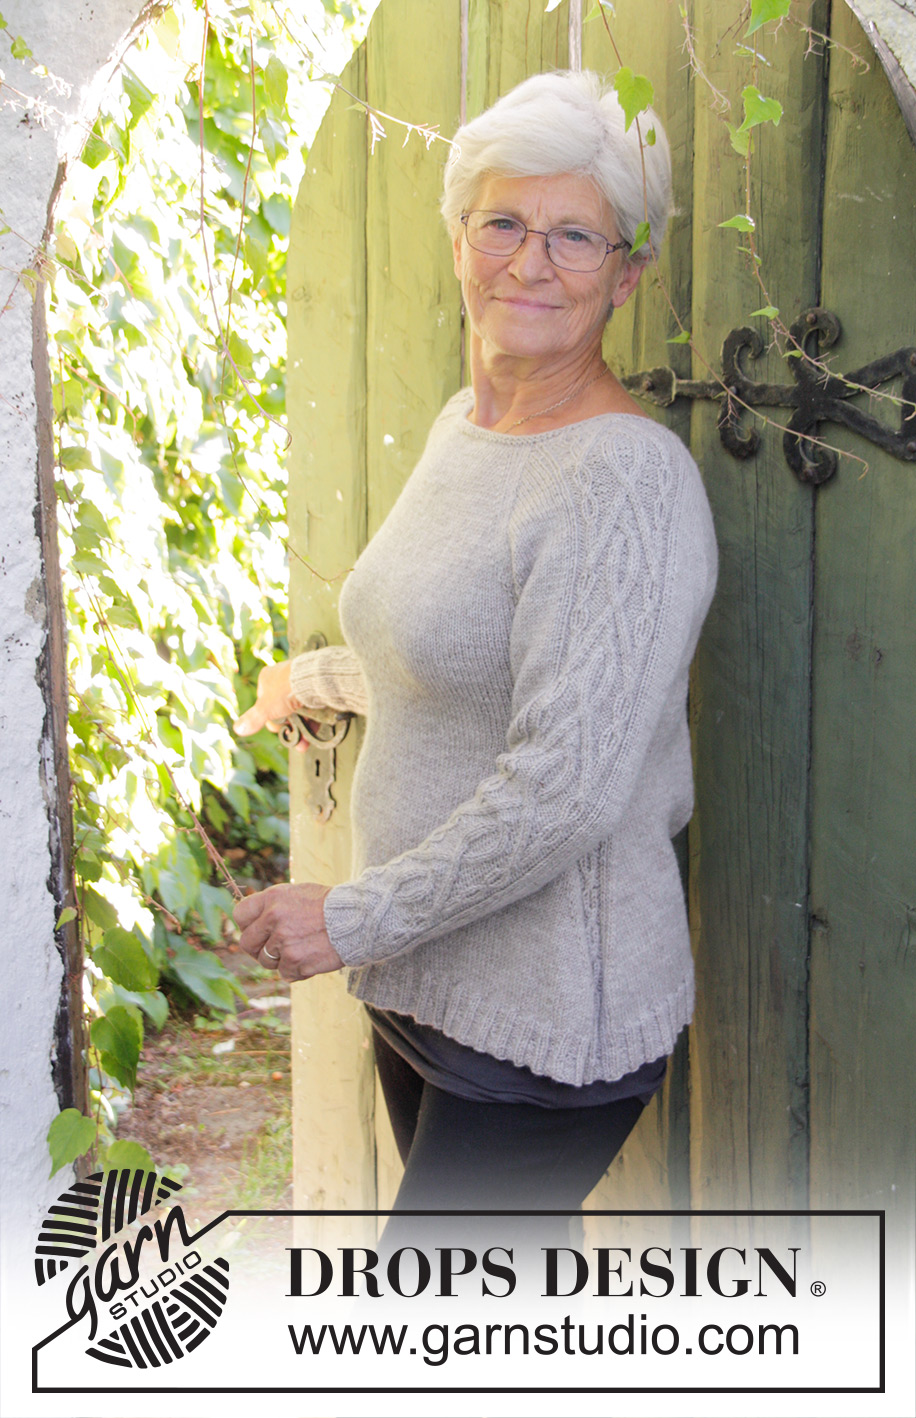
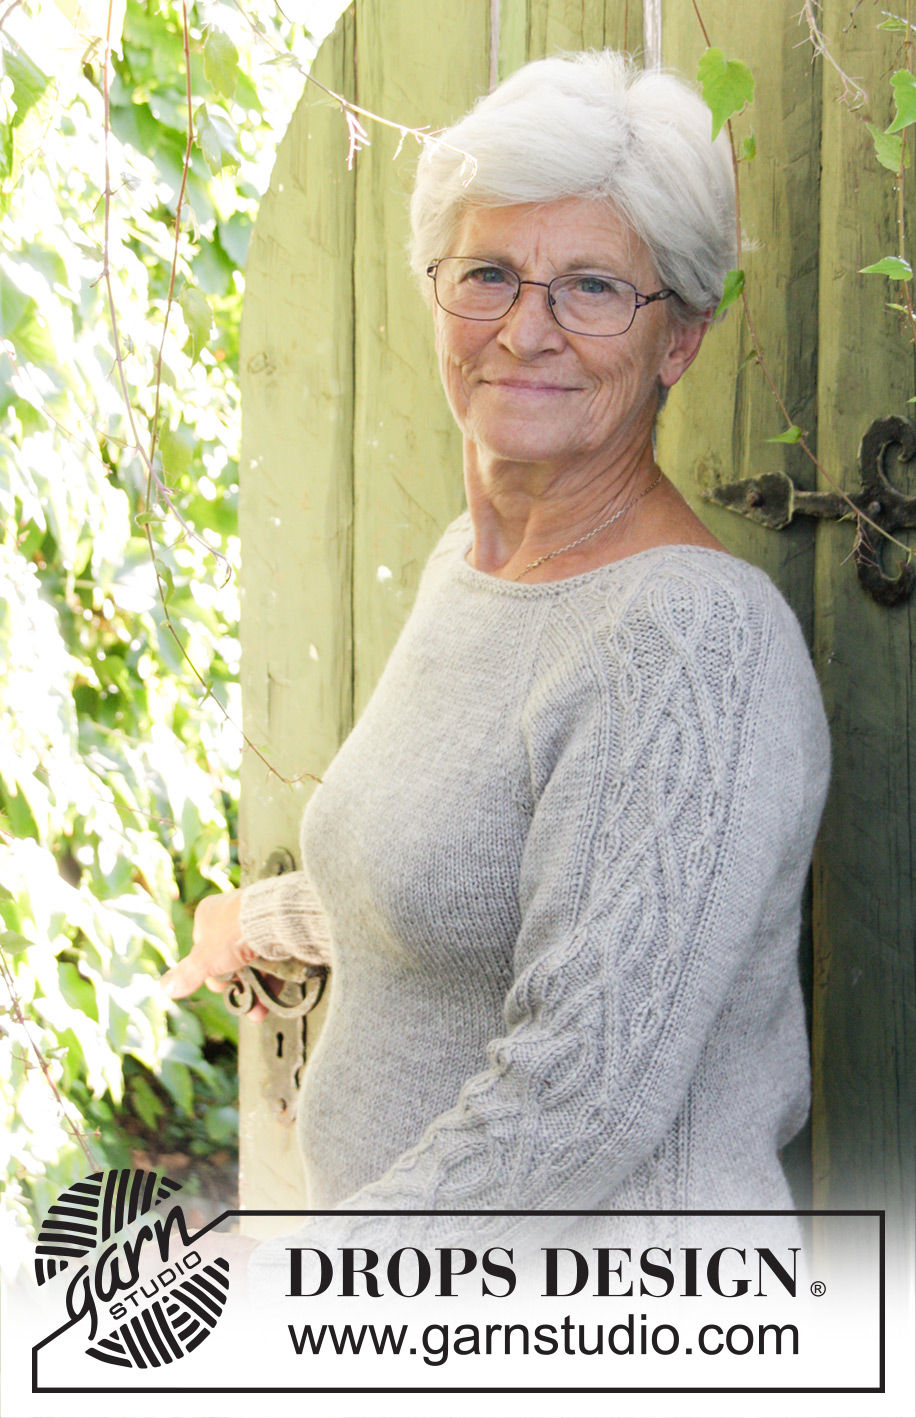
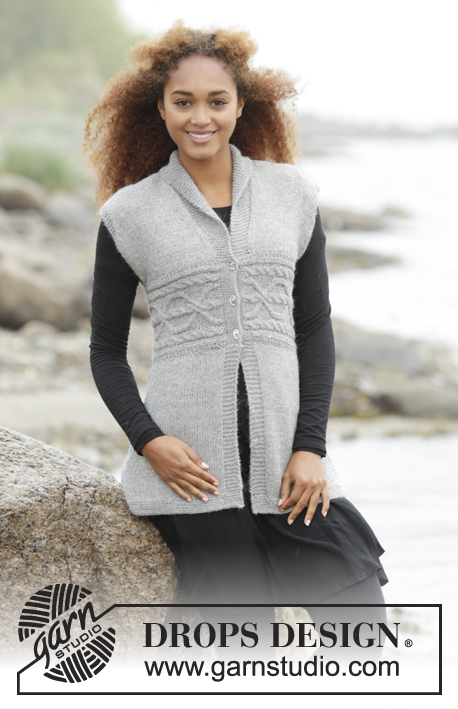
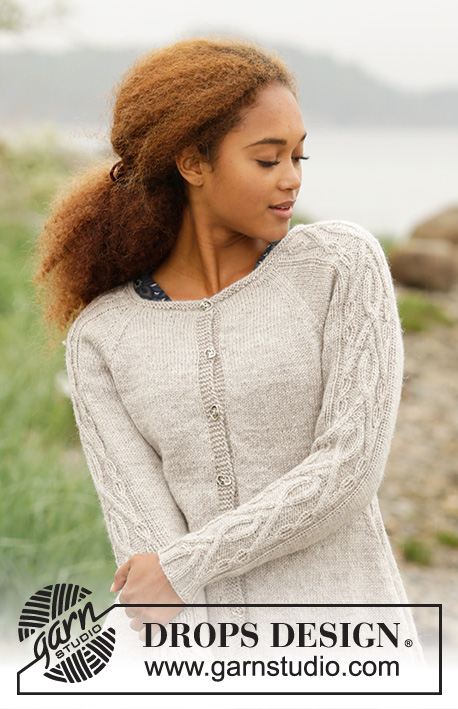
Knitted DROPS jumper with cables on sleeves, worked top down in ”Merino Extra Fine”. Size: S - XXXL.
DROPS 173-2 |
||||||||||||||||||||||||||||
|
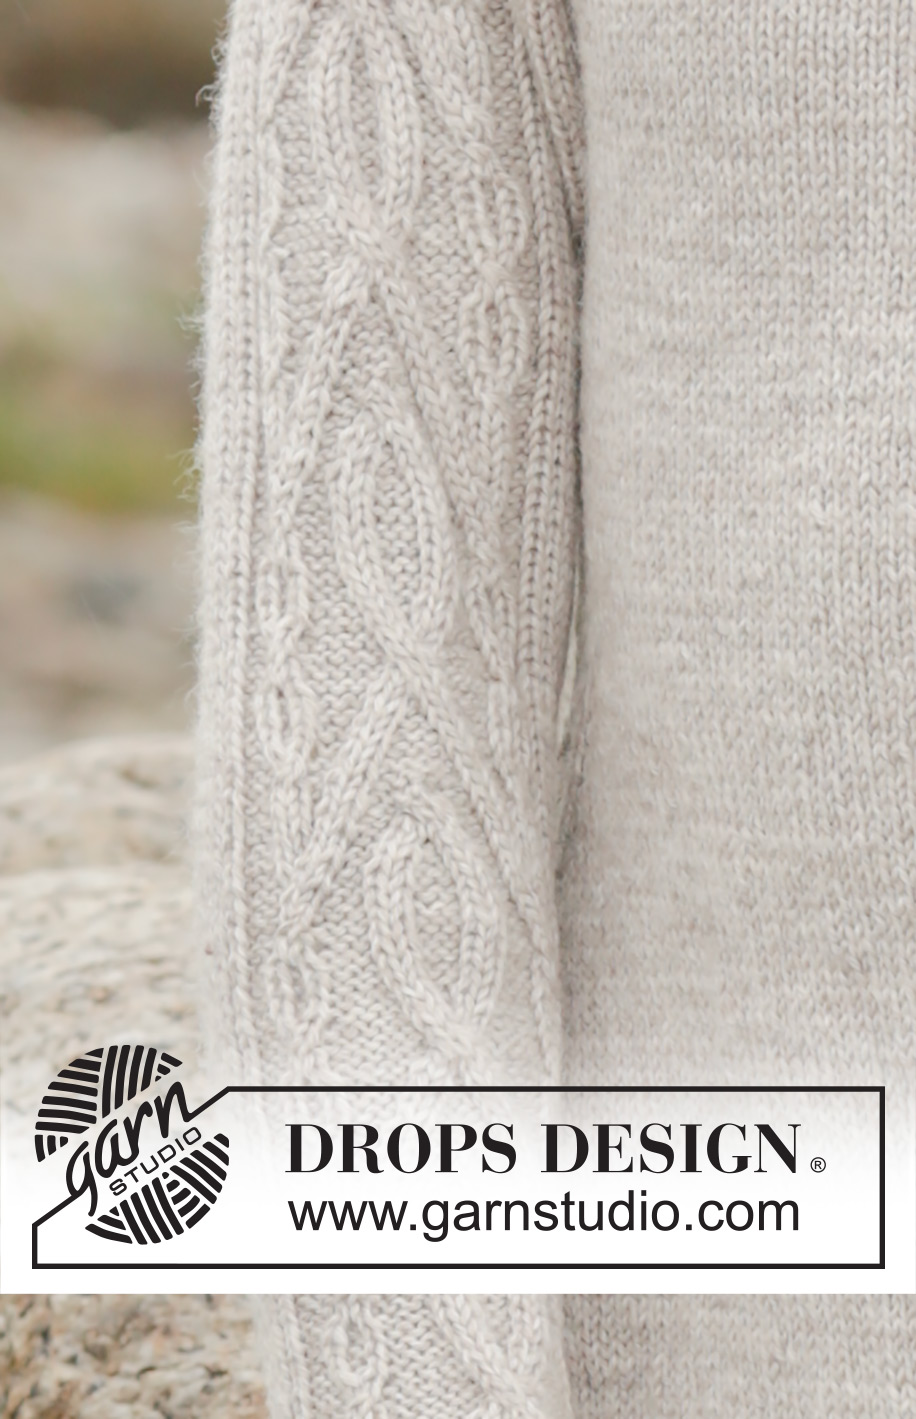
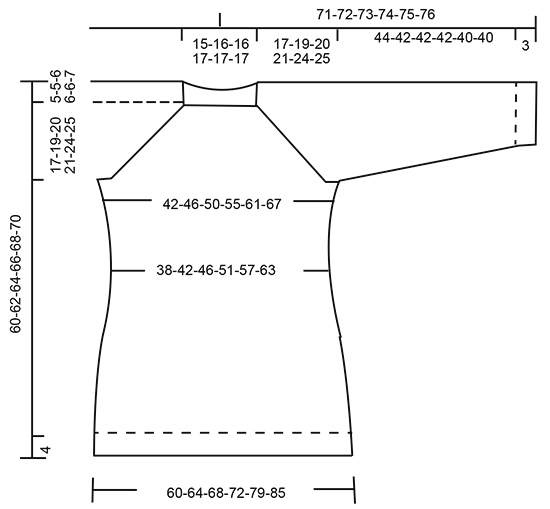
GARTER ST (worked in the round): 1 ridge = 2 rounds. * K 1 round and P 1 round *, repeat from *-*. PATTERN: See diagram A.1 (see diagram for correct size) and A.2. RAGLAN: Inc for raglan before marker and 2 sts K. Inc for raglan after marker and 2 sts K. Inc 1 st by making a YO. On next round K YOs twisted to avoid holes. DECREASE TIP: Work until 4 sts remain before A.2a/A.2b, K 2 tog, K 2, work A.2a/A.2b, K 2, slip 1 st as if to K, K 1, psso. INCREASE TIP-1 (evenly spaced): To calculate how often inc should be done, use the total no of sts on row (e.g. 105 sts) and divide these sts with no of inc to be done (e.g. 11) = 9.5. I.e. in this example inc 1 st for every 9th and 10th st. INCREASE TIP-2: Work until 2 st remains before A.2b, 1 YO, K 2, A.2b, K 2, 1 YO. Repeat inc in the other side = 4 sts inc on round. On next round K YO twisted to avoid holes. Then K the new sts. BIND-OFF TIP: If bind-off edge is tight, bind off on a needle ½ size larger. ---------------------------------------------------------- JUMPER: Worked in the round on circular needle, top down. Rounds start mid back. YOKE: Cast on 105-109-113-120-124-130 sts on circular needle size 3.5 mm / US 4 with Merino Extra Fine. Work 2 ridges in GARTER ST – see explanation above, then work as follows: K 1 round while inc 11-15-27-32-32-38 sts evenly - READ INCREASE TIP-1 = 116-124-140-152-156-168 sts. Switch to circular needle size 4 mm / US 6. Now work an elevation in back of neck, back and forth on needle in stockinette st as follows: Work 22-24-30-33-34-35 sts, turn and work 44-48-60-66-68-70 sts, turn and work 49-53-65-71-73-75 sts, turn and work 54-58-70-76-78-80 sts. Continue back and forth like this over 5 sts more on every turn until a total of 8 short rows have been worked, turn and work until mid back again. Now work in the round with pattern from mid back as follows: K the first 16-18-20-23-24-25 sts (= half back piece), insert a marker, K 2, work A.1a (choose diagram for correct size) over the next 22-22-26-26-26-30 sts, K 2 (= sleeve), insert a marker, K the next 32-36-40-46-48-50 sts (= front piece), insert a marker, K 2, work A.1a (choose diagram for correct size) over the next 22-22-26-26-26-30 sts, K 2 (= sleeve), insert a marker, K the next 16-18-20-23-24-25 sts (= half back piece). REMEMBER THE KNITTING GAUGE Continue pattern like this. When the 2 rows in A.1a have been worked, repeat A.1b over A.1a, AT THE SAME TIME on first round in A.1b beg inc for RAGLAN – see explanation above, on each side of every marker. NOTE: Inc differently on body and sleeves. RAGLAN BODY: Inc like this every round 0-0-0-2-2-6 times, and every other round 24-26-28-28-32-32 times. K the new sts. RAGLAN SLEEVES: Inc like this every other round 16-24-25-27-25-23 times, and every 4th round 4-1-1-1-4-6 times. In size S-XXL work the new sts in pattern A.1b until there is room for the entire pattern (= 30 sts). Then K the new sts. In size XXXL K all the new sts. When all inc are done there are 292-328-356-384-408-436 sts on round. Piece measures 22-24-26-27-30-32 cm / 8¾"-9½"-10¼"-10½"-11¾"-12½" from shoulder. Work next round as follows: Work the first 40-44-48-53-58-63 sts, slip the next 66-76-82-86-88-92 sts on a stitch holder (= sleeve), cast on 8-8-10-10-12-14 sts under sleeve, work the next 80-88-96-106-116-126 sts, slip the next 66-76-82-86-88-92 sts on a stitch holder (= sleeve), cast on 8-8-10-10-12-14 sts under sleeve, work the remaining 40-44-48-53-58-63 sts on round. BODY: There are now 176-192-212-232-256-280 sts for body. NOW MEASURE THE PIECE FROM HERE. Now work pattern as follows: K 38-42-47-52-58-64 sts, work A.2a (= 12 sts), K 76-84-94-104-116-128 sts, work A.2a, K 38-42-47-52-58-64 sts. When A.2a has been worked vertically, repeat A.2b vertically over A.2a. When piece measures 4 cm / 1½", dec on each side of every repetition of A.2a - READ DECREASE TIP! Dec like this every 6th-6th-4th-4th-6th-6th round 4-4-5-5-4-4 times in total = 160-176-192-212-240-264 sts. When piece measures 13 cm / 5" in all sizes, inc 1 st in each side of A.2b - READ INCREASE TIP-2! Inc like this every other round a total of 23 times in all sizes = 252-268-284-304-332-356 sts. Continue until piece measures 34-34-34-35-34-34 cm / 13½"-13½"-13½"-13¾"-13½"-13½" adjust so that one whole repetition of A.2b has been worked vertically. Now inc evenly, beg from mid back as follows: K the first 57-61-65-70-77-83 sts while inc 9-7-8-8-9-8 sts evenly, work K over K and P over P over the next 12 sts, K the next 114-122-130-140-154-166 sts while inc 18-15-17-17-18-16 sts evenly, work K over K and P over P over the next 12 sts, K the next 57-61-65-70-77-83 sts while inc 9-8-9-9-9-8 sts evenly = 288-298-318-338-368-388 sts. Switch to circular needle size 3.5 mm / US 4 and K until first repetition of A.2b. Now work rib as follows: * work K over K and P over P over the first 12 sts, work (K 2, P 3) over the next 130-135-145-155-170-180 sts, K the next 2 sts *, repeat from *-* 1 more time. When rib measures 2 cm / ¾", inc 1 P st in every section with 3 P = 344-356-380-404-440-464 sts. Continue with rib until rib measures 4 cm / 1½" in total. Bind off with K over K and P over P - READ BIND-OFF TIP. Fasten off. SLEEVES: Worked in the round on double pointed needles. NOW MEASURE THE PIECE FROM HERE. Slip the 66-76-82-86-88-92 sts from stitch holder back on double pointed needles size 4 mm / US 6 and pick up 1 st in each of the 8-8-10-10-12-14 new sts cast on under sleeve = 74-84-92-96-100-106 sts. Insert a marker in the middle of these new sts (= 4-4-5-5-6-7 new sts on each side of marker). Continue in the round with pattern A.1b over the 30 sts in the middle of sleeve and work A.2a (= 12 sts) mid under sleeve (i.e. 6 sts of pattern A.2a on each side of marker). K the remaining sts. When A.2a has been worked vertically, repeat A.2b vertically over A.2a. When piece measures 4 cm / 1½", dec 1 st on each side of A.2b under sleeve - remember decrease tip. Dec like this every 7th-5th-4th-4th-4th-3rd round 14-18-21-22-23-25 times in total = 46-48-50-52-54-56 sts. When A.1b has been worked 6 times in total vertically (includes pattern on yoke), continue with A.1c (- see diagram for correct size). When entire A.1c has been worked vertically, continue with K over K and P over P over these sts. When piece measures 44-42-42-42-40-40 cm / 17¼"-16½"-16½"-16½"-15¾"-15¾"– adjust so that A.2b has been worked 1 time vertically. Switch to double pointed needles size 3.5 mm / US 4. Now work rib, beg from the 12 sts in A.2b mid under sleeve: Work K over K and P over P over the first 12 sts (= A.2b), P 0-0-0-1-1-2, K 2-3-4-3-4-3, P 0-0-0-1-1-2, work K over K and P over P over the next 30 sts, P 0-0-0-1-1-2, K 2-3-4-3-4-3, P 0-0-0-1-1-2. When rib measures 3 cm / 1", bind off with K over K and P over P. Fasten off. Make another sleeve the same way. |
||||||||||||||||||||||||||||
Diagram explanations |
||||||||||||||||||||||||||||
|
||||||||||||||||||||||||||||
 |
||||||||||||||||||||||||||||
 |
||||||||||||||||||||||||||||
 |
||||||||||||||||||||||||||||
Have you finished this pattern?Tag your pictures with #dropspattern #irishplaitssweater or submit them to the #dropsfan gallery. Do you need help with this pattern?You'll find 25 tutorial videos, a Comments/Questions area and more by visiting the pattern on garnstudio.com. © 1982-2026 DROPS Design A/S. We reserve all rights. This document, including all its sub-sections, has copyrights. Read more about what you can do with our patterns at the bottom of each pattern on our site. |
||||||||||||||||||||||||||||


With over 40 years in knitting and crochet design, DROPS Design offers one of the most extensive collections of free patterns on the internet - translated to 17 languages. As of today we count 324 catalogs and 12290 patterns - 12280 of which are translated into English (US/in).
We work hard to bring you the best knitting and crochet have to offer, inspiration and advice as well as great quality yarns at incredible prices! Would you like to use our patterns for other than personal use? You can read what you are allowed to do in the Copyright text at the bottom of all our patterns. Happy crafting!
Post a comment to pattern DROPS 173-2
We would love to hear what you have to say about this pattern!
If you want to leave a question, please make sure you select the correct category in the form below, to speed up the answering process. Required fields are marked *.