
Popular categories
Looking for a yarn?


Comments / Questions (223)
Karl wrote:
Es steht ja "abnehmen"
28.07.2016 - 18:47
![]() Rahel wrote:
Rahel wrote:
Hallo, in der zehnten Runde von A.1.2.3.a, müsste man nicht 8Stb abnehmen anstatt zunehmen ? Sonst käme man ja auf 179Stb (18 A.2.a sind 144Stb, plus 27 von A.3.a gleich 171Stb, plus 8 zunehmen ergibt 179Stb). Danke für die Hilfe !
28.07.2016 - 16:33DROPS Design answered:
Liebe Rahel, wir haben das hier in unserem Web-Team besprochen und haben auch noch eine kleine Unklarheit, daher haben wir eine Anfrage an unser Designteam gemacht. Danke für Ihre Geduld!
03.08.2016 - 15:43
![]() Rahel wrote:
Rahel wrote:
Hallo, in der zehnten Runde von A1.2.3.a, müsste man nicht 8Stb abnehmen anstatt zunehmen ? Sonst käme man ja auf 179Stb (18 mal A2.a sind144Stb, plus 27 von A3.a gleich 171Stb, plus 8 zunehmen gleich 179...) Danke für die Hilfe !
26.07.2016 - 22:53
![]() Claudia wrote:
Claudia wrote:
Wird während jeder Reihe , ab der Zunahme nur vorne und hinten angegeben ist, zugenommen ( ges. Poncholänge) ? Auf dem Photo sieht es nicht so aus, aber in der Anleitung steht nichts Gegenteiliges. Falls nicht, wie verfahre ich dann mit den vorderen und hinteren markierten Maschen? Einfach im Muster weiterhäkeln?
25.07.2016 - 10:15DROPS Design answered:
Antwort siehe unten.
26.07.2016 - 13:35
![]() Claudia wrote:
Claudia wrote:
Wird während aller Runden ( ges. Poncholänge) vorne und hinten zugenommen? Auf dem Photo sieht es nicht so aus, aber in der Anleitung steht nichts Gegenteiliges.
25.07.2016 - 10:09DROPS Design answered:
Liebe Claudia, ja es wird bis zum Schluss vorne und hinten zugenommen.
26.07.2016 - 13:34
![]() Margit wrote:
Margit wrote:
Das Problem mit dem Netzmuster habe ich auf meine Art gelöst, aber jetzt soll ich nach dem Netzmuster gleichmäßig verteilt 8 Maschen abnehmen??? Wie bitte soll der Poncho dann weiter werden?
20.07.2016 - 21:46DROPS Design answered:
Liebe Margit, schön, dass es mit dem Netzmuster geklappt hat. Die Abnahme an dieser Stelle ist nur eine Anpassung der Maschenzahl, die Zunahmen für die Form des Ponchos werden unabhängig davon gemacht
22.07.2016 - 13:00
![]() Claudia wrote:
Claudia wrote:
Netzmusterprobleme. Die 3 LM am Beginn der 2. Runde befinden sich nun über den 3 LM der vorherigen 1. Zunahmenreihe.( Danach folgen aus der 1. Reihe die ersten 2 zugenommenen Stäbchen, dann der LM Bogen und dann die anderern 2 Stäbchen) Wenn ich die Zunahme der 2. Rd in den LM bogen der markierten Maschee machen.( also zwischen den 4 zug. Stb.werden die zwei Stäbchen der ersten Zunahme verdeckt. Ist das richtig?
20.07.2016 - 19:21
![]() Karin wrote:
Karin wrote:
Dear Drops, after joining and crocheting the first roow off dc .do not understand. it says start with the mesh pattern. at the same time it says see dc inc. so which is which i cant do both at the same time.
14.07.2016 - 11:41DROPS Design answered:
Dear Karen, work mesh pattern (= 3 rounds), repeat the 3 rounds as explain, and in as explained under "INC dc-GROUP". Happy crocheting!
15.07.2016 - 09:49
![]() Jette Nymann wrote:
Jette Nymann wrote:
I det mønster jeg har fundet på nettet, står der 4 ud for en række, men er det række 5? I så fald, hvordan starter jeg så række 4? Venlig hilsen Jette
05.07.2016 - 14:14DROPS Design answered:
Hej Jette. Nej, det er raekke 5 fordi den förste raekke af st (den med stjernen) er forkl i opskriften og taeller ikke med
05.07.2016 - 14:21
![]() Marina wrote:
Marina wrote:
Already having problem with A2 joining round. Just not getting the number of rep. And how do you start rnd 3 (or was it 4), so it will look clean. Disappointed at your library & tips. Expected more in those areas. To look at it's a beautiful poncho. Hope you can help me finish it.
22.06.2016 - 05:33DROPS Design answered:
Dear Marina, When working A.2a, A.3a, beg rounds with A.1a (each symbol in A.1a shows how to beg and end the row), ie on row 3 and 4 you will work ch 4 to beg the round and join with 1 sl st in 4th ch at beg of round. Happy crocheting!
22.06.2016 - 09:45
|
|||||||||||||||||||||||||||||||||||||||||||||||||
Light's Embrace#lightsembraceponcho |
|||||||||||||||||||||||||||||||||||||||||||||||||
 |
 |
||||||||||||||||||||||||||||||||||||||||||||||||
Crochet DROPS poncho with lace pattern, worked top down in ”Paris”. Size S-XXXL.
DROPS 169-4 |
|||||||||||||||||||||||||||||||||||||||||||||||||
|
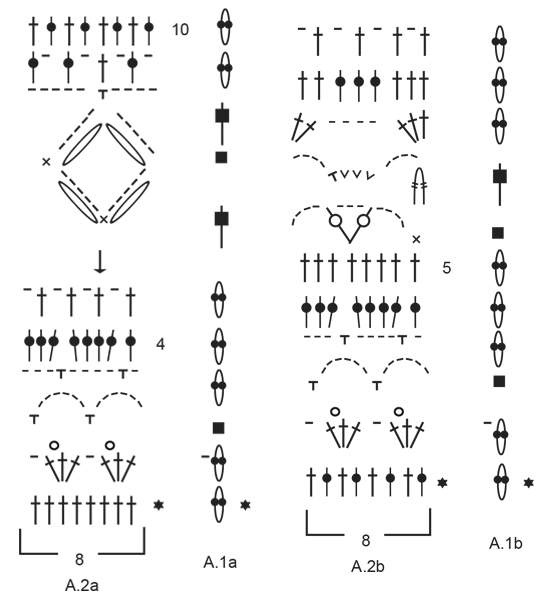
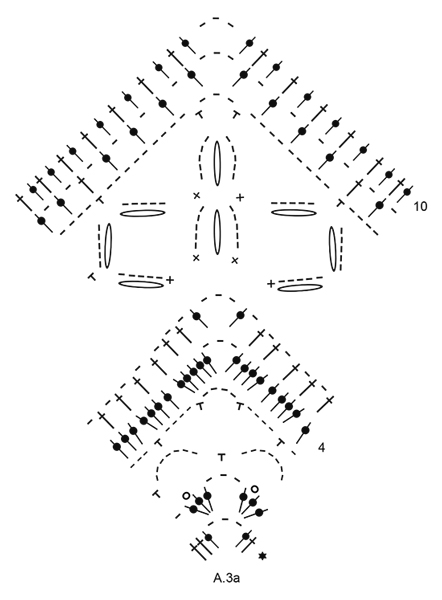
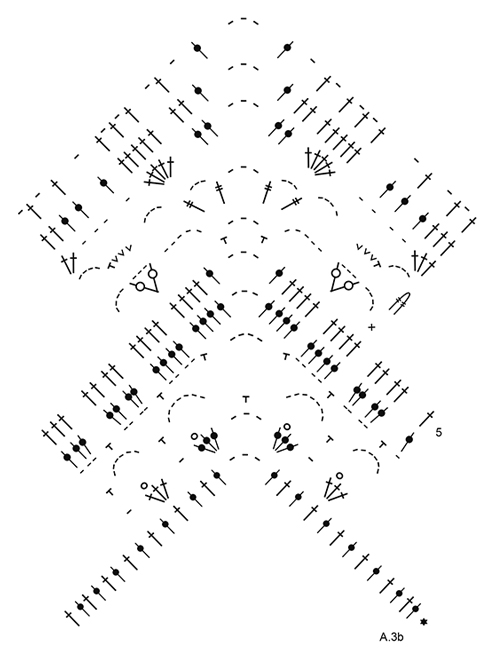
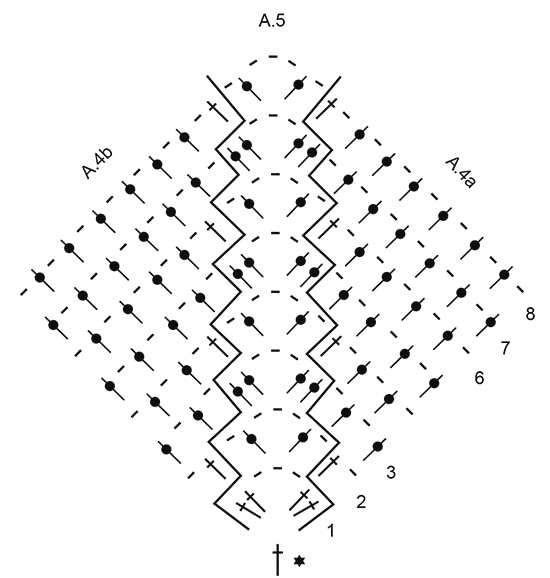
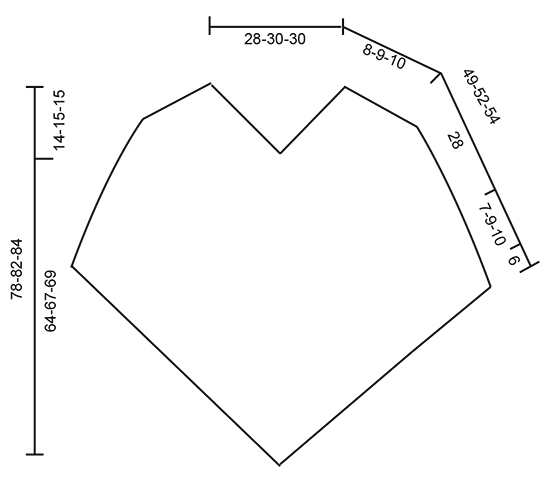
PATTERN: See diagrams A.1 to A.5. Diagrams A.1a and A.1b show how round beg and ends. CROCHET INFO: Beg every dc round with 3 ch (these ch do not replaces first dc). At the end of round work 1 sl st in 3rd ch at beg of round. NOTE: When working A.5 beg round with 3 ch. At the end of round work 1 dc in first st worked on round (i.e. st with the 3 ch in), then 1 sl st in 3rd ch at beg of round. WORK 2 TR TOG: Work 1 tr around ch-space below but wait with last pull through (= 2 loops on hook), skip 1 sc and work 1 tr around next ch-space but on last pull through, pull yarn through all loops on hook. WORK 3 TR TOG: Work 1 tr but wait with last pull through (= 2 sts on hook), work 1 more tr but wait with last pull through (= 3 loops on hook), work 1 more tr but on last pull through, pull yarn through all loops on hook. MESH PATTERN: ROUND 1: * Start with 1st row of A.5, work the 4 dc in first/next dc with marker, work (1 ch, ship 1 dc, 1 dc in next dc) until 1 dc remains before next marker, work 1 ch, skip next dc *, repeat from *-* 3 times more. There is now 4 repeats of A.5 on round. ROUND 2: * Work A.5 around first/next ch-space with marker, then work 1 dc in next dc, 1 ch, 1 dc around first ch-space, (1 ch, skip 1 dc, 1 dc in next ch-space) until 1 ch-space remains before next repeat of A.5, work 1 ch, 1 dc in next dc *, repeat from *-* 3 times more. ROUND 3: * Work A.5 around first/next ch-space with marker, then work (1 ch, skip 1 dc, 1 dc around next ch-space) until next repeat of A.5, 1 ch *, repeat from *-* 3 times more. ---------------------------------------------------------- PONCHO: Worked in the round, top down. First inc mid front, mid back and on each shoulder, then inc only mid front and mid back. Work 153-163-163 ch on hook size 4.5 mm/US 7 with Paris and form a ring with 1 sl st. Work 3 ch – see CROCHET INFO! Then work 1 dc in each of the next 3-1-1 ch, * skip ch 1, 1 dc in each of the next 5 ch *, repeat from *-* 24-26-26 more times on round = 128-136-136 dc + 3 ch on round. Now insert 4 markers from beg of round without working: Insert 1 marker in 1st dc on round (= mid back), skip 31-33-33 dc, insert 1 marker in next dc (= shoulder), skip 31-33-33 dc, insert 1 marker in next dc (= mid front), skip 31-33-33 dc, insert 1 marker in next dc (= shoulder), there are now 31-33-33 dc between last marker and beg of round. Now work MESH PATTERN - see explanation above. When 1st- 3rd round have been worked, repeat 2nd and 3rd round until 6-7-8 rounds with mesh pattern have been worked - see diagram A.4a and A.4b to see how to work the whole inc in each side of A.5. REMEMBER THE CROCHET GAUGE! Piece measures approx. 8-9-10 cm / 3"-3½"-4". Work next round as follows AT THE SAME TIME dec 0-8-8 dc evenly (= 0-4-4 dc dec on each side of mid back and mid front): *Work (2 dc, ch 3, 2 dc) around ch-space (= mid back on 1st repetition and mid front on 2nd repetition), then work 1 dc in every dc and 1 dc around every ch until next inc dc-group, work 3 dc around ch-space (= shoulder), work 1 dc in every dc and 1 dc around every ch until inc dc-group (mid front on 1st repetition and mid back on 2nd repetition)*, repeat from *-* 1 more time. There are now 117-125-133 dc between ch-space mid front and mid back (= 234-250-266 dc in total on round + 2 ch-space). Cut the yarn. NOTE: Then do not inc on each shoulder but only mid front and mid back on poncho. Work 1 sl st in 10th st from ch-space mid back and work pattern as follows: Work A.1a (shows how round beg and end, does not replace first st), A.2a (= 8 dc) 13-14-15 times in width, A.3a (= inc mid front), continue with A.2a 14-15-16 times in width, A.3a (= inc mid back) and A.2a 1 time in all sizes. On 4th round in A.3a there are 133-141-149 dc between ch-space mid front and mid back. Continue with pattern as before (there is now room for 16-17-18 repetitions A.2a on each side of A.3a). On 10th round inc 8 dc evenly on each side of A.3a (= 16 dc in total on round) = 163-171-179 dc on each side of ch-space mid front and mid back. Continue with pattern as before, but now work A.1b over A.1a, A.2b over A.2a and A.3b over A.3a (there is now room for 19-20-21 repetitions A.2 on each side of A.3). On 4th round inc 3 dc evenly between every repetitions of A.3 (i.e. 6 dc in total on round) = 169-177-185 dc between each ch-space mid front and mid back. Continue pattern (there is now room for 21-22-23 repetitions A.2 on each side of A.3). When entire diagram has been worked vertically, piece measures 36-37-38 cm / 14 ¼"-14½"-15". Cut the yarn. Now work mesh pattern as at beg of piece. Beg in ch-space mid back, and work mesh pattern from 3rd round in mesh pattern. Repeat 2nd and 3rd round until 6-8-10 rounds in total have been worked (includes last round in A.2 and A.3). Work next round as follows: * Work (2 dc, ch 3, 2 dc) around ch-space (= mid back), then work 1 dc in every dc and 1 dc around every ch until next rep of A.5 *, repeat from *-* 1 more time = 193-209-225 dc between ch-space mid front and mid back. Cut the yarn. Now work pattern A.1a, A.2a and A.3a as follows: Work 1 sl st in 12th dc from ch-space mid back and work pattern as follows: Work A.1a (shows how round beg and end, does not replace first st), A.2a until 2 dc remain before ch-space mid front, A.3a (= inc mid front), continue with A.2a until 2 dc remain before ch-space mid back, A.3a (= inc mid back) and A.2a 1 time in all sizes. When 4th row has been worked vertically, poncho measures 49-52-54 cm / 19 ¼"-20½"-21 ¼". Fasten off. |
|||||||||||||||||||||||||||||||||||||||||||||||||
Diagram explanations |
|||||||||||||||||||||||||||||||||||||||||||||||||
|
|||||||||||||||||||||||||||||||||||||||||||||||||
 |
|||||||||||||||||||||||||||||||||||||||||||||||||
 |
|||||||||||||||||||||||||||||||||||||||||||||||||
 |
|||||||||||||||||||||||||||||||||||||||||||||||||
 |
|||||||||||||||||||||||||||||||||||||||||||||||||
 |
|||||||||||||||||||||||||||||||||||||||||||||||||
Have you finished this pattern?Tag your pictures with #dropspattern #lightsembraceponcho or submit them to the #dropsfan gallery. Do you need help with this pattern?You'll find 13 tutorial videos, a Comments/Questions area and more by visiting the pattern on garnstudio.com. © 1982-2026 DROPS Design A/S. We reserve all rights. This document, including all its sub-sections, has copyrights. Read more about what you can do with our patterns at the bottom of each pattern on our site. |
|||||||||||||||||||||||||||||||||||||||||||||||||


With over 40 years in knitting and crochet design, DROPS Design offers one of the most extensive collections of free patterns on the internet - translated to 17 languages. As of today we count 325 catalogs and 12298 patterns - 12288 of which are translated into English (US/in).
We work hard to bring you the best knitting and crochet have to offer, inspiration and advice as well as great quality yarns at incredible prices! Would you like to use our patterns for other than personal use? You can read what you are allowed to do in the Copyright text at the bottom of all our patterns. Happy crafting!
Post a comment to pattern DROPS 169-4
We would love to hear what you have to say about this pattern!
If you want to leave a question, please make sure you select the correct category in the form below, to speed up the answering process. Required fields are marked *.