
Popular categories
Looking for a yarn?


Comments / Questions (223)
Sonya Breaum wrote:
I have never seen so many problems concerning one pattern before. From what I can understand, everyone having problems are from the US. which I can only guess at, because I can only speak English. I wonder if they actually wrote a pattern in English.... or maybe it's the difference in our languages..... or maybe they need to hire another translator . Either way, the patterns are fabulous to look at!
09.06.2017 - 01:33Charlotte wrote:
No reply? Somebody else had the same problem as me and also had no reply. Doesn't matter as I've now discarded the pattern and am doing my own thing. I shall avoid Drops patterns from now though. I expect they're good in their original language but the English translations are awful. Such a pitty as theres lots of beautiful patterns here. Love the yarn too. I've been crocheting & knitting for 40 years and have never come across such dreadful patterns. Disappointed
06.06.2017 - 12:29DROPS Design answered:
Dear Charlotte, the number of sts in XL will be checked, thank you very much in advance for your patience.
06.06.2017 - 15:38
![]() Jo Hunter wrote:
Jo Hunter wrote:
This pattern is horrible. Ive been working it for 3 days. Ive never had to refer to so many videos/comments/questions. Could you please provide written instructions. I also seen to be missing diagrams that have been mentioned. I have no a.5 in the book i bought. Please drops......written instructions. Im probably going to have to start again as i dont have enough stitches or im going to improvise and create my own. I will not be buying any more drops patterns if this is the quality
04.06.2017 - 19:29DROPS Design answered:
Dear Mrs Hunter, you can always ask your question here, or for any individual and personnal assistance, you are welcome to contact the store where you bought your yarn, even per mail or telephone. Happy crocheting!
06.06.2017 - 09:19Charlotte wrote:
I've completed a.2a section (with GREAT difficulty, I might add) and am stuck on the a.2b section. On row 10 of a.2a on the xxl size, I have 179 dc. That part is fine. But by the time I get to the 3 inc part on row 4 of a.2b, I end up with 199 sts, NOT the 185 the pattern states. 185 isn't even divisible by 8 for the following row! Nor is 199! Beautiful as it is, I'm coming to the conclusion that this pattern is simply not worth the aggro or ridiculous calculations!
03.06.2017 - 15:51
![]() Lori Erickson wrote:
Lori Erickson wrote:
Help. What am i doing in the first row. I have 153 in my circle, i chained 3...what do i do for 3-1-1.? I understand the rest. Thanks
16.03.2017 - 02:14DROPS Design answered:
Dear Mrs Erikson, work 1 dc in each of the next 3 ch, * skip ch 1, 1 dc in each of the next 5 ch *, repeat from *-* 24 more times on round = 128 dc + 3 ch on round. Happy crocheting!
16.03.2017 - 08:55
![]() Jan wrote:
Jan wrote:
How many double crochet stitches should there be after Mesh Rounds 1, 2, 3, 4, 5, 6, 7, and 8. Thank you.
11.03.2017 - 12:29DROPS Design answered:
Dear Jan, we do not have the number of sts at the end of each row, but if you follow pattern as explained, you should have the correct number of sts for your size at the end of Mesh pattern ie 234-266 dc on the last round before working A.1,A.2,A.3. Happy crocheting!
13.03.2017 - 09:49
![]() Jan wrote:
Jan wrote:
OK - I managed to make it through MESH Round 1. NOW, how do I begin Mesh Round 2? There are 4 double crochets from the first Mesh round. I assume the instruction: "Work A.5 around first/next ch-space with marker" is what i am supposed to do, but I do not know how to read these diagrams. Also, I did not know what to do with the stitch markers - so placed them in the first double crochet of the 4 dc cluster. Was this even correct?
01.03.2017 - 01:23DROPS Design answered:
Dear Jan, you will find diagram text matching each symbol, so that you can follow diagram and work A.5 as explained in the written pattern. Markers have to follow work (marks sides, mid front and mid back). Remember your DROPS store will provide you any further individual assistance. Happy crocheting!
01.03.2017 - 08:55
![]() Jan wrote:
Jan wrote:
I am attempting to make this lovely poncho - but found difficulty with the very first round - have way more repeats than the indicated "* skip ch 1, 1 dc in each of the next 5 ch *, repeat from *-* 24 times" for the sm/med size. With all these comments, I am thinking I may have bitten off more than I can chew - have any of you possibly re-written this pattern out for yourselves a bit more clearly and want to share???? Thanks
26.02.2017 - 14:52DROPS Design answered:
Dear Jan, in first size you have to work over the 153 ch as follows: 3 ch, 1 tr in each of the next 3 ch, *skip 1 ch, 1 tr in each of the next 5 ch*, repeat from *-* 24 more times on round = 3 ch + 3 tr + (5 tr x25)= 128 tr + 3 ch on round. Happy crocheting!
27.02.2017 - 10:54
![]() Mariah wrote:
Mariah wrote:
Thank you for all your help with my previous questions. I am sorry I have so many. I am about to start a.1a/a.2a/a3a etc. The video seems to be starting at row 6 or something but I can not even figure out how to start. I am making the small size. I get that a.1a shows how to start the round (with a ch of 4)... but when do I start a.2a? is it a repetition all the way around? Where do the rounds even start and end? I have never seen a pattern like this before so I am totally lost.
20.02.2017 - 21:05DROPS Design answered:
Dear Mariah, before working A.1a/A.2a/A.3a, you cut the yarn and join it with a sl st in 10th st from ch-space mid back, then work A.1a 1 time (= 4 ch on 1st row), then repeat A.2a 13 times in width (= skip 1 dc, *2 dc in next dc, 1 picot, 1 dc in same dc, 1 ch*, skip 3 dc, repeat from *-*), then work A.3a (= *2 dc around ch-space, 1 picot, 1 dc around ch-space*, 3 ch, repeat from *-* around same ch-space, 1 ch), then work A.2a a total of 14 times in width, A.3a, A.2a 1 time and join in the round. Continue like this following diagrams, and remember to inc on 10th round. Happy crocheting!
21.02.2017 - 09:41
![]() Mariah wrote:
Mariah wrote:
I do not understand what the section that begins, "Work next round as follows AT THE SAME TIME dec 0-8-8 dc evenly (= 0-4-4 dc dec on each side of mid back and mid front):" is telling me to do. Clarification would be appreciated
15.02.2017 - 16:32DROPS Design answered:
Dear Mariah, if you are working 1st size, you will work any dec. If you are working one of the 2 larger size, you will have to dec 8 dc evenly on round (4 dc on each side of mid back and mid front). Read more here how to inc evenly. Happy coccheting!
16.02.2017 - 09:28
|
|||||||||||||||||||||||||||||||||||||||||||||||||
Light's Embrace#lightsembraceponcho |
|||||||||||||||||||||||||||||||||||||||||||||||||
 |
 |
||||||||||||||||||||||||||||||||||||||||||||||||
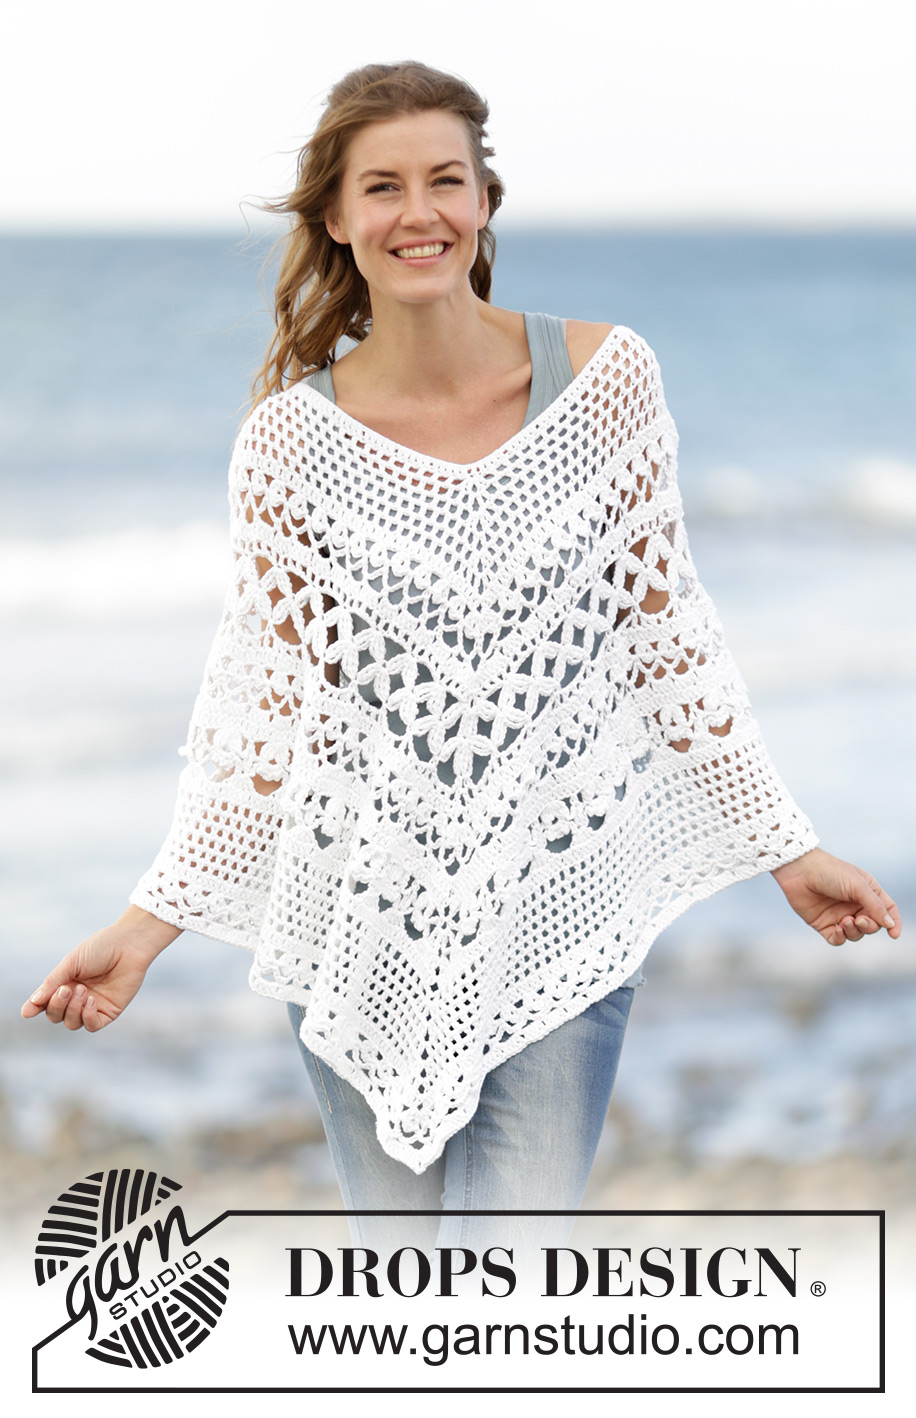
Crochet DROPS poncho with lace pattern, worked top down in ”Paris”. Size S-XXXL.
DROPS 169-4 |
|||||||||||||||||||||||||||||||||||||||||||||||||
|
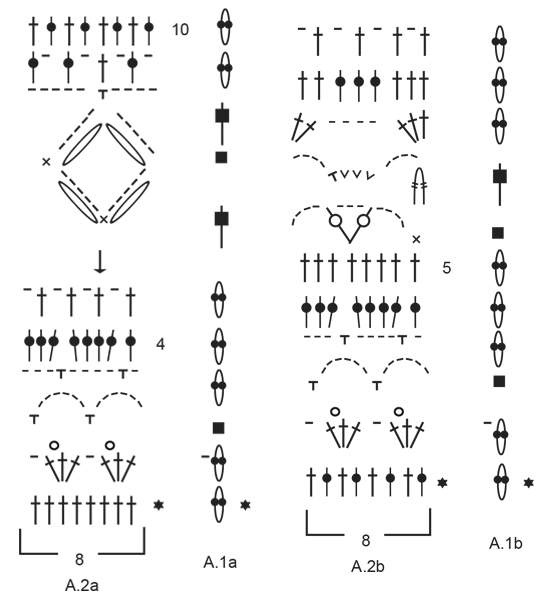
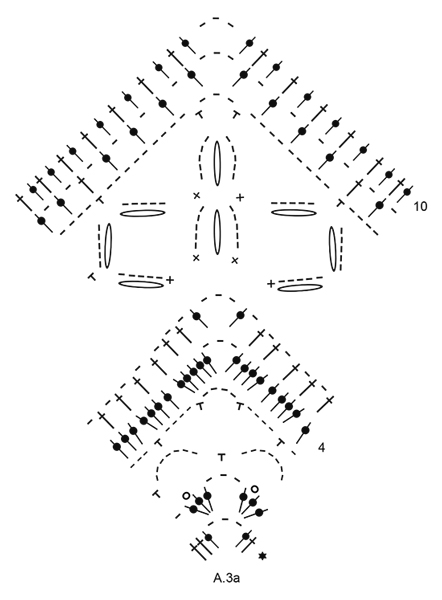
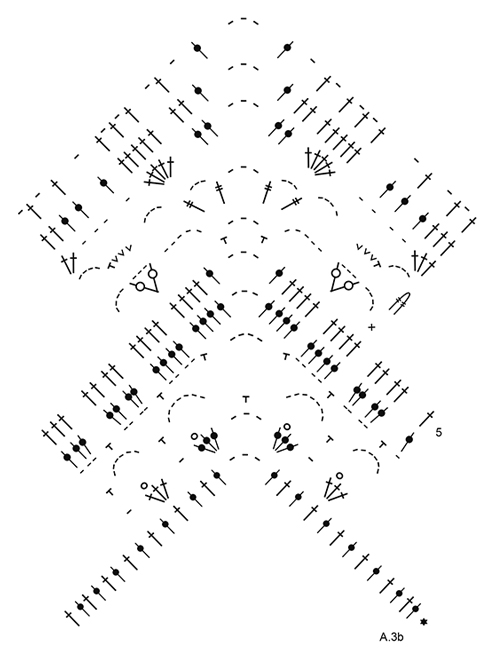
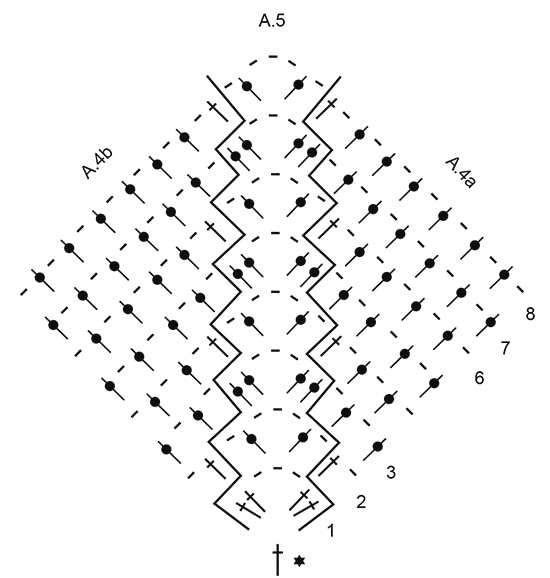
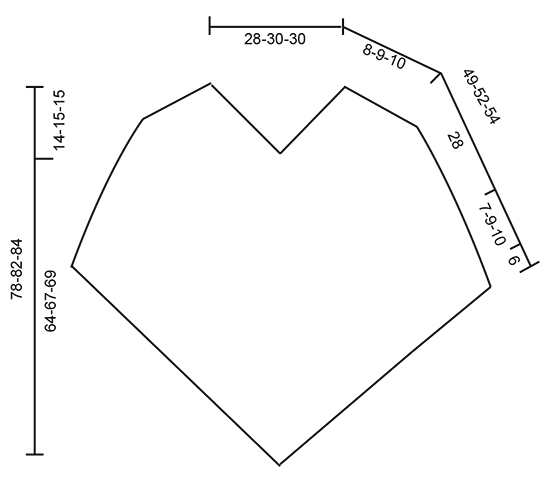
PATTERN: See diagrams A.1 to A.5. Diagrams A.1a and A.1b show how round beg and ends. CROCHET INFO: Beg every dc round with 3 ch (these ch do not replaces first dc). At the end of round work 1 sl st in 3rd ch at beg of round. NOTE: When working A.5 beg round with 3 ch. At the end of round work 1 dc in first st worked on round (i.e. st with the 3 ch in), then 1 sl st in 3rd ch at beg of round. WORK 2 TR TOG: Work 1 tr around ch-space below but wait with last pull through (= 2 loops on hook), skip 1 sc and work 1 tr around next ch-space but on last pull through, pull yarn through all loops on hook. WORK 3 TR TOG: Work 1 tr but wait with last pull through (= 2 sts on hook), work 1 more tr but wait with last pull through (= 3 loops on hook), work 1 more tr but on last pull through, pull yarn through all loops on hook. MESH PATTERN: ROUND 1: * Start with 1st row of A.5, work the 4 dc in first/next dc with marker, work (1 ch, ship 1 dc, 1 dc in next dc) until 1 dc remains before next marker, work 1 ch, skip next dc *, repeat from *-* 3 times more. There is now 4 repeats of A.5 on round. ROUND 2: * Work A.5 around first/next ch-space with marker, then work 1 dc in next dc, 1 ch, 1 dc around first ch-space, (1 ch, skip 1 dc, 1 dc in next ch-space) until 1 ch-space remains before next repeat of A.5, work 1 ch, 1 dc in next dc *, repeat from *-* 3 times more. ROUND 3: * Work A.5 around first/next ch-space with marker, then work (1 ch, skip 1 dc, 1 dc around next ch-space) until next repeat of A.5, 1 ch *, repeat from *-* 3 times more. ---------------------------------------------------------- PONCHO: Worked in the round, top down. First inc mid front, mid back and on each shoulder, then inc only mid front and mid back. Work 153-163-163 ch on hook size 4.5 mm/US 7 with Paris and form a ring with 1 sl st. Work 3 ch – see CROCHET INFO! Then work 1 dc in each of the next 3-1-1 ch, * skip ch 1, 1 dc in each of the next 5 ch *, repeat from *-* 24-26-26 more times on round = 128-136-136 dc + 3 ch on round. Now insert 4 markers from beg of round without working: Insert 1 marker in 1st dc on round (= mid back), skip 31-33-33 dc, insert 1 marker in next dc (= shoulder), skip 31-33-33 dc, insert 1 marker in next dc (= mid front), skip 31-33-33 dc, insert 1 marker in next dc (= shoulder), there are now 31-33-33 dc between last marker and beg of round. Now work MESH PATTERN - see explanation above. When 1st- 3rd round have been worked, repeat 2nd and 3rd round until 6-7-8 rounds with mesh pattern have been worked - see diagram A.4a and A.4b to see how to work the whole inc in each side of A.5. REMEMBER THE CROCHET GAUGE! Piece measures approx. 8-9-10 cm / 3"-3½"-4". Work next round as follows AT THE SAME TIME dec 0-8-8 dc evenly (= 0-4-4 dc dec on each side of mid back and mid front): *Work (2 dc, ch 3, 2 dc) around ch-space (= mid back on 1st repetition and mid front on 2nd repetition), then work 1 dc in every dc and 1 dc around every ch until next inc dc-group, work 3 dc around ch-space (= shoulder), work 1 dc in every dc and 1 dc around every ch until inc dc-group (mid front on 1st repetition and mid back on 2nd repetition)*, repeat from *-* 1 more time. There are now 117-125-133 dc between ch-space mid front and mid back (= 234-250-266 dc in total on round + 2 ch-space). Cut the yarn. NOTE: Then do not inc on each shoulder but only mid front and mid back on poncho. Work 1 sl st in 10th st from ch-space mid back and work pattern as follows: Work A.1a (shows how round beg and end, does not replace first st), A.2a (= 8 dc) 13-14-15 times in width, A.3a (= inc mid front), continue with A.2a 14-15-16 times in width, A.3a (= inc mid back) and A.2a 1 time in all sizes. On 4th round in A.3a there are 133-141-149 dc between ch-space mid front and mid back. Continue with pattern as before (there is now room for 16-17-18 repetitions A.2a on each side of A.3a). On 10th round inc 8 dc evenly on each side of A.3a (= 16 dc in total on round) = 163-171-179 dc on each side of ch-space mid front and mid back. Continue with pattern as before, but now work A.1b over A.1a, A.2b over A.2a and A.3b over A.3a (there is now room for 19-20-21 repetitions A.2 on each side of A.3). On 4th round inc 3 dc evenly between every repetitions of A.3 (i.e. 6 dc in total on round) = 169-177-185 dc between each ch-space mid front and mid back. Continue pattern (there is now room for 21-22-23 repetitions A.2 on each side of A.3). When entire diagram has been worked vertically, piece measures 36-37-38 cm / 14 ¼"-14½"-15". Cut the yarn. Now work mesh pattern as at beg of piece. Beg in ch-space mid back, and work mesh pattern from 3rd round in mesh pattern. Repeat 2nd and 3rd round until 6-8-10 rounds in total have been worked (includes last round in A.2 and A.3). Work next round as follows: * Work (2 dc, ch 3, 2 dc) around ch-space (= mid back), then work 1 dc in every dc and 1 dc around every ch until next rep of A.5 *, repeat from *-* 1 more time = 193-209-225 dc between ch-space mid front and mid back. Cut the yarn. Now work pattern A.1a, A.2a and A.3a as follows: Work 1 sl st in 12th dc from ch-space mid back and work pattern as follows: Work A.1a (shows how round beg and end, does not replace first st), A.2a until 2 dc remain before ch-space mid front, A.3a (= inc mid front), continue with A.2a until 2 dc remain before ch-space mid back, A.3a (= inc mid back) and A.2a 1 time in all sizes. When 4th row has been worked vertically, poncho measures 49-52-54 cm / 19 ¼"-20½"-21 ¼". Fasten off. |
|||||||||||||||||||||||||||||||||||||||||||||||||
Diagram explanations |
|||||||||||||||||||||||||||||||||||||||||||||||||
|
|||||||||||||||||||||||||||||||||||||||||||||||||
 |
|||||||||||||||||||||||||||||||||||||||||||||||||
 |
|||||||||||||||||||||||||||||||||||||||||||||||||
 |
|||||||||||||||||||||||||||||||||||||||||||||||||
 |
|||||||||||||||||||||||||||||||||||||||||||||||||
 |
|||||||||||||||||||||||||||||||||||||||||||||||||
Have you finished this pattern?Tag your pictures with #dropspattern #lightsembraceponcho or submit them to the #dropsfan gallery. Do you need help with this pattern?You'll find 13 tutorial videos, a Comments/Questions area and more by visiting the pattern on garnstudio.com. © 1982-2026 DROPS Design A/S. We reserve all rights. This document, including all its sub-sections, has copyrights. Read more about what you can do with our patterns at the bottom of each pattern on our site. |
|||||||||||||||||||||||||||||||||||||||||||||||||


With over 40 years in knitting and crochet design, DROPS Design offers one of the most extensive collections of free patterns on the internet - translated to 17 languages. As of today we count 325 catalogs and 12298 patterns - 12288 of which are translated into English (US/in).
We work hard to bring you the best knitting and crochet have to offer, inspiration and advice as well as great quality yarns at incredible prices! Would you like to use our patterns for other than personal use? You can read what you are allowed to do in the Copyright text at the bottom of all our patterns. Happy crafting!
Post a comment to pattern DROPS 169-4
We would love to hear what you have to say about this pattern!
If you want to leave a question, please make sure you select the correct category in the form below, to speed up the answering process. Required fields are marked *.