
Popular categories
Looking for a yarn?


Comments / Questions (223)
![]() Ivana wrote:
Ivana wrote:
Wow, what a pattern! As a beginner worked on this for a month, was well worth it. Thanks!
22.05.2026 - 21:04
![]() Theresa wrote:
Theresa wrote:
Jeg er forvirret over starten på omgangene ved netmønsteret. Når vi når omg2, så skal der vel startes med at hækle en ekstra luftmaske og en st i den sidste st inden den første lm buen med mærket i? Ellers kommer der jo et større hul mellem de 3 start lm og lm buen? Altså så det følger mønsteret i diag. A4.a?
06.02.2026 - 14:46DROPS Design answered:
Hei Theresa. Husk Hekleinfo og NB til A.5 (Når A.5 hekles beg omg med 3 lm. På slutten av omg hekles det 1 st i den først m som ble heklet på omg (dvs, m med de 3 lm i), deretter 1 kjm i 3.lm på starten av omg). mvh DROPS Design
09.02.2026 - 15:02
![]() Paulette POL wrote:
Paulette POL wrote:
"Au 4ème tour augmenter 3B à intervalles réguliers ENTRE CHAQUE MOTIF DE A3". S.O.S! Où exactement? Dans les 2 fois 8 B qui vont entourer l'arceau central ou dans les multiples arceaux qui séparent les deux pointes du poncho? Pourquoi ne pas avoir matérialisé ces augmentations sur le diagramme puisqu'il est valable pour toutes les tailles? Merci de votre compréhension et de votre réponse.
04.02.2026 - 17:16DROPS Design answered:
Bonjour Mme Pol, vous crochetez les diagrammes A.3 au milieu du devant et au milieu dos, vous allez augmenter ces mailles à intervalles réguliers entre celles de A.3 du milieu devant et celles de A.3 du milieu dos / et entre celles de A.3 du milieu dos et celles de A.3 du milieu devant. Ces augmentations sont à faire à intervalles réguliers dans les mailles de A.2. Bon crochet!
04.02.2026 - 17:51
![]() Paulette POL wrote:
Paulette POL wrote:
Pardon. Je viens de scruter à nouveau la vidéo qui concerne A2a/A3a et de comprendre qu'elle répond parfaitement à la question que je viens de poser. Désolée de vous avoir dérangé(e)s ne serait-ce que quelques minutes. A tricoter ou crocheter à des heures pas possibles, j'en perds mon bon sens. Merci en tout cas de vos précieux conseils.
28.01.2026 - 00:56
![]() Paulette POL wrote:
Paulette POL wrote:
Désarçonnée par la complexité des explications et pleine de doutes sur ma façon de les comprendre, après avoir défait 4 tours de point de grille, j'ai décidé de m'en tenir au digramme: ça me semble plus simple. Ai-je raison ou vais-je au devant de nouvelles difficultés pour la suite de l'ouvrage? Merci de me rassurer ou de me prodiguer un de vos précieux conseils. Amitiés et bonne année à vous tous/toutes.
22.01.2026 - 04:58DROPS Design answered:
Bonjour Mme Pol, il va vous falloir suivre à la fois les diagrammes et les explications écrites, car des informations complémentaire sur des augmentations/diminutions à faire à intervalles réguliers figurent dans le texte et pas dans les diagrammes. Bon crochet!
23.01.2026 - 09:25
![]() Rebecca wrote:
Rebecca wrote:
Jag får ej ihop det på varv 4 i a3b - 169 maskor??? Jag får 13 maskor för mycket. Vad gör jag för fel??? Har virkat om det hela flera gånger…
09.03.2025 - 09:15DROPS Design answered:
Hej Rebecca, Det är svårt att gissa vad som går fel... är det varvet med luftmaskor, har du 4 luftmaskor mellan varje fm i hörnet?
14.03.2025 - 11:44
![]() Federica wrote:
Federica wrote:
Buongiorno. sto realizzando il poncho. tutto bene fino a 10° giro di a2a. al decimo giro eseguo gli 8 aumenti per lato e mi trovo 171 maglie alte invece di 163. con 171 maglie non ho solo 20 ripetizioni di a2b, di più. al 4° giro si chiede ulteriore aumento, ma io ho 44 picot per lato, quindi 176 m.a. al 4° a2b a3b più la alta di alzata giro. siete sicuri di avere tenuto conto degli aumenti di a3b nel conteggio delle m.a?
15.07.2024 - 16:09DROPS Design answered:
Buonasera Federica, quale taglia sta lavorando? Buon lavoro!
20.07.2024 - 22:23
![]() Cris wrote:
Cris wrote:
Bonjour doit on suivre le texte avec les augmentations et diminution ou suivre les schémas suffit. Car là je suis au schéma 2b au 5 6e rang et j'ai déjà 10 cm de plus que les 35 cm après avoir fini le schéma. De plus il est trop large. Je crains de devoir tout recommencer. Ou je n aurai pas assez de boules. Merci
17.06.2024 - 19:35
![]() Cris wrote:
Cris wrote:
Bonjour doit on suivre le texte avec les augmentations et diminution ou suivre les schémas suffit. Car là je suis au schéma 2b au 5 6e rang et j'ai déjà 10 cm de plus que les 35 cm après avoir fini le schéma. De plus il est trop large. Je crains de devoir tout recommencer. Ou je n aurai pas assez de boules. Merci
17.06.2024 - 19:35DROPS Design answered:
Bonjour Cris, il faut suivre les explications écrites qui indiquent comment crocher les différents points fantaisie/diagrammes mais aussi comment augmenter (ou diminuer à intervalles réguliers). Pensez à bien vérifier votre tension et à bien conserver la même tension tout du long pour conserver les bonnes mesures. Bon crochet!
18.06.2024 - 07:38
![]() Cris wrote:
Cris wrote:
Bonjour qui peut m expliquer comment faire l espèce de losange du modèle 2a? Merci
22.05.2024 - 17:14DROPS Design answered:
Bonjour Cris, dans cette vidéo, nous montrons comment crocheter les rangs 6 et 7 de A.2a et de A.3a. Bon crochet!
23.05.2024 - 08:15
|
|||||||||||||||||||||||||||||||||||||||||||||||||
Light's Embrace#lightsembraceponcho |
|||||||||||||||||||||||||||||||||||||||||||||||||
 |
 |
||||||||||||||||||||||||||||||||||||||||||||||||
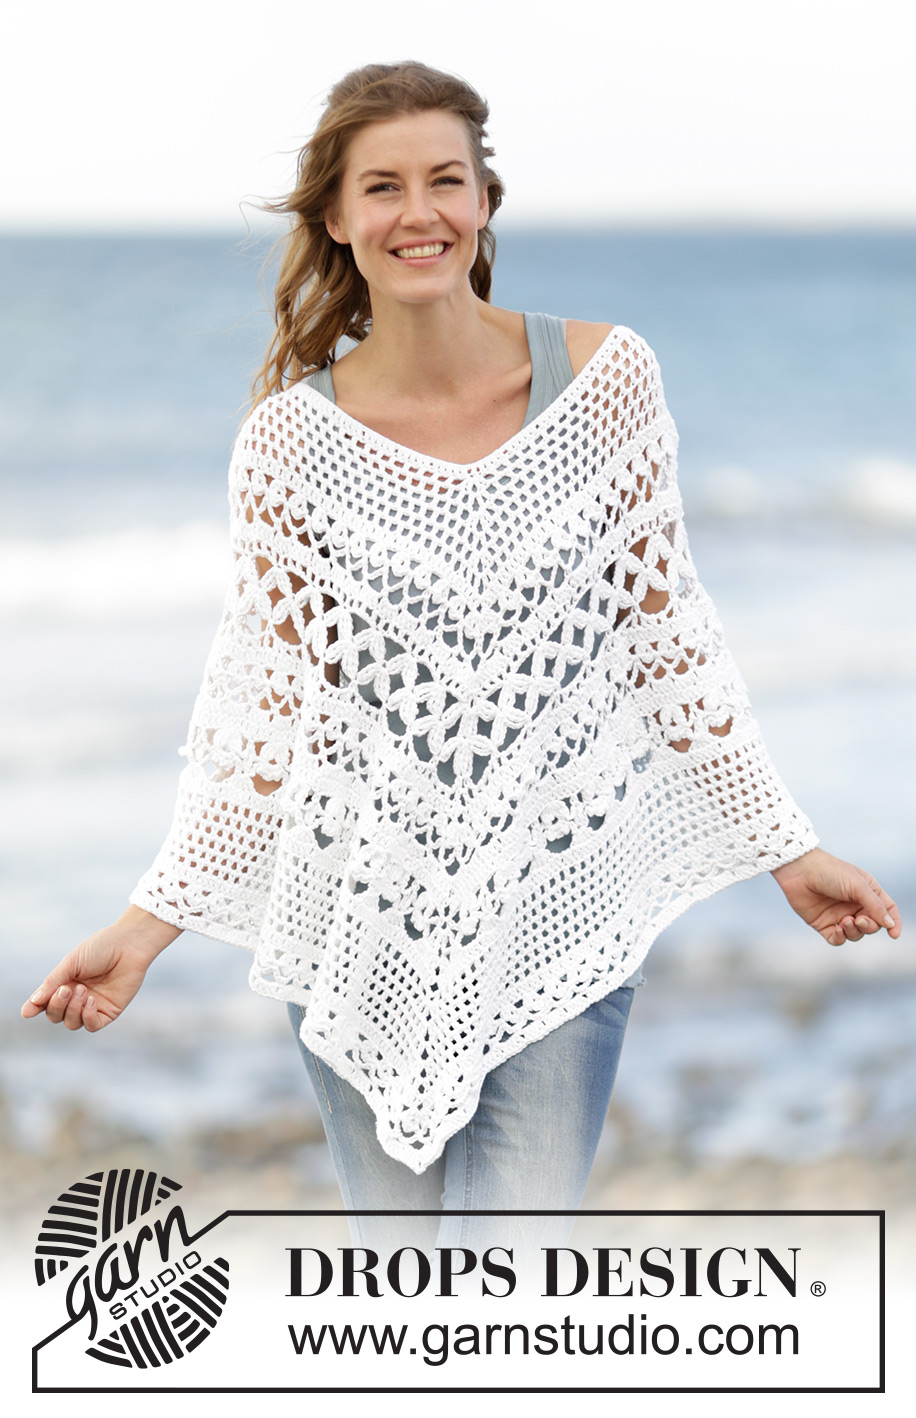
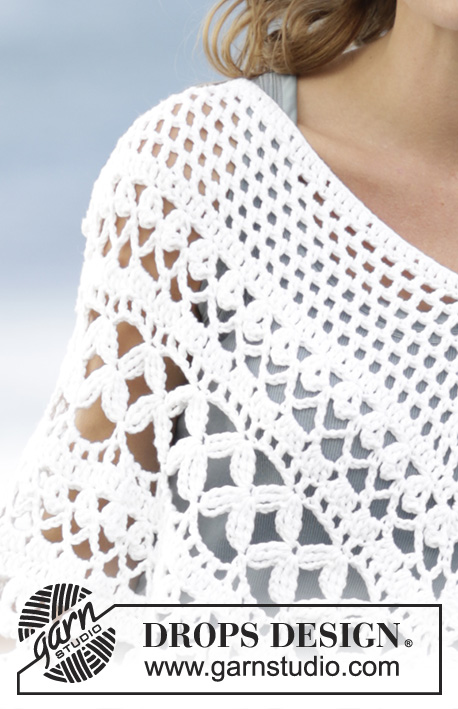
Crochet DROPS poncho with lace pattern, worked top down in ”Paris”. Size S-XXXL.
DROPS 169-4 |
|||||||||||||||||||||||||||||||||||||||||||||||||
|
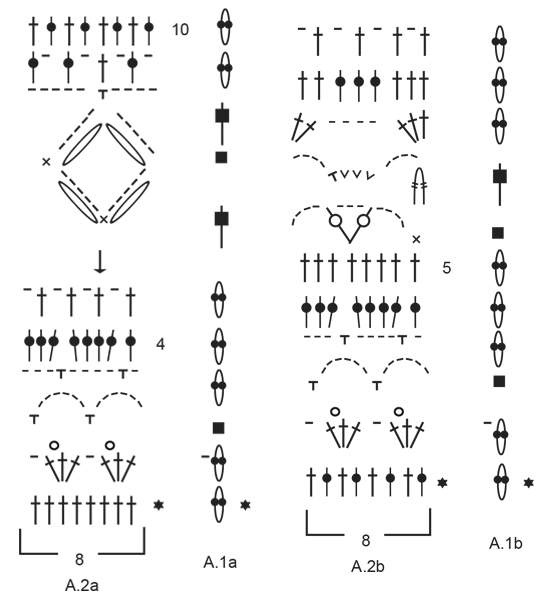
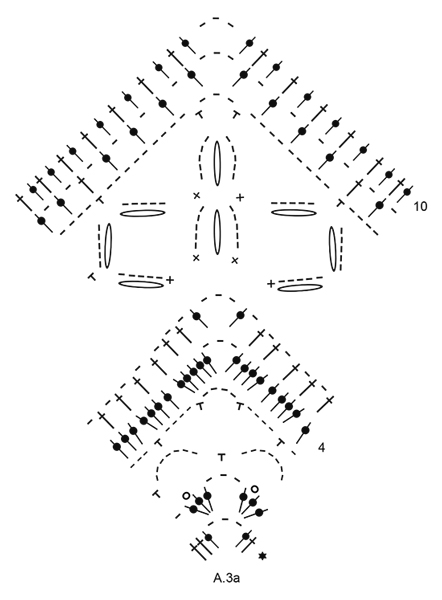
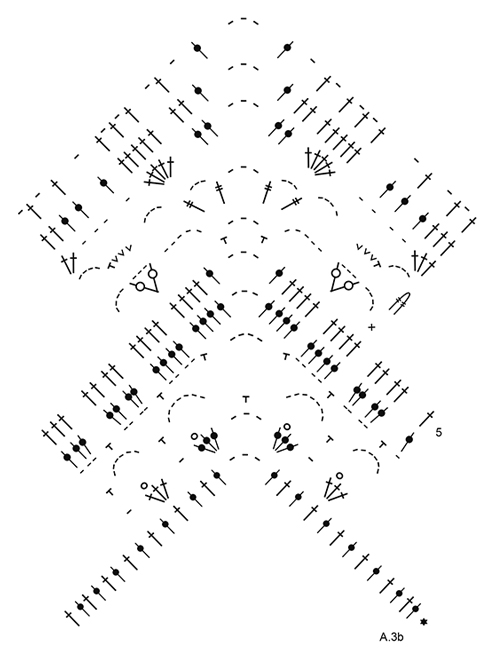
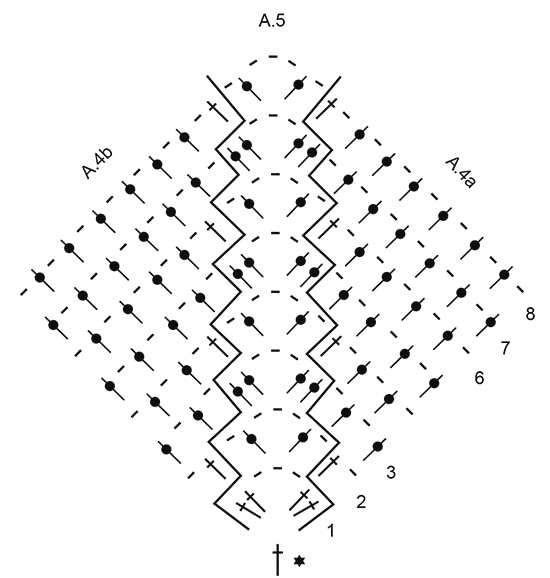
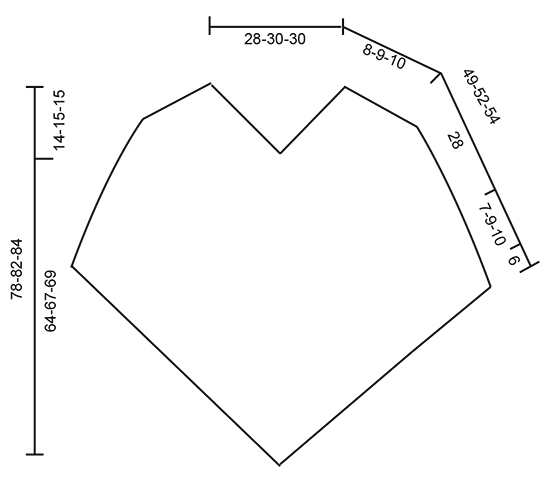
PATTERN: See diagrams A.1 to A.5. Diagrams A.1a and A.1b show how round beg and ends. CROCHET INFO: Beg every dc round with 3 ch (these ch do not replaces first dc). At the end of round work 1 sl st in 3rd ch at beg of round. NOTE: When working A.5 beg round with 3 ch. At the end of round work 1 dc in first st worked on round (i.e. st with the 3 ch in), then 1 sl st in 3rd ch at beg of round. WORK 2 TR TOG: Work 1 tr around ch-space below but wait with last pull through (= 2 loops on hook), skip 1 sc and work 1 tr around next ch-space but on last pull through, pull yarn through all loops on hook. WORK 3 TR TOG: Work 1 tr but wait with last pull through (= 2 sts on hook), work 1 more tr but wait with last pull through (= 3 loops on hook), work 1 more tr but on last pull through, pull yarn through all loops on hook. MESH PATTERN: ROUND 1: * Start with 1st row of A.5, work the 4 dc in first/next dc with marker, work (1 ch, ship 1 dc, 1 dc in next dc) until 1 dc remains before next marker, work 1 ch, skip next dc *, repeat from *-* 3 times more. There is now 4 repeats of A.5 on round. ROUND 2: * Work A.5 around first/next ch-space with marker, then work 1 dc in next dc, 1 ch, 1 dc around first ch-space, (1 ch, skip 1 dc, 1 dc in next ch-space) until 1 ch-space remains before next repeat of A.5, work 1 ch, 1 dc in next dc *, repeat from *-* 3 times more. ROUND 3: * Work A.5 around first/next ch-space with marker, then work (1 ch, skip 1 dc, 1 dc around next ch-space) until next repeat of A.5, 1 ch *, repeat from *-* 3 times more. ---------------------------------------------------------- PONCHO: Worked in the round, top down. First inc mid front, mid back and on each shoulder, then inc only mid front and mid back. Work 153-163-163 ch on hook size 4.5 mm/US 7 with Paris and form a ring with 1 sl st. Work 3 ch – see CROCHET INFO! Then work 1 dc in each of the next 3-1-1 ch, * skip ch 1, 1 dc in each of the next 5 ch *, repeat from *-* 24-26-26 more times on round = 128-136-136 dc + 3 ch on round. Now insert 4 markers from beg of round without working: Insert 1 marker in 1st dc on round (= mid back), skip 31-33-33 dc, insert 1 marker in next dc (= shoulder), skip 31-33-33 dc, insert 1 marker in next dc (= mid front), skip 31-33-33 dc, insert 1 marker in next dc (= shoulder), there are now 31-33-33 dc between last marker and beg of round. Now work MESH PATTERN - see explanation above. When 1st- 3rd round have been worked, repeat 2nd and 3rd round until 6-7-8 rounds with mesh pattern have been worked - see diagram A.4a and A.4b to see how to work the whole inc in each side of A.5. REMEMBER THE CROCHET GAUGE! Piece measures approx. 8-9-10 cm / 3"-3½"-4". Work next round as follows AT THE SAME TIME dec 0-8-8 dc evenly (= 0-4-4 dc dec on each side of mid back and mid front): *Work (2 dc, ch 3, 2 dc) around ch-space (= mid back on 1st repetition and mid front on 2nd repetition), then work 1 dc in every dc and 1 dc around every ch until next inc dc-group, work 3 dc around ch-space (= shoulder), work 1 dc in every dc and 1 dc around every ch until inc dc-group (mid front on 1st repetition and mid back on 2nd repetition)*, repeat from *-* 1 more time. There are now 117-125-133 dc between ch-space mid front and mid back (= 234-250-266 dc in total on round + 2 ch-space). Cut the yarn. NOTE: Then do not inc on each shoulder but only mid front and mid back on poncho. Work 1 sl st in 10th st from ch-space mid back and work pattern as follows: Work A.1a (shows how round beg and end, does not replace first st), A.2a (= 8 dc) 13-14-15 times in width, A.3a (= inc mid front), continue with A.2a 14-15-16 times in width, A.3a (= inc mid back) and A.2a 1 time in all sizes. On 4th round in A.3a there are 133-141-149 dc between ch-space mid front and mid back. Continue with pattern as before (there is now room for 16-17-18 repetitions A.2a on each side of A.3a). On 10th round inc 8 dc evenly on each side of A.3a (= 16 dc in total on round) = 163-171-179 dc on each side of ch-space mid front and mid back. Continue with pattern as before, but now work A.1b over A.1a, A.2b over A.2a and A.3b over A.3a (there is now room for 19-20-21 repetitions A.2 on each side of A.3). On 4th round inc 3 dc evenly between every repetitions of A.3 (i.e. 6 dc in total on round) = 169-177-185 dc between each ch-space mid front and mid back. Continue pattern (there is now room for 21-22-23 repetitions A.2 on each side of A.3). When entire diagram has been worked vertically, piece measures 36-37-38 cm / 14 ¼"-14½"-15". Cut the yarn. Now work mesh pattern as at beg of piece. Beg in ch-space mid back, and work mesh pattern from 3rd round in mesh pattern. Repeat 2nd and 3rd round until 6-8-10 rounds in total have been worked (includes last round in A.2 and A.3). Work next round as follows: * Work (2 dc, ch 3, 2 dc) around ch-space (= mid back), then work 1 dc in every dc and 1 dc around every ch until next rep of A.5 *, repeat from *-* 1 more time = 193-209-225 dc between ch-space mid front and mid back. Cut the yarn. Now work pattern A.1a, A.2a and A.3a as follows: Work 1 sl st in 12th dc from ch-space mid back and work pattern as follows: Work A.1a (shows how round beg and end, does not replace first st), A.2a until 2 dc remain before ch-space mid front, A.3a (= inc mid front), continue with A.2a until 2 dc remain before ch-space mid back, A.3a (= inc mid back) and A.2a 1 time in all sizes. When 4th row has been worked vertically, poncho measures 49-52-54 cm / 19 ¼"-20½"-21 ¼". Fasten off. |
|||||||||||||||||||||||||||||||||||||||||||||||||
Diagram explanations |
|||||||||||||||||||||||||||||||||||||||||||||||||
|
|||||||||||||||||||||||||||||||||||||||||||||||||
 |
|||||||||||||||||||||||||||||||||||||||||||||||||
 |
|||||||||||||||||||||||||||||||||||||||||||||||||
 |
|||||||||||||||||||||||||||||||||||||||||||||||||
 |
|||||||||||||||||||||||||||||||||||||||||||||||||
 |
|||||||||||||||||||||||||||||||||||||||||||||||||
Have you finished this pattern?Tag your pictures with #dropspattern #lightsembraceponcho or submit them to the #dropsfan gallery. Do you need help with this pattern?You'll find 13 tutorial videos, a Comments/Questions area and more by visiting the pattern on garnstudio.com. © 1982-2026 DROPS Design A/S. We reserve all rights. This document, including all its sub-sections, has copyrights. Read more about what you can do with our patterns at the bottom of each pattern on our site. |
|||||||||||||||||||||||||||||||||||||||||||||||||


With over 40 years in knitting and crochet design, DROPS Design offers one of the most extensive collections of free patterns on the internet - translated to 17 languages. As of today we count 325 catalogs and 12298 patterns - 12288 of which are translated into English (US/in).
We work hard to bring you the best knitting and crochet have to offer, inspiration and advice as well as great quality yarns at incredible prices! Would you like to use our patterns for other than personal use? You can read what you are allowed to do in the Copyright text at the bottom of all our patterns. Happy crafting!
Post a comment to pattern DROPS 169-4
We would love to hear what you have to say about this pattern!
If you want to leave a question, please make sure you select the correct category in the form below, to speed up the answering process. Required fields are marked *.