
Popular categories
Looking for a yarn?


Comments / Questions (45)
![]() Dorina wrote:
Dorina wrote:
Potreste darmi le misure di ogni sezione, mi piacerebbe sia più dettagliato. Grazie
25.01.2020 - 09:54DROPS Design answered:
Buongiorno Dorina, purtroppo un'informazione così dettagliata non è disponibile. Buon lavoro!
25.01.2020 - 12:53
![]() Hennie Koopman wrote:
Hennie Koopman wrote:
Sorry voor mijn vraag....heeft zich al opgelost
05.07.2019 - 17:59
![]() Hennie Koopman wrote:
Hennie Koopman wrote:
Ik wil maat L maken. Er staat...begin met 4 lossen....dan stk in elk van de volgende 6 lossen = 6 stk. Dan losse overslaan en 6 stk in volgende 6 lossen 30x= 180 stk. Ik kom op 186 stk plus 4 lossen. Jullie geven aan 192 stk. Volgend probleem 192 stk en 4 beginlossen is 193 stk. Voor de eerste toer A1 (hokjes met 1 losse ertussen) Betekent bij 193 stk dat je eindigt met 1 stk terwijl je de toer ook begonnen bent met 1 stk. Je moet toch eindigen met 1 losse? Hoeveel hokjes telt toer 1 bij maat L
05.07.2019 - 17:45DROPS Design answered:
Dag Hennie,
Het gedeelte tussen *_* wordt in totaal 31 keer gedaan, want er staat 'herhaal nog 30 keer, daardoor kom je op 192 stokjes. De 4 beginlossen worden niet meegerekend in het totaal aantal stokjes. A.1 gaat over 8 steken, deze herhaal je in totaal 24 keer. Daarnaast haak je A.2, deze komen boven de eerste 4 lossen (dus het 193e 'stokje')
08.07.2019 - 10:54
![]() Pat wrote:
Pat wrote:
I am starting the back section. I read the answer to a previous question about the back but I do not understand on the section of the back piece where it says to work A.5 then it has 19-29 chain spaces on first row. The chart does not show chain spaces until the second row, is there I am supposed to start? I love your patterns but they are sometimes hard to follow.
16.05.2019 - 00:55DROPS Design answered:
Dear Pat, when working A.3 you will have 2 ch-spaces (= 2 chains 2 times), then when repeating A.4 16-26 times in width you will have 16-26 times 2 chains and finishing row with A.5 you will have 1 chain-space (= 2 chains), so that there are 2 +16-26 + 1 = 19-29 ch-spaces (= 2 chains) at the end of this row. Happy crocheting!
16.05.2019 - 09:40
![]() Dawn wrote:
Dawn wrote:
I am starting the back A3,4,5. I am stuck. Can you please explain more detail how to do this? Thank you!
07.03.2018 - 02:11DROPS Design answered:
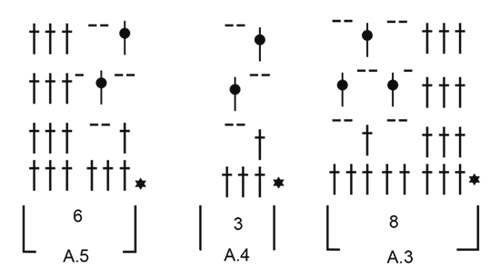
Dear Dawn, on back piece, start skipping 4-6-7 sts for armhole (see size), then crochet A.3 over the next 8 sts, repeat A.4 (= 3 sts) a total of 16-26 times in width and finish with A.5 (= 6 sts), there will be 4-6-7 sts unworked at the end of row for armhole. Start reading diagram from RS with the 2nd row in diagram (= 1st row in A.3,4,5 - the one with a star is the previous row), repeeat A.4 in width ans finish with A.5; turn and work row 2: A.5, repeat A.4 and finish with A.3. Happy crocheting!
07.03.2018 - 08:46
![]() Dawn wrote:
Dawn wrote:
I'm confused with A1 and A2. The diagram chart with the pattern is different than the video A1 and A2. Can you please explain further? Thank you.
27.02.2018 - 22:40DROPS Design answered:
Dear Dawn, in the video this pattern is worked back and forth, but you will work A.2 the same way, start with A.2 (= 1st st on round), then repeat A.1 in the round (= in the video this part is diagram A.2), we show in the video how to work A.2 = time code 1:19 for row 1. Just repeat this section in the round (= A.1 for the tunic) reading diagram always from the right towards the left. Happy crocheting!
28.02.2018 - 10:12
![]() Marie wrote:
Marie wrote:
Bonjour! J'ai une question concernant la première diminution d'emmanchures: faut-il diminuer (sauter) 2 fois 6 brides de chaque côté du DOS et de chaque côté du DEVANT càdire 24 brides au total ou seulement 12 brides au total? Merci d'avance pour votre réponse et merci pour tous vos jolis modèles.
29.03.2017 - 14:30DROPS Design answered:
Bonjour Marie, on saute d'abord 6 B pour les emmanchures du dos (en taille XXL) et on crochète A.3, A.4 et A.5 puis on continue en crochetant les rangs 2 et 3 de A.3 à A.5 en diminuant 2 fois à 3 m des bords comme indiqué sous DIMINUTIONS ARCEAUX = il reste 22 arceaux. Bon crochet!
29.03.2017 - 15:13
![]() Joanna wrote:
Joanna wrote:
Ik heb haaknaald 4 gebruikt.Is fijner haken. Je kunt dit model makkelijk zelf tailleren.goed meten. Ik heb afgewisseld tussen maat medium en small.
13.06.2016 - 21:28
![]() Joana wrote:
Joana wrote:
Obrigada pelas respostas e pela ajuda! Entretanto, como estava a ter mais problemas com a interpretação das instruções (a parte das costas e frente separadas), optei por alterar ligeiramente o modelo e seguir as instruções de outro modelo vosso (168-11). Contudo, fico a aguardar uma resposta, demore o tempo que demorar, pois o modelo é muito bonito! Obrigada e continuação de bom trabalho!
30.05.2016 - 11:38
![]() Joana wrote:
Joana wrote:
Olá outra vez. Porque fiquei com 21 aros em vez de 20 após as diminuições para as cavas? Eu fiz assim: fiz a 1ª carreira com aros de A.3 a A.5 e fiquei com 22 aros. Virei o trabalho e fiz as diminuições: fiz 3 pad em cima dos pa da carreira anterior, fiz 2 pc, saltei o aro da carreira anterior e fiz um pa à volta do aro seguinte. Continuei assim até faltar um aro no fim da carreira anterior, fiz 2 pc, saltei esse aro e fiz 3 pad em cima dos 3 pa da carreira anterior. Agradeço a ajuda.
26.05.2016 - 20:45DROPS Design answered:
Iremos comsultar o departamento de design para averiguar se há quaisquer falhas neste modelo o que poderá levar algum tempo. Tentaremos ser tão breves quanto possível. Pode, entretanto, colocar a sua dúvida quer na página de fãs da Drops do Facebook quer no grupo Drops Workshop também no Facebook. São muitas as fãs de croché que se entreajudam em relação aos milhares de modelos Drops nesse grupo ou na nossa página. Bom croché.
30.05.2016 - 11:29
|
|||||||||||||||||||||||||||||||||||||||||||
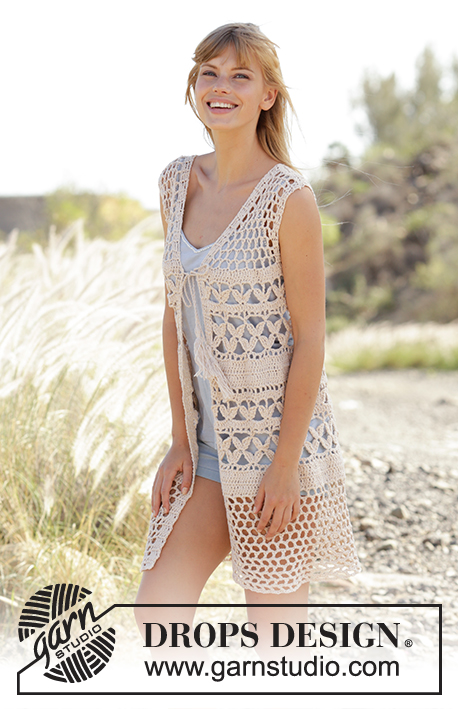
Summer Bliss#summerblissdress |
|||||||||||||||||||||||||||||||||||||||||||
|
|
|||||||||||||||||||||||||||||||||||||||||||
Crochet DROPS tunic with A-shape and lace pattern in ”Belle”. Size S-XXXL.
DROPS 167-18 |
|||||||||||||||||||||||||||||||||||||||||||
|
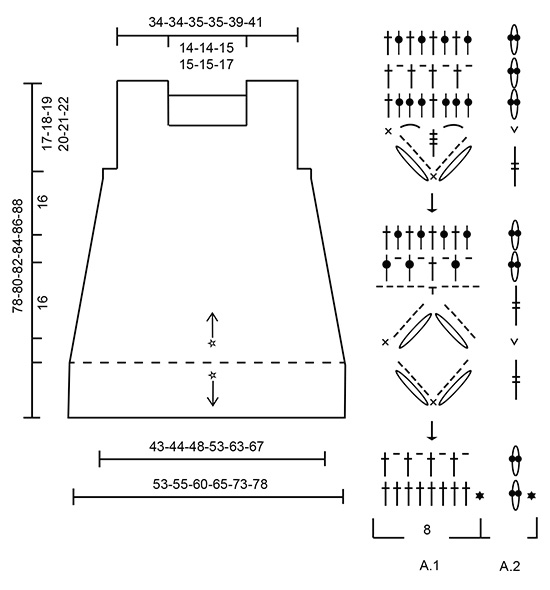
CROCHET INFO: On every dc round/row replace first dc with 4 ch. Finish round with 1 sl st in 4th ch at beg of round. PATTERN: See diagrams A.1 to A.5. DECREASE TIP: Dec 1 dc by working the next 2 dc tog as follows: Work 1 dc but wait with last pull through (= 2 loops on hook), then work next dc but on last pull through, pull yarn through all 3 loops on hook. DECREASE TIP CH-SPACES: Dec 1 ch-space at beg of row as follows seen from RS: Work ch 2, skip the first ch-space, work 1 dc around next ch-space. On next row skip the last ch-space seen from WS (= first ch-space seen from RS). Dec 1 ch-space at end of row as follows seen from RS: Work until 1 ch-space remains, ch 2, skip the last ch-space, work 1 st in each of the remaining sts. On next row skip the first ch-space, work ch 2, and 1 dc around next ch-space seen from WS (= last ch-space seen from RS). ---------------------------------------------------------- TUNIC: Worked in the round, bottom up, then divide the piece into front piece and back piece and work back and forth up to shoulder. Work an edge at the bottom of with mesh pattern at the end. Beg of round = in the right side. Work 195-205-223-242-270-289 loose ch on hook size 4.5 mm/US 7 with Belle and form a ring with 1 sl st. Work 4 ch – see CROCHET INFO! Then work as follows: Work 1 dc in each of the first 6-2-6-4-4-2 ch, * skip ch 1, 1 dc in each of the next 6 ch *, repeat from *-* 26-28-30-33-37-40 more times = 168-176-192-208-232-248 dc + 4 ch at beg of round. Continue in the round with 1 dc in every dc until piece measures 5-5-6-6-7-7 cm / 2"-2"-2⅜"-2⅜"-2¾"-2¾". REMEMBER THE CROCHET GAUGE! Now work pattern from 2nd round in diagram A.1 (= 8 dc) 21-22-24-26-29-31 times on round. NOTE: A.2 shows how round beg and ends. On last row in diagram dec 32 dc evenly in all sizes - READ DECREASE TIP = 136-144-160-176-200-216 dc + 4 ch at beg of round. Continue with 1 dc in every dc until piece measures 25-25-26-26-27-27 cm / 9¾"-9¾"-10¼"-10¼"-10½"-10½" vertically. Then work A.1 as before from 2nd round in diagram but now work 17-18-20-22-25-27 repetitions on round. NOTE: A.2 shows how round beg and ends. Finish before the last 2 rows in diagram A.1. Now work 1 row with 1 dc in every dc and adjust no of sts to 132-136-154-166-190-198 dc. Cut the yarn. Insert a marker here. NOW MEASURE THE PIECE FROM HERE. Now divide piece in 2 for front and back piece. BACK PIECE: Skip 4-6-6-6-6-7 dc for armhole, work A.3 (= 8 dc), A.4 (= 3 dc) 16-16-19-21-25-26 times in width, work A.5 (= 6 dc) = 19-19-22-24-28-29 ch-spaces on first row. Continue as explained in the different sizes below: SIZE S and M: Continue back and forth with pattern as shown on 2nd and 3rd row in A.3 to A.5 until piece measures 14-15 cm / 5½"-6" – adjust so that next row is worked as 3rd row. SIZE L, XL, XXL and XXXL: Continue back and forth with pattern as shown on 2nd and 3rd row in A.3 to A.5, AT THE SAME TIME on next row bind off for armhole in each side inside 3 sts - READ DECREASE TIP CH-SPACES. NOTE: Work 3 tr instead of 3 dc in each side on the rows with dec (this is done to avoid tight edges). Repeat dec 0-1-2-2 more times (= 1-2-3-3 dec in total in each side) = 20-20-22-23 ch-spaces remain. Then continue with ch-spaces as shown on 2nd and 3rd row in diagram A.3 to A.5 until piece measures 16-17-18-19 cm / 6¼"-6¾"-7"-7½" – adjust so that next row is worked as 3rd row. Then continue as explained below in all sizes: Work 1 dc in each of the first 3 dc and 4-4-4-4-5-5 whole ch-spaces (i.e. ch-spaces with 2 ch), work 1 dc in next dc, then work 24-24-26-26-26-28 dc evenly over the next 10-10-11-11-11-12 ch-spaces from previous row, work 1 dc in next dc, and 1 dc around next ch-space, continue with 4-4-4-4-5-5 whole ch-spaces (i.e. ch-spaces with 2 ch) and 1 dc in each of the outermost 3 dc. There are now 26-26-28-28-28-30 dc consecutively in the middle of back piece. Then finish each shoulder separately. Turn and work as before over the first 4-4-4-4-5-5 ch-spaces, work 1 dc in each of the first 3 dc of the 26-26-28-28-28-30 dc. Turn and work 16-16-16-16-19-19 dc evenly on shoulder. Fasten off. Work the other shoulder the same way but reversed. Beg at the armhole, and work 1 dc in each of the outermost 3 dc, then work ch-spaces as before over the 4-4-4-4-5-5 ch-spaces, and 1 dc in each of the next 3 dc. Turn and work 16-16-16-16-19-19 dc evenly over shoulder. Fasten off. FRONT PIECE: Skip 4-6-6-6-6-7 dc for armhole. Work A.3 (= 8 dc), A.4 (= 3 dc) 16-16-19-21-25-26 times in width, work A.5 = 19-19-22-24-28-29 ch-spaces on first row and 4-6-6-6-6-7 dc remain until beg on back piece. Continue as explained in the different sizes below: SIZE S and M: Continue back and forth with 2nd and 3rd row in A.3 to A.5 until 5 rows have been worked in both sizes. Now work as follows: Work 1 dc in each of the first 3 dc and 4-4 whole ch-spaces (i.e. ch-spaces with 2 ch), work 1 dc in next dc, then work 24-24 dc evenly over the next 10-10 ch-spaces, work 1 dc in next dc, and 1 dc around next ch-space, continue with 4-4 whole ch-spaces (i.e. ch-spaces with 2 ch) and 1 dc in each of the outermost 3 dc = 26-26 dc for neck in the middle of front piece. SIZE L, XL, XXL, XXXL: Continue back and forth with 2nd and 3rd row in A.3 to A.5, AT THE SAME TIME on next row bind off for armhole in each side as on back piece and when 5 rows with ch-spaces have been worked, work dc for neck in the middle of front piece as follows: Work 1 dc in each of the first 3 dc and 4-4-5-5 whole ch-spaces (i.e. ch-spaces with 2 ch), work 1 dc in next dc, then work 26-26-26-28 dc evenly over the next 11-11-11-12 ch-spaces from previous row, work 1 dc in next dc, and 1 dc around next ch-space, continue with 4-4-5-5 whole ch-spaces (i.e. ch-spaces with 2 ch) and 1 dc in each of the outermost 3 dc = 28-28-28-30 dc for neck in the middle of front piece. Now continue as explained below in all sizes: Then finish each shoulder separately. Turn and work ch-spaces as before over the first 4-4-4-4-5-5 ch-spaces, work 1 dc in each of the first 3 dc of the 26-26-28-28-28-30 dc. Turn and continue like this with ch-spaces and 3 dc in each side until piece measures 16-17-18-19-20-21 cm / 6¼"-6¾"-7"-7½"-8"-8¼". Turn and work 16-16-16-16-19-19 dc evenly over shoulder. Fasten off. Work the other shoulder the same way but reversed. I.e. beg at the armhole. ASSEMBLY: Sew the shoulder seams tog. Sew one and one stitch neatly tog and make sure to avoid a tight seam. Fasten off. EDGE AT THE BOTTOM: Now work an edge at the bottom of tunic as follows: ROUND 1: Fasten yarn with 1 sc and 3 ch at beg of round. * ch 2, skip approx. 1½ cm / ½", 1 dc *, repeat from *-* the entire round but finish with 1 sl st in 3rd ch at beg of round = approx. 71-73-80-87-97-104 ch-spaces on round. ROUND 2: Work sl sts until first ch-space. Then work as follows: work ch 3, * ch 2, 1 dc around next ch-space *, repeat from *-* around the entire round but finish with 1 sl st in 3rd ch at beg of round. Repeat 2nd round until piece measures 78-80-82-84-86-88 cm / 30¾"-31½"-32¼"-33"-33⅞"-34⅝" in total (measured from shoulder) or to desired length. Fasten off. |
|||||||||||||||||||||||||||||||||||||||||||
Diagram explanations |
|||||||||||||||||||||||||||||||||||||||||||
|
|||||||||||||||||||||||||||||||||||||||||||
 |
|||||||||||||||||||||||||||||||||||||||||||
 |
|||||||||||||||||||||||||||||||||||||||||||
Have you finished this pattern?Tag your pictures with #dropspattern #summerblissdress or submit them to the #dropsfan gallery. Do you need help with this pattern?You'll find 9 tutorial videos, a Comments/Questions area and more by visiting the pattern on garnstudio.com. © 1982-2026 DROPS Design A/S. We reserve all rights. This document, including all its sub-sections, has copyrights. Read more about what you can do with our patterns at the bottom of each pattern on our site. |
|||||||||||||||||||||||||||||||||||||||||||


With over 40 years in knitting and crochet design, DROPS Design offers one of the most extensive collections of free patterns on the internet - translated to 17 languages. As of today we count 325 catalogs and 12298 patterns - 12288 of which are translated into English (US/in).
We work hard to bring you the best knitting and crochet have to offer, inspiration and advice as well as great quality yarns at incredible prices! Would you like to use our patterns for other than personal use? You can read what you are allowed to do in the Copyright text at the bottom of all our patterns. Happy crafting!
Post a comment to pattern DROPS 167-18
We would love to hear what you have to say about this pattern!
If you want to leave a question, please make sure you select the correct category in the form below, to speed up the answering process. Required fields are marked *.