
Popular categories
Looking for a yarn?


Comments / Questions (65)
Jinky wrote:
I just finished the poncho, and this is my first time to make one, so am kinda in a rut as to how to block this one... Can you make a video on how to block this poncho? Thank you
11.04.2016 - 15:22DROPS Design answered:
See answer below.
11.04.2016 - 16:06Jinky wrote:
Is there a way you can show us how you block this poncho? Thank you.
11.04.2016 - 15:21DROPS Design answered:
Dear Jinky, you can block it as any other crocheted/knitted piece: wash it and place if flat taking care to finished measurements, add pin if necessary and let dry. Your DROPS store will have also more tips & advices for you, remember you can contact them even per mail or telephone. Happy crocheting!
11.04.2016 - 16:06Jinky wrote:
Don't you think it would be best well explain the diagram A.4 if this is incorporated already to the square after they are connected? It is more confusing if you tried to explain the A.4 done show it on a chart form. Just my two cent on the matter.
07.04.2016 - 14:01
![]() LeeAnn Russeau wrote:
LeeAnn Russeau wrote:
How do I work A4 diagram confusing
06.04.2016 - 23:48DROPS Design answered:
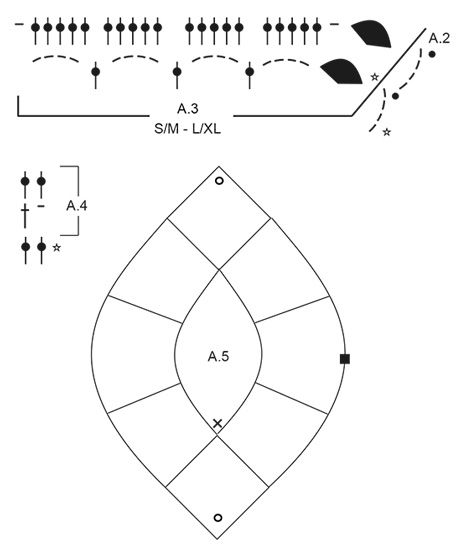
Dear LeeAnn, on first row of A.4 you do ch and dc until 3 dc remain before ch-space in the tip (as it says under ROUND 2), on second row you repeat dc-s around every ch-space. Happy crocheting!
07.04.2016 - 12:40
![]() JS wrote:
JS wrote:
How do I work A4?
05.04.2016 - 23:07DROPS Design answered:
Dear JS, start reading A.4 from the bottom corner on the right side and work towards the left every round: Round 1: (3ch to start round), then repeat *1ch, skip 1 dc, 1 dc in next dc*, repeat from *-* around. On round 2, work 2 dc around each ch-space. Happy crocheting!
07.04.2016 - 12:40Jinky wrote:
Correction on what I said earlier, dc2tog, ch3, dc2tog on the same ch2-space not ch 1-space. Thanks!
05.04.2016 - 06:26Jinky wrote:
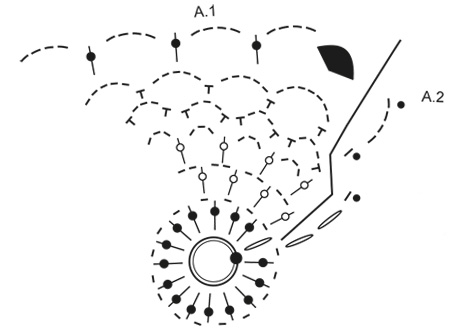
Just wanted to verify what is on the photo against what is in the chart.. On A.1 diagram, round 3, its says chain 3 (count as dc),dc, ch 3, dc2tog on the same chain 1space, but on the photo as to what I see... it's only dc2tog on chain 1space, then ch3 and do dc2tog on the next ch 1-space, which is correct? Thanks for anyone who can verify this.
05.04.2016 - 06:23DROPS Design answered:
Dear Mrs Jinky, thanks for your feedback, information has been forwarded to our Design team so that they can check. Thank you in advance for your patience.
05.04.2016 - 09:51
![]() Cindy wrote:
Cindy wrote:
I would also like to know if there are written directions for the diagrams in English? Although I have some experience I get confused with the diagrams. Cindy
29.03.2016 - 23:09DROPS Design answered:
Dear Cindy, there are only diagrams to this pattern, 1 symbol represents 1 stitch or group of sts - see diagram text and you have to repeat the framed parts in diagrams. Remember your DROPS store will provide you further individual assistance, even per mail or telephone. Happy crocheting!
30.03.2016 - 09:24
![]() LeeAnn Russeau wrote:
LeeAnn Russeau wrote:
I would like to know if there are written directions for the diagrams in English? I have recently just learned to crochet and it is very hard for me to follow a diagram at this time Thank You L
29.03.2016 - 19:48DROPS Design answered:
Dear Mrs Russeau, there are only diagrams to this pattern, you will find under legend all explanation: 1 symbol represents 1 stitch or group of st. Start reading the diagrams at the bottom corner on the right side and read towards the right every row from RS (= every round). Remember your DROPS store will provide you further individual assistance if required. Happy crocheting!
30.03.2016 - 08:55
![]() Susan S wrote:
Susan S wrote:
Do you have a bust measurement range in inches that corresponds to your sizing? Thank you.
12.03.2016 - 13:26DROPS Design answered:
Dear Susan S, you will find at the bottom of the pattern a measurement chart with all finished measurements for each size, taken flat from side to side - convert into inch here. Compare these to a similar garment you have and like the shape to find out the matching size. Happy crocheting!
12.03.2016 - 17:35
|
|||||||||||||||||||||||||||||||||||||||||||
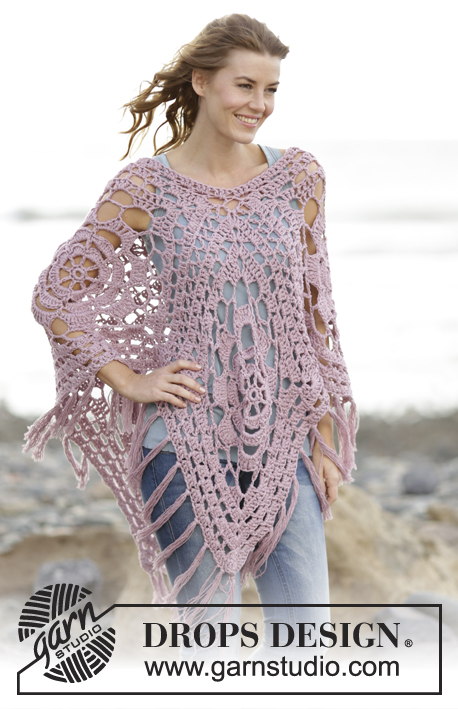
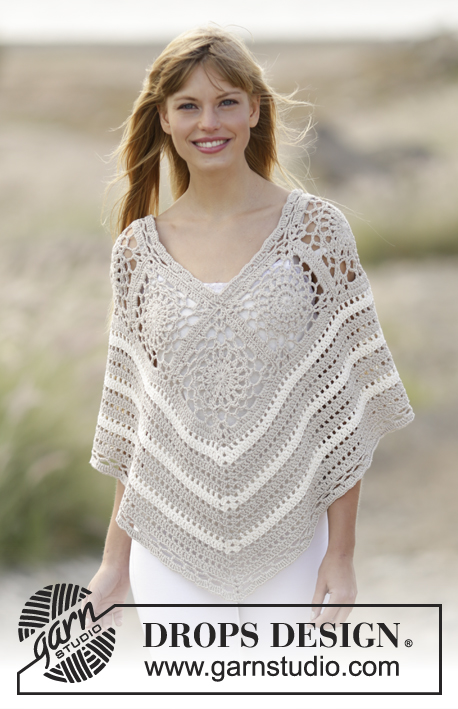
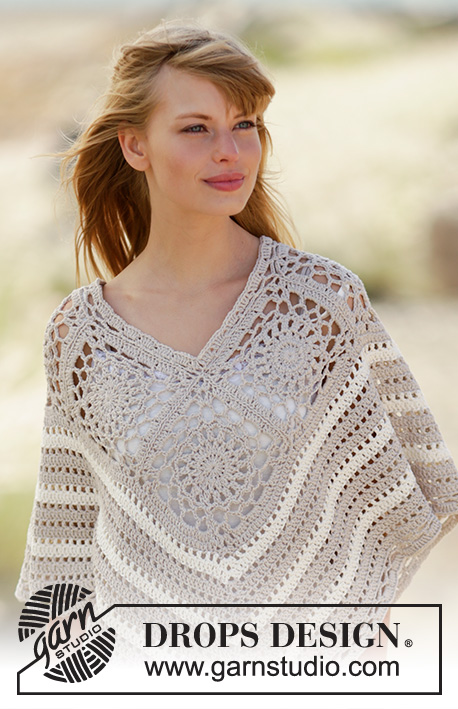
Sweet Martine#sweetmartineponcho |
|||||||||||||||||||||||||||||||||||||||||||
 |
 |
||||||||||||||||||||||||||||||||||||||||||
Crochet DROPS poncho with squares and lace pattern in ”Cotton Light”. The piece is worked top down. Size: S - XXXL.
DROPS 167-21 |
|||||||||||||||||||||||||||||||||||||||||||
|
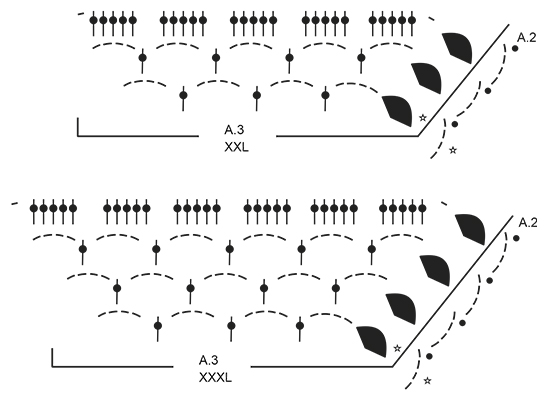
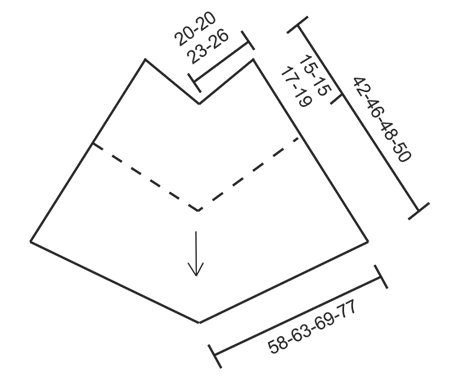
PATTERN: See diagrams A.1 to A.5. On diagram A.1 work first round in the entire round, then repeat A.1 and A.3 4 times in total on round. Diagram A.2 shows how every round beg and ends. A.5 shows how squares are assembled. CROCHET INFO: Beg every round with dc with 3 ch and finish with 1 sl st in 3rd ch. STRIPES: Work 0-4-4-4 rounds with light beige, then work * 2 rounds with off white, work 4 round with light beige *, repeat from *-* 3 times in total. INCREASE: On 1st round in A.4 (i.e. round with dc and ch) inc as follows: Work ch 1, around ch-space at the tip work as follows: 2 dc around ch-space, ch 3, 2 dc around same ch-space. On 2nd round in A.4 (i.e. round with dc) inc as follows: Work 1 dc around ch, around ch-space at the tip work as follows: 2 dc around ch-space, ch 3, 2 dc around same ch-space. ---------------------------------------------------------- PONCHO: The piece is worked from the neck down. First work squares as follows: SQUARE: Work 4 ch on hook size 4 mm / G/6 with light beige and form a ring with 1 sl st in first ch. Work A.1. Diagram A.2 shows how every round beg and ends. When first round of A.1 is worked, repeat A.1 4 times in total on round. When A.1 has been worked 1 time vertically, there are 16 ch-spaces and 4 corners. Work A.3 over A.1, i.e. repeat A.3 4 times in total on round (see diagram for correct size). NOTE: First round in A.3 is not worked, it only shows how next round is worked around sts. Diagram A.2 shows how every round beg and ends. When A.3 has been worked 1 time vertically, there are 80-80-100-120 dc and 4 corners. Fasten off. Square measures approx. 15-15-17-19 x 15-15-17-19 cm / 6"-6"-6¾"-7½" x 6"-6"-6¾"-7½". REMEMBER THE CROCHET GAUGE! Work 8 squares. ASSEMBLY: Sew squares tog edge to edge (see A.5) i.e. sew in outer loops of edge sts. These make up the upper part of poncho. Now work in the round from bottom edge of squares as follows: FROM SQUARES AND DOWN: ROUND 1: Beg in the side of square (see A.5), in the middle of the 1st square (i.e. 10-10-12-15 dc before corner). Work 3 ch – READ CROCHET INFO, work 1 dc in each of the first 10-10-12-15 dc, * over the 2 corners sewn tog work as follows: 1 dc in each of the next 2 dc, 2 dc around each of the next 2 corners, 1 dc in each of the next 2 dc *, then work 1 dc in every dc until next corner sewn tog (= over the next 20-20-25-30 dc), repeat from *-* over the next 2 corners sewn tog, 1 dc in each of the next 20-20-25-30 dc, over the next corner inc (see A.5) as follows: Work 1 dc around ch, around ch-space at the tip work as follows: 2 dc around ch-space, ch 3, 2 dc around same ch-space, 1 dc around next ch. Work 1 dc in every dc and from *-* over the next 8 corners sewn tog and the next 100-100-125-150 dc (i.e. 20-20-25-30 dc between each of the 2 corners sewn tog). Around next corner inc as follows: Work 1 dc around ch, around ch-space at the tip work as follows: 2 dc around ch-space, ch 3, 2 dc around same ch-space. Work 1 dc in every dc and from *-* the entire round, finish with 1 sl st in 3rd ch = 276-276-326-376 dc. ROUND 2: Work with off white - READ STRIPES. Work A.4 until 3 dc remain before ch-space in the tip, adjust to finish with 1 dc in last dc, work INCREASE – see explanation above. Repeat A.4 until next tip, work increase, work A.4 the rest of round. On every round inc 8 dc, i.e. inc 2 dc on each side of mid front/back. Repeat stripes and A.4 until finished measurements. When stripes have been worked, piece measures approx. 36-40-42-44 cm / 14¼"-15¾"-16½"-17¼" from the neck. EDGE AT THE BOTTOM: ROUND 1: Work with light beige. Work ch 1, work 1 sc in first dc, work * ch 5, skip 4 dc, 1 sc in next dc *, repeat from *-* until mid front/back, ** adjust so that last sc is worked around ch-space mid front/back, ch 5, 1 sc around same ch-space **, repeat from *-* until mid front/back, repeat from **-** around ch-space mid front/back, repeat from *-* the rest of round, finish with 1 sl st in first ch at beg of round. ROUND 2: Work ch 3, 1 sl st around first ch-space, 2 ch (= 1 hdc), work * ch 4, 1 hdc around next ch-space *, repeat from *-* until ch-space mid front/back, ** ch 4, around ch-space mid front/back work 1 hdc + 4 ch + 1 hdc **, repeat from *-* until mid front/back, repeat from **-** around ch-space mid front/back, repeat from *-* the rest of round, finish with 1 sl st in 2nd ch (= hdc) at beg of round. ROUND 3: Work 3 ch (= 1 dc), work 5 dc around every ch-space, around ch-space mid front/back work: ch 1, 2 dc around ch-space, ch 3, 2 dc around same ch-space, ch 1, finish round with 1 sl st in 3rd ch at beg of round. Fasten off. NECK EDGE: Beg mid front - see diagram and work with light beige on hook size 4 mm / G/6. Work as follows from RS: ROUND 1: Work 1 sc around ch-space in the middle (tip for the middle square), ** work ch 5, skip corner (i.e. 3 ch + 2 dc), 1 sc around ch, * ch 5, skip 5 dc, 1 sc between 2 dc *, repeat from *-* 2-2-3-4 more times, ch 5, skip 5 dc, 1 sc around ch, ch 5, 1 sc in seam between squares **, repeat from **-** around the entire neck, finish with 1 sl st in first sc. ROUND 2: Work ch 2, 1 sl st around first ch-space, 2 ch (= 1 hdc), * ch 4, 1 hdc around next ch-space *, repeat from *-* until 1 ch-space remains before mid back, work 1 hdc around the next 2 ch-spaces, repeat from *-* until 1 ch-space remains, work 1 hdc around last ch-space, finish with 1 sl st in 2nd ch (= 1 hdc) at beg of round. ROUND 3: Work 3 ch (= 1 dc), work 2 dc around first ch-space, work 5 dc around every ch-space until 1 ch-space remains before mid back, work 3 dc around each of the next 2 ch-spaces, work 5 dc around every ch-space until 1 ch-space remains, work 3 dc around last ch-space, finish with 1 sl st in first dc. Fasten off. |
|||||||||||||||||||||||||||||||||||||||||||
Diagram explanations |
|||||||||||||||||||||||||||||||||||||||||||
|
|||||||||||||||||||||||||||||||||||||||||||
 |
|||||||||||||||||||||||||||||||||||||||||||
 |
|||||||||||||||||||||||||||||||||||||||||||
 |
|||||||||||||||||||||||||||||||||||||||||||
 |
|||||||||||||||||||||||||||||||||||||||||||
Have you finished this pattern?Tag your pictures with #dropspattern #sweetmartineponcho or submit them to the #dropsfan gallery. Do you need help with this pattern?You'll find 11 tutorial videos, a Comments/Questions area and more by visiting the pattern on garnstudio.com. © 1982-2026 DROPS Design A/S. We reserve all rights. This document, including all its sub-sections, has copyrights. Read more about what you can do with our patterns at the bottom of each pattern on our site. |
|||||||||||||||||||||||||||||||||||||||||||


With over 40 years in knitting and crochet design, DROPS Design offers one of the most extensive collections of free patterns on the internet - translated to 17 languages. As of today we count 324 catalogs and 12290 patterns - 12280 of which are translated into English (US/in).
We work hard to bring you the best knitting and crochet have to offer, inspiration and advice as well as great quality yarns at incredible prices! Would you like to use our patterns for other than personal use? You can read what you are allowed to do in the Copyright text at the bottom of all our patterns. Happy crafting!
Post a comment to pattern DROPS 167-21
We would love to hear what you have to say about this pattern!
If you want to leave a question, please make sure you select the correct category in the form below, to speed up the answering process. Required fields are marked *.