DROPS Brushed Alpaca Silk
77% Alpaca, 23% Silk
from 3.95 $ /25g
Get the yarn to make this pattern from 47.40$.

The yarn cost is calculated from the pattern’s smallest size and the yarn’s cheapest product type. Looking for an even better price? You might find it on the DROPS Deals!

DROPS AW2425

No Worries

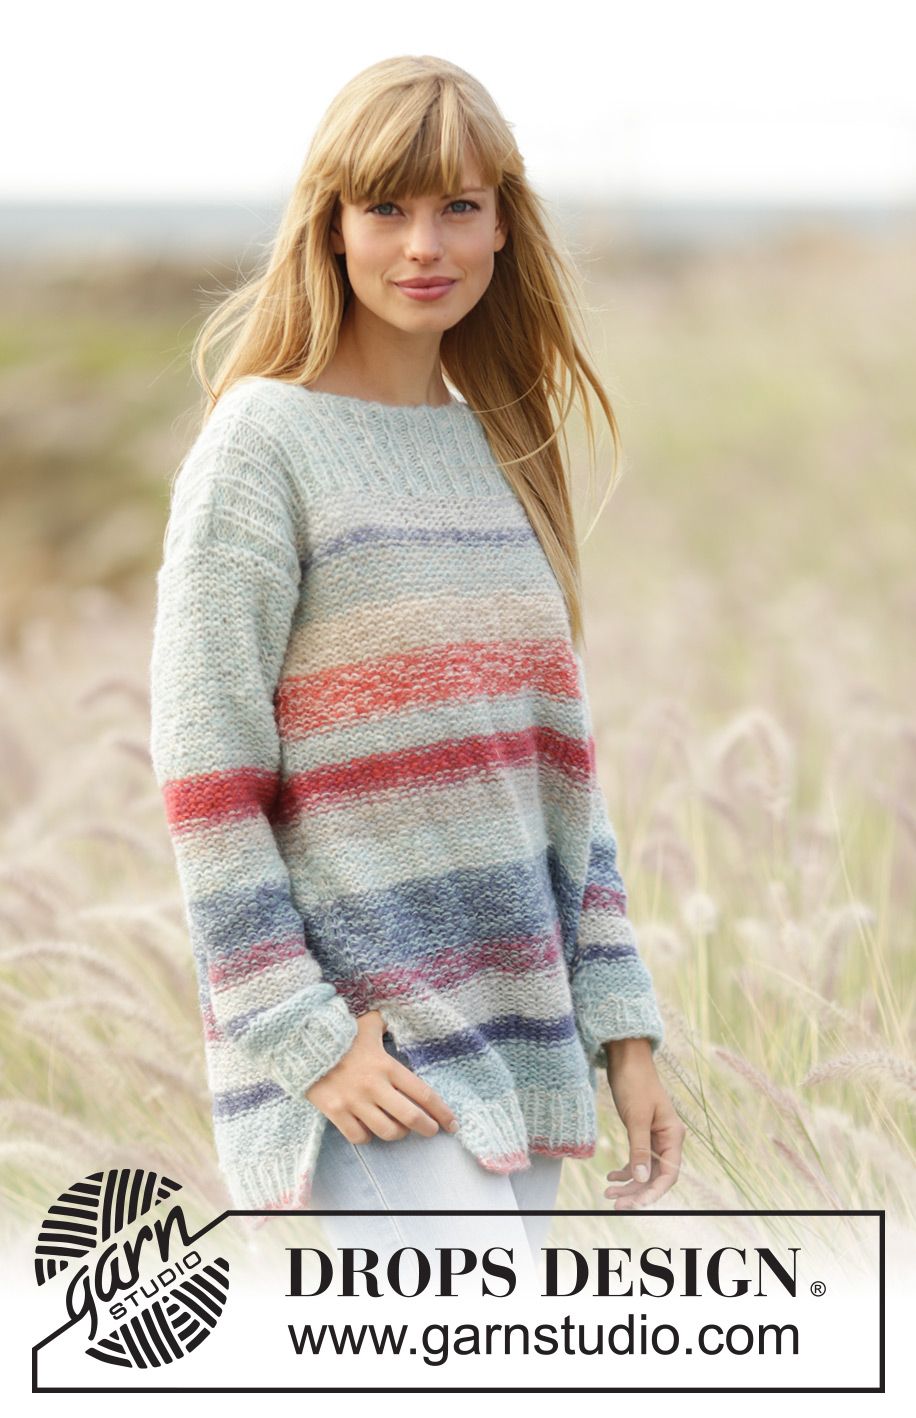
Knitted DROPS jumper with stripes, rib and vents in 2 strands ”Brushed Alpaca Silk”. Size: XS - XXXL.

DROPS 169-9
DROPS design: Pattern no as-054
Yarn group C + C or E
----------------------------------------------------------
Size: XS - S - M - L - XL - XXL - XXXL
Materials:
DROPS BRUSHED ALPACA SILK from Garnstudio
75-100-100-100-125-125-150 g color no 15, light sea green
75-100-100-100-125-125-150 g color no 01, off white
50-50-50-50-50-50-50 g colour no 14, light grey green
25-25-25-50-50-50-50 g color no 04, light beige
25-25-25-25-25-50-50 g color no 13, denim blue
25-25-25-25-25-25-50 g color no 06, coral
25-25-25-25-25-25-25 g color no 08, heather
NOTE: Jumper worked in one color = 275-300-325-350-375-425-450 g Brushed Alpaca Silk.

DROPS CIRCULAR NEEDLE (60 or 80 cm / 24" or 32") size 8 mm / US 11 - or size needed to get 11 sts x 15 rows in stockinette st with 2 strands = 4" x 4" (10 x 10 cm).
DROPS CIRCULAR NEEDLE (60 or 80 cm / 24" or 32") SIZE 6 mm/US 10 - for rib.

-------------------------------------------------------

Alternative Yarn – See how to change yarns here
Yarn Groups A to F – Use the same pattern and change the yarn here
Yarn usage using an alternative yarn – Use our yarn converter here

-------------------------------------------------------

DROPS Brushed Alpaca Silk
77% Alpaca, 23% Silk
from 3.95 $ /25g
Get the yarn to make this pattern from 47.40$.

The yarn cost is calculated from the pattern’s smallest size and the yarn’s cheapest product type. Looking for an even better price? You might find it on the DROPS Deals!

Pattern instructions

NOTE: This pattern is written in American English. All measurements in charts are in cm. For conversion from inches to cm - click here. There are different terms for crocheting in American and British English. If this pattern includes crochet, click for "crochet terms" here. For this pattern in British English, please click here.
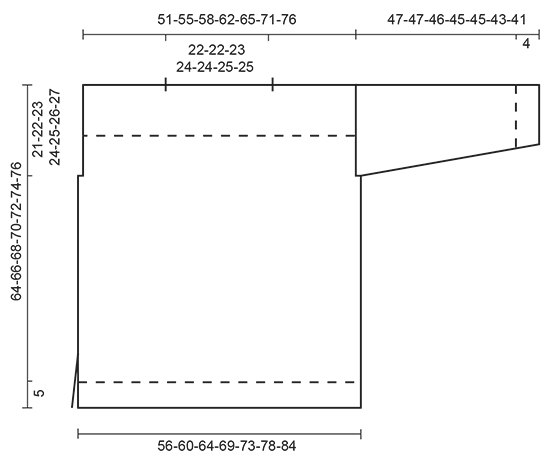
GARTER ST (back and forth):
K all rows. 1 ridge = K2 rows.

STRIPES:
Adjust so that last row in every stripe is from WS, i.e. first row in every stripe is from RS.
Work stripes with 2 strands as follows:
Stripe 1: 1 cm / ⅜" with coral and light sea green
Stripe 2: 4 cm / 1½" with off white and light sea green
Stripe 3: 4-4-5-5-6-6-7 cm / 1½"-1½"-2"-2"-2½"-2½"-2¾" with light sea green and light gray green
Stripe 4: 2 ridges with 2 strands denim blue
Stripe 5: 4-4-5-5-4-6-7 cm / 1½"-1½"-2"-2"-1½"-2⅜"-2¾" with light gray green and off white
Stripe 6: 3 cm / 1" with light gray green and heather
Stripe 7: 5-5-6-6-7-7-7 cm / 2"-2"-2⅜"-2⅜"-2¾"-2¾"-2¾" with light sea green and denim blue
Stripe 8: 4 cm / 1½" with light gray green and off white
Stripe 9: 2½ cm / ⅞" with light gray green and light beige
Stripe 10: 1 cm / ⅜" with heather and light beige
Stripe 11: 2½ cm / ⅞" with heather and coral
Stripe 12: 1 cm / ⅜" with light sea green and light beige
Stripe 13: 2 cm / ¾" with light gray green and off white
Stripe 14: 4 cm / 1½" with coral and off white
Stripe 15: 4-4-5-5-6-6-6 cm / 1½-"1½"-2"-2"-2⅜"-2⅜"-2⅜" with light beige and off white
Stripe 16: 4 cm / 1½" with light beige and light sea green
Stripe 17: 1 cm / ⅜" with light gray green and denim blue
Stripe 18: 3 cm / 1" with light gray green and off white
Stripe 19: Work the rest of the jumper in off white and light sea green.

INCREASE TIP:
Always inc from RS.
Inc 1 st by making 1 YO, on next row P YO twisted to avoid holes.
----------------------------------------------------------

JUMPER:
Worked back and forth on circular needle to make room for all the sts. Jumper is worked in stockinette st but sewn tog with WS outwards.

BACK PIECE:
Cast on 73-76-82-88-94-100-106 sts on circular needle size 6 mm / US 10 with 1 strand coral and 1 strand light sea green. P 1 row from RS.
Then work in STRIPES - see explanation above - as follows from WS: Work 3 sts in GARTER ST - see explanation above - rib = K 1/P 2 until 4 sts remain, K 1, finish with 3 sts in garter st. When 2nd stripe has been worked, switch to circular needle size 8 mm / US 11. Work in stockinette st with 3 sts in garter st in each side of piece and dec 11-10-12-12-14-14-14 sts evenly on first row = 62-66-70-76-80-86-92 sts. When piece measures 15 cm / 6", cast on 1 edge st in each side of piece at the end of the next 2 rows = 64-68-72-78-82-88-94 sts. Work in stockinette st with 1 edge st in garter st in each side of piece. REMEMBER THE KNITTING GAUGE When piece measures 43-44-45-46-47-48-49 cm / 17"-17¼"-17¾"-18"-18½"-19"-19¼", bind off 4-4-4-5-5-5-5 sts for armhole at beg of the next 2 rows = 56-60-64-68-72-78-84 sts. When 18th stripe has been worked (piece measures 52-52-56-56-58-60-62 cm / 20½"-20½"-22"-22"-22¾"-23½"-24½" adjust so that last row is from WS, work 19th stripe and inc 11-10-12-11-13-13-13 sts evenly on first row = 67-70-76-79-85-91-97 sts. Switch to circular needle size 6 mm / US 10. On next row from WS work as follows: Work rib = K 1/P 2, finish with K 1. Continue with K over K and P over P until piece measures 64-66-68-70-72-74-76 cm / 25¼"-26"-26¾"-27½"-28⅜"-29⅛"-30". Insert 1 marker after 20-21-23-24-27-29-32 sts in from each side (marks shoulder seams). Bind off sts with K over K and P over P on circular needle size 8 mm / US 11.

FRONT PIECE:
Cast on and work as back piece.

SLEEVE:
Worked back and forth on needle. Cast on 29-29-32-32-35-35-35 sts on circular needle size 6 mm / US 10 with 1 strand off white and 1 strand light sea green. P 1 row from RS. Then work as follows from WS: Work rib K 1/P 2 with 1 edge st in garter st in each side of piece. When piece measures 4 cm / 1½", P from WS and dec 3-3-4-4-5-5-5 sts evenly = 26-26-28-28-30-30-30 sts. Switch to circular needle size 8 mm / US 11. Work in stockinette st with 1 edge st in garter st in each side and work 3rd-13th stripe. When piece measures 8 cm / 3⅛", inc 1 st inside 1 edge st in garter st in each side of piece - READ INCREASE TIP! Repeat inc every 3½-3-3-2½-2½-2-2 cm / 1¼"-1⅛"-1⅛"-⅞"-⅞"-¾"-¾" 10-11-11-12-12-14-15 more times = 48-50-52-54-56-60-62 sts. When 3rd-13th stripe has been worked 1 time, finish piece with 1 strand light sea green and 1 strand off white. Bind off when piece measures 47-47-46-45-45-43-41 cm / 18½"-18½"-18"-17¾"-17¾"-17"-16" (shorter measurements in the larger sizes because of wider shoulders). Make another sleeve.

ASSEMBLY:
Sew jumper tog with WS outwards. Sew shoulder seams in to markers. Sew in sleeves with WS outwards, sew sleeve seams inside 1 edge st, sew side seam inside 1 edge st down to the 3 sts in garter st in each side (= approx. 15 cm / 6" vent).

This pattern has been corrected.

Updated online: 03.01.2017
New yarnamount (size XS and S): DROPS BRUSHED ALPACA SILK from Garnstudio 50-50-50-50-50-50-50 g colour no 14, light grey green

Diagram

All measurements in charts are in cm.

diagram measurements
Do you have a question? See a list of frequently asked questions (FAQ)

Knitting tension is what determines the final measurements of your work, and is usually measured per 10 x 10 cm. It is provided like so: number of stitches in width x number of rows in height - eg: 19 stitches x 26 rows = 10 x 10 cm.

The knitting tension is very individual; some people knit/crochet loosely while others work tightly. You adjust the knitting tension with the needle size, which is why the suggested needle size only serve as a guide! You need to adjust this (up or down) to ensure that YOUR knitting tension matches the knitting tension provided in the pattern. If you work with a different knitting tension than provided you will have a different yarn consumption, and your work will have different measurements than what the pattern suggests.

The knitting tension also determines which yarns can replace each other. As long as you achieve the same knitting tension you can replace one yarn with another.

See DROPS lesson: How to measure your tension/gauge

See DROPS video: How to make a gauge tension swatch

The required amount of yarn is provided in grams, eg: 450 g. To calculate how many balls you’ll need you first need to know how many grams are in 1 ball (25g, 50g or 100g). This information is available if you click on the individual yarn quality on our pages. Divide the amount required with the amount of each ball. For example, if each ball is 50g (the most common amount), the calculation will be as follows: 450 / 50 = 9 balls.

The important thing when changing from one yarn to another is that the knitting/crochet tension remains the same. This is so that the measurements of the finished piece will be the same as on the sketch provided. It is easier to achieve the same knitting tension using yarns from the same yarn group. It is also possible to work with multiple strands of a thinner yarn to achieve the knitting tension of a thicker one. Please try our yarn converter. We recommend you to always work a test swatch.

Please NOTE: when changing yarn the garment might have a different look and feel to the garment in the photo, due to individual properties and qualities of each yarn.

See DROPS lesson: Can I use a different yarn than the one mentioned in the pattern?

All our yarns are categorised into yarn groups (from A to F) according to thickness and knitting tension – group A contains the thinnest yarns and group F the thickest. This makes it easier for you to find alternative yarns to our patterns, should you wish to switch yarn. All yarns within the same group have a similar knitting tension and can easily replace each other. However, different yarn qualities have different structures and properties which will give the finished work a unique look and feel.

Click here for an overview of the yarns in each yarn group

At the top of all our patterns you’ll find a link to our yarn converter, which is a helpful tool should you wish to use a different yarn than suggested. By filling in the yarn quality you wish to replace, the amount (in your size) and number of strands, the converter will present good alternative yarns with the same knitting tension. Additionally it will tell you how much you’ll require in the new qualities and whether you’ll need to work with multiple strands. Most skeins are 50g (some are 25g or 100g).

If the pattern is worked with multiple colours, every colour will have to be converted separately. Similarly, if the pattern is worked with several strands of different yarns (for example 1 strand Alpaca and 1 strand Kid-Silk) you will have to find alternatives for each, individually.

Click here to see our yarn converter

Since different yarns have different qualities and textures we have chosen to keep the original yarn in our patterns. However, you can easily find options among our available qualities by using our yarn converter, or simply pick a yarn from the same yarn group.

It is possible that some retailers still have discontinued yarns in stock, or that someone has a few skeins at home that they would like to find patterns for.  

The yarn converter will provide both alternative yarn as well as required amount in the new quality.

If you think it's hard to decide what size to make, it can be a good idea to measure a garment you own already and like the size of. Then you can pick the size by comparing those measures with the ones available in the pattern's size chart.

You'll find the size chart at the bottom of the pattern.

See DROPS lesson: How to read size chart

The needle size provided in the pattern serves only as a guide, the important thing is to follow the knitting tension. And since knitting tension is very individual, you will have to adjust the needle size to ensure that YOUR tension is the same as in the pattern – maybe you’ll have to adjust 1, or even 2 needle sizes, up or down to achieve the correct tension. For this, we recommend that you work test swatches.

Should you work with a different knitting tension than the one provided, the measurements of the finished garment might deviate from the measurement sketch.

See DROPS lesson: How to measure your tension/gauge

See DROPS video: How to make a gauge tension swatch

Working a garment top-down provides more flexibility and room for personal adjustment. For example it is easier to try the garment on while working, as well as making adjustments to length of yoke and shoulder caps.

The instructions are carefully explaining every step, in the correct order. Diagrams are adjusted to the knitting direction and are worked as usual.

The diagram depicts all rows/rounds, and every stitch seen from the right side. It is read from bottom to top, from right to left. 1 square = 1 stitch.

When working back and forth, every other row is worked from the right side and every other row is worked from the wrong side. When working from the wrong side, the diagram will have to be worked reversed: from left to right, knit stitches are purled, purl stitches are knit etc.

When working in the round every round is worked from the right side and the diagram are worked from right to left on all rounds.

See DROPS lesson: How to read knitting diagrams

The diagram depicts all rows/rounds, and every stitch seen from the right side. It is worked from bottom to top, from right to left.

When working back and forth every other row is worked from the right side: from right to left and every other row is worked from the wrong side: from left to right.

When working in the round, every row in the diagram are worked from the right side, from right to left.

When working a circular diagram you start in the middle and work your way outwards, counter clockwise, row by row.

The rows usually start with a given number of chain stitches (equivalent to the height of the following stitch), this will either be depicted in the diagram or explained in the pattern.

See DROPS lesson: How to read crochet diagrams

Instructions for working several diagrams after each other on the same row/round, will often be written like so: “work A.1, A.2, A.3 a total of 0-0-2-3-4 times". This means you work A.1 once, then A.2 is worked once, and A.3 is repeated (in width) the number of times provided for your size – in this case like so: S = 0 times, M = 0 times, L=2 times, XL= 3 times and XXL = 4 times.

The diagrams are worked as usual: begin with the first row in A.1, then work the first row in A.2 etc.

See DROPS lesson: How to read knitting diagrams

See DROPS lesson: How to read crochet diagrams

The total width of the garment (from wrist-to-wrist) will be larger in the larger sizes, despite the actual sleeves being shorter. The larger sizes have longer sleeve caps and wider shoulders, so there will be a good fit in all sizes.

The measurement sketch/schematic drawing provides information regarding the full length of the garment. If it’s a jumper or a jacket the length is measured from the highest point on the shoulder (usually closest to the neckline), and straight down to the bottom of the garment. It is NOT measured from the tip of shoulder. Similarly, the length of yoke is measured from the highest point on the shoulder and down to where yoke is split into body and sleeves.

See DROPS lesson: How to read a schematic drawing

Diagrams are often repeated on the round or in height. 1 repeat is the diagram the way it appears in the pattern. If it says to work 5 repeats of A.1 in the round, then you work A.1 a total of 5 times after/next to each other in the round. If it says to work 2 repeats of A.1 vertically/in height you work the entire diagram once, then begin again at the start and work the entire diagram one more time.

Chain stitches are slightly narrower than other stitches and to avoid working the cast-on edge too tight, we simply chain more stitches to begin with. The stitch count will be adjusted on the following row to fit the pattern and measurement sketch.

The rib edge is more elastic and will contract slightly compared to, for example, stocking stitch. By increasing before the rib edge, you avoid a visible difference in width between the rib edge and the rest of the body.

It’s very easy to cast off too tightly, and by making yarn overs while casting off (and simultaneously casting these off) you avoid a too tight cast off edge.

See DROPS video: How to bind off with yarn overs (yo)

To achieve an even increase (or decrease) you can increase on, for example: every 3rd and 4th row alternately, like so: work 2 rows and increase on the 3rd row, work 3 rows and increase on the 4th. Repeat this until the increase is complete.

See DROPS lesson: Increase or decrease 1 st on every 3rd and 4th row alternately

Should you prefer to work in the round instead of back and forth, you may of course adjust the pattern. You’ll need to add steeks mid-front (usually 5 stitches), and follow the instructions. When you would normally turn and work from the wrong side, simply work across the steek and continue in the round. At the end you’ll cut the piece open, pick up stitches to work bands, and cover the cut edges.

See DROPS video: How to knit steeks and cut open

Should you prefer to work back and forth instead of in the round, you may of course adjust the pattern so you work the pieces separately and then assemble them at the end. Divide the stitches for the body in 2, add 1 edge stitch in each side (for sewing) and work the front and back pieces separately.

See DROPS lesson: Can I adapt a pattern for circular needles into straight needles?

Pattern repeats can vary slightly in the different sizes, in order to get the correct proportions. If you’re not working the exact same size as the garment in the photo, yours might deviate slightly. This has been carefully developed and adjusted so that the complete impression of the garment is the same in all sizes.

Make sure to follow instructions and diagrams for your size!

If you have found a pattern you like which is available in women’s size it’s not very difficult to convert it to men’s size. The biggest difference will be the length of sleeves and body. Start working on the women size that you think would fit across the chest. The additional length will be worked right before you cast off for the armhole/sleeve cap. If the pattern is worked top-down you can add the length right after the armhole or before the first decrease on sleeve.

Regarding additional yarn amount, this will depend on how much length you add, but it is better with a skein too many than too few.

All yarns will have excess fibres (from production) that might come off as lint or shedding. Brushed yarns (ie hairier yarns) have more of these loose, excess fibres, causing more shedding.

Shedding also depends on what is worn under or over the garment, and whether this pulls at the yarn fibres. It’s therefore not possible to guarantee that there will be no shedding

Below are some tips on how to get the best result when working with hairier yarns:

1. When the garment is finished (before you wash it) shake it vigorously so the looser hairs come off. NOTE: do NOT use a lint roller, brush or any method that pulls at the yarn.

2. Place the garment in a plastic bag and put it in your freezer - the temperature will cause the fibres to become less attached to each other, and excess fibres will come off easier.

3. Leave in the freezer for a few hours before taking it out and shaking it again.

4. Wash the garment according to the instructions on the yarn label.

Pilling is a natural process that happens to even the most exclusive of fibers. It's a natural sign of wear and tear that is hard to avoid, and that is most visible in high friction areas of your garment like a sweater's arms and cuffs.

You can make your garment look as new by removing the pilling, using a fabric comb or a pill/lint remover.

Still can't find the answer you need? Then scroll down and leave your question so one of our experts can try to help you. This will be done normally within 5 to 10 working days.
In the meantime, you can read the questions and answers that others have left to this pattern or join the DROPS Workshop on Facebook to get help from fellow knitters/crocheters!

You might also like...

Post a comment to pattern DROPS 169-9

We would love to hear what you have to say about this pattern!

If you want to leave a question, please make sure you select the correct category in the form below, to speed up the answering process. Required fields are marked *.

Comments / Questions (47)

country flag Christine wrote:

Bonjour, Merci beaucoup pour votre réponse. J'ai finalement compris ! Bonne journée.

22.06.2018 - 09:13

country flag Christine wrote:

Merci pour votre réponse. Mais j'ai toujours un problème malgré vos explications. Après avoir monté les mailles, je suis sur l'envers du travail (avec boucles) . Vous demandez de tricoter ce rang sur l'endroit en jersey envers alors que je suis sur l'envers. Comment faire ?

21.06.2018 - 17:29

DROPS Design answered:

Bonjour Christine, tout à fait, en fonction des modèles et du résultat souhaité le 1er rang va se tricoter soit en mailles envers soit en mailles endroit et sera, soit l'endroit, soit l'envers. Bon tricot!

22.06.2018 - 07:42

country flag Christine wrote:

Bonjour, Je tricote le dos et J'ai monté les 82 m. (M). Vous demandez de tricoter un rang à l'envers sur l'endroit du travail mais je suis sur l'envers du travail. Comment doit on tricoter le rang qui suit le montage de mailles ? Merci beaucoup pour votre aide.

20.06.2018 - 20:18

DROPS Design answered:

Bonjour Christine, dans ce modèle, le 1er rang après avoir monté les mailles se tricote sur l'endroit, mais en jersey envers puis on continue les côtes en tricotant le 1er rang des côtes sur l'envers. Quand on tricote les rayures, le 1er rang se tricote toujours sur l'endroit. À la fin, le pull sera assemblé avec la partie jersey endroit sur l'envers. Bon tricot!

21.06.2018 - 07:58

country flag Marisa wrote:

Hello, This may be obvious but please confirm, the pattern is worked in garter stitch so I knit every row. However the increase tip says to purl the increase twisted on the following row. Should this read as knit twisted or do I indeed pearl the y.o on following row? Many thanks for your explanation.

12.10.2017 - 22:54

DROPS Design answered:

Dear Marisa, this jumper is worked in stocking stitch, ie K from RS and P from WS but when sewing you will turn jumper and sleeves with P side outside (= reverse stocking stitch). Increase-tip is therefore correct. Happy knitting!

13.10.2017 - 09:36

country flag Karoline wrote:

Hei, Hvor finner jeg hvor mye garn jeg trenger til de ulike størrelsene?

24.03.2017 - 14:17

DROPS Design answered:

Garnmengden finnes til høyre eller under bildet av modellen, avhengig av hva du leser på. PC, nettbrett eller mobiltelefon.

25.09.2017 - 11:46

country flag Marion Heeren wrote:

Ik maak de trui in xxl, maar blijk ook echt veel te weinig van nr 14 lichtgrijsgroen te hebben. Van alle andere kleuren heb ik meer dan voldoende. Als ik het aantal cm tel dat ik bij het achterpand met lichtgrijsgroen brei komt in de buurt van wat ik met naturel ook brei. Echter van naturel heb ik 125 gram en van lichtgrijsgroen maar 50cm. Erg vervelend nu want ik moet maar hopen dat ik nog aan hetzelfde verfbad kan komen. Misschien is er een aanpassing nodig.

27.02.2017 - 07:54

DROPS Design answered:

Hoi Marion. Wij zullen het noteren, onze Design afdeling bekijken het patroon en maken een aanpassing als zij vinden dat het verkeerd is.

27.02.2017 - 14:40

country flag Sharon Brobst wrote:

Thank you for responding; I did keep my tension per the gauge listed; perhaps the pattern should be updated to state 50 grams, not 25 for this color; I'm not sure what else it could be. Any further thoughts from you would be appreciated. Thanks, Sharon

28.12.2016 - 02:58

country flag Sharon Brobst wrote:

I ordered the amount of yarn specified in the pattern; my gauge is accurate but I've run out of lavender #17 (substituted for light gray green) and I still have 1 3/4th sleeves to go. Is there anything you could do to assist with this, or at least explain why this might happen? Thanks! Sharon

20.12.2016 - 22:49

DROPS Design answered:

Dear Mrs Brobst, did you kept the correct tension when working? You should need 25-50 g light grey green, ie 1-2 balls depending on your size. Happy knitting!

21.12.2016 - 09:39

country flag Esmee wrote:

Het is mij niet duidelijk hoe de ribbelsteek aan de goede kant eruit komt. Anderen hebben deze vraag ook al gesteld, maar die twee antwoorden spraken elkaar weer tegen. Is de tweede pen die je breit (dus aan de verkeerde kant) 1x recht en 2x averecht of 1x averecht en 2x recht?

05.09.2016 - 17:37

DROPS Design answered:

Hoi Esmee. Je breit 1 r/ 2 av op de verkeerde kant, dus dat is 1 av/2 r op de goede kant. Zie ook foto.

06.09.2016 - 13:37

country flag RF Mullane wrote:

I would like to make DROPS 169-9 (No Worries, pattern no as-054), but would prefer using DROPS Cloud yarn. Based on the # of grams indicated on pattern, I would only need 7-50 g balls of Cloud yarn. However, if I base it on the 325 g of Brushed Alpaca Silk yardage, (1820 m), I would need 22.75-50 g balls of Cloud yarn. Is this correct? Please advise.

11.08.2016 - 19:51

DROPS Design answered:

Dear Mrs Mullane, you will fin here how to calculate new amount of yarn when choosing an alternative, and remember your DROPS store will help you also if needed. Happy knitting!

15.08.2016 - 10:25