
Popular categories
Looking for a yarn?


|
|
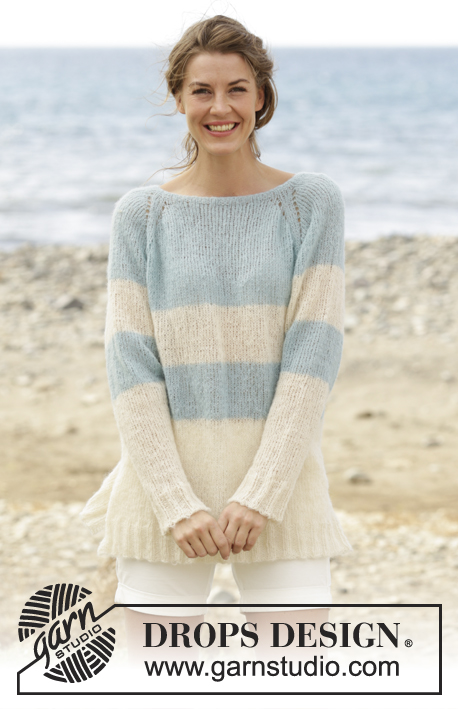
No Worries |
|
|
|
|
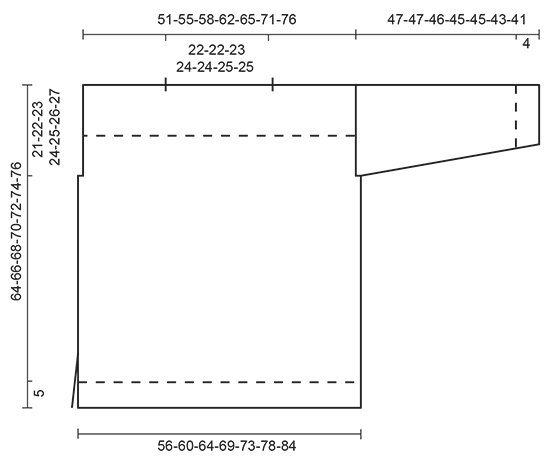
Knitted DROPS jumper with stripes, rib and vents in 2 strands ”Brushed Alpaca Silk”. Size: XS - XXXL.
DROPS 169-9 |
|
|
GARTER ST (back and forth): K all rows. 1 ridge = K2 rows. STRIPES: Adjust so that last row in every stripe is from WS, i.e. first row in every stripe is from RS. Work stripes with 2 strands as follows: Stripe 1: 1 cm / ⅜" with coral and light sea green Stripe 2: 4 cm / 1½" with off white and light sea green Stripe 3: 4-4-5-5-6-6-7 cm / 1½"-1½"-2"-2"-2½"-2½"-2¾" with light sea green and light gray green Stripe 4: 2 ridges with 2 strands denim blue Stripe 5: 4-4-5-5-4-6-7 cm / 1½"-1½"-2"-2"-1½"-2⅜"-2¾" with light gray green and off white Stripe 6: 3 cm / 1" with light gray green and heather Stripe 7: 5-5-6-6-7-7-7 cm / 2"-2"-2⅜"-2⅜"-2¾"-2¾"-2¾" with light sea green and denim blue Stripe 8: 4 cm / 1½" with light gray green and off white Stripe 9: 2½ cm / ⅞" with light gray green and light beige Stripe 10: 1 cm / ⅜" with heather and light beige Stripe 11: 2½ cm / ⅞" with heather and coral Stripe 12: 1 cm / ⅜" with light sea green and light beige Stripe 13: 2 cm / ¾" with light gray green and off white Stripe 14: 4 cm / 1½" with coral and off white Stripe 15: 4-4-5-5-6-6-6 cm / 1½-"1½"-2"-2"-2⅜"-2⅜"-2⅜" with light beige and off white Stripe 16: 4 cm / 1½" with light beige and light sea green Stripe 17: 1 cm / ⅜" with light gray green and denim blue Stripe 18: 3 cm / 1" with light gray green and off white Stripe 19: Work the rest of the jumper in off white and light sea green. INCREASE TIP: Always inc from RS. Inc 1 st by making 1 YO, on next row P YO twisted to avoid holes. ---------------------------------------------------------- JUMPER: Worked back and forth on circular needle to make room for all the sts. Jumper is worked in stockinette st but sewn tog with WS outwards. BACK PIECE: Cast on 73-76-82-88-94-100-106 sts on circular needle size 6 mm / US 10 with 1 strand coral and 1 strand light sea green. P 1 row from RS. Then work in STRIPES - see explanation above - as follows from WS: Work 3 sts in GARTER ST - see explanation above - rib = K 1/P 2 until 4 sts remain, K 1, finish with 3 sts in garter st. When 2nd stripe has been worked, switch to circular needle size 8 mm / US 11. Work in stockinette st with 3 sts in garter st in each side of piece and dec 11-10-12-12-14-14-14 sts evenly on first row = 62-66-70-76-80-86-92 sts. When piece measures 15 cm / 6", cast on 1 edge st in each side of piece at the end of the next 2 rows = 64-68-72-78-82-88-94 sts. Work in stockinette st with 1 edge st in garter st in each side of piece. REMEMBER THE KNITTING GAUGE When piece measures 43-44-45-46-47-48-49 cm / 17"-17¼"-17¾"-18"-18½"-19"-19¼", bind off 4-4-4-5-5-5-5 sts for armhole at beg of the next 2 rows = 56-60-64-68-72-78-84 sts. When 18th stripe has been worked (piece measures 52-52-56-56-58-60-62 cm / 20½"-20½"-22"-22"-22¾"-23½"-24½" adjust so that last row is from WS, work 19th stripe and inc 11-10-12-11-13-13-13 sts evenly on first row = 67-70-76-79-85-91-97 sts. Switch to circular needle size 6 mm / US 10. On next row from WS work as follows: Work rib = K 1/P 2, finish with K 1. Continue with K over K and P over P until piece measures 64-66-68-70-72-74-76 cm / 25¼"-26"-26¾"-27½"-28⅜"-29⅛"-30". Insert 1 marker after 20-21-23-24-27-29-32 sts in from each side (marks shoulder seams). Bind off sts with K over K and P over P on circular needle size 8 mm / US 11. FRONT PIECE: Cast on and work as back piece. SLEEVE: Worked back and forth on needle. Cast on 29-29-32-32-35-35-35 sts on circular needle size 6 mm / US 10 with 1 strand off white and 1 strand light sea green. P 1 row from RS. Then work as follows from WS: Work rib K 1/P 2 with 1 edge st in garter st in each side of piece. When piece measures 4 cm / 1½", P from WS and dec 3-3-4-4-5-5-5 sts evenly = 26-26-28-28-30-30-30 sts. Switch to circular needle size 8 mm / US 11. Work in stockinette st with 1 edge st in garter st in each side and work 3rd-13th stripe. When piece measures 8 cm / 3⅛", inc 1 st inside 1 edge st in garter st in each side of piece - READ INCREASE TIP! Repeat inc every 3½-3-3-2½-2½-2-2 cm / 1¼"-1⅛"-1⅛"-⅞"-⅞"-¾"-¾" 10-11-11-12-12-14-15 more times = 48-50-52-54-56-60-62 sts. When 3rd-13th stripe has been worked 1 time, finish piece with 1 strand light sea green and 1 strand off white. Bind off when piece measures 47-47-46-45-45-43-41 cm / 18½"-18½"-18"-17¾"-17¾"-17"-16" (shorter measurements in the larger sizes because of wider shoulders). Make another sleeve. ASSEMBLY: Sew jumper tog with WS outwards. Sew shoulder seams in to markers. Sew in sleeves with WS outwards, sew sleeve seams inside 1 edge st, sew side seam inside 1 edge st down to the 3 sts in garter st in each side (= approx. 15 cm / 6" vent). |
|
|
|
|
Have you made this or any other of our designs? Tag your pictures in social media with #dropsdesign so we can see them! Do you need help with this pattern?You'll find tutorial videos, a Comments/Questions area and more by visiting the pattern on garnstudio.com. © 1982-2024 DROPS Design A/S. We reserve all rights. This document, including all its sub-sections, has copyrights. Read more about what you can do with our patterns at the bottom of each pattern on our site. |


With over 40 years in knitting and crochet design, DROPS Design offers one of the most extensive collections of free patterns on the internet - translated to 17 languages. As of today we count 304 catalogs and 11422 patterns - 11417 of which are translated into English (US/in).
We work hard to bring you the best knitting and crochet have to offer, inspiration and advice as well as great quality yarns at incredible prices! Would you like to use our patterns for other than personal use? You can read what you are allowed to do in the Copyright text at the bottom of all our patterns. Happy crafting!
Comments / Questions (47)
Hi I would like to knit the jumper No Worries size large and the pattern states 375grans Yarn in all which doesn’t seem much for this jumper which looks quite long. Am I reading it right. Also when I knitted up a swatch in the alpaca silk I can never seem to get a close knit look . Is this the nature of this yarn. Appreciate your thoughts .. Thank you. Jennifer
30.09.2023 - 20:41DROPS Design answered:
Dear Mrs Love, if your tension is right in both width and height, you should have the correct amount of yarn. Not sure what you mean about the look, maybe it comes from the hairy caracteristic of the yarn? Please feel free to ask your DROPS store (either per mail or per telephone), they will be able to help you further. Thanks for your comprehension. Happy knitting!
02.10.2023 - 10:15Ik heb wel erg veel wol over. In totaal 7 hele bollen! (3 ecru, 3 licht zeegroen, 1 beige).
08.10.2020 - 16:25Hoe zit het nu met de licht grijs groen? Ik vrees dat ik niet genoeg ga hebben voor de mouwen. Waarom wordt het patroon niet aangepast? Voor alle maten 2 bolletjes??
25.09.2020 - 15:48DROPS Design answered:
Dag Wilma,
De hoeveelheid garen voor lichtgrijs groen is inmiddels aangepast.
10.10.2020 - 11:09Are the numbers on the diagram a measurement for across the chest, or for around? Also, is it definitely in inches, if English/US was picked, or do the diagram number stay in centimeters? I would need an approximately 60 inch bust measurement, for the person I want to make it for, and I don’t want to run out of yarn or, worse yet, have it not fit, after all that work!
26.12.2019 - 05:22DROPS Design answered:
Dear Mrs Miller, the measurements on the diagram at the bottom of the pattern gives the sizes for the piece (lying flat and measured across the chest). Please remember that this is a loose, oversized sweater, and the measurements reflect this. Happy Crafting!
26.12.2019 - 09:02Hej igen, glömde en fråga. Om man stickar sprunden på 2 stickor, visst borde man kunna sticka tröjan runt på rundstickor fram till ärmhålen ? Då slipper man sy ihop sidorna eller hur? Med vänlig hälsning, Mickan
20.02.2019 - 12:42DROPS Design answered:
Hei igjen Mickan. Ja, du kan gjerne strikke den rundt på rundpinne opp til ermhullet, etter at du har strikket splitten. Da trenger du ikke legge opp kantmasker i hver side. God fornøyelse
21.02.2019 - 11:40Hej Tänkte prova denna tröja. Har alltid svårt att välja storlek, men kan man säga att tröja är stor i modellen? Oversize? Kollat på måtten i tabellen och får den känsla. Med vänlig hälsning, Mickan
20.02.2019 - 12:35DROPS Design answered:
Hei Mickan. Ja, dette er en vid og romslig modell så den skal være oversized. God fornøyelse
21.02.2019 - 11:38Neulotaanko pusero ainaoikein-neuletta vaiko sileää neuletta lukuunottamatta resoreita?
31.01.2019 - 19:00DROPS Design answered:
Hei, pusero neulotaan sileänä oikeana neuleena, mutta lopuksi sen nurja puoli käännetään ulospäin.
06.02.2019 - 17:34Ook ik kom lichtgrijsgroen te kort! In februari 2017 is daar al opmerkingen over gemaakt en helaas is het patroon niet aangepast . Ik ben halverwege mijn eerste mouw en de wol is op! Terwijl ik van lichtzeegroen nog bijna 3 bollen heb. Nu zal ik mijn mouwen aanpassen. Echt heel jammer dit, teleurstellend!
27.09.2018 - 22:54Joanne wrote:
Hi there. Is there any reason that this needs to be knitted on a circular needle?
29.08.2018 - 12:23DROPS Design answered:
Hello Joanne. You can work this pattern with straight needles if you feel more comfortable. Happy knitting!
29.08.2018 - 15:17Hei. Strikker genseren i str XL. Som mål står det at den er 73 cm nederst. Min er 80 cm. Jeg følger oppskriften, bruker pinne nr 6 og nr 8. Bruker dobbel tråd brushed alpakka Silk.
09.07.2018 - 21:42DROPS Design answered:
Hej Eva, det tyder på at du har strikket den lidt løsere end hvad vi har gjort ifølge strikkefastheden (vi har 15 pinde glatstrik på 10 cm) eller at du har strikket nogle af striberne en anelse længere end hvad vi har.
10.07.2018 - 09:54