
Popular categories
Looking for a yarn?


Comments / Questions (36)
![]() Heidi Kragh Mortensen wrote:
Heidi Kragh Mortensen wrote:
Jeg forstår ikke mønster A1? Der er ikke noget diagram som forklare hvad det er jeg skal gøre?
12.03.2024 - 11:25DROPS Design answered:
Hej Heidi, jo du finder diagrammet til højre for måleskitsen og diagramforklaringen lige ovenfor :)
13.03.2024 - 15:06
![]() Marianne wrote:
Marianne wrote:
Bonjour, Je ne trouve pas le dessin du diagramme sur cette page. Est-ce normal? Si non où pourrais-je le trouver? Merci Marianne
24.02.2024 - 02:29DROPS Design answered:
Bonjour Marianne, vous trouverez le diagramme A.1 (2 mailles x 4 rangs) à droite du schéma des mesures, sous la manche. Bon tricot!
26.02.2024 - 07:54
![]() Pam wrote:
Pam wrote:
How many 25g balls do I need to make a size M cardigan?
24.10.2022 - 16:56DROPS Design answered:
Hi Pam, Size M uses 225 g, which is 9 balls. Happy knitting!
25.10.2022 - 07:09
![]() Anna Schisani wrote:
Anna Schisani wrote:
Hello. When working the 9 cm rectangular on the collar, are the last rows (decreasing 3 times and casting off) worked in pattern A1 or are the simply worked in stocking stitch? Thank you.
07.02.2022 - 10:11DROPS Design answered:
Dear Mrs Schisani, continue working remaining stitches in A.1 as before, and cast off 6 sts at the beginning of every WS row (right front piece)/RS row (left front piece). Happy knitting!
07.02.2022 - 11:02
![]() Inge B wrote:
Inge B wrote:
Kloppen de maten bij de tekening wel? Ik heb normaal maat XL en als ik de breedtematen onderaan het vest bij elkaar optel (achterpand 67, rechtervoorpand 46 en linkervoorpand ook 46) kom ik op een breedte van 159 cm. Dat is véél meer dan de,vesten die ik heb. Op de foto ziet het vest er niet heel wijd uit.
04.02.2022 - 17:30DROPS Design answered:
Dag Inge,
Ja, de maten kloppen wel, het is echt een oversized vest. Het komt ook overeen met het aantal op te zetten steken.
11.02.2022 - 16:07
![]() Simonetta Seu wrote:
Simonetta Seu wrote:
J ai trop mal aux epaules a tricoter avec le aiguille circulaire, il y a la possibilite d avoir le model avec les aiguilles classiques?
10.12.2021 - 19:50DROPS Design answered:
Bonjour Mme Seu, cette leçon explique comment adapter un modèle sur aiguille droites; dans le cas de cette veste, ce sera très simple car on utilise les aiguilles circulaires pour tricoter en allers et retours pour avoir suffisamment de place pour y loger toutes les mailles. Bon tricot!
13.12.2021 - 08:34
![]() Gisela Bongart wrote:
Gisela Bongart wrote:
Hallo, welche Farbe ist das beim Modell? Helles Seegrün ist es nicht, daraus hab ich nämlich einen Pullover gestrickt und die Farbe ist grünlicher.
29.10.2021 - 14:36DROPS Design answered:
Liebe Frau Bongart, die Farbdarstellung auf Fotos und durch die Bildschirmwiedergabe entspricht meist nicht genau der "realen" Farbe. Das Modell zeigt die genannte Farbe, auch wenn sie auf dem Foto etwas bläulicher aussieht als die echte Farbe. Viel Spaß beim Stricken!
30.10.2021 - 11:59
![]() Magda wrote:
Magda wrote:
Dzień dobry, nie rozumiem jak zrobić końcówkę przodów. Czy mam najpierw zrobić 9 cm, potem w następnych 3 lewych rzędach zamykać po 6 oczek? I na końcu te pozostałe 6 oczek? A w lewym nie robi się dłuższego kołnierza? Czy robi się jak prawy tylko zamyka oczka na prawej stronie? Pozdrawiam
27.02.2021 - 15:20DROPS Design answered:
Witaj Magdo, najpierw wykonujesz część kołnierza jak w opisie, i jest to prostokąt o długości 9 cm. W 3 następnych rzędach na lewej stronie robótki zamykasz po 6 oczek w każdym, a pozostałe oczka przerabiasz jak wcześniej (w sumie zamkniesz 18 o.), górna część kołnierza ma kształt trójkąta. Na końcu zamykasz te pozostałe 6 oczek tak jak zakańczasz robótkę. Na lewym przodzie wykonujesz kołnierz tak samo (będzie symetryczny), tylko zamykasz po 6 o. na początku każdego z 3 rzędów na prawej stronie robótki. Powodzenia!
28.02.2021 - 18:38
![]() Inge Frederiksen wrote:
Inge Frederiksen wrote:
Denne åben jakke i Drops Brushed Alpaca I str. XXXL er mønstret over 26 m, der er to masker i overskud da mønstre går over 4 m (24).Hvad skal jeg gøre ved de 2 overskydende masker. Jeg har set opskriften i Ude og Hjemme nr. 34 2020. Venlig hilsen Inge
21.09.2020 - 14:53DROPS Design answered:
Hej Inge. Diagram A.1 består kun av 2 maskor, så du stickar det 13 gånger för att få det över 26 maskor. Mvh DROPS Design
22.09.2020 - 08:00
![]() Karen wrote:
Karen wrote:
Jetzt habe ich die ersten Reihen gestrickt und nun merke ich, dass das Muster A.1 fehlt. Wo finde ich das Muster?
10.01.2020 - 20:12DROPS Design answered:
Liebe Karen, Diagram A.1 finden Sie bei der Maßskizze, unter der Ärmel. Viel Spaß beim stricken!
13.01.2020 - 08:16
|
|||||||||||||
Saltwater#saltwaterjacket |
|||||||||||||
|
|
|||||||||||||
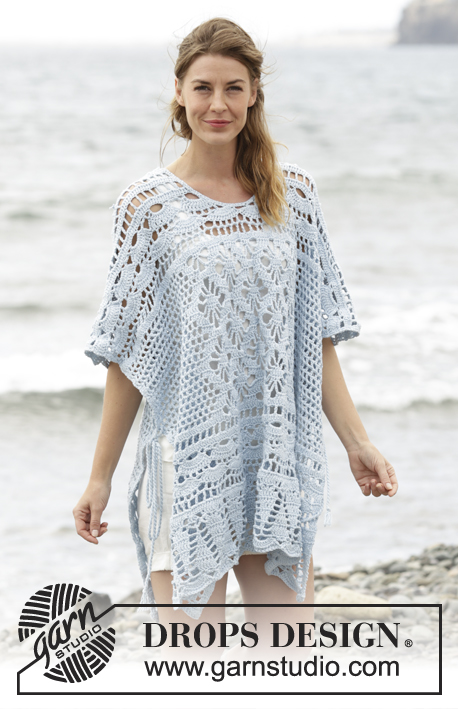
Knitted DROPS jacket with lace pattern and band collar in ”Brushed Alpaca Silk”. Size: S - XXXL.
DROPS 168-32 |
|||||||||||||
|
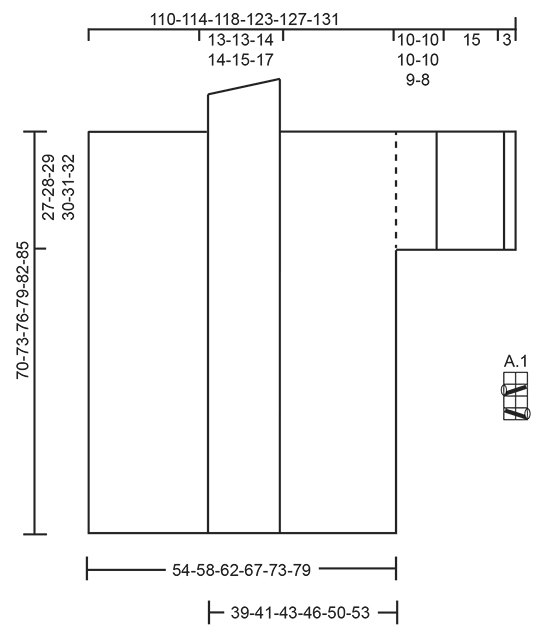
GARTER ST (back and forth on needle): K all rows. 1 ridge = K2 rows. PATTERN: See diagram A.1. The diagram shows all rows in pattern seen from RS. ---------------------------------------------------------- JACKET: Worked back and forth on circular needle from mid front up to armhole, then cast on new sts for sleeve and work front and back piece separately. BODY: LOOSELY cast on 191-203-217-233-251-269 sts on circular needle size 6 mm / US 10 with Brushed Alpaca Silk. Work 2 ridges in GARTER ST - see explanation above. Work next row as follows from RS: 2 edge sts in garter st, work pattern according to diagram A.1 over the next 22-22-24-24-26-26 sts, work 31-34-36-40-43-47 sts in stockinette st, insert 1 marker (marks the side), work 81-87-93-101-109-119 sts in stockinette st (= back piece), insert 1 marker (marks the side), work 31-34-36-40-43-47 sts in stockinette st, A.1 over the next 22-22-24-24-26-26 sts and finish with 2 edge sts in garter st. Continue the pattern like this and move the markers upwards when working. REMEMBER THE KNITTING GAUGE When piece measures 43-45-47-49-51-53 cm / 17"-17¾"-18½"-19¼"-20"-21", adjust so that last row is worked from WS, divide the piece at the markers and finish each front piece and back piece separately. BACK PIECE: = 81-87-93-101-109-119 sts. Work 2 rows in stockinette st and cast on 39-39-39-39-38-36 new sts for sleeves at the end of these 2 rows = 159-165-171-179-185-191 sts on needle. Work next row as follows from RS: 4 edge sts in garter st, A.1 over the next 20 sts, work in stockinette st until 24 sts remain on needle, work A.1 over the next 20 sts and finish with 4 edge sts in garter st. Continue pattern like this. When piece measures 68-71-74-77-80-83 cm / 26¾"-28"-29⅛"-30⅜"-31½"-32¾", bind off the middle 17-17-19-19-21-23 sts for neck and finish each shoulder separately. Continue to bind off 1 st on next row from neck = 70-73-75-79-81-83 sts remain on the shoulder. When piece measures approx. 69-72-75-78-81-84 cm / 27"-28½"-29½"-30¾"-32"-33" - adjust so that next row is worked from RS - K 2 rows over all sts before LOOSELY binding off with K from RS. Jacket measures approx. 70-73-76-79-82-85 cm / 27½"-28¾"-30"-31"-32¼"-33½" from shoulder and down. RIGHT FRONT PIECE: = 55-58-62-66-71-75 sts. Work 1 row from RS as before and cast on 39-39-39-39-38-36 new sts for sleeve at the end of this row = 94-97-101-105-109-111 sts on needle. P 1 row from WS but K the first 4 sts (= sleeve edge) and work the last 24-24-26-26-28-28 sts towards mid front as before. Work next row as follows from RS: 2 edge sts in garter st, A.1 over band as before, work in stockinette st until 24 sts remain on needle, work A.1 over the next 20 sts and finish with 4 edge sts in garter st (= sleeve edge). Continue the pattern like this until piece measures approx. 69-72-75-78-81-84 cm / 27"-28½"-29½"-30¾"-32"-33" (adjust so that next row is worked from WS). K 2 rows but work the outermost 24-24-26-26-28-28 sts in towards mid front as before. On next row from WS, bind off the first 70-73-75-79-81-83 sts on shoulder = 24-24-26-26-28-28 sts on needle for collar. Insert 1 marker, NOW MEASURE PIECE FROM HERE! Continue A.1 with 2 edge sts in garter st in each side until collar measures 9-9-9-9-10-11 cm / 3½"-3½"-3½"-3½"-4"-4½" - from marker. At beg of the next 3 rows from WS bind off the first 6-6-6-6-7-7 sts = 6-6-8-8-7-7 sts remain on needle. Bind off these sts on next row from WS. LEFT FRONT PIECE: Work as right but reversed. I.e. work first row from RS as before. On next row (= WS), cast on new sts for sleeve at the end of row. Continue to work next row from RS as follows: Work 4 edge sts in garter st (= sleeve edge), A.1 over the next 20 sts, work in stockinette st until 24-24-26-26-28-28 sts remain on needle, continue with A.1 over the next 22-22-24-24-26-26 sts and finish with 2 edge sts in garter st. When piece measures approx. 69-72-75-78-81-84 cm / 27"-28½"-29½"-30¾"-32"-33" - adjust so that next row is worked from RS, K 2 rows over the first 70-73-75-79-81-83 sts on shoulder (work the other sts as before). On next row from RS, bind off the first 70-73-75-79-81-83 sts = 24-24-26-26-28-28 collar sts remain on needle. When binding off collar sts, bind off at beg of every row from RS (instead of beg of every row from WS). ASSEMBLY: Sew shoulder seam inside bind-off edge with 1 stitch in every st so that 2 ridges are placed towards each other on shoulder - make sure to avoid a tight seam. Sew collar tog mid back - sew WS against WS and sew collar to neck line in the back of neck (the seam should be in towards WS). Sew underarm seams inside 1 edge st. CROCHET EDGE: Work a finishing edge from RS up along right front piece, around the collar in the back of neck and down along left front piece on hook size 5 mm / H/8 with Brushed Alpaca Silk as follows: Work 1 sc in first st, * ch 4, skip 2 sts, 1 sc in next st *, repeat from *-*. Work the same edge at the bottom of both sleeves but now finish round with 1 sl st in first dc at beg of round (instead of 1 sc in next st). |
|||||||||||||
Diagram explanations |
|||||||||||||
|
|||||||||||||
 |
|||||||||||||
Have you finished this pattern?Tag your pictures with #dropspattern #saltwaterjacket or submit them to the #dropsfan gallery. Do you need help with this pattern?You'll find 19 tutorial videos, a Comments/Questions area and more by visiting the pattern on garnstudio.com. © 1982-2026 DROPS Design A/S. We reserve all rights. This document, including all its sub-sections, has copyrights. Read more about what you can do with our patterns at the bottom of each pattern on our site. |
|||||||||||||


With over 40 years in knitting and crochet design, DROPS Design offers one of the most extensive collections of free patterns on the internet - translated to 17 languages. As of today we count 325 catalogs and 12291 patterns - 12281 of which are translated into English (US/in).
We work hard to bring you the best knitting and crochet have to offer, inspiration and advice as well as great quality yarns at incredible prices! Would you like to use our patterns for other than personal use? You can read what you are allowed to do in the Copyright text at the bottom of all our patterns. Happy crafting!
Post a comment to pattern DROPS 168-32
We would love to hear what you have to say about this pattern!
If you want to leave a question, please make sure you select the correct category in the form below, to speed up the answering process. Required fields are marked *.