
Popular categories
Looking for a yarn?


Comments / Questions (67)
![]() Paula wrote:
Paula wrote:
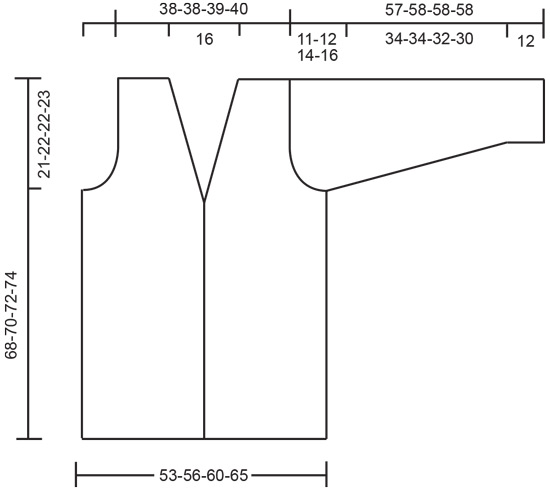
Op het plaatje zie ik knoopsgaten in de linkerbies (links voor de kijker). In het patroon is dat niet beschreven. Op welke hoogte en hoeveel zijn er ingegroeid?
16.03.2019 - 09:41DROPS Design answered:
Dag Paula,
Goede vraag! Ik zal het even door geven aan de ontwerpafdeling om aan te passen. Nog even geduld dus.
18.03.2019 - 14:19
![]() Petra Van Beek wrote:
Petra Van Beek wrote:
Ik ben de mouwen bezig in xl. Klopt het dat je dan bij 42cm lengte dan met verminderen moet beginnen? Dit vraag ik omdat met de andere maten de lengte langer is als je dat moet gaan doen 46 en 44 cm.
12.11.2018 - 16:20DROPS Design answered:
Dag Petra,
Ja, dat klopt. Vanwege een hogere mouwkop bij de grotere maten, moet je eerder beginnen met afkanten voor de mouwkop.
13.11.2018 - 08:38
![]() Mirjam wrote:
Mirjam wrote:
Ik heb een borstomvang van 105cm. Maar hij ziu ruim moeten vallen. Welke maat kan ik het best aanhouden?
28.10.2018 - 09:46DROPS Design answered:
Dag Mirjam,
Onderaan in de tekening kun je zien hoe breed het vest wordt bij elke maat. (Deze maten zijn de helft van de borstomvang.) Afhankelijk van hoe ruim je hem wilt hebben, kun je op basis hiervan de geschikte maat kiezen.
28.10.2018 - 17:18
![]() Jenny wrote:
Jenny wrote:
Hallo, ik heb de tekening gezien is het gewoon een v hals. maar op de tekening komt het als een col over. dat snap ik niet zo goed. Hoe word deze dan gedaan.
23.10.2018 - 19:09DROPS Design answered:
Dag Jenny,
Deze kraag staat inderdaad niet aangegeven in de tekening. Het is een v-hals in combinatie met een kraag. (Voor de v-hals maak je minderingen in het patroon en voor de kraag maak je meerderingen. Als je op de voorpanden voor de schouder hebt afgekant brei je voor de kraag nog een stukje door over een aantal steken. Dit staat allemaal wel beschreven in het patroon.
23.10.2018 - 19:38
![]() Anna-Luise Maaß wrote:
Anna-Luise Maaß wrote:
Ich finde die Jacke wunderschön und auch den Pullover mit den verschiedenen Quadraten. Aber ich würde es nie hinbekommen. Vielleicht liest das jemand, der mir die Jacke stricken würde. Aber bezahlen könnte man die Arbeit ja gar nicht, nicht wahr ? Viele Grüße Anna-Luise
29.09.2018 - 20:48DROPS Design answered:
Liebe Frau Maaß, nehmen Sie bitte Kontakt mit Ihrem DROPS Laden auf oder fragen Sie bitte in userem DROPS Workshop.
01.10.2018 - 08:31
![]() Barbara wrote:
Barbara wrote:
Buongiorno, non ho mai fatto un maglione aperto davanti e mi trovo in difficoltà in questo punto del collo davanti sinistro/destro: Rimangono ora sul ferro solo le m a punte legaccio per il collo = 20 m. Continuare a punto legaccio su questa maglie così: * 2 ferri di punto legaccio su tutte le m, 2 ferri di punto legaccio solo sulle prime 16 m (=m lato bordo davanti) *, ripetere da *-* finché il collo non misuri ca 8 cm. Come devo lavorare le altre 4 maglie? Grazie per la risposta.
11.07.2018 - 15:57DROPS Design answered:
Buongiorno Barbara, questa parte del collo è lavorata a ferri accorciati, il che significa che si lavora solo su una parte delle maglie, non su tutte. In questo caso deve lavorare 2 ferri a legaccio su tutte le maglie e 2 ferri solo sulle prime 16 maglie, non deve lavorare sulle altre maglie. Questa tecnica serve a dare un maggior volume al lavoro. Buon lavoro!
11.07.2018 - 16:00
![]() Evelyne LAMBERG wrote:
Evelyne LAMBERG wrote:
Bonjour, Désolée mais votre réponse ne m'éclaire pas du tout. Si " les 38 cm du schéma correspondent à la largeur d'épaules encolure comprises, après les diminutions des emmanchures"; si je rajoute la largeur des emmanchures données pour 2X11cm=22cm, j'arrive à une largeur totale de 60cm et non pas 53 cm comme marqué sur le bas du diagramme! Il y a donc bien une erreur quelque part! Merci d'expliquer plus clairement.
27.03.2018 - 19:48DROPS Design answered:
Bonjour Mme Lamberg, vous commencez par 86 m soit 53 cm environ avec un échantillon de 16 m = 10 cm. Après les diminutions des emmanchures, il reste 62 m, soit 38 cm. Bon tricot!
28.03.2018 - 15:23
![]() Evelyne LAMBERG wrote:
Evelyne LAMBERG wrote:
Bonjour, Je ne comprends pas les mesures du diagramme au niveau largeur encolure + épaules? C'est donné pour 38 cm en S; si je rajoute l'arrondi des manches qui fait une profondeur de 11cm (X 2=22 cm), j'ai donc un total de 38+22=60 cm. Hors le gilet est tricoté droit et donné à la base pour une largeur de 53 cm en S. D'où viennent les 7 cm de différence? Ne serais-ce pas une erreur? Merci pour votre réponse Evelyne
23.03.2018 - 17:18DROPS Design answered:
Bonjour Mme Lamberg, les 38 cm du schéma correspondent à la largeur d'épaules encolure comprises, après les diminutions des emmanchures. Bon tricot!
26.03.2018 - 10:36Ina Kaneti wrote:
After reading the answer to Elaine Hinkley about the directions for the collar increase, I'm still having trouble understanding the directions - do I need to increase one stitch every row for 6 times and then increase 1 stitch every other row for 6 times and then 1 stitch every 4th row six times? Does it mean that this increase is over 6+12+24 = 42 rows?
29.01.2018 - 14:51DROPS Design answered:
Dear Mrs Kaneti, you are right. Happy knitting!
29.01.2018 - 17:04
![]() Elaine Hinkley wrote:
Elaine Hinkley wrote:
When the directions say increase 1 stitch inside 1 edge stitch 6 times every row. How many rows do you do this for before you start doing every other row? And from this point when do you know when to increase 6 times every 4th row? Thanks for your help.
05.11.2017 - 22:38DROPS Design answered:
Dear Elanie, you increase in every row SIX times (that is six row), then in every other row SIX times (that is six row plus twelve row, since you started the increases) ,then continue with increasing ecery 4th row. Happy Knitting!
06.11.2017 - 02:16
|
|
DROPS 69-8 |
|
 |
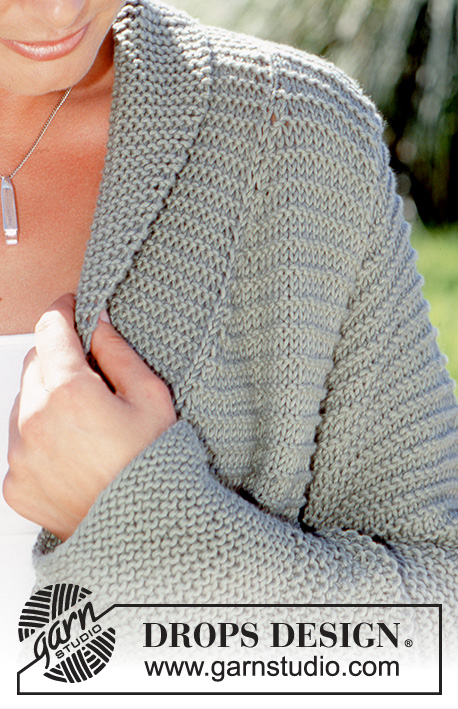 |
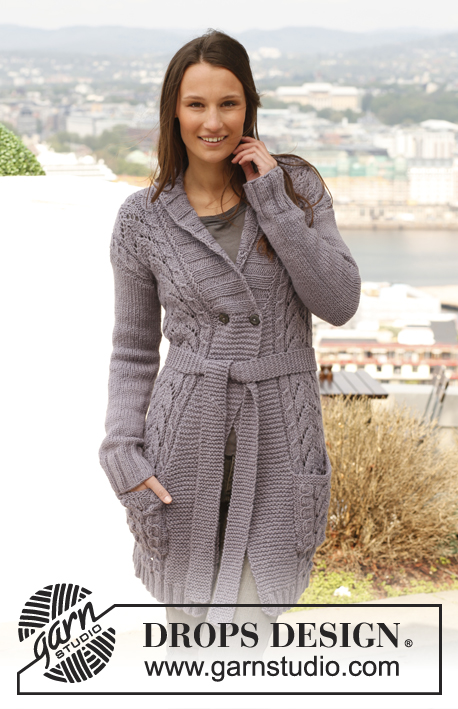
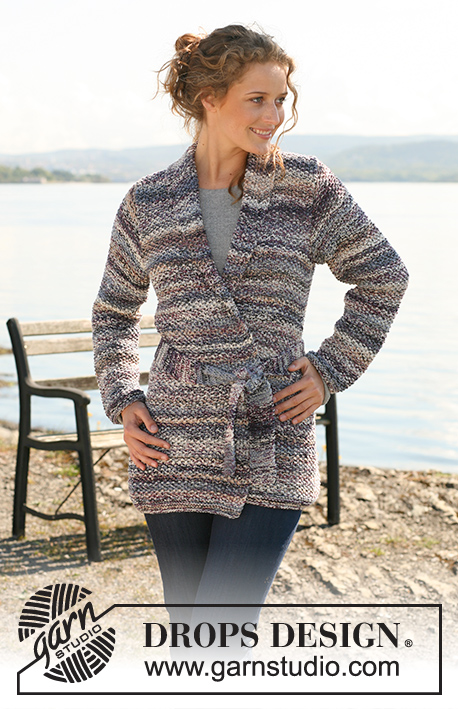
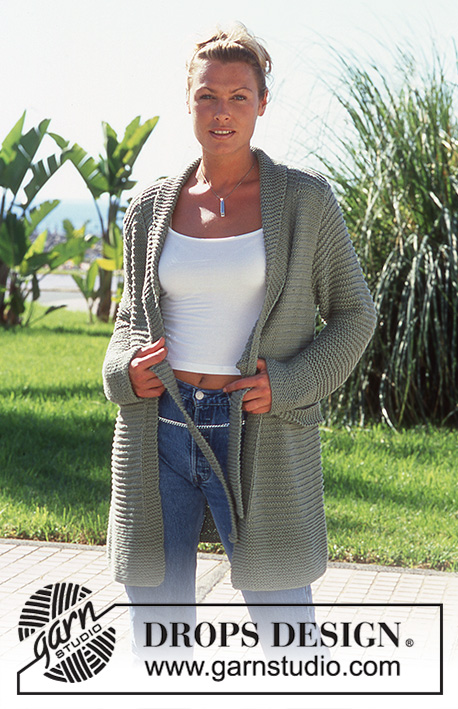
DROPS Cardigan in Paris
DROPS 69-8 |
|
|
Gauge: 16 sts x 20 rows = 10 x 10 cm [4" x 4"] in stockinette st. Garter st, when knitting flat: Knit all sts, all rows. Pattern: Row 1 (right side row): Knit Row 2: Purl Row 3: Purl Row 4: Purl Row 5: Knit Row 6: Knit Repeat these 6 rows. Knitting tips: Dec for the neck only on right side rows. Right front: dec 1 st as follows: sl 1, K 1, psso. Left front: dec 1 st as follows: K 2 tog. Back: Cast on 86-92-98-106 sts. Knit garter st for 12 cm [4.75"], then continue with pattern- see instructions above. When the piece measures 47-48-50-51 cm [18.5"-18⅞"-19.75"-20"] bind off for armhole at each side every other row: 3 sts 1-2-2-2 times, 2 sts 2-2-3-4 times, 1 st 5-5-5-7 times = 62-62-64-64 sts. When the piece measures 66-68-70-72 cm [26"-26.75"-27⅝"-28.25"] bind off the center 24 sts for the neck. On the next row dec 1 st at each neck edge = 18-18-19-19 sts remain on each shoulder. Bind off the remaining sts when the piece measures 68-70-72-74 cm [26.75"-27⅝"-28.25"-29⅛"]. Left front: Cast on 48-51-54-58 sts. Knit garter st for 12 cm [4.75"] over all sts. Continue with pattern, but knit the 6 edge sts at the center front as follows from edge (seen from the right side): 5 sts garter st, 1 st stockinette st. Read the entire next section before knitting. When the piece measures 46-47-49-50 cm [18⅛"-18.5"-19.25"-19.75"] inc 2 sts inside 1 edge st at the center front for collar - knit the increased sts for collar in garter st, keeping the 1 st in stockinette st between button bands and body. On the following 2 rows knit 2 rows garter st over only the 7 button band sts (short rows). Then inc 1 st inside 1 edge st 6 times every row, then 6 times every other row and then 6 times every 4th row = 20 sts increased for collar. At the same time when the piece measures 47-48-50-51 cm [18.5"-18⅞"-19.75"-20"] bind off for armhole at the side as on back. At the same time when the piece measures 50-51-53-54 cm [19.75"-20"-20⅞"-21.25"] dec for the neck shaping (while increasing for collar) as follows: make decs inside the 1 stockinette st + garter sts for collar. Dec 1 st 18 times every other row - see knitting tips. When the piece measures 68-70-72-74 cm [26.75"-27⅝"-28.25"-29⅛"] bind off shoulder sts + 6 button band sts = 18-18-19-19 sts bound off. There are now 20 garter sts on the needles (collar). Continue in garter st as follows: * 2 rows garter st over all sts, 2 rows garter st over only the outermost 16 sts *, repeat from * - * until the inner edge of collar measures approx. 8 cm [3⅛"] (the outer edge should measure 16 cm [6.25"]). Put sts on a holder. Right front: Cast on and knit the same as the left but reverse all shaping. Sleeve: Cast on 38-38-40-42 sts. Knit garter st for 12 cm [4.75"], then continue with pattern. When the piece measures 13-13-14-14 cm [5⅛"-5⅛"-5.5"-5.5"] inc 1 st at each side 13-14-13-14 times every 2.5-2-2-2 cm [1"-0.75"-0.75"-0.75"] = 64-66-66-70 sts. When sleeve measures approx. 46-46-44-42 cm [18⅛"-18⅛"-17.25"-16.5"] bind off for sleeve cap at each side every other row: 3 sts 1-1-1-0 time, 2 sts 3-3-2-2 times, 1 st 4-5-7-10 times, then bind off 2 sts at each side until the piece measures 56-57-57-57 cm [22"-22.5"-22.5"-22.5"] and then bind off 3 sts each side 1 time. The piece measures approx. 57-58-58-58 cm [22.5"-22⅞"-22⅞"-22⅞"]. Bind off the remaining sts. Belt: Cast on 9 sts and knit garter st to desired length or until the belt measures approx. 120-130-140-150 cm [47.25"-51⅛"-55⅛"-59"]. Bind off. Assembly: Sew shoulder seams. Join the collar at center back with Kitchener stitch. Sew the collar to back neckline with seam on right side of work. Sew in sleeves. Sew sleeve and side seams using edge sts as a seam allowance. |
|
 |
|
Have you finished this pattern?Tag your pictures with #dropspattern or submit them to the #dropsfan gallery. Do you need help with this pattern?You'll find 22 tutorial videos, a Comments/Questions area and more by visiting the pattern on garnstudio.com. © 1982-2026 DROPS Design A/S. We reserve all rights. This document, including all its sub-sections, has copyrights. Read more about what you can do with our patterns at the bottom of each pattern on our site. |
|


With over 40 years in knitting and crochet design, DROPS Design offers one of the most extensive collections of free patterns on the internet - translated to 17 languages. As of today we count 325 catalogs and 12298 patterns - 12288 of which are translated into English (US/in).
We work hard to bring you the best knitting and crochet have to offer, inspiration and advice as well as great quality yarns at incredible prices! Would you like to use our patterns for other than personal use? You can read what you are allowed to do in the Copyright text at the bottom of all our patterns. Happy crafting!
Post a comment to pattern DROPS 69-8
We would love to hear what you have to say about this pattern!
If you want to leave a question, please make sure you select the correct category in the form below, to speed up the answering process. Required fields are marked *.