
Popular categories
Looking for a yarn?


Comments / Questions (77)
![]() Vania wrote:
Vania wrote:
In sigrid jacket it states to add on 2 new stitches at end of row for next 2 rows. I’m assuming I’m starting these on the end of a right side row.? Also, when I’m coming back what do I do with the two stitches? Do I do the one stitch in garter stitch and do A9, stockinette and add the 2 stitches at the end ? Thanks 🌷
13.05.2018 - 13:57DROPS Design answered:
Dear Vania, you will knit these 2 new sts on next row from WS then cast on the 2 new sts at the end of this row from WS then start to work in pattern as explained. Happy knitting!
14.05.2018 - 10:52
![]() Vania wrote:
Vania wrote:
What does “marks vent” mean in the sigrid jacket pattern?
09.05.2018 - 14:06DROPS Design answered:
Dear Vania, when you cast on 2 new sts on each side, vent on the sides are finished, this mark the vents - you will sew then side to these 2 new sts cast on. Happy knitting!
09.05.2018 - 14:20
![]() Vania Wengel wrote:
Vania Wengel wrote:
Hi I received an email saying I have got an answer for my question. I have clicked on the link provided. It says the link is not found and to put in the country that I’m from to find the website. I click on English (us) but I still can’t see my answer
04.05.2018 - 20:24DROPS Design answered:
Hi Vania! Go directly to the pattern and click on the 'Commens' tab just under materials or see: https://www.garnstudio.com/pattern.php?id=7138&cid=19#comments Kind regards!
30.05.2018 - 18:49
![]() Freya wrote:
Freya wrote:
Jag har sett video, men fastnar på samma ställe. Så här står det: ”Sticka 1 rätst kantm, öka 1 m, A3, minska 1 m, slätst tills det återstår 2 m före A3, minska 1 m, A3, öka 1 m, 1 rätst kantm. ” ok men sen när jag är på nästa varv hur gör jag då? Är det: 1 rm (kant) + A3 direkt eller ska den nya maskan stickas rät/avig? Alltså är nästa varv: 1 rm (kant), A3, slätst, A3, 1 rm (kant) ELLER 1 rm (kant), am, A3, slätst, A3, am, 1 rm (kant)? Ska A4 stickas här också?
29.01.2018 - 20:24DROPS Design answered:
Hei Freya. Maskene som blir økt på yttersiden av A.3 mot hver side (dvs mellom A.3 og kantmasken i rille) skal strikkes i mønster A.4 - les ØKETIPS. Dvs etter første pinne med økning strikkes det tilbake fra vrangen slik: 1 kantmaske rille, strikk kastet vridd vrang slik at det ikke blir hull (= første maske i A.4), A.3, glattstrikk frem til neste rapport A.3, strikk A.3, strikk kastet vridd vrang slik at det ikke blir hull (= første maske i A.4), 1 kantmaske rille. God fornøyelse!
26.02.2018 - 12:50
![]() Karin wrote:
Karin wrote:
Prøver igen da jeg ikke har modtaget svar. Skal mit arbejde være ved ærmegab når jeg har foretaget 20 forflytninger . I opskriften står der at arbejdet skal måle 62 ved ærmegab når jeg strikker str L. Mit arbejde måler 57 cm efter 20 forflytninger. I opskriften står der at man SAMTIDIG når arbejdet måler 62 cm slåes der 1 ny maske op i slutningen af næste pind fra retsiden til ærmegab .
01.11.2016 - 09:53DROPS Design answered:
Hej Karin. Du har ikke faaet svar, da vi har meget travlt ;-) Jeg er igang med at arbejde ned igennem alle spörgsmaal, saa du faar svar saa hurtigt jeg kommer til det.
01.11.2016 - 10:02
![]() Karin wrote:
Karin wrote:
Str L
28.10.2016 - 22:49DROPS Design answered:
Hej Karin. Jeg har regnet lidt paa det og du burde vaere klar med forflytningen omkring de 62 cm. Saa enten mangler du at forflytte nogen gange, eller flytter du oftere end i hver 4. pind, eller du har en forkert strikkefasthed i höjden. Du starter ved 24 cm med forflytning og du flytter 19 gange i hver 4. pind, dvs du har strikket godt 76 pinde naar du har flyttet 19 gange. Med den rette strikkefasthed (20 p per 10 cm er det ca. 38 cm): 24+38 = 62 cm.
01.11.2016 - 14:11
![]() Karin wrote:
Karin wrote:
Er i gang med at strikke denne dejlig jakke til min datter. Men er i tvivl om når jeg har gentaget forflytning af masker feks 20 gange skal mit arbejde så måle 62 cm og ved ærmegab ? Mit arbejde måler 57cm efter 20 forflytninger .
23.10.2016 - 13:53DROPS Design answered:
Hej Karin. Hvilken störrelse laver du? Saa kan jeg nemmere fölge med :)
25.10.2016 - 12:25
![]() Anette Skov wrote:
Anette Skov wrote:
I har et generelt problem med udskrivning af alle jeres mønstre. De bliver skåret dumt i den printede version. Linier skæres over på midten, så det øverste af teksten står på den ene side og det nederste står på næste side. Diagrammer skæres over midt i det hele , hvilket gør det besværligt at følge med i, hvordan mønstret skal se ud. Det ville være så dejligt, hvis I kunne lave nogle bedre udskriftsversioner af opskrifterne, evt. i pdf-format lidt ligesom de har gjort det på yarnspirations.
05.10.2016 - 13:21DROPS Design answered:
Hej Anette. Vi har testet print fra flere maskiner/browsere uden problemer. Der har vaeret bövl med nye indstillinger i Chrome (dvs, indstillinger hos dem - ikke os), men det er ordnet nu. Saa bruger du Chrome, pröv at refreshe (F5) og pröv igen. Hjaelper det ikke - eller har du en anden browser, saa er det ret sikkert noget i dine printindstillinger. Det kan jeg desvaerre ikke hjaelpe dig med.
05.10.2016 - 14:04
![]() Soutoul Michèle wrote:
Soutoul Michèle wrote:
Je suis arrivée sans problème aux manches mais pour l'arrondi il n'y a pas d'explication pour le nombre de mailles à diminuer à chaque rang. Pourriez-vous me le préciser s'il vous plaît ? Merci
15.07.2016 - 14:23DROPS Design answered:
Bonjour Mme Soutoul, on ne rabat pas de mailles pour l'arrondi de la manche, mais on tricote des rangs raccourcis ainsi: 1 rang sur l'endroit jusqu'à ce qu'il reste 8-12m, 1 rang sur l'envers jusqu'à ce qu'il reste 8-12 m, 1 rang sur l'end jusqu'à ce qu'il reste 17-23 m, 1 rang sur l'env jusqu'à ce qu'il reste 17-23 m, au rang suivant, tricotez toutes les mailles, tournez et tricotez 1 rang sur toutes les mailles, et rabattez au rang suivant sur l'endroit. Bon tricot!
15.07.2016 - 16:00
![]() Jeanette wrote:
Jeanette wrote:
Hej, jag har läst frågor och svar samt sett på videon om mönstret. Jag tycker fortfarande att mönstret är något oklart. I själva mönstret står det inget om att maskorna efter A3 skall stickas i mönstret A4. Som jag har tolkat det skall endast ärmarna stickas i A4, men när jag läser ökningstipset och tittar noga på bilden skulle det kunna tolkas som att A4 även skall stickas i kanterna där ökningen sker efter/innan A3. Om det är så borde detta framgå i mönstret (fram- och bakstycke).
18.06.2016 - 15:32
|
|||||||
Sigrid Jacket#sigridjacket |
|||||||
|
|
|||||||
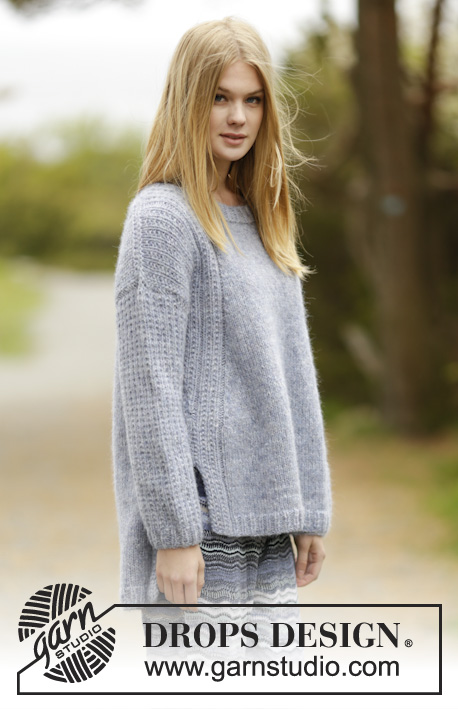
Knitted DROPS jacket with false raglan, vent and textured pattern in ”Air”. Size: S - XXXL.
DROPS 166-11 |
|||||||
|
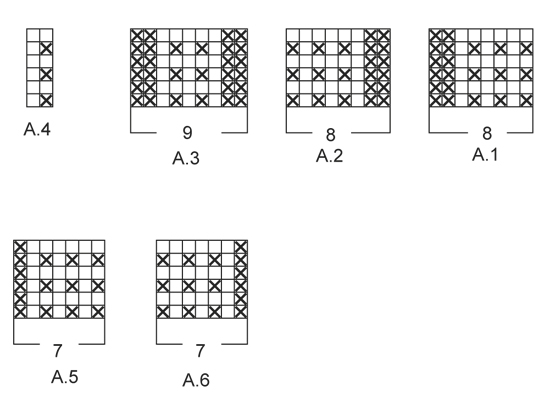
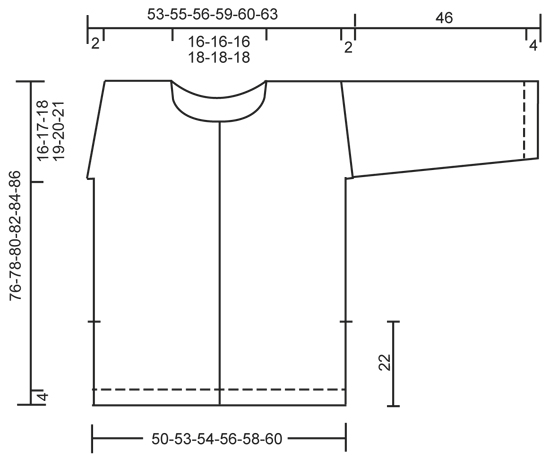
GARTER ST (back and forth): K all rows. 1 ridge = K2 rows. PATTERN: See diagrams A.1 to A.6. The diagrams show all rows in pattern seen from RS. INCREASE TIP: Inc 1 st by making 1 YO. On next row work YOs twisted, i.e. work in the back loop of st instead of front to avoid holes. NOTE: Work the inc sts gradually in diagram A.4. DECREASE TIP: Dec 1 sts as follows: All dec are done from RS! Dec as follows after A.3: K 2 tog. Dec as follows before A.3: Work until 2 sts before A.3, slip 1 st as if to K, K 1, psso. BUTTONHOLES: Dec for buttonholes on right band. 1 buttonhole = K tog third and fourth st from edge and make 1 YO. Dec for buttonholes when piece measures: SIZE S: 25, 33, 41, 49, 57 and 65 cm / 9¾",13",16",19¼",22½",25½". SIZE M: 25, 33, 42, 50, 59 and 67 cm / 9¾",13",16½",19¾",23¼",26½". SIZE L: 27, 35, 44, 52, 61 and 69 cm / 10½",13¾",17¼",20½",24",27". SIZE XL: 28, 37, 45, 54, 62 and 71 cm / 11",14½",17¾",21¼",24½",28". SIZE XXL: 28, 37, 46, 55, 64 and 73 cm / 11",14½",18",21½",25¼",28¾". SIZE XXXL: 30, 39, 48, 57, 66 and 75 cm / 11¾",15¼",19",22½",26",29½". ---------------------------------------------------------- JACKET: Worked back and forth on circular needle and sewn tog when finished. BACK PIECE: Cast on 95-98-101-107-113-116 sts on circular needle size 5 mm / US 8 with Air. Work rib as follows: A.1 (= 8 sts), K 1, * P 2, K 1 *, repeat from *-* until 8 sts remain on row, A.2 (= 8 sts). Continue like this back and forth until piece measures 4 cm / 1½". On next row from RS switch to circular needle size 5.5 mm / US 9 and work as follows: A.1, stockinette st over the next 79-82-85-91-97-100 sts, AT THE SAME TIME dec 15-14-15-17-21-20 sts evenly, A.2 = 80-84-86-90-92-96 sts on needle in total. Continue in stockinette st, work A.1 and A.2 in each side as before until piece measures 22 cm / 8¾". REMEMBER THE KNITTING TENSION/GAUGE At the end of the next 2 rows cast on 2 new sts (marks vent) = 84-88-90-94-96-100 sts. Now work as follows: 1 edge st in GARTER ST - see explanation above, A.3 (= 9 sts) stockinette st until A.2, work A.3 over A.2 and next to last st and finish with 1 edge st in garter st. When piece measures 26-24-24-23-23-23 cm / 10¼"-9½"-9½"-9"-9"-9", beg displacement of A.3 towards mid back. Work 1 edge st in garter st, inc 1 st - READ INCREASE TIP, A.3, dec 1 st - READ DECREASE TIP, stockinette st until 2 sts remain before A.3, dec 1 st, A.3, inc 1 st, 1 edge st in garter st. Repeat displacement of A.3 every 4th row 17-19-20-21-22-24 more times. NOTE: Inc is always inside 1 edge st in garter st in each side. AT THE SAME TIME when piece measures 60-61-62-63-64-65 cm / 23⅝"-24"-24⅜"-24¾"-25¼"-25½", cast on 1 new st at the end of the next 2 rows for armholes = 86-90-92-96-98-102 sts. Now continue pattern inside 1 edge st in garter st and 1 st in stockinette st in each side. Work the 82-86-88-92-94-98 middle sts in pattern as before. When piece measures 74-76-78-80-82-84 cm / 29⅛"-30"-30¾"-31½"-32¼"-33", cast/bind off the middle 24-24-24-26-26-26 sts for neck and finish each shoulder separately. On next row from the neck, cast/bind off 1 st = 30-32-33-34-35-37 sts remain on each shoulder. When piece measures 76-78-80-82-84-86 cm / 30"-30¾"-31½"-32¼"-33"-33⅞", work 1 ridge over all sts. Cast/bind off. Work the other shoulder the same way. RIGHT FRONT PIECE: Cast on 55-55-58-61-64-64 sts on circular needle size 5 mm / US 8 with Air. Work rib as follows: A.5 (= band), K 1, * P 2, K 1 *, repeat from *-* until 8 sts remain, A.2. Continue like this back and forth until piece measures 4 cm / 1½". On next row from RS switch to circular needle size 5.5 mm / US 9 and work as follows: A.5 (= 7 sts), stockinette st until 8 sts remain, AT THE SAME TIME dec 8-6-8-9-11-9 sts evenly over these sts, A.2 = 47-49-50-52-53-55 sts. Continue in stockinette st, work A.5 over band and A.2 in the side as before until piece measures 22 cm / 8¾". Now cast on 2 new sts in the side (= marks vent) = 49-51-52-54-55-57 sts. REMEMBER BUTTONHOLES! Now work A.3 over A.2 and next to last st on needle and work 1 edge st in garter st in the side. When piece measures 26-24-24-23-23-23 cm / 10¼"-9½"-9½"-9"-9"-9", beg displacement of A.3 towards mid front. Dec 1 st before A.3 and inc 1 st before last st on needle. Repeat displacement of A.3 every 4th row 17-19-20-21-22-24 more times. NOTE: Inc is always inside 1 edge st in garter st in the side. AT THE SAME TIME when piece measures 60-61-62-63-64-65 cm / 23⅝"-24"-24⅜"-24¾"-25¼"-25½", cast on 1 new st at the end of next row from RS for armhole = 50-52-53-55-56-58 sts. Continue pattern as before with 1 edge st in garter st and 1 st in stockinette st in the side. When piece measures 64-66-68-69-71-73 cm / 25¼"-26"-26¾"-27"-28"-28¾", slip the first 14-14-14-15-15-15 sts on a stitch holder for neck. Then cast/bind off sts on every row from neck as follows: 3 sts 1 time, 2 sts 1 time and 1 st 1 time = 30-32-33-34-35-37 sts remain for shoulder. Work edge st towards neck in garter st. When piece measures 76-78-80-82-84-86 cm / 30"-30¾"-31½"-32¼"-33"-33⅞", work 1 ridge over all sts. Cast/bind off. LEFT FRONT PIECE: Cast on and work as right front piece but reversed. I.e. work as follows on first row: A.1, K 1, * P 2, K 1 *, repeat from *-* until 7 sts remain, A.6 (= band). When piece measures 22 cm / 8¾", cast on 2 new sts in the side (marks vent). Now work A.3 over the 2nd st on row and A.1. When piece measures 26-24-24-23-23-23 cm / 10¼"-9½"-9½"-9"-9"-9", beg displacement of A.3 towards mid front. Inc 1 st after 1 edge st in garter st in the side and dec 1 st after A.3. Continue displacement the same way as on right front piece AT THE SAME TIME cast on 1 new st for armhole - adjust according to right front piece. When piece measures 64-66-68-69-74-73 cm / 25¼"-26"-26¾"-27"-28"-28¾", slip the first 14-14-14-15-15-15 sts seen from WS on a stitch holder for neck. Then cast/bind off sts on every row from neck as follows: 3 sts 1 time, 2 sts 1 time and 1 st 1 time = 30-32-33-34-35-37 sts. Work edge st towards neck in garter st. When piece measures 76-78-80-82-84-86 cm / 30"-30¾"-31½"-32¼"-33"-33⅞", work 1 ridge over all sts. Cast/bind off. SLEEVE: Work back and forth on circular needle. Cast on 39-41-43-43-43-45 sts on circular needle size 5 mm / US 8 with Air. Work rib as follows: 1 edge st in garter st, K 1, * P 1, K 1 *, repeat from *-* until 1 st remains, 1 edge st in garter st. When rib measures 4 cm / 1½", switch to circular needle size 5.5 mm / US 9 and continue pattern as follows: 1 edge st in garter st, work last st in A.4, repeat A.4 until 1 st remains, 1 edge st in garter st. When piece measures 10 cm / 4", inc 1 st inside 1 edge st in garter st in each side. Work the inc sts in pattern A.4: Repeat inc every approx. 5½-4½-4½-3½-3-3 cm / 2¼"-1¾"-1¾"-1¼"-1"-1" 6-7-7-9-11-11 more times = 53-57-59-63-67-69 sts. When sleeve measures 46 cm / 18" in all sizes, work a sleeve cap with short rows as follows from RS: Work until 8-9-9-10-11-12 sts remain, turn and work until 8-9-9-10-11-12 sts remain, turn and work until 17-19-19-21-22-23 sts remain, turn and work until 17-19-19-21-22-23 sts remain. Turn and work all sts on needle, turn and work over all sts. Cast/bind off with K from RS. Make another sleeve. ASSEMBLY: Sew the shoulder seams tog. Sew sleeves to body inside 1 edge st in garter st. Sew underarm seams and side seams in one inside 1 edge st in garter st but leave 22 cm / 8¾" for vent at the bottom of body. Sew the buttons on to left band. NECK EDGE: Beg from RS on right front piece and pick up approx. 120-130 sts (includes sts on stitch holders the front). K 1 round from WS while adjusting no of sts to 90-90-90-96-96-96 sts - but not over band sts, work these as before. Now work rib (K 1/P 2) inside band sts in each side, finish with K 1 before last band. When rib measures 3 cm / 1", cast/bind off with K over K and P over P. |
|||||||
Diagram explanations |
|||||||
|
|||||||
 |
|||||||
 |
|||||||
Have you finished this pattern?Tag your pictures with #dropspattern #sigridjacket or submit them to the #dropsfan gallery. Do you need help with this pattern?You'll find 23 tutorial videos, a Comments/Questions area and more by visiting the pattern on garnstudio.com. © 1982-2026 DROPS Design A/S. We reserve all rights. This document, including all its sub-sections, has copyrights. Read more about what you can do with our patterns at the bottom of each pattern on our site. |
|||||||


With over 40 years in knitting and crochet design, DROPS Design offers one of the most extensive collections of free patterns on the internet - translated to 17 languages. As of today we count 325 catalogs and 12298 patterns - 12288 of which are translated into English (US/in).
We work hard to bring you the best knitting and crochet have to offer, inspiration and advice as well as great quality yarns at incredible prices! Would you like to use our patterns for other than personal use? You can read what you are allowed to do in the Copyright text at the bottom of all our patterns. Happy crafting!
Post a comment to pattern DROPS 166-11
We would love to hear what you have to say about this pattern!
If you want to leave a question, please make sure you select the correct category in the form below, to speed up the answering process. Required fields are marked *.