
Popular categories
Looking for a yarn?


Comments / Questions (77)
![]() Vania wrote:
Vania wrote:
Hi jacket coming along nicely ☺️I was curious why for left front piece there is no decrease after you knit 8 3/4 length and there is a decrease evenly on right side?
26.07.2018 - 02:51DROPS Design answered:
Dear Vania, when piece measures 8 3/4" you cast on 2 new sts on each side on back piece and only on one side (towards back piece) on each front piece. I may misunderstand your meaning seing no decrease at 8 3/4". Happy knitting!
26.07.2018 - 10:12
![]() V Wengel wrote:
V Wengel wrote:
When it says bind off 3 st one time, 2 st one time and 1 stitch 1 time, do you bind off 3 at the beginning of the RS after I slipped the stitches on holder then at the beginning of the ws row bind off 2 one time then on RS row bind off 1 st 1 time and then repeat until there are 30stitcnes?
06.07.2018 - 03:24DROPS Design answered:
Deear Mrs Wengel, these sts are bound off for neck: work 1 row from RS (right front piece) slipping the first 14 sts on a st holder, then work row to the end, turn and work row from WS. At the beg of next row from RS bind off 3 sts, work row to the end, turn and work next row from WS. At the beg of next row from RS bind off 2 sts, and so on. i.e. you will bind off the sts for neck at the beg of each row from RS (towards neck) on right front piece (= at the beg of each row from WS for the left front piece). Happy knitting!
06.07.2018 - 08:27
![]() V Wengel wrote:
V Wengel wrote:
I’m finishing up the right front piece. I’m on RS. Do I slip the14 st into my holder or do I knit the 14 in pattern then put them on a holder? Thank you 🌷
04.07.2018 - 20:23DROPS Design answered:
Dear Mrs Wengel, to avoid cutting the yarn, work these 14 sts first at the beg of the round and slip them on a st holder, then continue row as before. Happy knitting!
05.07.2018 - 07:34
![]() Vania wrote:
Vania wrote:
On right front piece, I did first row perfect, when doing ribbing on wrong side do I start with p1, *k2p1* in order for the ribbing to come out proper? Thank you
13.06.2018 - 16:35DROPS Design answered:
Dear Vania, read diagram from the left towards the right from RS and work ribbing K over K and P over P, ie, the P2/K1 from RS will be worked P1/K2 from RS. Happy knitting!
14.06.2018 - 08:20
![]() Vania wrote:
Vania wrote:
Thank you very much. I wrote out exactly all 4 rows and I couldn’t fit it in this comment box . If row 1 is correct I can do row 1 first and then go from there. Let’s clarify row 1. 1 garter,yo purlwise,A3,knit 2 together,stockinette, slip knit wise, knit one,pass over stitch, yo knitwise, 1 garter?
23.05.2018 - 14:41DROPS Design answered:
Dear Vania, you increase twice on row 1 with a YO and work this YO on row 2 as first st in A.1 (= P from WS), on row 2 you will work the first st in A.4 = K from RS. On row 3 you will work the new st as 1st st in A.4 (= P from RS) and on row 4 you will work this st P from WS. On row 5 you will inc one more st on each side and this st will be worked as 2nd st in A.4 (= K from RS and P from WS) and increase again 4 rows higher and these new sts will be now worked as the 1st st in A.4 (= new repeat of A.4), on next increase row you will work the 4th increase st as 2nd st in A.4 and so on. Happy knitting!
23.05.2018 - 14:55
![]() Vania wrote:
Vania wrote:
On row 3 are the one yo’s on Each side worked as purl.? Then when I get 2 or more yo’s on the sides do I work chart a 4 like this: 1 garter st, purl 1, k1,A3,stockinette,a3,k1 purl 1, 1garter st? I’m just thinking it will look the same. I’m just having trouble how A4 is worked on both sides. thank you 😊 hopefully I will have no more questions for a while
23.05.2018 - 00:59DROPS Design answered:
Dear Vania, oops I think I was wrong yesterday, the first increase will be worked as the first st in A.4 = K from WS (= twisted to avoid a hole). The 2nd increase will be worked as the 2nd st in A.4, ie on row 3 you will K the first st in A.4, YO (= increase) and on row 4 you will work the YO as the 2nd st in A.4 (= P from WS ) and P the first st in A.4 (from WS read diagram from the left towards the right). Next increase will be worked as 1st st in A.4 and next increase will be worked as the 2nd st in A.4 and so on. Happy knitting!
23.05.2018 - 08:33
![]() Vania wrote:
Vania wrote:
So you said the increased stitches are worked In a4. So I’m assuming the first and all displacements are worked like this, 1 garter stitch, yo purlwise, work next 9 stitches of chart a3, knit 2 tog, knit until 2 stitches before and slip stitch knit wise, knit next stitch, pass over slipped stitch, a3, then yo knitwise as in chart a4. I really like this pattern 🌺
19.05.2018 - 11:37DROPS Design answered:
Dear Vania, correct on first row from WS after first displacement row, then continue increasing inside the edge st and work A.4 as in diagram. Happy knitting!
22.05.2018 - 10:22
![]() Vania wrote:
Vania wrote:
So I’m repeating displacement every 4 rows? If I start a displacement on a right side, the 4th lands on a wrong side, do I do the displacement on the 5th row which is a right side? Thank you 🌷
18.05.2018 - 13:47DROPS Design answered:
Dear Vania, that's right, you work 3 rows after first displacement and displace patterns on next row (= 4th row). Happy knitting!
18.05.2018 - 15:27
![]() Vania wrote:
Vania wrote:
In sigrid jacket do I start displacement on right side row? Also, if displacement is done on every 4 th row (17 times) that would land on a wrong side row. And it states all decreases done on RS. The jacket is looking great so far 🌻
18.05.2018 - 12:46DROPS Design answered:
Dear Vania, displacement will be worked from RS, ie on a RS row increase 1 st before A.3 and dec 1 st after A.3 at the beg of row and dec 1 st before last A.3 and inc 1 st after last A.3 at the end of row. The new sts increased will be then worked in A.4 see INCREASE-TIP. Happy knitting!
18.05.2018 - 13:32
![]() Vania wrote:
Vania wrote:
Hi, I have added on the two stitches at the end and have 84:stitches. I was continuing on doing 1 garter stitch, A9 and then stockinette. I have been following the rules of the chart. What am I doing wrong? The pattern on the end sides looks like it is the opposite. I have pictures but not sure how to submit them. Thank you 😊
16.05.2018 - 00:16DROPS Design answered:
Dear Vania, when you have the 84 sts (first size), work next row from RS as follows: 1 edge st in garter st, A.3 (= 9 sts) then stockinette st until A.2, work A.3 over A.2 and next to last st and finish with 1 edge st in garter st. Happy knitting!
16.05.2018 - 09:34
|
|||||||
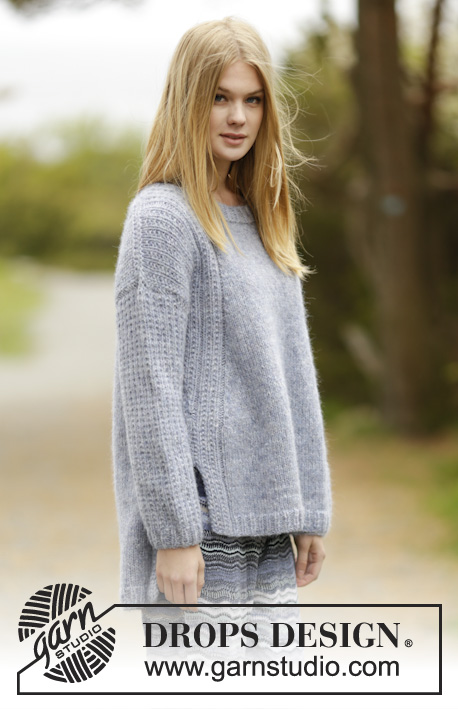
Sigrid Jacket#sigridjacket |
|||||||
|
|
|||||||
Knitted DROPS jacket with false raglan, vent and textured pattern in ”Air”. Size: S - XXXL.
DROPS 166-11 |
|||||||
|
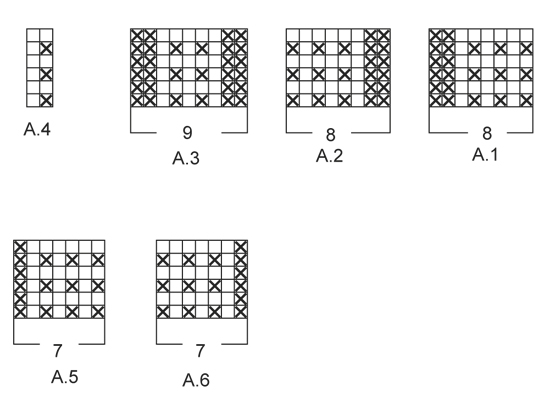
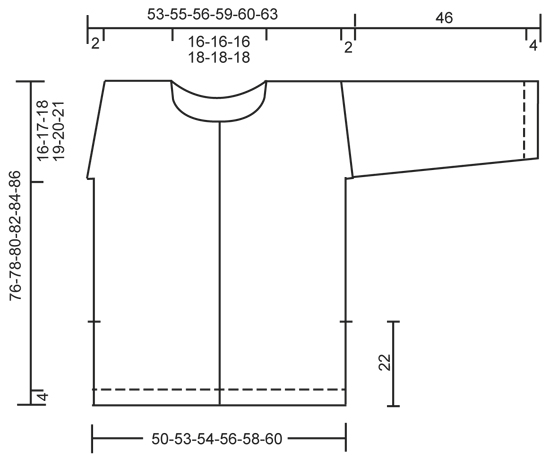
GARTER ST (back and forth): K all rows. 1 ridge = K2 rows. PATTERN: See diagrams A.1 to A.6. The diagrams show all rows in pattern seen from RS. INCREASE TIP: Inc 1 st by making 1 YO. On next row work YOs twisted, i.e. work in the back loop of st instead of front to avoid holes. NOTE: Work the inc sts gradually in diagram A.4. DECREASE TIP: Dec 1 sts as follows: All dec are done from RS! Dec as follows after A.3: K 2 tog. Dec as follows before A.3: Work until 2 sts before A.3, slip 1 st as if to K, K 1, psso. BUTTONHOLES: Dec for buttonholes on right band. 1 buttonhole = K tog third and fourth st from edge and make 1 YO. Dec for buttonholes when piece measures: SIZE S: 25, 33, 41, 49, 57 and 65 cm / 9¾",13",16",19¼",22½",25½". SIZE M: 25, 33, 42, 50, 59 and 67 cm / 9¾",13",16½",19¾",23¼",26½". SIZE L: 27, 35, 44, 52, 61 and 69 cm / 10½",13¾",17¼",20½",24",27". SIZE XL: 28, 37, 45, 54, 62 and 71 cm / 11",14½",17¾",21¼",24½",28". SIZE XXL: 28, 37, 46, 55, 64 and 73 cm / 11",14½",18",21½",25¼",28¾". SIZE XXXL: 30, 39, 48, 57, 66 and 75 cm / 11¾",15¼",19",22½",26",29½". ---------------------------------------------------------- JACKET: Worked back and forth on circular needle and sewn tog when finished. BACK PIECE: Cast on 95-98-101-107-113-116 sts on circular needle size 5 mm / US 8 with Air. Work rib as follows: A.1 (= 8 sts), K 1, * P 2, K 1 *, repeat from *-* until 8 sts remain on row, A.2 (= 8 sts). Continue like this back and forth until piece measures 4 cm / 1½". On next row from RS switch to circular needle size 5.5 mm / US 9 and work as follows: A.1, stockinette st over the next 79-82-85-91-97-100 sts, AT THE SAME TIME dec 15-14-15-17-21-20 sts evenly, A.2 = 80-84-86-90-92-96 sts on needle in total. Continue in stockinette st, work A.1 and A.2 in each side as before until piece measures 22 cm / 8¾". REMEMBER THE KNITTING TENSION/GAUGE At the end of the next 2 rows cast on 2 new sts (marks vent) = 84-88-90-94-96-100 sts. Now work as follows: 1 edge st in GARTER ST - see explanation above, A.3 (= 9 sts) stockinette st until A.2, work A.3 over A.2 and next to last st and finish with 1 edge st in garter st. When piece measures 26-24-24-23-23-23 cm / 10¼"-9½"-9½"-9"-9"-9", beg displacement of A.3 towards mid back. Work 1 edge st in garter st, inc 1 st - READ INCREASE TIP, A.3, dec 1 st - READ DECREASE TIP, stockinette st until 2 sts remain before A.3, dec 1 st, A.3, inc 1 st, 1 edge st in garter st. Repeat displacement of A.3 every 4th row 17-19-20-21-22-24 more times. NOTE: Inc is always inside 1 edge st in garter st in each side. AT THE SAME TIME when piece measures 60-61-62-63-64-65 cm / 23⅝"-24"-24⅜"-24¾"-25¼"-25½", cast on 1 new st at the end of the next 2 rows for armholes = 86-90-92-96-98-102 sts. Now continue pattern inside 1 edge st in garter st and 1 st in stockinette st in each side. Work the 82-86-88-92-94-98 middle sts in pattern as before. When piece measures 74-76-78-80-82-84 cm / 29⅛"-30"-30¾"-31½"-32¼"-33", cast/bind off the middle 24-24-24-26-26-26 sts for neck and finish each shoulder separately. On next row from the neck, cast/bind off 1 st = 30-32-33-34-35-37 sts remain on each shoulder. When piece measures 76-78-80-82-84-86 cm / 30"-30¾"-31½"-32¼"-33"-33⅞", work 1 ridge over all sts. Cast/bind off. Work the other shoulder the same way. RIGHT FRONT PIECE: Cast on 55-55-58-61-64-64 sts on circular needle size 5 mm / US 8 with Air. Work rib as follows: A.5 (= band), K 1, * P 2, K 1 *, repeat from *-* until 8 sts remain, A.2. Continue like this back and forth until piece measures 4 cm / 1½". On next row from RS switch to circular needle size 5.5 mm / US 9 and work as follows: A.5 (= 7 sts), stockinette st until 8 sts remain, AT THE SAME TIME dec 8-6-8-9-11-9 sts evenly over these sts, A.2 = 47-49-50-52-53-55 sts. Continue in stockinette st, work A.5 over band and A.2 in the side as before until piece measures 22 cm / 8¾". Now cast on 2 new sts in the side (= marks vent) = 49-51-52-54-55-57 sts. REMEMBER BUTTONHOLES! Now work A.3 over A.2 and next to last st on needle and work 1 edge st in garter st in the side. When piece measures 26-24-24-23-23-23 cm / 10¼"-9½"-9½"-9"-9"-9", beg displacement of A.3 towards mid front. Dec 1 st before A.3 and inc 1 st before last st on needle. Repeat displacement of A.3 every 4th row 17-19-20-21-22-24 more times. NOTE: Inc is always inside 1 edge st in garter st in the side. AT THE SAME TIME when piece measures 60-61-62-63-64-65 cm / 23⅝"-24"-24⅜"-24¾"-25¼"-25½", cast on 1 new st at the end of next row from RS for armhole = 50-52-53-55-56-58 sts. Continue pattern as before with 1 edge st in garter st and 1 st in stockinette st in the side. When piece measures 64-66-68-69-71-73 cm / 25¼"-26"-26¾"-27"-28"-28¾", slip the first 14-14-14-15-15-15 sts on a stitch holder for neck. Then cast/bind off sts on every row from neck as follows: 3 sts 1 time, 2 sts 1 time and 1 st 1 time = 30-32-33-34-35-37 sts remain for shoulder. Work edge st towards neck in garter st. When piece measures 76-78-80-82-84-86 cm / 30"-30¾"-31½"-32¼"-33"-33⅞", work 1 ridge over all sts. Cast/bind off. LEFT FRONT PIECE: Cast on and work as right front piece but reversed. I.e. work as follows on first row: A.1, K 1, * P 2, K 1 *, repeat from *-* until 7 sts remain, A.6 (= band). When piece measures 22 cm / 8¾", cast on 2 new sts in the side (marks vent). Now work A.3 over the 2nd st on row and A.1. When piece measures 26-24-24-23-23-23 cm / 10¼"-9½"-9½"-9"-9"-9", beg displacement of A.3 towards mid front. Inc 1 st after 1 edge st in garter st in the side and dec 1 st after A.3. Continue displacement the same way as on right front piece AT THE SAME TIME cast on 1 new st for armhole - adjust according to right front piece. When piece measures 64-66-68-69-74-73 cm / 25¼"-26"-26¾"-27"-28"-28¾", slip the first 14-14-14-15-15-15 sts seen from WS on a stitch holder for neck. Then cast/bind off sts on every row from neck as follows: 3 sts 1 time, 2 sts 1 time and 1 st 1 time = 30-32-33-34-35-37 sts. Work edge st towards neck in garter st. When piece measures 76-78-80-82-84-86 cm / 30"-30¾"-31½"-32¼"-33"-33⅞", work 1 ridge over all sts. Cast/bind off. SLEEVE: Work back and forth on circular needle. Cast on 39-41-43-43-43-45 sts on circular needle size 5 mm / US 8 with Air. Work rib as follows: 1 edge st in garter st, K 1, * P 1, K 1 *, repeat from *-* until 1 st remains, 1 edge st in garter st. When rib measures 4 cm / 1½", switch to circular needle size 5.5 mm / US 9 and continue pattern as follows: 1 edge st in garter st, work last st in A.4, repeat A.4 until 1 st remains, 1 edge st in garter st. When piece measures 10 cm / 4", inc 1 st inside 1 edge st in garter st in each side. Work the inc sts in pattern A.4: Repeat inc every approx. 5½-4½-4½-3½-3-3 cm / 2¼"-1¾"-1¾"-1¼"-1"-1" 6-7-7-9-11-11 more times = 53-57-59-63-67-69 sts. When sleeve measures 46 cm / 18" in all sizes, work a sleeve cap with short rows as follows from RS: Work until 8-9-9-10-11-12 sts remain, turn and work until 8-9-9-10-11-12 sts remain, turn and work until 17-19-19-21-22-23 sts remain, turn and work until 17-19-19-21-22-23 sts remain. Turn and work all sts on needle, turn and work over all sts. Cast/bind off with K from RS. Make another sleeve. ASSEMBLY: Sew the shoulder seams tog. Sew sleeves to body inside 1 edge st in garter st. Sew underarm seams and side seams in one inside 1 edge st in garter st but leave 22 cm / 8¾" for vent at the bottom of body. Sew the buttons on to left band. NECK EDGE: Beg from RS on right front piece and pick up approx. 120-130 sts (includes sts on stitch holders the front). K 1 round from WS while adjusting no of sts to 90-90-90-96-96-96 sts - but not over band sts, work these as before. Now work rib (K 1/P 2) inside band sts in each side, finish with K 1 before last band. When rib measures 3 cm / 1", cast/bind off with K over K and P over P. |
|||||||
Diagram explanations |
|||||||
|
|||||||
 |
|||||||
 |
|||||||
Have you finished this pattern?Tag your pictures with #dropspattern #sigridjacket or submit them to the #dropsfan gallery. Do you need help with this pattern?You'll find 23 tutorial videos, a Comments/Questions area and more by visiting the pattern on garnstudio.com. © 1982-2026 DROPS Design A/S. We reserve all rights. This document, including all its sub-sections, has copyrights. Read more about what you can do with our patterns at the bottom of each pattern on our site. |
|||||||


With over 40 years in knitting and crochet design, DROPS Design offers one of the most extensive collections of free patterns on the internet - translated to 17 languages. As of today we count 325 catalogs and 12298 patterns - 12288 of which are translated into English (US/in).
We work hard to bring you the best knitting and crochet have to offer, inspiration and advice as well as great quality yarns at incredible prices! Would you like to use our patterns for other than personal use? You can read what you are allowed to do in the Copyright text at the bottom of all our patterns. Happy crafting!
Post a comment to pattern DROPS 166-11
We would love to hear what you have to say about this pattern!
If you want to leave a question, please make sure you select the correct category in the form below, to speed up the answering process. Required fields are marked *.