
Popular categories
Looking for a yarn?


Comments / Questions (109)
![]() CHATILLON wrote:
CHATILLON wrote:
Bonjour, nous aimerions avoir le diagramme complet pour realiser ce pull. Merci par avance Cordialement Me CHATILLON
18.11.2018 - 17:00DROPS Design answered:
Bonjour Mme Chatillon, nous n'avons pas de diagramme complet pour chaque taille, suivez bien attentivement en même temps les diagrammes et les explications pour votre taille. Bon crochet!
19.11.2018 - 09:08
![]() Dina wrote:
Dina wrote:
I am sorry to say that my yoke size is small to start the diagram so May I add more rows to increase its length and to be under bust as shown in the photo ...or I had to repeat work by adding more rows in the WS ie working row 1RS then 3more rows then row 2RS then 3more rows and so on????!please advice
06.08.2018 - 17:02DROPS Design answered:
Dear Dina, make sure to check and keep your tension, you should have 18 dc x 9 rows = 10 x 10 cm - if your tension is still too tight in height you can adjust the yoke length working some more rows evenly between the rows with increases. Hapy crocheting!
07.08.2018 - 09:44
![]() Dina wrote:
Dina wrote:
I am sorry to say that my yoke size is small to start the diagram so May I add more rows to increase its length and to be under bust as shown in the photo ...or I had to repeat work by adding more rows in the WS ie working row 1RS then 3more rows then row 2RS then 3more rows and so on????!please advice
06.08.2018 - 16:59
![]() Carrie wrote:
Carrie wrote:
On next row from RS, inc as follows: Inc 1 dc on each side of every marker (= 24 dc inc), repeat inc on every row from RS 3-3-4-6-7-9 times in total, then inc before every marker (= 12 dc inc), repeat inc on every row from RS 4-4-4-2-2-0 times in total I'm having trouble with this part. I did the 1st row but don't understand how many more rows I am supposed yo do or how exactly to increase... Can you please help?
31.07.2018 - 03:25DROPS Design answered:
Dear Carrie, you will now increase for the round yoke 1 dc on each side of each marker (= 24 sts increased). Depending on your size you will work these increases on every row 3-3 times in total in size S and M, 4 times in total in size L, 6 times in total in size XL, 7 times in total in size XXL, 9 times in total in size XXXL. Then repeat these increase every other row 4 times in total in size S, M and L and 2 times in total in total in size XL and XXL (no increase every other row in the largest size). Happy crocheting!
31.07.2018 - 10:01
![]() Ellen wrote:
Ellen wrote:
Your explanation on the chains at beginning of pattern A1 is very confusing!! Looking through peoples questions you haven't answered simply you just say follow A1,A2,A3 then join. BUT the chain shows especially on bobble row. Does the starting point after the joins veer to left each time and not run vertically down the back of jumper? The start of the row of bobbles is particually confusing. To recap PLEASE explain starting chains IN VERY EASY DIALOGUE.
29.06.2018 - 18:03DROPS Design answered:
Dear Ellen, you start either A.1 depending on the row with either 1, 3 or4 chains and finish each round with 1 sl st in the 1st, 3rd or 4th chain from beg of round. On the row with bobbles you start with 4 ch (then work 4 ch = 1st sch-space and 1 boblle, 3 ch = A.1) and finish with 1 sl st in the 4th ch from beg of round. Happy crocheting!
02.07.2018 - 08:49
![]() Sarah wrote:
Sarah wrote:
When doing the row before bobble it starts 3 chains then 2 chains 4 trebles 2 chains etc. At end of row 2 chains and sl st into previous 3 chains. I am left with a single line of chains where I have joined!!! Which doesn't look right! To recap- 4 trebles,2 Ch joined into 3 Ch at start which looks as if I have one line treble in the pattern. Please explain step by step where I am going wrong with the starting chains
28.06.2018 - 14:54DROPS Design answered:
Dear Sarah, when working A.z you start round with A.1 and finish the round with A.3 = 2 chains at the end of last repeat before the sl st joining the beg of round. Happy crocheting!
28.06.2018 - 18:00
![]() Paula M wrote:
Paula M wrote:
Es muy enredada la explicación, mucha palabras, especialmente para el canesu, debieran colocar un video de cómo aumentar los puntos y especificar bien dónde comienzan los marcadores,los puntos se aumentan antes o después. Prefiero los patrones y no tanta letra sin sentido, dice repetir de *-* y ves cuentos de asteriscos(✴), al final no sabes de donde a dónde se repite!
27.06.2018 - 20:23
![]() Sarah wrote:
Sarah wrote:
WHEN STARTING THE PATTERN ARE THE 3 CHAINS AT BEGINNING TO BE USED AS THE FIRST TREBLE STITCH? IF NOT I AM CONFUSED ON WHAT TO DO WITH THEM AT THE JOINS????
26.06.2018 - 17:42DROPS Design answered:
Dear Sarah, the 3 ch replace the first st at beg of row only when working piece back and forth, finish then each row with a sl st in the 3rd ch from beg of row, turn piece, work 3 ch at the beg of row and finish with 1 sl st in the 3rd ch from beg of round. When working diagrams, the first st in A.1 shows how to start and finish the round. Happy crocheting!
27.06.2018 - 08:19
![]() Yvonne wrote:
Yvonne wrote:
On lacey days jumper continuing with my previous question i cannot get neck size correct, far to wide and it is shoulder high not neck height?? i am determined to get it right but struggling how to do it!! i have unpicked it endlesss times! tension, chains and hook all correct!!!!
19.06.2018 - 15:14DROPS Design answered:
Deaer Yvonne, see previous answer and check the number of chains and number of sts in your size. Hapy crocheting!
19.06.2018 - 15:54
![]() Yvonne wrote:
Yvonne wrote:
On lacey days jumper i am not getting on too good,!!!! I have correct amount of chains at the start,correct tension, i have just finished yoke, but the neck opening is far too big and it is too far down my back??? there is no way when i do neck edge it will be as high as the picture. what have i done wrong.?
19.06.2018 - 14:25DROPS Design answered:
Dear Yvonne, at the very first round on yoke, you will skip chains evenly so that you should have 124-124-132-136-140-148 tr at the end of this first round over the 153-153-163-168-173-183 ch (this is to avoid that the foundation chain is too tight and prevent a tight neck edge). Happy crocheting!
19.06.2018 - 15:53
|
||||||||||||||||||||||||||||||||||
Lacey Days Jumper#laceydaysjumper |
||||||||||||||||||||||||||||||||||
 |
 |
|||||||||||||||||||||||||||||||||
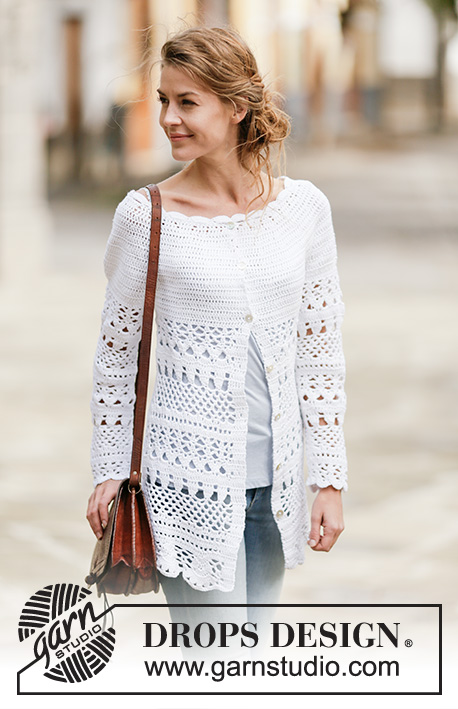
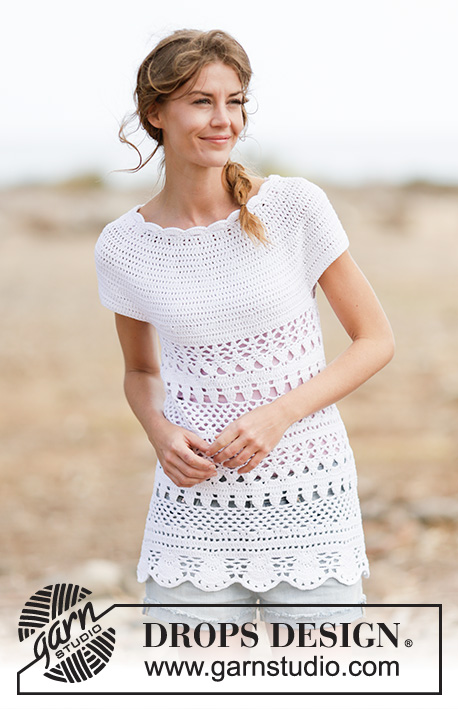
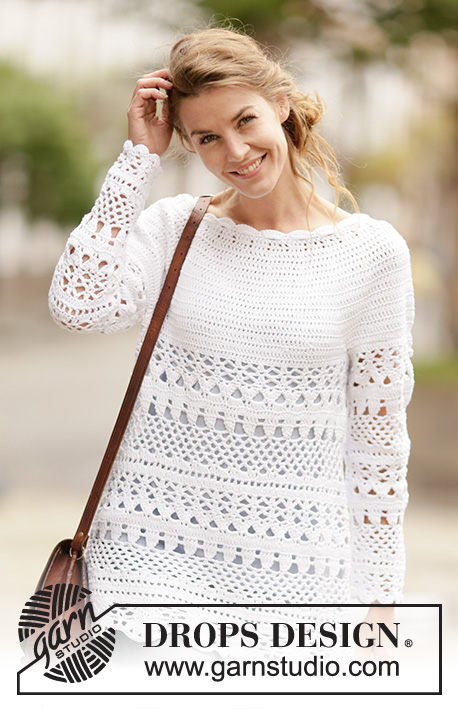
Crochet DROPS jumper with lace pattern and round yoke, worked top down in ”Cotton Light”. Size: S - XXXL.
DROPS 162-27 |
||||||||||||||||||||||||||||||||||
|
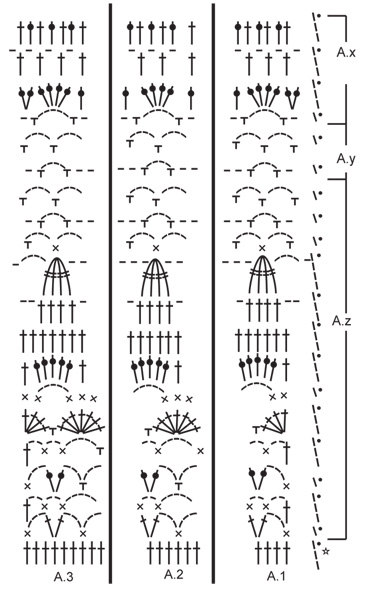
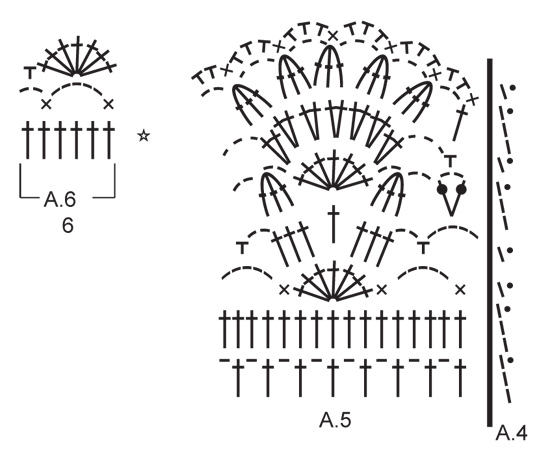
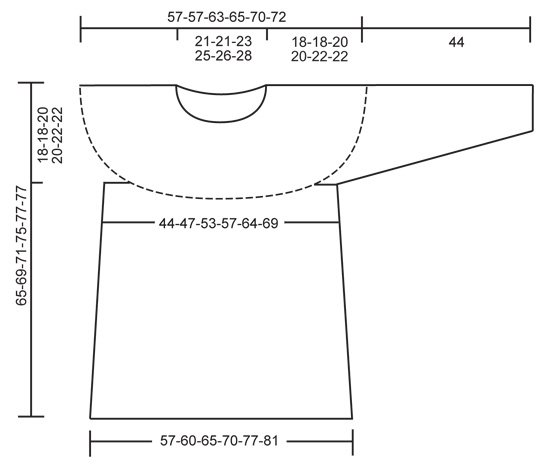
CROCHET INFO: Applies when piece is worked back and forth. Replace first dc on every row with dc with ch 3, finish row with 1 sl st in 3rd ch. INCREASE TIP: Inc 1 dc by working 2 dc in 1 dc. DECREASE TIP: Work 1 dc but wait with last pull through (= 2 sts on hook), then work next dc but on last pull through, pull yarn through all sts on hook = 1 dc dec. PATTERN: See diagrams A.1 to A.6. A.4 show how the pattern beg and ends when working in the round. ---------------------------------------------------------- YOKE: Worked top down from mid back. Work 153-153-163-168-173-183 ch on hook size 4 mm / G/6 with Cotton Light and form a ring with 1 sl st in first ch. Work next round as follows: 3 ch (= 1 dc), 1 dc in first ch from ch-ring, 1 dc in each of the next ch 2, * skip ch 1, 1 dc in each of the next 4 ch *, repeat from *-* = 124-124-132-136-140-148 dc. Then work piece back and forth. Work every row tog at the end of row with 1 sl st in 3rd ch from beg of row. Turn piece. READ CROCHET INFO! Insert 12 markers in the piece as follows: Work 15-15-17-18-19-21 dc AT THE SAME TIME inc 1-5-3-3-4-2 dc evenly – READ INCREASE TIP, insert first marker, * work 4 dc, insert next marker *, repeat from *-* 1 more time, work 16 dc, insert next marker, * work 4 dc, insert next marker *, repeat from *-* 1 more time, work 30-30-34-36-38-42 dc AT THE SAME TIME inc 2-10-6-6-8-4 dc evenly, insert next marker, * work 4 dc, insert next marker *, repeat from *-* 1 more time, work 16 dc, insert next marker, * work 4 dc, insert next marker *, repeat from *-* 1 more time, work 15-15-17-18-19-21 dc AT THE SAME TIME inc 1-5-3-3-4-2 dc evenly = 128-144-144-148-156-156 dc. REMEMBER THE CROCHET GAUGE! Turn piece. On next row from RS, inc as follows: Inc 1 dc on each side of every marker (= 24 dc inc), repeat inc on every row from RS 3-3-4-6-7-9 times in total, then inc before every marker (= 12 dc inc), repeat inc on every row from RS 4-4-4-2-2-0 times in total = 248-264-288-316-348-372 dc. Piece measures approx. 17-17-19-19-21-21 cm / 6¾"-6¾"-7½"-7½"-8¼"-8¼". On next round work as follows: 35-38-42-47-53-57 dc (half back piece), 8 ch (armhole), skip 54-56-60-64-68-72 dc from previous row (to be used for sleeve later), 70-76-84-94-106-114 dc AT THE SAME TIME inc 1-1-3-1-1-3 dc evenly (front piece), 8 ch (armhole), skip 54-56-60-64-68-72 dc from previous row (to be used for sleeve later) and 35-38-42-47-53-57 dc (half back piece) = 157-169-187-205-229-247 dc/ch. Now work piece in the round without turning. Continue to work as follows: A.1, A.2 24-26-29-32-36-39 times in total in width, finish with A.3. Work the first 7 rounds of A.z. On 8th round in A.z (= dc-round) inc 6 dc evenly – READ INCREASE TIP = 163-175-193-211-235-253 dc. Continue to work A.z as before but now work A.2 25-27-30-33-37-40 times in width. When A.z has been worked 1 time vertically, work A.y over A.z 1-2-2-3-3-3 times in total vertically. Then work A.x over A.y. On 2nd round in A.x inc 12 dc evenly = 175-187-205-223-247-265 dc. Continue to work A.x as before but now work A.2 27-29-32-35-39-42 times in width. On last round in A.x inc 6 dc evenly = 181-193-211-229-253-271 dc. Then work A.z over A.x (now work A.2 28-30-33-36-40-43 times in width). On 8th round in A.z inc 12 dc evenly = 193-205-223-241-265-283 dc. Continue to work A.z as before but now work A.2 30-32-35-38-42-45 times in width. When A.z has been worked 1 time vertically, work A.y over A.z 1-2-2-3-3-3 times in total vertically. Then work A.x over A.y. On 2nd round in A.x inc 6 dc evenly = 199-211-229-247-271-289 dc. Continue to work A.x as before but now work A.2 31-33-36-39-43-46 times in width. On last round in A.x inc 9-13-11-9-17-15 dc evenly = 208-224-240-256-288-304 dc. Then work as follows: A.5 13-14-15-16-18-19 times in total (A.4 shows how round beg and ends). Fasten off when A.5 has been worked 1 time vertically. Piece measures approx. 65-69-71-75-77-77 cm / 25½"-27"-28"-29½"-30½"-30½". SLEEVE: Sleeve is worked in the round, top down. Beg by working mid under sleeve as follows: Work 1 sc in 5th ch of the 8 ch worked in armhole on body. Work 3 ch (= 1 dc). Then work with 1 dc in each of the next 3 ch. Then work with 1 dc in every dc over sleeve AT THE SAME TIME dec 1-3-1-5-3-1 dc evenly – READ DECREASE TIP, before working 1 dc in each of the remaining 4 ch under sleeve = 61-61-67-67-73-79 dc. Continue to work as follows: A.1, A.2 8-8-9-9-10-11 times in width, finish with A.3. On 8th round in A.z (= dc-round) dec 6 dc evenly = 55-55-61-61-67-73 dc. Continue to work A.z as before but now work A.2 7-7-8-8-9-10 times in width. When A.z has been worked 1 time vertically, work A.y over A.z. When A.z has been worked 1 time vertically, work A.x over A.y. On last round in A.x dec 6 dc evenly = 49-49-55-55-61-67 dc. Then work A.z over A.x. A.2 is now worked 6-6-7-7-8-9 times in width. On 8th round dec 6 dc evenly = 43-43-49-49-55-61 dc. When A.z has been worked 1 time vertically, work A.y over A.z. Then work A.x over A.y. On last round in A.x dec 0-0-0-0-6-6 dc evenly = 43-43-49-49-49-55 dc. Then work the first 5 rounds of A.z. A.2 is now worked 5-5-6-6-6-7 times in width. Fasten off. Sleeve measures approx. 44 cm / 17¼" in all sizes. Work the other sleeve the same way. NECK EDGE: Worked in the round. Work 1 edge around the neck in ch-round on hook size 4 mm / G/6 with Cotton Light, beg mid back from RS as follows: Work up 114-114-120-120-126-126 dc in ch-round. Then work A.6 19-19-20-20-21-21 times in width. Fasten off. |
||||||||||||||||||||||||||||||||||
Diagram explanations |
||||||||||||||||||||||||||||||||||
|
||||||||||||||||||||||||||||||||||
 |
||||||||||||||||||||||||||||||||||
 |
||||||||||||||||||||||||||||||||||
 |
||||||||||||||||||||||||||||||||||
Have you finished this pattern?Tag your pictures with #dropspattern #laceydaysjumper or submit them to the #dropsfan gallery. Do you need help with this pattern?You'll find 16 tutorial videos, a Comments/Questions area and more by visiting the pattern on garnstudio.com. © 1982-2026 DROPS Design A/S. We reserve all rights. This document, including all its sub-sections, has copyrights. Read more about what you can do with our patterns at the bottom of each pattern on our site. |
||||||||||||||||||||||||||||||||||


With over 40 years in knitting and crochet design, DROPS Design offers one of the most extensive collections of free patterns on the internet - translated to 17 languages. As of today we count 325 catalogs and 12298 patterns - 12288 of which are translated into English (US/in).
We work hard to bring you the best knitting and crochet have to offer, inspiration and advice as well as great quality yarns at incredible prices! Would you like to use our patterns for other than personal use? You can read what you are allowed to do in the Copyright text at the bottom of all our patterns. Happy crafting!
Post a comment to pattern DROPS 162-27
We would love to hear what you have to say about this pattern!
If you want to leave a question, please make sure you select the correct category in the form below, to speed up the answering process. Required fields are marked *.