DROPS Cotton Light uni colour 50% Cotton, 50% Polyester |
1.80 $ /50g |
Order |
Clicking the ORDER button will redirect you to Wool Warehouse Direct Ltd website
The yarn cost is calculated from the pattern’s smallest size and the yarn’s cheapest product type. Looking for an even better price? You might find it on the DROPS Deals!
-------------------------------------------------------
Alternative Yarn – See how to change yarns here
Yarn Groups A to F – Use the same pattern and change the yarn here
Yarn usage using an alternative yarn – Use our yarn converter here
-------------------------------------------------------
DROPS Cotton Light uni colour 50% Cotton, 50% Polyester 1.80 $ /50g Order |
Clicking the ORDER button will redirect you to Wool Warehouse Direct Ltd website
The yarn cost is calculated from the pattern’s smallest size and the yarn’s cheapest product type. Looking for an even better price? You might find it on the DROPS Deals!
This pattern has been corrected. Click here to see the correction/s.
All measurements in charts are in cm.
= sc in st | |
= dc in st | |
= ch | |
= dc around ch | |
= 1 bobble with 4 tr: Work 1 tr in next dc but wait with last pull through (= 2 sts on hook), work 1 tr in each of the next 3 dc the same way, pull yarn through all 5 sts on hook | |
= first row/round is explained in pattern | |
= 1 sc around ch | |
= 2 dc in same st | |
= Work 1 dc in next dc but wait with last pull through (= 2 sts on hook), work 1 dc in each of the next 2 dc the same way, pull yarn through all 4 sts on hook | |
= 7 dc in same ch/dc | |
= sl st |
Each of our patterns has specific tutorial videos to help you.
These step-by-step tutorials might also help you:
Why is the knitting/crochet tension so important?
Knitting tension is what determines the final measurements of your work, and is usually measured per 10 x 10 cm. It is provided like so: number of stitches in width x number of rows in height - eg: 19 stitches x 26 rows = 10 x 10 cm.
The knitting tension is very individual; some people knit/crochet loosely while others work tightly. You adjust the knitting tension with the needle size, which is why the suggested needle size only serve as a guide! You need to adjust this (up or down) to ensure that YOUR knitting tension matches the knitting tension provided in the pattern. If you work with a different knitting tension than provided you will have a different yarn consumption, and your work will have different measurements than what the pattern suggests.
The knitting tension also determines which yarns can replace each other. As long as you achieve the same knitting tension you can replace one yarn with another.
See DROPS lesson: How to measure your tension/gauge
See DROPS video: How to make a gauge tension swatch
How do I know how many balls of yarn I need?
The required amount of yarn is provided in grams, eg: 450 g. To calculate how many balls you’ll need you first need to know how many grams are in 1 ball (25g, 50g or 100g). This information is available if you click on the individual yarn quality on our pages. Divide the amount required with the amount of each ball. For example, if each ball is 50g (the most common amount), the calculation will be as follows: 450 / 50 = 9 balls.
Can I use a different yarn than what the pattern suggests?
The important thing when changing from one yarn to another is that the knitting/crochet tension remains the same. This is so that the measurements of the finished piece will be the same as on the sketch provided. It is easier to achieve the same knitting tension using yarns from the same yarn group. It is also possible to work with multiple strands of a thinner yarn to achieve the knitting tension of a thicker one. Please try our yarn converter. We recommend you to always work a test swatch.
Please NOTE: when changing yarn the garment might have a different look and feel to the garment in the photo, due to individual properties and qualities of each yarn.
See DROPS lesson: Can I use a different yarn than the one mentioned in the pattern?
What are the yarn groups?
All our yarns are categorised into yarn groups (from A to F) according to thickness and knitting tension – group A contains the thinnest yarns and group F the thickest. This makes it easier for you to find alternative yarns to our patterns, should you wish to switch yarn. All yarns within the same group have a similar knitting tension and can easily replace each other. However, different yarn qualities have different structures and properties which will give the finished work a unique look and feel.
How do I use the yarn converter?
At the top of all our patterns you’ll find a link to our yarn converter, which is a helpful tool should you wish to use a different yarn than suggested. By filling in the yarn quality you wish to replace, the amount (in your size) and number of strands, the converter will present good alternative yarns with the same knitting tension. Additionally it will tell you how much you’ll require in the new qualities and whether you’ll need to work with multiple strands. Most skeins are 50g (some are 25g or 100g).
If the pattern is worked with multiple colours, every colour will have to be converted separately. Similarly, if the pattern is worked with several strands of different yarns (for example 1 strand Alpaca and 1 strand Kid-Silk) you will have to find alternatives for each, individually.
Why do you show discontinued yarns in the patterns?
Since different yarns have different qualities and textures we have chosen to keep the original yarn in our patterns. However, you can easily find options among our available qualities by using our yarn converter, or simply pick a yarn from the same yarn group.
It is possible that some retailers still have discontinued yarns in stock, or that someone has a few skeins at home that they would like to find patterns for.
The yarn converter will provide both alternative yarn as well as required amount in the new quality.
What size should I knit?
If you think it's hard to decide what size to make, it can be a good idea to measure a garment you own already and like the size of. Then you can pick the size by comparing those measures with the ones available in the pattern's size chart.
You'll find the size chart at the bottom of the pattern.
See DROPS lesson: How to read size chart
Why do I get the wrong knitting tension with the suggested needle size?
The needle size provided in the pattern serves only as a guide, the important thing is to follow the knitting tension. And since knitting tension is very individual, you will have to adjust the needle size to ensure that YOUR tension is the same as in the pattern – maybe you’ll have to adjust 1, or even 2 needle sizes, up or down to achieve the correct tension. For this, we recommend that you work test swatches.
Should you work with a different knitting tension than the one provided, the measurements of the finished garment might deviate from the measurement sketch.
See DROPS lesson: How to measure your tension/gauge
See DROPS video: How to make a gauge tension swatch
Why is the pattern worked top-down?
Working a garment top-down provides more flexibility and room for personal adjustment. For example it is easier to try the garment on while working, as well as making adjustments to length of yoke and shoulder caps.
The instructions are carefully explaining every step, in the correct order. Diagrams are adjusted to the knitting direction and are worked as usual.
How do I work according to a knitting diagram?
The diagram depicts all rows/rounds, and every stitch seen from the right side. It is read from bottom to top, from right to left. 1 square = 1 stitch.
When working back and forth, every other row is worked from the right side and every other row is worked from the wrong side. When working from the wrong side, the diagram will have to be worked reversed: from left to right, knit stitches are purled, purl stitches are knit etc.
When working in the round every round is worked from the right side and the diagram are worked from right to left on all rounds.
See DROPS lesson: How to read knitting diagrams
How do I work according to a crochet diagram?
The diagram depicts all rows/rounds, and every stitch seen from the right side. It is worked from bottom to top, from right to left.
When working back and forth every other row is worked from the right side: from right to left and every other row is worked from the wrong side: from left to right.
When working in the round, every row in the diagram are worked from the right side, from right to left.
When working a circular diagram you start in the middle and work your way outwards, counter clockwise, row by row.
The rows usually start with a given number of chain stitches (equivalent to the height of the following stitch), this will either be depicted in the diagram or explained in the pattern.
See DROPS lesson: How to read crochet diagrams
How do I work several diagrams simultaneously on the same row/round?
Instructions for working several diagrams after each other on the same row/round, will often be written like so: “work A.1, A.2, A.3 a total of 0-0-2-3-4 times". This means you work A.1 once, then A.2 is worked once, and A.3 is repeated (in width) the number of times provided for your size – in this case like so: S = 0 times, M = 0 times, L=2 times, XL= 3 times and XXL = 4 times.
The diagrams are worked as usual: begin with the first row in A.1, then work the first row in A.2 etc.
See DROPS lesson: How to read knitting diagrams
See DROPS lesson: How to read crochet diagrams
Why are the sleeves shorter in larger sizes?
The total width of the garment (from wrist-to-wrist) will be larger in the larger sizes, despite the actual sleeves being shorter. The larger sizes have longer sleeve caps and wider shoulders, so there will be a good fit in all sizes.
Where on the garment is the length measured?
The measurement sketch/schematic drawing provides information regarding the full length of the garment. If it’s a jumper or a jacket the length is measured from the highest point on the shoulder (usually closest to the neckline), and straight down to the bottom of the garment. It is NOT measured from the tip of shoulder. Similarly, the length of yoke is measured from the highest point on the shoulder and down to where yoke is split into body and sleeves.
See DROPS lesson: How to read a schematic drawing
What is a repeat?
Diagrams are often repeated on the round or in height. 1 repeat is the diagram the way it appears in the pattern. If it says to work 5 repeats of A.1 in the round, then you work A.1 a total of 5 times after/next to each other in the round. If it says to work 2 repeats of A.1 vertically/in height you work the entire diagram once, then begin again at the start and work the entire diagram one more time.
Why does the piece start with more chain stitches than it’s worked with?
Chain stitches are slightly narrower than other stitches and to avoid working the cast-on edge too tight, we simply chain more stitches to begin with. The stitch count will be adjusted on the following row to fit the pattern and measurement sketch.
Why increase before the rib edge when the piece is worked top-down?
The rib edge is more elastic and will contract slightly compared to, for example, stocking stitch. By increasing before the rib edge, you avoid a visible difference in width between the rib edge and the rest of the body.
Why increase in the cast-off edge?
It’s very easy to cast off too tightly, and by making yarn overs while casting off (and simultaneously casting these off) you avoid a too tight cast off edge.
See DROPS video: How to bind off with yarn overs (yo)
How do I increase/decrease on every 3rd and 4th row/round alternately?
To achieve an even increase (or decrease) you can increase on, for example: every 3rd and 4th row alternately, like so: work 2 rows and increase on the 3rd row, work 3 rows and increase on the 4th. Repeat this until the increase is complete.
See DROPS lesson: Increase or decrease 1 st on every 3rd and 4th row alternately
How can I work a jacket in the round instead of back and forth?
Should you prefer to work in the round instead of back and forth, you may of course adjust the pattern. You’ll need to add steeks mid-front (usually 5 stitches), and follow the instructions. When you would normally turn and work from the wrong side, simply work across the steek and continue in the round. At the end you’ll cut the piece open, pick up stitches to work bands, and cover the cut edges.
See DROPS video: How to knit steeks and cut open
Can I work a jumper back and forth instead of in the round?
Should you prefer to work back and forth instead of in the round, you may of course adjust the pattern so you work the pieces separately and then assemble them at the end. Divide the stitches for the body in 2, add 1 edge stitch in each side (for sewing) and work the front and back pieces separately.
See DROPS lesson: Can I adapt a pattern for circular needles into straight needles?
Why is the pattern slightly different than what I see in the photo?
Pattern repeats can vary slightly in the different sizes, in order to get the correct proportions. If you’re not working the exact same size as the garment in the photo, yours might deviate slightly. This has been carefully developed and adjusted so that the complete impression of the garment is the same in all sizes.
Make sure to follow instructions and diagrams for your size!
How do I make a women’s size garment into a men’s size one?
If you have found a pattern you like which is available in women’s size it’s not very difficult to convert it to men’s size. The biggest difference will be the length of sleeves and body. Start working on the women size that you think would fit across the chest. The additional length will be worked right before you cast off for the armhole/sleeve cap. If the pattern is worked top-down you can add the length right after the armhole or before the first decrease on sleeve.
Regarding additional yarn amount, this will depend on how much length you add, but it is better with a skein too many than too few.
How do I prevent a hairy garment from shedding?
All yarns will have excess fibres (from production) that might come off as lint or shedding. Brushed yarns (ie hairier yarns) have more of these loose, excess fibres, causing more shedding.
Shedding also depends on what is worn under or over the garment, and whether this pulls at the yarn fibres. It’s therefore not possible to guarantee that there will be no shedding
Below are some tips on how to get the best result when working with hairier yarns:
1. When the garment is finished (before you wash it) shake it vigorously so the looser hairs come off. NOTE: do NOT use a lint roller, brush or any method that pulls at the yarn.
2. Place the garment in a plastic bag and put it in your freezer - the temperature will cause the fibres to become less attached to each other, and excess fibres will come off easier.
3. Leave in the freezer for a few hours before taking it out and shaking it again.
4. Wash the garment according to the instructions on the yarn label.
Why does my garment pill?
Pilling is a natural process that happens to even the most exclusive of fibers. It's a natural sign of wear and tear that is hard to avoid, and that is most visible in high friction areas of your garment like a sweater's arms and cuffs.
You can make your garment look as new by removing the pilling, using a fabric comb or a pill/lint remover.
Lacey Days Jumper |
||||||||||||||||||||||||||||||||||
|
|
|||||||||||||||||||||||||||||||||
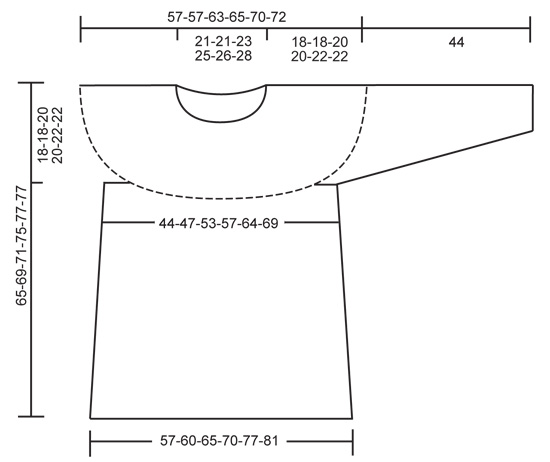
Crochet DROPS jumper with lace pattern and round yoke, worked top down in ”Cotton Light”. Size: S - XXXL.
DROPS 162-27 |
||||||||||||||||||||||||||||||||||
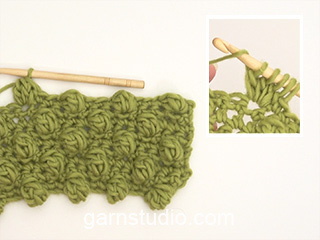
CROCHET INFO: Applies when piece is worked back and forth. Replace first dc on every row with dc with ch 3, finish row with 1 sl st in 3rd ch. INCREASE TIP: Inc 1 dc by working 2 dc in 1 dc. DECREASE TIP: Work 1 dc but wait with last pull through (= 2 sts on hook), then work next dc but on last pull through, pull yarn through all sts on hook = 1 dc dec. PATTERN: See diagrams A.1 to A.6. A.4 show how the pattern beg and ends when working in the round. ---------------------------------------------------------- YOKE: Worked top down from mid back. Work 153-153-163-168-173-183 ch on hook size 4 mm / G/6 with Cotton Light and form a ring with 1 sl st in first ch. Work next round as follows: 3 ch (= 1 dc), 1 dc in first ch from ch-ring, 1 dc in each of the next ch 2, * skip ch 1, 1 dc in each of the next 4 ch *, repeat from *-* = 124-124-132-136-140-148 dc. Then work piece back and forth. Work every row tog at the end of row with 1 sl st in 3rd ch from beg of row. Turn piece. READ CROCHET INFO! Insert 12 markers in the piece as follows: Work 15-15-17-18-19-21 dc AT THE SAME TIME inc 1-5-3-3-4-2 dc evenly – READ INCREASE TIP, insert first marker, * work 4 dc, insert next marker *, repeat from *-* 1 more time, work 16 dc, insert next marker, * work 4 dc, insert next marker *, repeat from *-* 1 more time, work 30-30-34-36-38-42 dc AT THE SAME TIME inc 2-10-6-6-8-4 dc evenly, insert next marker, * work 4 dc, insert next marker *, repeat from *-* 1 more time, work 16 dc, insert next marker, * work 4 dc, insert next marker *, repeat from *-* 1 more time, work 15-15-17-18-19-21 dc AT THE SAME TIME inc 1-5-3-3-4-2 dc evenly = 128-144-144-148-156-156 dc. REMEMBER THE CROCHET GAUGE! Turn piece. On next row from RS, inc as follows: Inc 1 dc on each side of every marker (= 24 dc inc), repeat inc on every row from RS 3-3-4-6-7-9 times in total, then inc before every marker (= 12 dc inc), repeat inc on every row from RS 4-4-4-2-2-0 times in total = 248-264-288-316-348-372 dc. Piece measures approx. 17-17-19-19-21-21 cm / 6 3/4"-6 3/4"-7½"-7½"-8 1/4"-8 1/4". On next round work as follows: 35-38-42-47-53-57 dc (half back piece), 8 ch (armhole), skip 54-56-60-64-68-72 dc from previous row (to be used for sleeve later), 70-76-84-94-106-114 dc AT THE SAME TIME inc 1-1-3-1-1-3 dc evenly (front piece), 8 ch (armhole), skip 54-56-60-64-68-72 dc from previous row (to be used for sleeve later) and 35-38-42-47-53-57 dc (half back piece) = 157-169-187-205-229-247 dc/ch. Now work piece in the round without turning. Continue to work as follows: A.1, A.2 24-26-29-32-36-39 times in total in width, finish with A.3. Work the first 7 rounds of A.z. On 8th round in A.z (= dc-round) inc 6 dc evenly – READ INCREASE TIP = 163-175-193-211-235-253 dc. Continue to work A.z as before but now work A.2 25-27-30-33-37-40 times in width. When A.z has been worked 1 time vertically, work A.y over A.z 1-2-2-3-3-3 times in total vertically. Then work A.x over A.y. On 2nd round in A.x inc 12 dc evenly = 175-187-205-223-247-265 dc. Continue to work A.x as before but now work A.2 27-29-32-35-39-42 times in width. On last round in A.x inc 6 dc evenly = 181-193-211-229-253-271 dc. Then work A.z over A.x (now work A.2 28-30-33-36-40-43 times in width). On 8th round in A.z inc 12 dc evenly = 193-205-223-241-265-283 dc. Continue to work A.z as before but now work A.2 30-32-35-38-42-45 times in width. When A.z has been worked 1 time vertically, work A.y over A.z 1-2-2-3-3-3 times in total vertically. Then work A.x over A.y. On 2nd round in A.x inc 6 dc evenly = 199-211-229-247-271-289 dc. Continue to work A.x as before but now work A.2 31-33-36-39-43-46 times in width. On last round in A.x inc 9-13-11-9-17-15 dc evenly = 208-224-240-256-288-304 dc. Then work as follows: A.5 13-14-15-16-18-19 times in total (A.4 shows how round beg and ends). Fasten off when A.5 has been worked 1 time vertically. Piece measures approx. 65-69-71-75-77-77 cm / 25½"-27"-28"-29½"-30½"-30½". SLEEVE: Sleeve is worked in the round, top down. Beg by working mid under sleeve as follows: Work 1 sc in 5th ch of the 8 ch worked in armhole on body. Work 3 ch (= 1 dc). Then work with 1 dc in each of the next 3 ch. Then work with 1 dc in every dc over sleeve AT THE SAME TIME dec 1-3-1-5-3-1 dc evenly – READ DECREASE TIP, before working 1 dc in each of the remaining 4 ch under sleeve = 61-61-67-67-73-79 dc. Continue to work as follows: A.1, A.2 8-8-9-9-10-11 times in width, finish with A.3. On 8th round in A.z (= dc-round) dec 6 dc evenly = 55-55-61-61-67-73 dc. Continue to work A.z as before but now work A.2 7-7-8-8-9-10 times in width. When A.z has been worked 1 time vertically, work A.y over A.z. When A.z has been worked 1 time vertically, work A.x over A.y. On last round in A.x dec 6 dc evenly = 49-49-55-55-61-67 dc. Then work A.z over A.x. A.2 is now worked 6-6-7-7-8-9 times in width. On 8th round dec 6 dc evenly = 43-43-49-49-55-61 dc. When A.z has been worked 1 time vertically, work A.y over A.z. Then work A.x over A.y. On last round in A.x dec 0-0-0-0-6-6 dc evenly = 43-43-49-49-49-55 dc. Then work the first 5 rounds of A.z. A.2 is now worked 5-5-6-6-6-7 times in width. Fasten off. Sleeve measures approx. 44 cm / 17 1/4'' in all sizes. Work the other sleeve the same way. NECK EDGE: Worked in the round. Work 1 edge around the neck in ch-round on hook size 4 mm / G/6 with Cotton Light, beg mid back from RS as follows: Work up 114-114-120-120-126-126 dc in ch-round. Then work A.6 19-19-20-20-21-21 times in width. Fasten off. |
||||||||||||||||||||||||||||||||||
Diagram explanations |
||||||||||||||||||||||||||||||||||
|
||||||||||||||||||||||||||||||||||
Have you made this or any other of our designs? Tag your pictures in social media with #dropsdesign so we can see them! Do you need help with this pattern?You'll find tutorial videos, a Comments/Questions area and more by visiting the pattern on garnstudio.com. © 1982-2024 DROPS Design A/S. We reserve all rights. This document, including all its sub-sections, has copyrights. Read more about what you can do with our patterns at the bottom of each pattern on our site. |
With over 40 years in knitting and crochet design, DROPS Design offers one of the most extensive collections of free patterns on the internet - translated to 17 languages. As of today we count 304 catalogs and 11422 patterns - 11417 of which are translated into English (US/in).
We work hard to bring you the best knitting and crochet have to offer, inspiration and advice as well as great quality yarns at incredible prices! Would you like to use our patterns for other than personal use? You can read what you are allowed to do in the Copyright text at the bottom of all our patterns. Happy crafting!
Comments / Questions (111)
Yvonne wrote:
On lacey days jumper i am not getting on too good,!!!! I have correct amount of chains at the start,correct tension, i have just finished yoke, but the neck opening is far too big and it is too far down my back??? there is no way when i do neck edge it will be as high as the picture. what have i done wrong.?
19.06.2018 - 14:25DROPS Design answered:
Dear Yvonne, at the very first round on yoke, you will skip chains evenly so that you should have 124-124-132-136-140-148 tr at the end of this first round over the 153-153-163-168-173-183 ch (this is to avoid that the foundation chain is too tight and prevent a tight neck edge). Happy crocheting!
19.06.2018 - 15:53Yvonne wrote:
On the Lacey days jumper I am trying to start 2nd row of pattern- on the graph at the beginning it says- 1ch then 1 DC, does the Ch take the place of the DC ? Also does it apply for the following rows? Eg. 3ch then 1 TR I can't seem to get the end of the rows joined together correctly.
14.06.2018 - 23:15DROPS Design answered:
Dear Yvonne, when working diagrams in the round, the chains at the beg of the round do not replace the first st on round, ie chain 1 and then crochet 1 dc in the first dc frm previous row (see 1st row i n A.1 showing how to crochet 1st row in A.z over the previous row). Happy crocheting!
15.06.2018 - 08:30Yvonne wrote:
I am really confused!!!; On Lacey days jumper I am now on 1st row of pattern, I have finished previous round on 169 . As I read it i do A1and A2 together =10 trebles for 26 times =260 then A3 =9 total "269" am I looking at it wrong,?????
08.06.2018 - 17:11DROPS Design answered:
Dear Yvonne, you crochet A.1 just one time in width (= 4 sts), then repeat the 6 sts in A.2 a total of 26 times (= 156 sts) and finish with A.3 (= 9 sts) = 4 + 156 + 9= 169 sts. Happy crocheting!
11.06.2018 - 08:11Yvonne wrote:
Thank you for quick reply!!! My question about 1st row of body on Lacey days jumper makes sense now! Can't wait to finish it 😉!!
08.06.2018 - 15:40Yvonne wrote:
Just finished yoke on Lacey days jumper.Started 1st row of body, I have done 38 tr, then 8 Ch (for armhole) I have skipped 56 tr. But when I start 76 tr. It distorts the yoke. What am I doing wrong? Please help!
08.06.2018 - 14:59DROPS Design answered:
Dear Yvonne, when dividing piece for sleeve you skip quite more sts (= 56 sts in size M) for sleeve that you replace by 8 chains for under sleeve, make sure to not twist work and continue working 1 tr in each of the next 76 tr for front piece and repeat armhole again, finish on mid back. This video shows how to work body under sleeve. Happy crocheting!
08.06.2018 - 15:10Teresa wrote:
Hola, otra pregunta, hay que aumentar en el LD a cada lado del MP(24pa), repetir los aumentos cada fila del LD 3 veces, quiere decir que en el lado revés tengo que hacer toda la vuelta P.a. y hacer en total 6 vueltas?, sería interesante que todas las vueltas se numerasen, no lo entiendo, gracias
28.02.2018 - 21:13DROPS Design answered:
Hola Teresa. Los aumentos se trabajan solo por el lado derecho: a cada lado del MP (= 24 p.a.) un total de 3 veces y después antes de cada MP (= 12 p.a.) un total de 4 veces. Por el lado revés no hay aumentos, trabajar toda la fila de puntos altos.
01.03.2018 - 20:07Teresa wrote:
Buenas tardes, en primer lugar gracias por esos patrones que facilitan la labor, pero tengo varias dudas de este patron 162/27, en el canesú después de la 1º vuelta, que tengo 124 p.a. dice ahora trabajar la labor de ida y vuelta, quiere decir que tengo que hacer 2 vueltas mas con p.a.? gracias por su tiempo, un saludo
28.02.2018 - 20:36DROPS Design answered:
Hola Teresa. No hace falta trabajar más vueltas/filas que las explicadas en el patrón. Al terminar la vuelta con 124 puntos tienes que unir formando un anillo entre el 1º y el último punto con 1 punto enano, girar la labor ( a partir de ahora trabajar de ida y vuelta, es decir tanto por el lado derecho como por el lado revés - ver INFORMACIÓN PARA LA REALIZACIÓN DEL TRABAJO).
01.03.2018 - 19:58Lucy Bates wrote:
Are there any written instructions for this project? I am very confused by the charts and much prefer a written pattern!
24.01.2018 - 23:40DROPS Design answered:
Dear Mrs Bates, there are only diagrams to this pattern, each symbol is the key for a stitch/group of stitch as explained under diagram text. Start reading diagram from the bottom corner on the right side and read every round from the right towards the left. Happy crocheting!
25.01.2018 - 08:22Sara Van Sas wrote:
Hoe kan ik mooi sluiten zonder gaatjes bij het terug haken te krijgen .
28.10.2017 - 12:00DROPS Design answered:
Hallo Sara, Als je stokjes heen en weer haakt wordt het eerste stokje op de toer wordt vervangen door 3 lossen en sluit je iedere toer met 1 stokje in de 3e losse (dus echtin de steek steken en niet om de steek) van het begin van de vorige toer.
29.10.2017 - 19:05Kiss Heléna wrote:
A mintához tartozó diagramokról szeretnék érdeklődni, hogy mikor lesznek (újra?) elérhetőek? A választ előre is köszönöm.
14.09.2017 - 13:05DROPS Design answered:
Kedves Heléna, köszönjük, hogy felhívta a figyelmünket a hiányzó jelmagyarázatokra. A diagram szimbólumai már elérhetőek. Örömteli kézimunkázást!
18.09.2017 - 00:37