
Popular categories
Looking for a yarn?


Comments / Questions (43)
![]() Sylvia wrote:
Sylvia wrote:
Liebes Drops Team, am 29.02.2016 hat schon jemand darauf hingewiesen, dass in der Anleitung beim Ärmel die Krausrippen vor A1 fehlen. Offenbar wurde der Fehler nicht behoben. In der Anleitung fehlen sie immer noch. Liebe Grüße Sylvia
29.04.2019 - 21:11DROPS Design answered:
Liebe Sylvie, die Ärmel wurden korrigiert, nach A.1 an der Passe stricken Sie 2 Krausrippen, dann teilen Sie die Arbeit. Die Ärmel beginnen dann mit 2 Krausrippen, dann glatt rechts weiter stricken. Viel Spaß beim stricken!
30.04.2019 - 10:17
![]() Mitsiblue wrote:
Mitsiblue wrote:
Lorsque je m'apprête à terminer l'empiècement du pull, il faut pour les manches, glisser par exemple, 54 mailles sur un arrêt de mailles, puis monter 8 mailles sous la manche...? Comment?.. A quel endroit? A quel rang?
07.03.2019 - 16:56DROPS Design answered:
Bonjour Mitsiblue, cette vidéo montre (à partir du time code 6:54 environ) comment on va glisser les mailles des manches en attente et comment monter les mailles au-dessus des mailles en attente. (pour un raglan, mais la technique sera la même). Ce tour va se tricoter ici quand les augmentations sont terminées, après avoir tricoté 1 fois A.1 en hauteur et 2 côtes mousse. Bon tricot!
08.03.2019 - 07:42Tara wrote:
Is it possible to increase with an invisible increase in stead of a yarn over to make the hole even smaller? Or would that throw the pattern off?
10.07.2018 - 14:59DROPS Design answered:
Dear Tara, you are welcome to use any other increase technique, we are explaining here the one we used. Happy knitting!
10.07.2018 - 15:47
![]() Gunn Berg wrote:
Gunn Berg wrote:
Jeg finner ikke noe mønster på denne oppskriften. Er det falt ut?
16.05.2018 - 10:24DROPS Design answered:
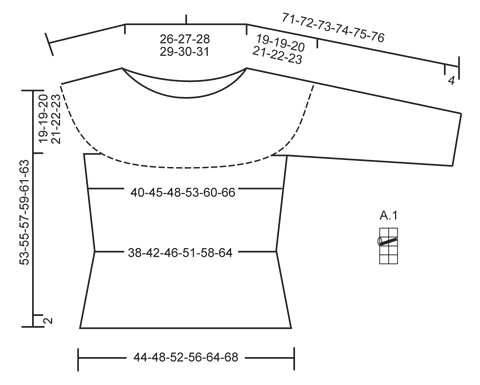
Hej Gun, Diagram A.1 ligger til højre for måleskitsen, lige under ærmet. God fornøjelse!
17.05.2018 - 14:56
![]() Johanna wrote:
Johanna wrote:
In body section, after inc at 6" measurement , repeat for L and XL are printed at 3 1/8". This does not correspond with the cm measurement given. This is only shown in pattern 161-9.
30.09.2017 - 03:10
![]() Susann wrote:
Susann wrote:
Mir waren die Ärmel viel zu kurz, ich musste sie 8cm länger stricken als angegeben (Gr. S) . Vielleicht ist da ein Fehler bei den entsprechenden Maßen?
15.09.2017 - 22:20DROPS Design answered:
Liebe Susann, am Ende der Anleitung finden Sie alle Maßnahmen für jede Größe, die können Sie mit einem ähnlichen Pulli vergleichen, die Sie gerne haben, und dann anpassen wenn nötig. Viel Spaß beim stricken!
18.09.2017 - 08:43
![]() Monica wrote:
Monica wrote:
Buonasera, vorrei fare questo modello utilizzando il filato Air. Il mio campione con i ferri 5 corrisponde, ma penso che il lavoro risulti troppo fitto nelle parti dove è previsto usare i ferri 4. 5, potrei usare i ferri 5 per tutto il lavoro? Grazie
14.12.2016 - 12:21DROPS Design answered:
Buongiorno Monica. Le parti lavorate con i ferri 4,5 sono davvero limitate e servono per dare un po' più di sostegno al lavoro. Può seguire le indicazioni del modello. Buon lavoro!
14.12.2016 - 12:23
![]() Monica wrote:
Monica wrote:
Buonasera, vorrei fare questo modello utilizzando il filato Air. Il mio campione con i ferri 5 corrisponde, ma penso che il lavoro risulti troppo fitto nelle parti dove è previsto usare i ferri 4. 5, potrei usare i ferri 5 per tutto il lavoro? Grazie
13.12.2016 - 17:33DROPS Design answered:
Buonasera Monica, se il suo campione corrisponde il lavoro verrà come quello indicato, altrimenti potrebbe non ritrovarsi con le misure. Si ricordi di lavorare il campione in tondo, perchè la tensione può variare cambiando la lavorazione. Buon lavoro!
13.12.2016 - 19:12
![]() Leonore wrote:
Leonore wrote:
Vielen Dank. Die zwei Krausrippen nach A.1 sind beschrieben, aber ich meinte vor A.1. Auf dem Foto sieht es aus, als ob davor auch noch eine (?) Krausrippe wäre.
01.03.2016 - 09:06DROPS Design answered:
Liebe Leonore, die 2 Krausrippen vor A.1 sind hier beschrieben: "... 2 Krausrippen (= 4 Rd kraus re) str, GLEICHZEITIG in der 1. Rd 8-11-11-15-21-28 M gleichmäßig verteilt zunehmen (= 208-226-246-260-286-308 M). Zu Rundnadel Nr. 5 wechseln und im Muster A.1 weiterstr."
01.03.2016 - 14:19
![]() Leonore wrote:
Leonore wrote:
Auf dem Foto des Modells sind am Ärmel oben deutlich 2 zusätzliche Krausrippen zu sehen; d.h. der Ärmel müsste mit 4 Reihen kraus rechts begonnen werden, was nicht in der Anleitung steht. Ebenso fehlt die Angabe, dass zum Schluss vor A 1 eine (oder zwei?) Krausrippen gestrickt werden sollten. Ist das richtig? Ansonsten ist das ein tolles Modell, das sehr gut sitzt. Mir waren die Ärmel etwas zu eng, aber man kann das Teil ja zwischendrin anprobieren und leicht an die eigenen Vorlieben anpassen.
29.02.2016 - 09:26DROPS Design answered:
Liebe Leonore, die Krausrippen nach A.1 sind beschrieben (Wenn A.1 in der Höhe zu Ende gestr wurde, zu Rundnadel Nr. 4,5 wechseln. 2 Krausrippen (= 4 Rd kraus re) str, ..) aber die weiteren Krausrippen am Ärmel sind tatsächlich nicht in der Anleitung. Ich werde das an die Designabteilung weitergeben, Danke für den Hinweis.
29.02.2016 - 15:02
|
|||||||
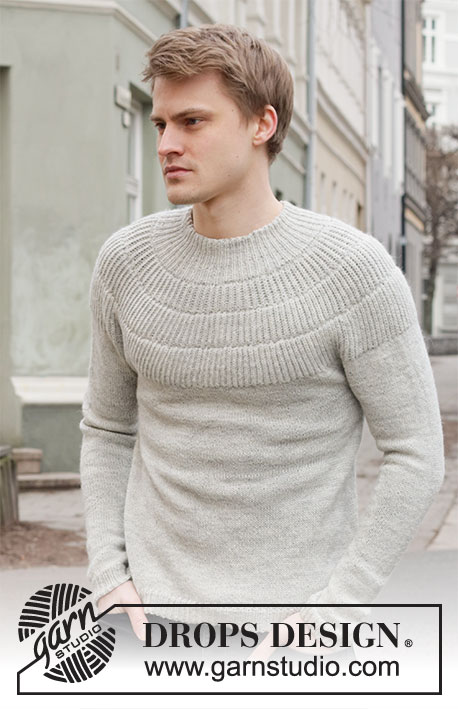
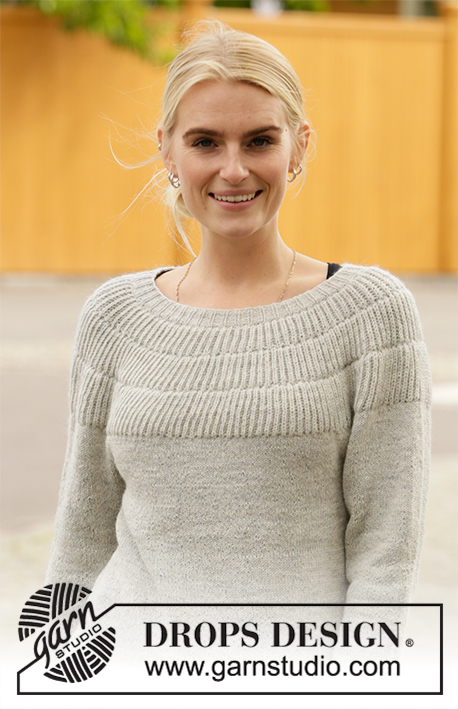
Athena Jumper#athenajumper |
|||||||
 |
 |
||||||
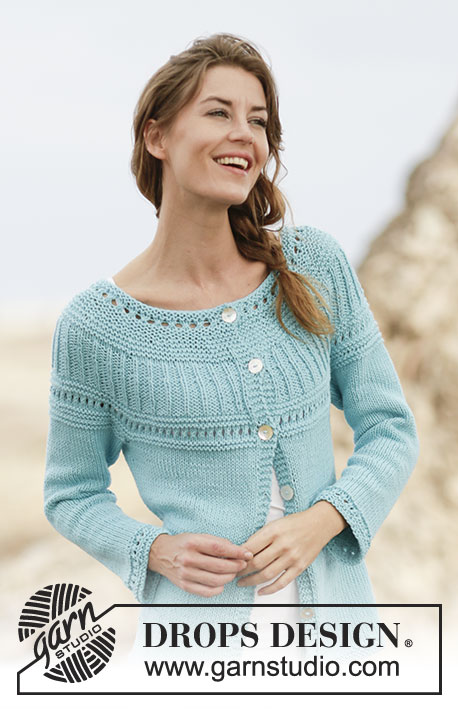
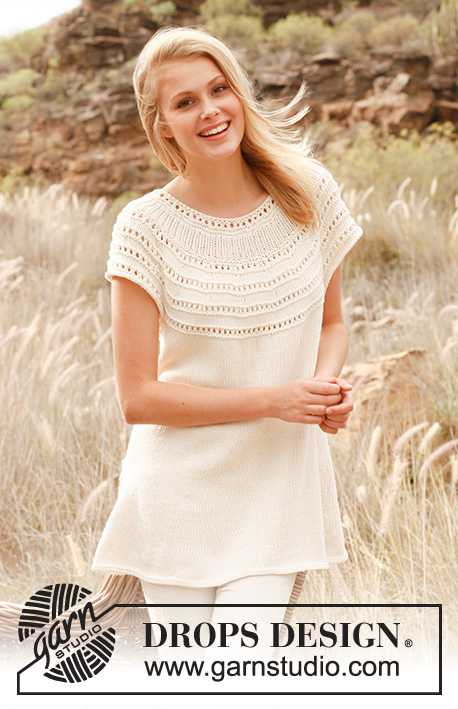
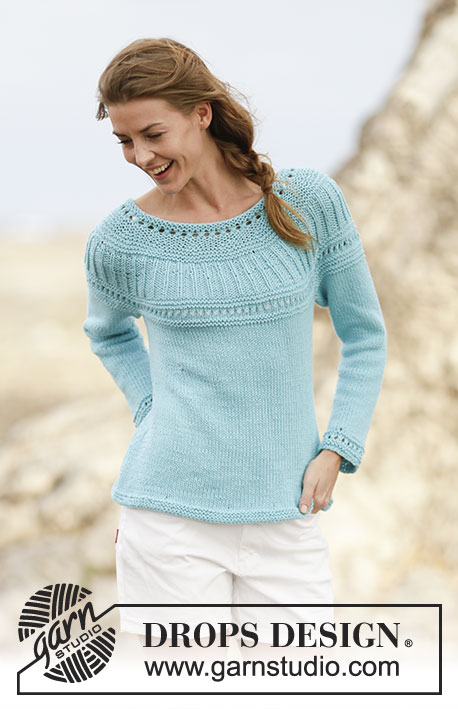
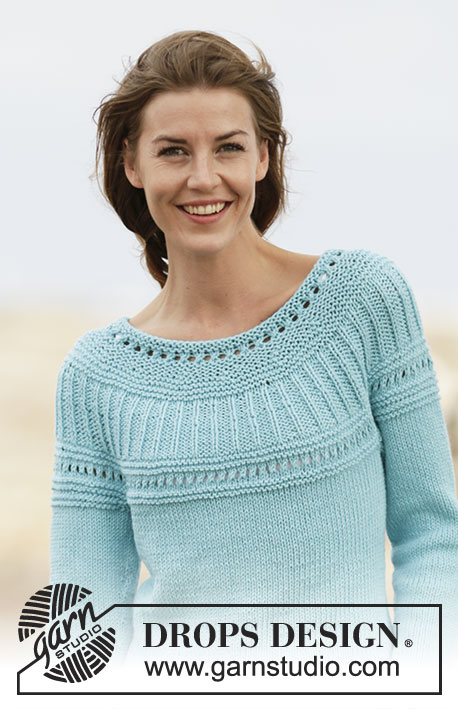
Knitted DROPS jumper in stockinette st, garter st with lace pattern and round yoke, worked top down in ”Paris”. Size: S - XXXL.
DROPS 161-9 |
|||||||
|
GARTER ST (worked in the round): * K 1 round and P 1 round *, repeat from *-*. 1 ridge = 2 rounds. PATTERN: See diagram A.1. INCREASE TIP 1: Inc 1 st by making 1 YO, on next round work YO twisted (i.e. work in back loop of st instead front) to avoid holes. INCREASE TIP 2: Inc with YO on each side of 2 sts in each side (the marker sits inbetween these sts). Knit YO twisted on next round. DECREASE TIP: Dec as follows before 1 st in stockinette st and marker: K 2 tog. Dec after marker and 1 st in stockinette st as follows: Slip 1 st as if to K, K 1, psso. ---------------------------------------------------------- JUMPER: Worked in the round on circular needle, top down. Rounds beg = mid back. YOKE: Cast on 92-96-100-104-108-112 sts on circular needle size 4.5 mm / US 7 with Paris. Work 2 ridges in GARTER ST - see explanation above. Switch to circular needle size 5 mm / US 8 and work A.1, AT THE SAME TIME on first round in diagram inc 12-16-18-18-20-20 sts evenly - READ INCREASE TIP 1 = 104-112-118-122-128-132 sts. When A.1 has been worked vertically, switch back to circular needle size 4.5 mm / US 7. Work in garter st AT THE SAME TIME inc 10 sts evenly on 2nd ridge and 6-7-13-15-21-26 sts evenly on 5th ridge (NOTE: Inc on a round with K) = 120-129-141-147-159-168 sts. REMEMBER THE KNITTING GAUGE When 7-7-8-8-8-10 ridges have been worked in total, piece measures approx. 7-7-8-8-8-9 cm / 2¾"-2¾"-3"-3"-3"-3½", switch to circular needle size 5 mm / US 8. Work 2 rounds in stockinette st. Now work rib as follows: * K 1, P 2 *, repeat from *-* the entire round. When rib measures 2 cm / ¾", inc by making 1 YO before K st in every section P the entire round (= 40-43-47-49-53-56 sts inc) = 160-172-188-196-212-224 sts. On next round P YOs twisted (i.e. work in back loop of st instead of front) to avoid holes. Continue with K 1/P 3. Repeat inc before every st with K when rib measures 4-4-4-5-6-6 cm / 1½"-1½"-1½"-2"-2½"-2½" = 200-215-235-245-265-280 sts. Continue with K 1/P 4 until rib measures 6-6-6-7-8-8 cm / 2½"-2½"-2½"-2¾"-3"-3" in total. Work 2 rounds in stockinette st. Now switch to circular needle size 4.5 mm / US 7. Work 2 ridges while AT THE SAME TIME on first round inc 8-11-11-15-21-28 sts evenly = 208-226-246-260-286-308 sts. Switch to circular needle size 5 mm / US 8 and continue with A.1. When A.1 has been worked vertically, switch to circular needle size 4.5 mm / US 7. Work 2 ridges while AT THE SAME TIME on first round inc 8-10-10-16-22-28 sts evenly = 216-236-256-276-308-336 sts. Now continue on circular needle size 5 mm / US 8 as follows: Work the first 30-34-37-41-47-52 sts (= back piece), slip the next 48-50-54-56-60-64 sts on a stitch holder (= sleeve), cast on 8 new sts under sleeve, work the next 60-68-74-82-94-104 sts (= front piece), slip the next 48-50-54-56-60-64 sts on a stitch holder (= sleeve), cast on 8 new sts under sleeve, work the remaining 30-34-37-41-47-52 sts (= back piece) on round. BODY: There are now 136-152-164-180-204-224 sts for body. Insert a marker in each side of body where new sts were cast on under sleeves (= 4 new sts on each side of marker). MEASURE PIECE FROM HERE. Continue in stockinette st. When piece measures 4 cm / 1½", dec on each side of each markers (= 4 sts dec) - READ DECREASE TIP! Repeat dec when piece measures 11-10-9-8-7-6 cm / 4½"-4"-3½"-3"-2¾"-2½" = 128-144-156-172-196-216 sts. When piece measures 18-17-16-15-14-13 cm / 7"-6¾"-6¼"-6"-5½"-5", inc 1 st on each side of each marker - READ INCREASE TIP 2 (= 4 sts inc). Repeat inc every 2-2½-3-3-3½-4 cm / ¾"-⅞"-1⅛"-1⅛"-1¼"-1½" 4 more times = 148-164-176-192-216-236 sts. When piece measures 32-33-34-35-36-37 cm / 12½"-13½"-13⅜"-13¾"-14¼"-14½", inc 10-8-11-10-14-8 sts evenly = 158-172-187-202-230-244 sts. Switch to circular needle size 4.5 mm / US 7 and work 3 ridges. Loosely bind off. SLEEVE: Work sleeve in stockinette st in the round on circular needle/double pointed needles. There are 48-50-54-56-60-64 sts for each sleeve. Slip sts from stitch holder back on circular needle/double pointed needles size 5 mm / US 8 and cast on 8 new sts under sleeve = 56-58-62-64-68-72 sts. First work 2 ridges and continue hereafter in stockinette st, AT THE SAME TIME insert a marker in the middle of the new sts under sleeve. NOW MEASURE THE PIECE FROM HERE. When piece measures 4 cm / 1½", dec 1 st on each side of markes - READ DECREASE TIP! Repeat dec every 4-3½-3-2½-2½-2 cm / 1½"-1¼"-1⅛"-⅞"-⅞"-¾" 7-8-9-9-11-12 more times = 40-40-42-44-44-46 sts. When sleeve measures 35-35-35-34-34-34 cm = 13¾"-13¾"-13¾"-13⅜"-13⅜"-13⅜", work 1 ridge over all sts and then work A.1. When A.1 has been worked vertically, switch to double pointed needles size 4.5 mm / US 7 and inc 1-1-3-3-3-3 sts evenly = 41-41-45-47-47-49 sts. Work 2 ridges and bind off, sleeve measures approx. 39-39-39-38-38-38 cm / 15¼"-15¼"-15¼"-15"-15"-15". Make another sleeve the same way. ASSEMBLY: Sew the openings under the sleeves. |
|||||||
Diagram explanations |
|||||||
|
|||||||
 |
|||||||
Have you finished this pattern?Tag your pictures with #dropspattern #athenajumper or submit them to the #dropsfan gallery. Do you need help with this pattern?You'll find 29 tutorial videos, a Comments/Questions area and more by visiting the pattern on garnstudio.com. © 1982-2026 DROPS Design A/S. We reserve all rights. This document, including all its sub-sections, has copyrights. Read more about what you can do with our patterns at the bottom of each pattern on our site. |
|||||||


With over 40 years in knitting and crochet design, DROPS Design offers one of the most extensive collections of free patterns on the internet - translated to 17 languages. As of today we count 325 catalogs and 12298 patterns - 12288 of which are translated into English (US/in).
We work hard to bring you the best knitting and crochet have to offer, inspiration and advice as well as great quality yarns at incredible prices! Would you like to use our patterns for other than personal use? You can read what you are allowed to do in the Copyright text at the bottom of all our patterns. Happy crafting!
Post a comment to pattern DROPS 161-9
We would love to hear what you have to say about this pattern!
If you want to leave a question, please make sure you select the correct category in the form below, to speed up the answering process. Required fields are marked *.