
Popular categories
Looking for a yarn?


Comments / Questions (97)
![]() Viviane F wrote:
Viviane F wrote:
Les augmentations : taille M\•du raglan se font sur les rangs pairs ? (8 fois au total donc 8× 8 mailles) + •pour le dos et le devant 16 × 1 maille tous les tours (16 × 2) puis par la suite 8 × 1 maille tous les 2 tours (8 × 2) +• les manches 4 × 1 augmentation tous les 2 tours (4 × 2) puis par la suite 6 × 1 tous les 4 tours (6 × 2). Si j\'additionne les augmentations 64 + 32 + 16 + 8 + 12 + 150 mailles du début = 282, vous indiquez 286 mailles, où est mon erreur ?
11.05.2020 - 16:43DROPS Design answered:
Bonjour Viviane, pour le devant et le dos vous augmentez (16+8) fois 2 mailles soit 48 m x 2 (devant+dos) = 96 m. Pour les manches vous augmentez 10 x 2 m x 2 manches = 40 m. Vous aviez 150 mailles + 96 + 40= 286 m. Bon tricot!
11.05.2020 - 17:05
![]() Alma wrote:
Alma wrote:
Se lo schema A2 corrisponde alla manica gli aumenti per il raglan non capisco dove devono essere lavorati non spiega se mettere dei segnapunti ad inizio e fine del motivo A2 scusate grazie
04.04.2020 - 16:55DROPS Design answered:
Buongiorno Alma. Le m delle maniche sono A2 +la m a maglia rasata + A2. Per aumentare sulle maniche, deve aumentare dopo il primo A2 e prima del secondo A2 (aumenta il numero di m a m rasata tra i due diagrammi). Sul davanti / dietro aumenta prima del primo A2 e dopo il secondo A2. Consigliamo di fare uno schema segnando su quali giri aumenta sul davanti/dietro e su quali aumenta sulle maniche. Buon lavoro!
04.04.2020 - 17:20
![]() Alma wrote:
Alma wrote:
Chiedo scusa non mi sono saputa spiegare intendevo dire quando trovo scritto dopo gli aumenti raglan fare gli aumenti davanti e dietro in numero di volte ma i segnapunti non sono stati menzionati come mi regolo non capisco grazie ancora
02.04.2020 - 22:55DROPS Design answered:
Buongiorno Alma, tutti gli aumenti sullo sprone fanno parte degli aumenti del raglan. Quando si mettono in sospeso le maglie delle maniche si inseriscono i segnapunti laterali, che sono quelli che userà per lavorare gli aumenti del CORPO seguendo il SUGGERIMENTO PER GLI AUMENTI. Ci riscriva se ha ulteriori dubbi. Buon lavoro!
03.04.2020 - 09:16
![]() Alma wrote:
Alma wrote:
Dove viene citato fare gli aumenti davanti e dietro non è sottolineato dall'inizio dove sistemare i segnapunti non so come devo regolarmi non capisco
02.04.2020 - 22:22DROPS Design answered:
Buonasera Alma, nella prima parte del lavoro, sullo SPRONE, gli aumenti sono per il raglan, deve seguire quello che è scritto nel paragrafo RAGLAN. Buon lavoro!
02.04.2020 - 22:40
![]() Mariëtte wrote:
Mariëtte wrote:
Moet je eerst voor de raglan meerderen en daarna voor voor- en achterkant? Of doe je alles tegelijkertijd?
10.02.2020 - 21:04DROPS Design answered:
Dag Mariëtte,
Voor de raglan meerder je zowel op de voor- en achterpanden als op de mouwen, dus je meerdert aan elke kant van elke raglanlijn en dit doe je dus tegelijk. Het aantal/frequentie van de meerderingen zijn wel vershillend op het lijf en de mouwen.
12.02.2020 - 20:54
![]() Jane wrote:
Jane wrote:
Jeg strikker str S, men kan slet ikke få den til at at passe. Efter 14 udt på hver række og 7 på hver anden er der jo kun strikket 28 rækker efter A1. Det giver et bærestykke på 13 cm. Er der noget jeg har misforstået? Har ellers aldrig haft problemer med at forstå jeres opskrifter før.
16.07.2019 - 08:25DROPS Design answered:
Hei Jane. A.1 har ingen økninger, det er først når du begynner å strikke A.2 du starter med økninger. Du vil strikke A.2 litt over 2,5 gang er før du er ferdig med økningene. God Fornøyelse!
26.08.2019 - 14:39
![]() Denise wrote:
Denise wrote:
For the raglan increase that is required before and after A2, should this increase be made on every row, or on alternate rows?
05.07.2019 - 19:54DROPS Design answered:
Dear Denise, you have to increase first in every row, then in every other row. See detailed instructions under the YOKE as there is different increasing for front/back piece and sleeves: Inc on front/back piece: 1 st every round a total of 14-16-18-20-26-30 times, then on every other round 7-8-9-10-9-9 times. Inc on sleeves: 1 st every other round a total of 2-4-6-8-10-12 times and then every 4th round a total of 6 times in all sizes. Happy knitting!
07.07.2019 - 08:55
![]() Nicoline wrote:
Nicoline wrote:
Dag, ik ben bezig met patroon Esther. Als ik het patroon lees, moet je tijdens A2 meerderen. A2 telt 16 toeren. Als ik tel in hoeveel regels er gemeerderd moet worden, kom ik op 32 (16 elke toer+8 om de toer bij M). Betekent dit dat je A2 2x moet breien?
18.06.2019 - 18:54DROPS Design answered:
Dag Nicoline,
Klopt! Je breit A.2 2 keer in de hoogte.
23.06.2019 - 20:29
![]() Paula Cook wrote:
Paula Cook wrote:
I am making Esther 159-33. Size M. As I understand it, under the YOKE, when starting on the increases section, I knit the back section, increase 1 st before A.1, knit the 39 st, and then 1 st increase. Then knit the front piece. Increase 1 st, knit 39 st and increase 1 and finish with 18. Is that correct? That would be 4 increase on that row. Then on next row, when also increasing sleeves, every other round, my next question is where Exactly do I do the increase for the sleeves? Thanks
16.06.2019 - 02:42DROPS Design answered:
Dear Mrs Cook, you increase for raglan before/after A.2 (not A.1), when increasing for sleeve, increase after 1st A.2 and before next A.2 (= the number of sts in stocking st between both A.2 will then increase). Happy knitting!
17.06.2019 - 08:02
![]() Kari Skaar wrote:
Kari Skaar wrote:
Jeg er nå ferdig med økningene, men stykket frå skulderen er bare 13 cm og det skal være 19 cm! Hva skal jeg gjøre for å få riktig lengde? Kanskje strikke videre uten økninger?
14.05.2019 - 06:31DROPS Design answered:
Hei Kari, Har du sjekket strikkefastheten din? Det kan tenkes du må øke pinne størrelse for å få riktige mål. Strikke en prøvelapp for å se hva du trenger for å 21 masker og 28 pinner på 10 x 10 cm. God fornøyelse!
15.05.2019 - 07:32
|
||||||||||||||||||||||
Esther#esthertop |
||||||||||||||||||||||
 |
 |
|||||||||||||||||||||
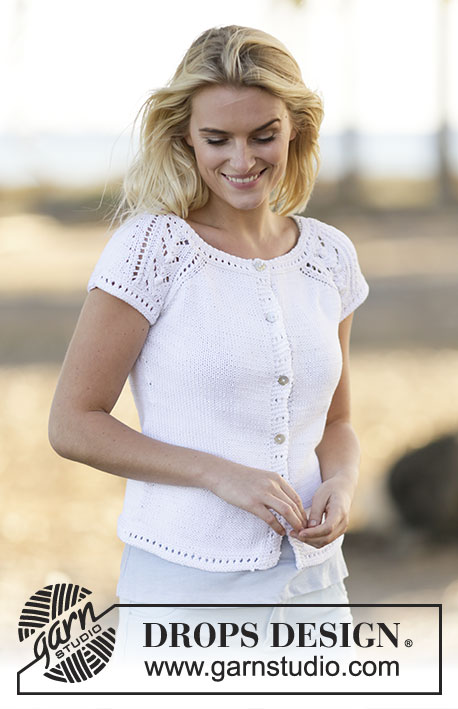
Knitted DROPS top with raglan and lace pattern, worked top down with short sleeves in ”Muskat”. Size: S - XXXL.
DROPS 159-33 |
||||||||||||||||||||||
|
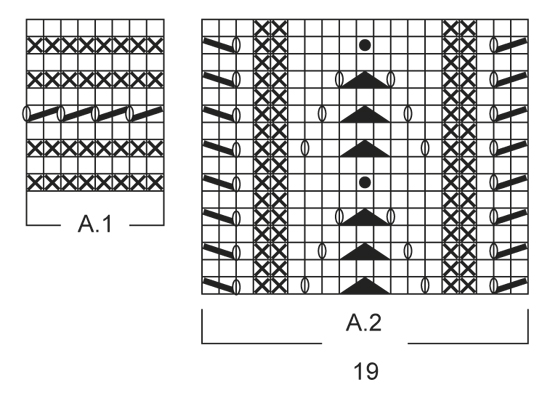
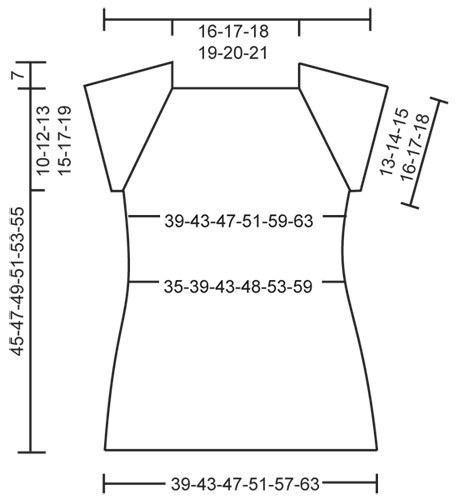
PATTERN: See diagrams A.1-A.2. RAGLAN: Inc for raglan on each side of A.2. Inc with a YO, work YO twisted on next round to avoid holes. The inc on body and sleeves are uneven as explained in pattern. INCREASE TIP: Beg 1 st before marker and inc as follows: 1 YO, K 2 (marker is between these 2 sts), 1 YO. On next round K YOs twisted to avoid holes. DECREASE TIP: Dec as follows before marker: K 2 tog. Dec as follows after marker: Slip 1 st as if to K, K 1, psso. ---------------------------------------------------------- TOP: Worked in the round on circular needle, top down. YOKE: READ ALL OF THE FOLLOWING SECTION BEFORE CONTINUING! Cast on 146-150-154-158-162-166 sts on circular needle size 3 mm / US 2.5 with Muskat. Work A.1. When A.1 has been worked, switch to circular needle size 4 mm / US 6. Work next round as follows from mid back: Work 17-18-19-20-21-22 sts in stockinette st (= back piece), work A.2 (= 19 sts), 1 st in stockinette st, A.2 (= 19 sts) (= 39 sts on sleeve), work 34-36-38-40-42-44 sts in stockinette st (= front piece), work A.2, 1 st in stockinette st and A.2 (= 39 sts on sleeve) and finish with 17-18-19-20-21-22 sts in stockinette st (= back piece). Continue pattern like this AT THE SAME TIME inc for RAGLAN beg on next round - see explanation above. Inc on front/back piece: 1 st every round a total of 14-16-18-20-26-30 times, then on every other round 7-8-9-10-9-9 times. Inc on sleeves: 1 st every other round a total of 2-4-6-8-10-12 times and then every 4th round a total of 6 times in all sizes. After all inc there are 262-286-310-334-366-394 sts on row, continue working until the piece measures approx. 17-19-20-22-24-26 cm = 6¾"-7½"-8"-8¾"-9½"-10¼" from shoulder and down. Work next round as follows: K 38-42-46-50-56-61 (= back piece), slip the next 55-59-63-67-71-75 sts on a stitch holder for sleeve, cast on 6-6-6-8-8-10 new sts, insert 1 marker in the middle of the new sts, K 76-84-92-100-112-122 (= front piece), slip the next 55-59-63-67-71-75 sts on 1 stitch holder for sleeve, cast on 6-6-6-8-8-10 new sts, insert 1 marker in the middle of the new sts and K the remaining 38-42-46-50-56-61 (= back piece) = 164-180-196-216-240-264 sts on row - NOW MEASURE PIECE FROM HERE. BODY: Continue in stockinette st. When piece measures 4 cm / 1½", dec 1 st on each side of markers in the side - READ DECREASE TIP (= 4 sts dec). Repeat dec every 4 cm / 1½" a total of 4 times = 148-164-180-200-224-248 sts. When piece measures 22 cm / 8¾" in all sizes, inc 1 st on each side of markers in the side - READ INCREASE TIP (= 4 sts inc). Repeat inc every 2 1/2 cm / ⅞" a total of 4 times = 164-180-196-216-240-264 sts. When piece measures 33-33-34-34-34-34 cm / 13"-13"-13½"-13½"-13½"-13½"-, switch to circular needle size 3 mm / US 2.5. Work pattern according to diagram A.1 and then loosely bind off. Top measures approx. 52-54-56-58-60-62 cm / 20½"-21¼"-22"-22¾"-23⅝"-24⅜" from shoulder and down. SLEEVE EDGE: Worked in the round on double pointed needles. Slip the 55-59-63-67-71-75 sts from stitch holder back on double pointed needles size 3 mm / US 2.5 and cast on 6-6-6-8-8-10 new sts under sleeve = 61-65-69-75-79-85 sts. Work pattern in the round according to diagram A.1 and then loosely bind off. Work the other sleeve edge the same way. ASSEMBLY: Sew tog under sleeves. |
||||||||||||||||||||||
Diagram explanations |
||||||||||||||||||||||
|
||||||||||||||||||||||
 |
||||||||||||||||||||||
 |
||||||||||||||||||||||
Have you finished this pattern?Tag your pictures with #dropspattern #esthertop or submit them to the #dropsfan gallery. Do you need help with this pattern?You'll find 23 tutorial videos, a Comments/Questions area and more by visiting the pattern on garnstudio.com. © 1982-2026 DROPS Design A/S. We reserve all rights. This document, including all its sub-sections, has copyrights. Read more about what you can do with our patterns at the bottom of each pattern on our site. |
||||||||||||||||||||||


With over 40 years in knitting and crochet design, DROPS Design offers one of the most extensive collections of free patterns on the internet - translated to 17 languages. As of today we count 324 catalogs and 12290 patterns - 12280 of which are translated into English (US/in).
We work hard to bring you the best knitting and crochet have to offer, inspiration and advice as well as great quality yarns at incredible prices! Would you like to use our patterns for other than personal use? You can read what you are allowed to do in the Copyright text at the bottom of all our patterns. Happy crafting!
Post a comment to pattern DROPS 159-33
We would love to hear what you have to say about this pattern!
If you want to leave a question, please make sure you select the correct category in the form below, to speed up the answering process. Required fields are marked *.