
Popular categories
Looking for a yarn?


Comments / Questions (61)
![]() CHABANNE wrote:
CHABANNE wrote:
Bonjour Pourriez-vous me préciser à quoi correspond une section Merci
05.01.2022 - 09:24DROPS Design answered:
Bonjour Mme Chabanne, pour le poncho, vous devez augmenter de chaque côté de chaque partie /section tricotée ainsi: (1 m env, 3 m end, 1 m env), autrement dit tricotez jusqu'à cette première m envers, faites 1 jeté, tricotez 1 m env, 3 m end, 1 m env, faites 1 jeté et répétez aux 3 autres sections/parties tricotées ainsi. Bon tricot!
05.01.2022 - 16:43
![]() Angela Muñoz wrote:
Angela Muñoz wrote:
Buenas tardes, el punto resorte del final de la prenda (4cm), se teje con la aguja 4.5mm o con la 5mm? Gracias
23.10.2021 - 00:30DROPS Design answered:
Hola Angela, si no se especifica lo contrario, se trabaja con la última aguja cambiada, la de 4 mm.
24.10.2021 - 12:27
![]() Angela M wrote:
Angela M wrote:
Hola, me gustaría saber cuanto es el largo total de la prenda para la talla s/m, ya que en las instrucciones dice tejer hasta 41cm y después 4 cm de punto resorte, pero en el dibujo con medidas dice 45cm y 4cm de punto resorte, así que mide 45cm o 49cm totales? Gracias
18.10.2021 - 02:01DROPS Design answered:
Hola Angela, para la talla s/m, la longitud del poncho es 45 cm. Buen trabajo!
18.10.2021 - 10:02
![]() Lara wrote:
Lara wrote:
Buongiorno, cosa intendete dire con "Il giro ora inizia a un lato del lavoro"? Si lavora in tondo o avanti e dietro separati? Grazie!
21.09.2021 - 10:08DROPS Design answered:
Buongiorno Lara, si lavora sempre in tondo, è solo una precisazione sulla posizione dell'inizio del giro. Buon lavoro!
21.09.2021 - 10:46
![]() Elena Onorati wrote:
Elena Onorati wrote:
Buonasera, cosa intendete per aumenti ai lati di tutte le sezioni? Le sezioni sono due giusto? Cioè le due ripetizioni dai “9 punti a diritto nel caso dei 150 punti di partenza quindi aumento 5 punti prima dei primi 9 punti a diritto e poi altre 5 all’inizio dei secondi 9 punti a diritto per la ripetizione..
20.01.2021 - 17:59DROPS Design answered:
Buonasera Elena, deve aumentare ai lati delle parti "1 maglia rovescio, 3 maglie diritto, 1 maglia rovescio", per cui inizia lavorando 9 maglie diritto, 1 gettato, 1 maglia rovescio, 3 maglie diritto, 1 maglia rovescio, 1 gettato e così via come indicato. Buon lavoro!
20.01.2021 - 19:27
![]() Janeth ELENA Martínez Martínez wrote:
Janeth ELENA Martínez Martínez wrote:
Buenos días: En la parte de la espalda también va el diseño, ya que los aumentos antes y después de 1r 3d 1r (sólo son 4), según instrucción son 8, o es que se hace doble aumento; favor explicar si es así porque la verdad no sé cómo hacer aumento doble seguido. Gracias 😊
18.01.2021 - 15:02DROPS Design answered:
Hola Janeth. El dibujo se trabaja en el delantero y en la espalda. Los aumentos se trabajan antes y después de la sección de 1r, 3d 1 r., que se repite 4 veces en la vuelta. 2 puntos (uno a cada lado) x 4 veces =un total de 8 puntos. Los aumentos se trabajan según las explicaciones encima del patrón.
23.01.2021 - 20:00
![]() Janeth Elena Martínez Martínez wrote:
Janeth Elena Martínez Martínez wrote:
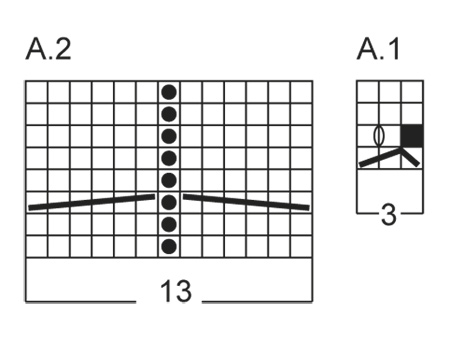
Favor aclarar él diagrama A1, en la primera carrera se desliza un punto, en la segunda se hace lazada en medio de los dos puntos, en la 3 y 4 carrera se tejen los puntos al derecho. En él modelo se observa un orificio y/o agujero con esta instrucción no aparece el agujero. Gracias
21.12.2020 - 22:24DROPS Design answered:
Hola Janeth. Fila 1: deslizar 1 punto como de derecho, 2 puntos juntos de derecho, pasar el punto deslizado sobre el punto trabajado. Fila 2: 1 derecho, 1 hebra, 1 derecho. Filas 3-4: todos los puntos de derecho. Repetir 1-4. Como la hebra no se trabaja retorcida, se forma un agujero, que se ve en la foto.
27.12.2020 - 19:49
![]() Johanne wrote:
Johanne wrote:
Une fois qu’on a terminé les augmentations avant et après les sections( 1m.env, 3m.end,1m.env), est-ce qu’on continue à tricoter ces sections où on continue de tricoter tout à l’endroit en gardant seulement les motifs de torsades. Merci!
16.09.2020 - 21:31DROPS Design answered:
Bonjour Johanne, quand les augmentations sont terminées, on continue à tricoter les mailles comme avant = point fantaise, + les mailles endroit à l'endroit et les mailles envers à l'envers. Bon tricot!
17.09.2020 - 10:06
![]() Michela wrote:
Michela wrote:
Buongiorno, ho appena iniziato il poncho, ma non riesco a trovare le istruzioni per i raglan. Sono io che non le vedo?
31.07.2020 - 16:02DROPS Design answered:
Buongiorno Michela. Deve fare riferimento a questa frase: ALLO STESSO TEMPO aumentare a ogni lato di tutte le sezioni 1 m rov, 3 m dir, 1 m rov – LEGGERE IL SUGGERIMENTO PER GLI AUMENTI = 8 aumenti. Trova il suggerimento per gli aumenti nella parte iniziale delle spiegazioni. Buon lavoro!
31.07.2020 - 16:10
![]() Esther Volpolini wrote:
Esther Volpolini wrote:
Sur le diagramme A2 que signifie le point noir svp
15.04.2020 - 19:07DROPS Design answered:
Bonjour Esther, le point noir signifie '1 m env sur l'endroit, end sur l'envers'. Bon tricot!
16.04.2020 - 08:20
|
||||||||||||||||||||||
Cold Springs#coldspringsset |
||||||||||||||||||||||
|
|
||||||||||||||||||||||
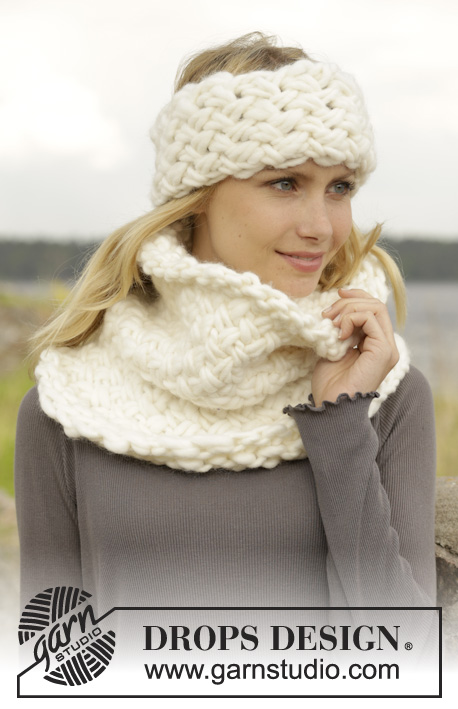
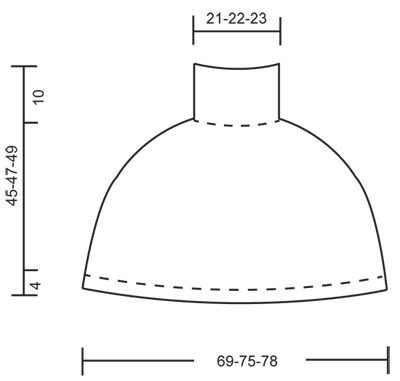
Knitted DROPS poncho and head band with cables, worked top down in ”Alaska”. Size S-XXXL.
DROPS 157-15 |
||||||||||||||||||||||
|
PATTERN: See diagrams A.1-A.2. The diagrams show all rows in pattern seen from RS. GARTER ST (in the round on circular needle): * K 1 round and P 1 round *, repeat from *-*. 1 ridge = 2 rounds. GARTER ST (back and forth on needle): K all rows. 1 ridge = K2 rows. INCREASE TIP: Inc 1 st by making a YO. On next round K YO twisted (i.e. work in back loop of st instead of front) to avoid holes. ---------------------------------------------------------- PONCHO: Worked in the round on circular needle, top down. Cast on 132-138-144 sts on circular needle size 4 mm / US 6 with Alaska. K 1 round. Then work rib (= K 3/P 3). When piece measures 10 cm / 4'', work 1 ridge in GARTER ST - see explanation above AT THE SAME TIME on 1st row inc 18-24-28 sts evenly = 150-162-172 sts. Switch to circular needle size 5 mm / US 8. REMEMBER THE GAUGE! Round now beg in one side of piece. * K 9-11-11, P 1, K 3, P 1, K 1-2-2, P 1, A.1 (= 3 sts), P 2, A.2 (= 13 sts), ** P 2, A.1 **, repeat from **-** 0-0 1 more time, P 2, A.2, P 2, A.1, P 1, K 1-2-2, P 1, K 3, P 1, K 9-11-11 *, repeat from *-* 1 more time. AT THE SAME TIME inc on each side of all P 1, K 3, P 1 – SEE INCREASE TIP = 8 sts inc. K inc sts. Repeat inc every 3rd round 16-17-17 times in total = 278-298-308 sts. Continue pattern. When piece measures 41-43-45 cm / 16"-17"-17 3/4", switch to circular needle size 4 mm / US 6 and work 1 ridge over all sts AT THE SAME TIME inc 4-2-4 sts evenly = 282-300-312 sts. Then work rib = K 3/P 3 until piece measures 45-47-49 cm / 17 3/4"-18½"-19 1/4". Bind off sts with K over K and P over P. ---------------------------------------------------------- HEAD BAND: Worked back and forth on needle. Cast on 23 sts on needle size 5 mm / US 8 with Alaska. Work 1 ridge in GARTER ST - see explanation above AT THE SAME TIME on last row inc 6 sts evenly = 29 sts. Then work as follows from RS: K 2, P 1, A.1 (= 3 sts), P 2, A.2 (= 13 sts), P 2, A.1, P 1, K 2. Continue pattern like this. REMEMBER THE GAUGE! When piece measures 47 cm / 18½'', work 1 ridge over all sts AT THE SAME TIME on 1st row dec 6 sts evenly = 23 sts. Bind off. Sew head band tog mid back. |
||||||||||||||||||||||
Diagram explanations |
||||||||||||||||||||||
|
||||||||||||||||||||||
 |
||||||||||||||||||||||
 |
||||||||||||||||||||||
Have you finished this pattern?Tag your pictures with #dropspattern #coldspringsset or submit them to the #dropsfan gallery. Do you need help with this pattern?You'll find 15 tutorial videos, a Comments/Questions area and more by visiting the pattern on garnstudio.com. © 1982-2026 DROPS Design A/S. We reserve all rights. This document, including all its sub-sections, has copyrights. Read more about what you can do with our patterns at the bottom of each pattern on our site. |
||||||||||||||||||||||


With over 40 years in knitting and crochet design, DROPS Design offers one of the most extensive collections of free patterns on the internet - translated to 17 languages. As of today we count 324 catalogs and 12290 patterns - 12280 of which are translated into English (US/in).
We work hard to bring you the best knitting and crochet have to offer, inspiration and advice as well as great quality yarns at incredible prices! Would you like to use our patterns for other than personal use? You can read what you are allowed to do in the Copyright text at the bottom of all our patterns. Happy crafting!
Post a comment to pattern DROPS 157-15
We would love to hear what you have to say about this pattern!
If you want to leave a question, please make sure you select the correct category in the form below, to speed up the answering process. Required fields are marked *.