
Popular categories
Looking for a yarn?


Comments / Questions (71)
![]() Brigitt wrote:
Brigitt wrote:
Doch ich nahm dann die kleine Differenz in der Länge notgedrungen hin. Jedenfalls führte das dazu, dass die Kragenspitze hinten nicht mittig war. Mit einem Kunstkniff beim Zusammennähen, konnte ich das aber ändern.
04.09.2016 - 15:21
![]() Brigitt wrote:
Brigitt wrote:
Ich habe die Jacke fertig gestellt. Der Kragen ist hinten spitz geworden, was man vorher im Bild nicht sehen konnte. Trotz mehrerer Teilauftrennungen, konnte ich es nicht verhindern, dass die beiden Vorderteile unterschiedlich lang geworden sind. Ich habe das zweite Vorderteil drei Mal gestrickt. Einmal war es viel zu kurz, einmal viel zu lang und das dritte Mal war es immer noch etwas unterschiedlich.
04.09.2016 - 15:20
![]() Brigitt wrote:
Brigitt wrote:
Ich bin beim rechten Vorderteil. Der Anleitung entnehme ich, dass die letzten 11 cm, nach Beginn des Kragens, vom Beginn des Kragens aus gemessen werden. Ich habe die verkürtzten Reihen des Kragens fertig gestrickt und es kommt mir etwas knapp vor, wenn ich die letzte angegebene Länge, bei mir 11 cm, vom Kragenbeginn aus messe. Ich würde, rein intuitiv die letzten 11 cm vom unteren Jackenrand aus messen, dort wo die Maschen quasi liegengeblieben sind, beim Fertigen der verkürzten Kragenreihen.
12.02.2016 - 19:39DROPS Design answered:
Liebe Brigitt, ich denke, dass der Kragen wirklich ziemlich klein ist bei dem Modell. Und ich lese die Anleitung auch so, dass nach 11 cm (an der breitesten Stelle ab 1. Markierer gemessen), das Knopfloch eingearbeitet wird.
09.03.2016 - 11:43
![]() Deras wrote:
Deras wrote:
Bonsoir merci pour votre explication , je n 'avais pas compris qu 'il fallait commencer les augmentations en haut du col avant d'avoir fini les rangs racourcis , je vais devoir en détricoter quelques cm mais ce n 'es pas un problème merci encore pour tous ces conseils marie danièle deras
23.09.2015 - 23:26
![]() Deras wrote:
Deras wrote:
Bonsoir je viens de lire votre réponse , et je vous remercie vivement je n 'avais pas compris qu 'il fallait commencais a augmentais les mailles en haut du col av
23.09.2015 - 23:22
![]() Deras wrote:
Deras wrote:
Bonjour désolé de revenir vers vous , mais aurais je bientot une réponse afin de terminer la veste , car je suis désolé , mais je ne comprends pas comlent finir e devant droit bonne journée marie danièle deras
22.09.2015 - 16:58DROPS Design answered:
Bonjour Mme Deras, vous trouverez ci-dessous la réponse à votre question. Merci pour votre patience. Bon tricot!
23.09.2015 - 10:27
![]() Deras wrote:
Deras wrote:
Rebonjour je viens de lire votre réponse, mais cela ne correspond pas a ma question j 'ai fini de tricoter les rangs raccourcis avec les mailles que j 'avais monté en plus pour le col a la suite comme indiqué j ai tricoté un rang sur la totalité des mailles et la il faut mesurer entre 10 et 14 cm on mesure quoi ? surtout que en meme temps le il faut que l 'ouvrage mesure 4 cm pour commencer les augmentations ces 4cm se mesure ou? bonne journée
19.09.2015 - 13:32DROPS Design answered:
Bonjour Mme Deras, quand les rangs raccourcis sont terminés, continuez au point mousse sur toutes les mailles pendant 10-14 cm, mais à 4 cm à partir des mailles montées pour le col (mesurez au plus large = côté col), augmentez 1 m en fin de rang sur l'endroit (= côté col) d'abord tous les 4 rangs puis tous les 2 rangs, ET à 9-13 cm depuis les mailles montées pour le col (mesurez en bas de la veste, à partir du rang où les mailles ont été montées pour le col), ouvrez les boutonnières. Bon tricot!
23.09.2015 - 10:27
![]() Deras wrote:
Deras wrote:
Bobsoir je suis désolée de revenir vers vous, mais je ne comprends pas je viens de finir les rangs racourcis du devant droit et le rang sur toutes les mailles ensuite continuer en miusse 10/14cm on mesure bine a partir des mailles que l 'on a remonter pour le col ? mais en meme temps vous parlez de 4cm au plus large pour commencer les augmentations mais je mesure ou ces 4 cm ? merci de m 'expliquez et encore meerci cordialement marie danièle deras
18.09.2015 - 23:18DROPS Design answered:
Bonjour Mme Deras, on mesure à partir des mailles montées pour le col, pendant les rangs raccourcis, on a tricoté davantage de rangs sur les mailles côté col: les mailles du col sont montées en fin de rangs sur l'endroit et on commence les rangs raccourcis sur l'envers. Bon tricot!
19.09.2015 - 10:33
![]() Deras wrote:
Deras wrote:
Bonjour j 'ai bien fini mon dos, et pour le devant droit je viens de monter les mailles splémentaire, mais pour les raangs racourcis que dois je faire des 108 premières mailles merci de ce que vous pourrez me dire cordialement marie danièle
12.09.2015 - 16:50DROPS Design answered:
Bonjour Mme Deras, vous tricotez d'abord 1 rang sur les 108 premières m sur l'envers et placez 1 marqueur (repère pour les rangs raccourcis), tournez et tricotez le rang retour sur l'endroit. Au rang suivant, tricotez 104 m (il reste 4 m avant le marqueur), tournez et tricotez le rang retour. Continuez ainsi en laissant 4 m de plus avant le marqueur (= tricotez 4 m en moins) jusqu'à ce que vous ayez tricoté un total de 22 côtes mousse (= 44 rangs). Bon tricot!
14.09.2015 - 09:16
![]() Deras wrote:
Deras wrote:
Bonjour j ai déposé le 14 et 22 juillet et je n 'ai toujours pas eu de réponse..cela m surprend...mais a ce point une autre question n 'es t'il pas possible de continuer a tricoter le dos a la suite du 1er devant et ensuite le 2ème devant évitant ainsi les coutures de coté merci pour la réponse que vous pourrez me donner bonne journée a vous marie danièle deras
26.07.2015 - 08:25DROPS Design answered:
Bonjour Mme Deras, voir réponse ci-dessous et merci pour votre patience et compréhension. À la fin du dos, vous pouvez tricoter le devant droit, mais le devant gauche devra être tricoté séparément et assemblé au dos (il commence par le milieu devant pour se terminer côté dos). Bon tricot!
27.07.2015 - 17:42
|
||||
Dragonfly#dragonflycardigan |
||||
|
|
||||
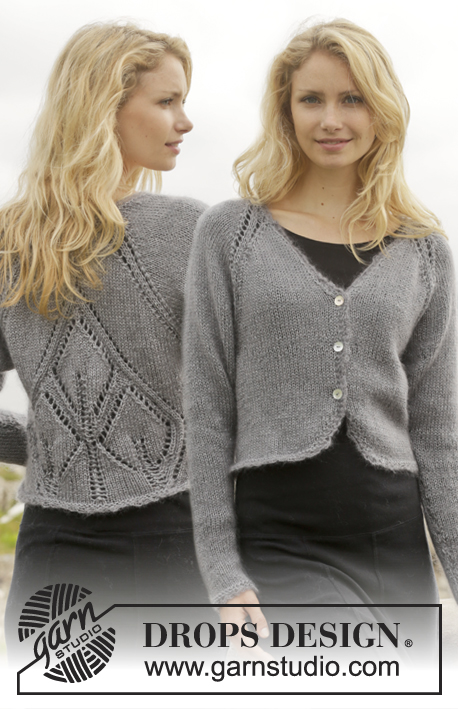
Knitted DROPS jacket with short rows and shawl collar in ”Fabel”. Size: S - XXXL.
DROPS 157-13 |
||||
|
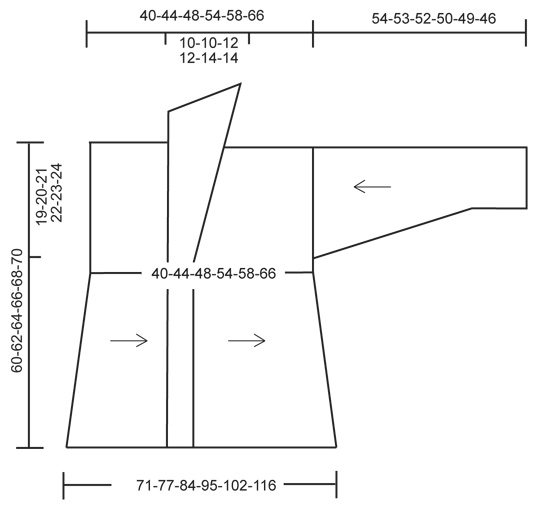
GARTER ST (back and forth on needle): K all rows. 1 ridge = K2 rows. GARTER ST (in the round on circular needle): * K 1 round and P 1 round *, repeat from *-*. 1 ridge = 2 rounds. PATTERN: * Switch color to black. Then work short rows, beg from RS as follows (always work the first 3 sts in garter st): Work 3 sts in garter st, stockinette st over the next 55 sts, turn and work back. Work 3 sts in garter st, stockinette st over the next 79 sts, turn and work back. Work 3 sts in garter st, stockinette st over the next 25 sts, turn and work back. Switch color to chiaroscuro. Work 4 ridges back and forth over all sts *, repeat from *-*. 1 repetition = 8 rows at the top and 14 rows at the bottom. NOTE: Work the 4 ridges in chiaroscuro and the short rows in black until finished measurements. BUTTONHOLES: Dec for buttonholes on right band. Beg from RS and work as follows: K 86-86-88-88-90-90, 1 YO, K 2 tog, K 12, 1 YO, K 2 tog, and K the rest of row. On next row K YOs. -------------------------------------------------------- BACK PIECE: Worked back and forth from side to side on circular needle to make room for all the sts. Cast on 144-148-154-158-164-168 sts on circular needle size 3 mm / US 2.5 with 2 strands chiaroscuro. Then continue piece with 1 strand chiaroscuro. Work 6 ridges in GARTER ST – see explanation above, AT THE SAME TIME on 1st row from RS insert 1 marker in piece when 46-48-50-52-54-56 sts remain on needle. This marks where to sew in sleeve. Work PATTERN - see explanation above. REMEMBER THE GAUGE! Continue with pattern until piece measures 15-17-18-21-22-26 cm / 6"-6¾"-7"-8¼"-8¾"-10¼" measured at the shortest, adjust to finish before the 4 ridges. On next row from WS, bind off the first 5 sts for neck, work the rest of row = 139-143-149-153-159-163 sts. Work pattern until piece measures 25-27-30-33-36-40 cm / 9¾"-10½"-11¾"-13"-14¼"-15¾" (10-10-12-12-14-14 cm / 4"-4"-4¾"-4¾"-5½"-5½" from dec for neck), adjust to finish before the 4 ridges. Cast on 5 new sts at the end of next row from RS = 144-148-154-158-164-168 sts. Continue as before. When piece measures 40-44-48-54-58-66 cm / 15¾"-17¼"-19"-21¼"-22¾"-26" - adjust to finish with a whole repetition of pattern, work 2 ridges over all sts with chiaroscuro AT THE SAME TIME insert a marker on last row from RS when 46-48-50-52-54-56 sts remain on needle. This marks where to sew in sleeve. Bind off with 2 strands chiaroscuro. RIGHT FRONT PIECE: Work from the side to mid front. Cast on 144-148-154-158-164-168 sts on circular needle size 3 mm / US 2.5 with 2 strands chiaroscuro. Then continue piece with 1 strand chiaroscuro. Work 6 ridges, AT THE SAME TIME on 1st row from RS insert 1 marker in piece when 46-48-50-52-54-56 sts remain on needle. This marks where to sew in sleeve. Work pattern until piece measures 15-17-18-21-22-26 cm / 6"-6¾"-7"-8¼"-8¾"-10¼" measured at the shortest, adjust to finish before the 4 ridges. At the end of the next row from RS, cast on 20-20-22-22-24-24 new sts for collar = 164-168-176-180-188-192 sts. Insert 1 marker in piece, NOW MEASURE PIECE FROM HERE. Now continue piece in chiaroscuro. READ ALL OF THE FOLLOWING SECTION BEFORE CONTINUING! Work short rows, beg from WS as follows: Work the first 68-68-90-90-108-108 sts, insert 1 marker, turn and work back. Work until 4 sts remain before marker, turn and work back. Continue like this by working 4 sts less on every turn until 13-13-18-18-22-22 ridges have been worked in total. When short rows are done, work in garter st over all sts until piece measures 10-10-12-12-14-14 cm / 4"-4"-4¾"-4¾"-5½"-5½". AT THE SAME TIME when piece measures 4 cm / 1½" at the widest, inc 1 st at the end of next row from RS, repeat inc every 4th row 3-3-3-3-6-6 more times then on every row from RS 14-14-18-18-17-17 times = 182-186-198-202-212-216 sts. AT THE SAME TIME when piece measures 9-9-11-11-13-13 cm / 3½"-3½"-4½"-4½"-5"-5", dec for BUTTONHOLES - see explanation above, on next row from RS. Work 1 ridge in black. Bind off with 2 strands black. LEFT FRONT PIECE: Work from mid front to the side. Cast on 182-186-198-202-212-216 sts on circular needle size 3 mm / US 2.5 with 2 strands black. Then continue piece with 1 strand black. Work 1 ridge AT THE SAME TIME on row from WS insert 1 marker after 38-38-44-44-48-48 sts. Switch color to chiaroscuro. READ ALL OF THE FOLLOWING SECTION BEFORE CONTINUING! Work in garter st over all sts AT THE SAME TIME on 1st row from RS, dec 1 st at the end of row by K tog the last 2 sts, repeat dec on every row from RS 13-13-17-17-16-16 more times, then every 4th row 4-4-4-4-7-7 times = 164-168-176-180-188-192 sts. AT THE SAME TIME when piece measures 4 cm / 1½", work short rows as follows – beg from WS: Work until marker, turn and work back. Work 4 sts after marker, turn and work back. Continue like this by working 4 sts more on every turn until 13-13-18-18-22-22 ridges have been worked in total. When short rows have been worked, piece measures approx. 10-10-12-12-14-14 cm / 4"-4"-4¾"-4¾"-5½"-5½". Insert 1 marker in piece, now measure piece from here. On next row from WS, bind off the first 20-20-22-22-24-24 sts = 144-148-154-158-164-168 sts on needle. Work pattern until piece measures 15-17-18-21-22-26 cm / 6"-6¾"-7"-8¼"-8¾"-10¼" measured at the shortest, adjust to finish before the 4 ridges. Work 6 ridges over all sts with chiaroscuro, AT THE SAME TIME on last row from RS insert 1 marker in piece when 46-48-50-52-54-56 sts remain on needle (seen from RS). This marks where to sew in sleeve. Bind off with 2 strands chiaroscuro. SLEEVE: Worked in the round on double pointed needles. Cast on 56-58-60-62-64-66 sts on double pointed needles size 3 mm / US 2.5 with 2 strands black. Then continue piece with 1 strand black. Work 1 ridge in GARTER ST - see explanation above. Switch color to chiaroscuro and work in garter st until piece measures 4 cm / 1½". Then work in stockinette st. Insert 1 marker at the beg of round. When piece measures 8 cm / 3⅛", inc 1 st on each side of marker, repeat inc every 2½-2-2-2-1½-1½ cm / ⅞"-¾"-¾"-¾"-½"-½" 17-18-19-20-21-22 more times = 92-96-100-104-108-112 sts. When piece measures 54-53-52-50-49-46 cm / 21¼"-21"-20½"-19¾"-19¼"-18" (shorter measurements in the larger sizes because of wider shoulders), bind off all sts. ASSEMBLY: Sew the shoulder seams. Sew side seams from marker and down. Sew in sleeves with WS outwards. Sew shawl collar tog mid back and sew it to the neckline. Sew the buttons on to left band. CROCHET EDGE: Crochet an edge around the bottom edge of jacket, beg at the bottom of left front piece. Work with black on hook size 3 mm / C as follows: 1 sc, * ch 3, 1 dc in 1st ch, skip approx. 1 cm / ⅜", 1 sc *, repeat from *-* around the entire jacket. Fasten off. |
||||
Diagram explanations |
||||
|
||||
 |
||||
Have you finished this pattern?Tag your pictures with #dropspattern #dragonflycardigan or submit them to the #dropsfan gallery. Do you need help with this pattern?You'll find 25 tutorial videos, a Comments/Questions area and more by visiting the pattern on garnstudio.com. © 1982-2026 DROPS Design A/S. We reserve all rights. This document, including all its sub-sections, has copyrights. Read more about what you can do with our patterns at the bottom of each pattern on our site. |
||||


With over 40 years in knitting and crochet design, DROPS Design offers one of the most extensive collections of free patterns on the internet - translated to 17 languages. As of today we count 324 catalogs and 12278 patterns - 12268 of which are translated into English (US/in).
We work hard to bring you the best knitting and crochet have to offer, inspiration and advice as well as great quality yarns at incredible prices! Would you like to use our patterns for other than personal use? You can read what you are allowed to do in the Copyright text at the bottom of all our patterns. Happy crafting!
Post a comment to pattern DROPS 157-13
We would love to hear what you have to say about this pattern!
If you want to leave a question, please make sure you select the correct category in the form below, to speed up the answering process. Required fields are marked *.